|
|
|
|
|
|
|
|
|
|
|
|
|
|
|
|
|
|
|
|
|
|
|
|
|
|
|
|
|
|
|
|
|
|
|
Assigning VIP VIP_address to node node_address Results: script_results
|
|
|
Releasing VIP VIP_address from node node_address Results: script_results
|
|
|
|
|
|
|
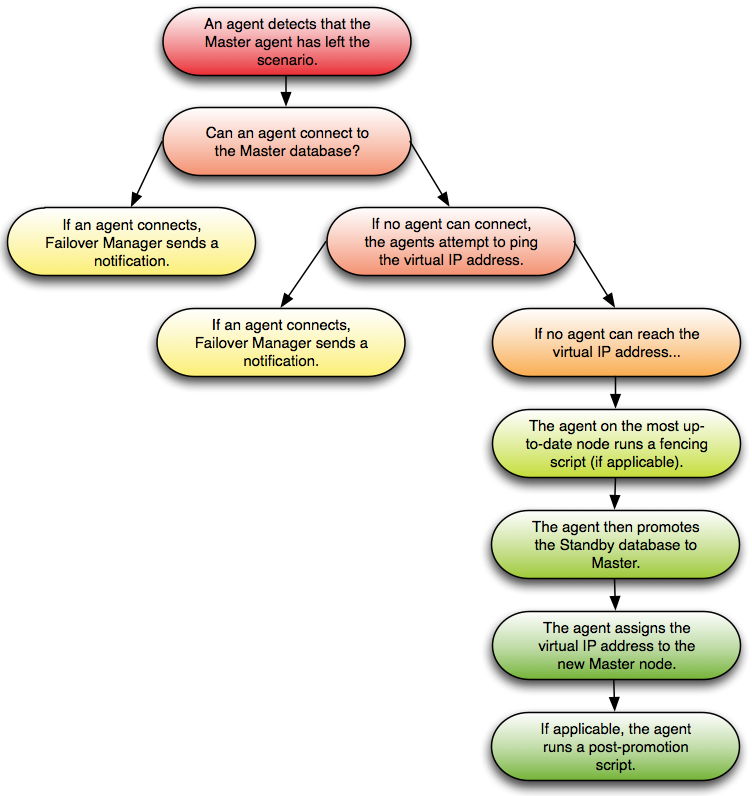
Cluster cluster_name notified that master node has left
|
|
|
|
|
|
|
|
|
|
|
|
|
|
|
|
The agent on this node will check every auto.resume.period seconds to see if it can resume monitoring the failed database. The cluster should be checked during this time and the agent stopped if the database will not be started again. See the agent log for more details.
|
|
|
|
|
|
|
|
|
|
|
|
|
|
|
|
|
|
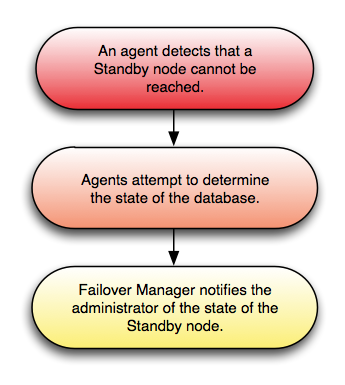
A standby agent on cluster_name has left the cluster, but the coordinator has detected that the standby database is still running.
|
|
|
|
|
|
|
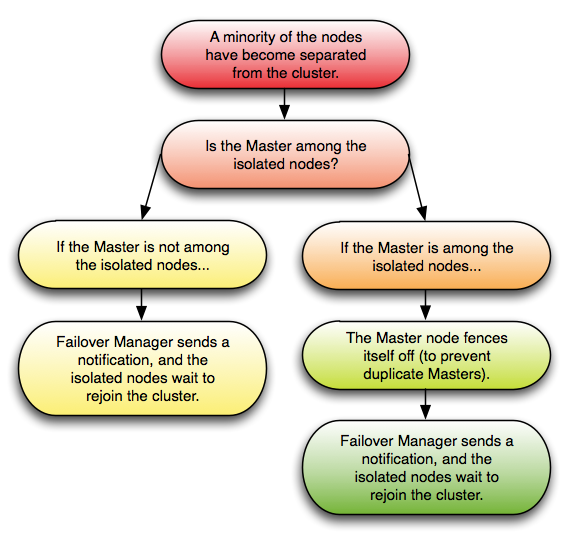
Cluster cluster_name has dropped below three nodes
|
|
|
|
|
|
|
|
|
|
|
|
|
|
|
|
|
|
|
|
|
|
|
|
|
|
|
|
|
|
|
|
|
|
|
|
|
|
|
|
|
|
|
|
|
|
The lock file for cluster cluster_name has been removed from: path_name on node node_address. This lock prevents multiple agents from monitoring the same cluster on the same node. Please restore this file to prevent accidentally starting another agent for cluster.
|
|
|
A recovery.conf file for cluster cluster_name has been found at: path_name on master node node_address. This may be problematic should you attempt to restart the DB on this node.
|
|
|
|
|
|
|
|
|
|
|
|
The auto.reconfigure property has been set to false for this node. The node has not been reconfigured to follow the new master node after a failover.
|
|
|
|
|
|
|
|
|
Your remote.timeout value (value) is higher than your local.timeout value (value). If the local database takes too long to respond, the local agent could assume that the database has failed though other agents can connect. While this will not cause a failover, it could force the local agent to stop monitoring, leaving you without failover protection.
|
|
|
|
|
|
|
|
|
|
|
|
|
|
|
|
|
|
|
|
|
|
|
|
|
|
|
Exit Value: exit_code
Results: script_results
Failover has NOT occurred.
|
|
|
Post-promotion script script_name failed to execute successfully.
Exit Value: exit_code
Results: script_results
|
|
|
|
|
|
|
|
|
|
|
|
|
|
|
|
|
|
The trigger file file_name could not be created on node. Could not promote standby. Error details: message_details
|
Error creating recovery.conf file on node_address for cluster cluster_name
|
|
|
|
|
|
|
|
|
|
|
|
|
|
|
|
|
|
|
|
|
|
|
|
|
|
|
|
|
|
|
|
|
|
|
|
|
|
|
|
|
|
|
|
|
|
|
|
|
|
|
|
|