EDB Postgres™ Advanced Server Installation Guide for Linux


EDB Postgres™ Advanced Server 11
November 19, 2018


1 Introduction
The EDB Postgres Advanced Server Installation Guide is a comprehensive guide to installing EDB Postgres Advanced Server (Advanced Server). In this guide you will find detailed information about:


1.1 Typographical Conventions Used in this Guide
Certain typographical conventions are used in this manual to clarify the meaning and usage of various commands, statements, programs, examples, etc. This section provides a summary of these conventions.
In the following descriptions, a term refers to any word or group of words that are language keywords, user-supplied values, literals, etc. A term’s exact meaning depends upon the context in which it is used.
Italic font introduces a new term, typically in the sentence that defines it for the first time.
Fixed-width (mono-spaced) font is used for terms that must be given literally such as SQL commands, specific table and column names used in the examples, programming language keywords, etc. For example, SELECT * FROM emp;
Italic fixed-width font is used for terms for which the user must substitute values in actual usage. For example, DELETE FROM table_name;
Square brackets [ ] denote that one or none of the enclosed terms may be substituted. For example, [ a | b ] means choose one of “a” or “b” or neither of the two.
Braces {} denote that exactly one of the enclosed alternatives must be specified. For example, { a | b } means exactly one of “a” or “b” must be specified.
Ellipses ... denote that the preceding term may be repeated. For example, [ a | b ] ... means that you may have the sequence, “b a a b a”.
2 Requirements Overview
The following sections detail the supported platforms and installation requirements for EDB Postgres Advanced Server 11.
2.1 Supported Platforms
The Advanced Server 11 RPM packages are supported on the following platforms:
64 bit Linux:


2.2 Linux Installation Prerequisites
You can use an RPM package to install Advanced Server and supporting components on a Linux host. Before installing Advanced Server, please review the following prerequisites.
Installing EPEL
Before installing Advanced Server, you may be required to install the EPEL (Extra Packages for Enterprise Linux) repository. You can use yum to install the package:
yum install epel-release
If yum cannot access a repository that contains epel-release, you will get an error message:
No package epel available.
Error: Nothing to do
If you receive this error, you can download the EPEL rpm package, and install it manually. To manually install EPEL, download the rpm package, assume superuser privileges, navigate into the directory that contains the package, and install EPEL with the command:
yum install epel-release
For more information about installing EPEL, visit:
Linux-specific Software Requirements
You must install xterm, konsole, or gnome-terminal before executing any console-based program installed by EnterpriseDB installers.
Migration Toolkit or EDB*Plus Installation Prerequisites
Before using an RPM to install Migration Toolkit or EDB*Plus, you must first install Java (version 1.8 or later). On a Linux system, you can use the yum package manager to install Java. Open a terminal window, assume superuser privileges, and enter:
# yum install java
Follow the onscreen instructions to complete the installation.
3 Using a Package Manager to Install Advanced Server
You can use the yum package manager to install Advanced Server or Advanced Server supporting components. yum will attempt to satisfy package dependencies as it installs a package, but requires access to the Advanced Server repositories. If your system does not have access to a repository via the Internet, you can use RPM to install an individual package or create a local repository, but you may be required to manually satisfy package dependencies.
You must have credentials for the EnterpriseDB repository to install Advanced Server; to submit a request for credentials, click an Access Repository button on the following page:
https://www.enterprisedb.com/advanced-downloads
For a list of the RPM installers available from EnterpriseDB for Advanced Server and supporting components, see Section 3.1.1.
Installing the server package creates a database superuser named enterprisedb. The user is assigned a user ID (UID) and a group ID (GID) of 26. The user has no default password; use the passwd command to assign a password for the user. The default shell for the user is bash, and the user's home directory is /var/lib/edb/as11.
By default, Advanced Server logging is configured to write files to the log subdirectory of the data directory, rotating the files each day and retaining one week of log entries. You can customize the logging behavior of the server by modifying the postgresql.conf file; for more information about modifying the postgresql.conf file, please see Section 3.1.
The RPM installers place Advanced Server components in the directories listed in the table below:
3.1 Installing an RPM Package
Before installing Advanced Server or a supporting component via an RPM package over the web, you must create the repository configuration file (edb-repo). The repository configuration file contains connection and authentication information for the EnterpriseDB repository. To prepare your system to perform an RPM installation:
1.
Assume superuser privileges and use either rpm or yum to create the repository configuration file:
rpm -Uvh https://yum.enterprisedb.com/edbrepos/edb-repo-latest.noarch.rpm
 
or
 
yum install -y https://yum.enterprisedb.com/edbrepos/edb-repo-latest.noarch.rpm
2.
To enable a repository, change the value of the enabled parameter to 1 and replace the user name and password placeholders in the baseurl specification with your user name and the repository password.
Installing Advanced Server
To install Advanced Server 11, enable and provide connection credentials for the edbas11 repository and the enterprisedb-dependencies repository:
[edbas11]
name=EnterpriseDB Advanced Server 11 $releasever - $basearch
baseurl=https://<username>:<password>@yum.enterprisedb.com/11/redhat/rhel-$releasever-$basearch
enabled=0
gpgcheck=1
gpgkey=file:///etc/pki/rpm-gpg/ENTERPRISEDB-GPG-KEY
 
[enterprisedb-dependencies]
name=EnterpriseDB Dependencies $releasever - $basearch
baseurl=https://<username>:<password>@yum.enterprisedb.com/dependencies/redhat/rhel-$releasever-$basearch
enabled=0
gpgcheck=1
gpgkey=file:///etc/pki/rpm-gpg/ENTERPRISEDB-GPG-KEY
Installing supporting components
The repository configuration file also contains an entry for the enterprisedb-tools repository. Enable the [enterprisedb-tools] and the [enterprisedb-dependencies] entries in the edb.repo file when installing Advanced Server supporting components:
[enterprisedb-tools]
name=EnterpriseDB Tools $releasever - $basearch
baseurl=https://<username>:<password>@yum.enterprisedb.com/tools/redhat/rhel-$releasever-$basearch
enabled=0
gpgcheck=1
gpgkey=file:///etc/pki/rpm-gpg/ENTERPRISEDB-GPG-KEY
3.
Then, you can use the yum install command to install Advanced Server or supporting components. For example, to install the server and its core components, use the command:
yum install edb-as11-server
When you install an RPM package that is signed by a source that is not recognized by your system, yum may ask for your permission to import the key to your local server. If prompted, and you are satisfied that the packages come from a trustworthy source, enter a y, and press Return to continue.
After installing Advanced Server, you must configure the installation; see Section 3.4, Configuring a Package Installation, for details.
For information about the available packages, see Section 3.1.1.
During the installation, yum may encounter a dependency that it cannot resolve. If it does, it will provide a list of the required dependencies that you must manually resolve.
 
 
3.1.1 Advanced Server RPM Installers
The tables that follow list the packages that are available from EnterpriseDB. Please note that you can also use the yum search command to access a list of the packages that are currently available from your configured repository. To use the yum search command, open a command line, assume root privileges, and enter:
yum search package
Where package is the search term that specifies the name (or partial name) of a package. The repository search will return a list of available packages that include the specified search term.
Please note: The available package list is subject to change.
The edb-as11-server-client package contains client programs and utilities that you can use to access and manage Advanced Server.
The edb-as11-contrib package installs contributed tools and utilities that are distributed with Advanced Server. Files for these modules are installed in:
Documentation: /usr/edb/as11/share/doc
Loadable modules: /usr/edb/as11/lib
Binaries: /usr/edb/as11/bin
The edb-as11-server-core package includes the programs needed to create the core functionality behind the Advanced Server database.
The edb-as11-server-devel package contains the header files and libraries needed to compile C or C++ applications that directly interact with an Advanced Server server and the ecpg or ecpgPlus C preprocessor.
The edb-as11-server-docs package installs the readme file.
The edb-as11-server-libs package provides the essential shared libraries for any Advanced Server client program or interface.
The edb-as11-server-plperl package installs the PL/Perl procedural language for Advanced Server. Please note that the edb-as11-server-plperl package is dependent on the platform-supplied version of Perl.
The edb-as11-server-plpython package installs the PL/Python procedural language for Advanced Server. Please note that the edb-as11-server-plpython package is dependent on the platform-supplied version of Python.
The edb-as11-pltcl package installs the PL/Tcl procedural language for Advanced Server. Please note that the edb-as11-pltcl package is dependent on the platform-supplied version of TCL.
The edb-edbplus package contains the files required to install the EDB*Plus command line client. EDB*Plus commands are compatible with Oracle's SQL*Plus.
The following table lists the packages for Advanced Server 11 supporting components that are stored in the Tools repository:
The edb-jdbc package includes the .jar files needed for Java programs to access an Advanced Server database.
The edb-migrationtoolkit package installs Migration Toolkit, facilitating migration to an Advanced Server database from Oracle, PostgreSQL, MySQL, Sybase and SQL Server.
The edb-oci package installs the EnterpriseDB Open Client library, allowing applications that use the Oracle Call Interface API to connect to an Advanced Server database.
The edb-pem package installs Management Tool that efficiently manages, monitor, and tune large Postgres deployments from a single remote GUI console.
Please Note: Available packages are subject to change.


3.2 Installing an RPM Package on a SLES Host
You must have credentials that allow access to the EnterpriseDB repository to install an RPM package on a SLES host. To request credentials for the repository, visit the Advanced Downloads page at:
https://www.enterprisedb.com/advanced-downloads
You can use the zypper package manager to install Advanced Server or Advanced Server supporting components on an SLES host. zypper will attempt to satisfy package dependencies as it installs a package, but some components require access to specific repositories that are not hosted at EnterpriseDB.
To add Advanced Server or supporting components, use the following commands to add EnterpriseDB repository configuration files to your SLES host:
zypper addrepo https://zypp.enterprisedb.com/suse/epas11-sles.repo
zypper addrepo https://zypp.enterprisedb.com/suse/epas-sles-tools.repo
zypper addrepo https://zypp.enterprisedb.com/suse/epas-sles-dependencies.repo
Each command creates a repository configuration file in the /etc/zypp/repos.d directory. The files are named:
After creating the repository configuration files, use the zypper refresh command to refresh the metadata on your SLES host to include the EnterpriseDB repositories.
/etc/zypp/repos.d # zypper refresh
Repository ‘Devel project of Java packages for openSUSE:Factory (SLE_12_SP3)’ is up to date.
Repository ‘SLE-Module-Legacy12-Pool’ is up to date.
Repository ‘SLE-Module-Legacy12-Updates’ is up to date.
Repository ‘SLES12-12-0’ is up to date.
Repository ‘SLES12-Pool’ is up to date.
Repository ‘SLES12-Updates’ is up to date.
Repository ‘SLE-SDK12-Pool’ is up to date.
Repository ‘SLE-SDK12-Updates’ is up to date.
Repository ‘SUSE-PackageHub-12’ is up to date.
Repository ‘SUSE-PackageHub-12-Pool’ is up to date.
Repository ‘wxWidgets Packages (SLE_12_SP3)’ is up to date.
Repository ‘Various compilers (SLE_12_SP3)’ is up to date.
Retrieving repository ‘EDB Postgres Advanced Server 11 12 – x86_64’ metadata -------------------------[\]
 
Authentication required for ‘https://zypp.enterprisedb.com/11/suse/suse-12-x86_64’
User Name:
Password:
 
Retrieving repository ‘EDB Postgres Advanced Server 11 12 – x86_64’ metadata…………………………………………………………………………………….[done]
Building repository ‘EDB Postgres Advanced Server 11 12 – x86_64’ cache………………………………………………………………………………………………………………….[done]
Retrieving repository ‘EDB Postgres Advanced Server Dependencies 12 – x86_64’ metadata…………………………………………………………………………[done]
Building repository ‘EDB Postgres Advanced Server Dependencies 12 – x86_64’ cache……………………………………………………………………………………….[done]
Retrieving repository ‘EDB Postgres Advanced Server Tools 12 – x86_64’ metadata…………………………………………………………………………………….[done]
Building repository ‘EDB Postgres Advanced Server Tools 12 – x86_64’ cache…………………………………………………………………………………………….[done]
All repositories have been refreshed.
When prompted for a User Name and Password, provide your connection credentials for the EnterpriseDB repository. If you need credentials, contact EnterpriseDB at:
https://www.enterprisedb.com/general-inquiry-form
Before installing EDB Postgres Advanced Server or supporting components, you must also add SUSEConnect and the SUSE Package Hub extension to the SLES host and register the host with SUSE, allowing access to SUSE repositories. Use the commands:
zypper install SUSEConnect
SUSEConnect -p PackageHub/12/x86_64
SUSEConnect -p sle-sdk/12/x86_64
For detailed information about registering a SUSE host, visit:
https://www.suse.com/support/kb/doc/?id=7016626
The following sections provide information about the specific repositories that are not hosted by EnterpriseDB, but that provide software that satisfies dependencies for each listed component. Please note that after adding repository access, you should use the zypper refresh command to process the repository content:
zypper refresh
 
 
Java Components:
Please note that only OpenJDK (version 1.8) is supported on SLES hosts of Java components. Before using an RPM installer to add Advanced Server or a supporting component that requires Java, use zypper to add supporting repository locations to your system.
Use the commands:
zypper addrepo http://download.opensuse.org/repositories/Java:/Factory/SLE_12_SP2/Java:Factory.repo
zypper refresh
You can now use zypper install command to install Advanced Server or supporting components. To install the server and its core components, invoke the command:
zypper install edb-as11
Slony:
If you are using a package to add Slony to an SLES host, please note that you must add access to the Perl repository:
For SLES 12 SP2:
zypper addrepo http://download.opensuse.org/repositories/devel:languages:perl/SLE_12_SP2/devel:languages:perl.repo
For SLES 12 SP3:
zypper addrepo http://download.opensuse.org/repositories/devel:languages:perl/SLE_12_SP3/devel:languages:perl.repo
Then:
zypper refresh
PostGIS:
When using an RPM package to add PostGIS to an SLES host, you must add the following repository:
zypper addrepo "http://download.opensuse.org/repositories/server:/Kolab:/3.3/SLE_12/server:Kolab:3.3.repo"
pgAgent:
When adding the pgAgent packages to an SLES host, you must add access to the wxWidgets repository:
For SLES 12 SP2:
SUSEConnect –p sle-module-legacy/12/x86_64
SUSEConnect –p sle-sdk/12/x86_64
zypper addrepo http://download.opensuse.org/repositories/X11:/wxWidgets/SLE_12_SP2/X11:wxWidgets.repo
For SLES 12 SP3:
SUSEConnect –p sle-module-legacy/12/x86_64
SUSEConnect –p sle-sdk/12/x86_64
zypper addrepo http://download.opensuse.org/repositories/X11:/wxWidgets/SLE_12_SP3/X11:wxWidgets.repo
Then:
zypper refresh
BART:
When installing BART on an SLES host, you must add the SUSE SDK as well as the Archiving repository:
SUSEConnect –p sle-sdk/12/x86_64
zypper addrepo https://download.opensuse.org/repositories/Archiving/SLE_12_SP3/Archiving.repo
Then:
zypper refresh
LLVM JIT:
When installing LLVM JIT on an SLES host, you must add the following repository to your system:
zypper addrepo https://download.opensuse.org/repositories/devel:/tools:/compiler/SLE_12_SP3/devel:tools:compiler.repo
Then:
zypper refresh
Updating Components on a SLES Host:
To update components installed with zypper, use the zypper update command.


3.3 Performing a Minor Version Update of an RPM Installation
If you used an RPM package to install Advanced Server or its supporting components, you can use yum to perform a minor version upgrade to a more recent version. To review a list of the package updates that are available for your system, open a command line, assume root privileges, and enter the command:
yum check-update package_name
Where package_name is the search term for which you wish to search for updates. Please note that you can include wild-card values in the search term. To use yum update to install an updated package, use the command:
yum update package_name
Where package_name is the name of the package you wish to update. Include wild-card values in the update command to update multiple related packages with a single command. For example, use the following command to update all packages whose names include the expression edb:
yum update edb*
Please note that the yum update command will only perform an update between minor releases; to update between major releases, you must use pg_upgrade.
For more information about using yum commands and options, enter yum --help on your command line, or visit:


3.4 Configuring a Package Installation
The packages that install the database server component create a service configuration file (on version 6.x hosts) or unit file (on version 7.x hosts), and service startup scripts.
 
3.4.1 Creating a Database Cluster and Starting the Service
The PostgreSQL initdb command creates a database cluster. After installing Advanced Server, you must manually configure the service and invoke initdb to create your cluster. When invoking initdb, you can:
Include the service command on RHEL or CentOS 6.x, and use a service configuration file to configure the environment.
Include the systemd service manager on RHEL or CentOS 7.x use a service configuration file to configure the environment.
To review the initdb documentation, visit:
https://www.postgresql.org/docs/11/static/app-initdb.html
After specifying any options in the service configuration file, you can create the database cluster and start the service; these steps are platform specific.
On RHEL or CentOS 6.x
To create a database cluster in the PGDATA directory that listens on the port specified by the PGPORT environment variable specified in the service configuration file (described in Section 2.2), assume root privileges, and invoke the service script:
service edb-as-11 initdb
You can also assign a locale to the cluster when invoking initdb. By default, initdb will use the value specified by the $LANG operating system variable, but if you append a preferred locale when invoking the script, the cluster will use the alternate value. For example, to create a database cluster that uses simplified Chinese, invoke the command:
service edb-as-11 initdb zh_CH.UTF-8
After creating a database cluster, start the database server with the command:
service edb-as-11 start
On RHEL or CentOS 7.x
To invoke initdb on a RHEL or CentOS 7.x system, with the options specified in the service configuration file, assume the identity of the operating system superuser:
su - root
Then, invoke initdb:
/usr/edb/as11/bin/edb-as-11-setup initdb
After creating the cluster, use systemctl to start, stop, or restart the service:
systemctl { start | stop | restart } edb-as-11
For more information about controlling the service, see Section 2.2
 
3.4.2 Using a Service Configuration File on CentOS or Redhat 6.x
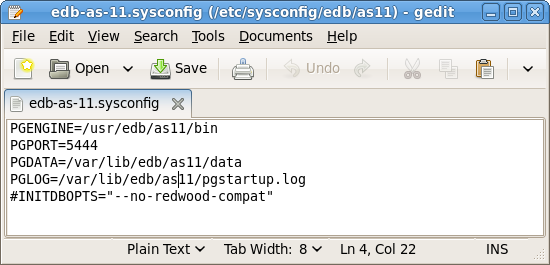
On a CentOS or RedHat version 6.x host, the RPM installer creates a service configuration file named edb-as-11.sysconfig in /etc/sysconfig/edb/as11 (see Figure 3.1). Please note that options specified in the service configuration file are only enforced if initdb is invoked via the service command; if you manually invoke initdb (at the command line), you must specify the other options (such as the location of the data directory and installation mode) on the command line.
C:\Users\susan\Desktop\one.png
Figure 3.1 -The Advanced Server service configuration file.
The file contains the following environment variables:
PGENGINE specifies the location of the engine and utility executable files.
PGPORT specifies the listener port for the database server.
PGDATA specifies the path to the data directory.
PGLOG specifies the location of the log file to which the server writes startup information.
Use INITDBOPTS to specify any initdb option or options that you wish to apply to the new cluster. For more information, see Section 3.4.2.1.
You can modify the edb-as-11.sysconfig file before using the service command to invoke the startup script to change the listener port, data directory location, startup log location or installation mode. If you plan to create more than one instance on the same system, you may wish to copy the edb-as-11.sysconfig file (and the associated edb-as-11 startup script) and modify the file contents for each additional instance that resides on the same host.
3.4.2.1 Specifying Cluster Options with INITDBOPTS
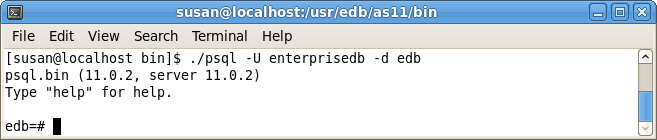
You can use the INITDBOPTS variable to specify your cluster configuration preferences. By default, the INITDBOPTS variable is commented out in the service configuration file; unless modified, when you run the service startup script, the new cluster will be created in a mode compatible with Oracle databases. Clusters created in this mode will contain a database named edb, and have a database superuser named enterprisedb.
To create a new cluster in PostgreSQL mode, remove the pound sign (#) in front of the INITDBOPTS variable, enabling the "--no-redwood-compat" option. Clusters created in PostgreSQL mode will contain a database named postgres, and have a database superuser named postgres.
You may also specify multiple initdb options. For example, the following statement:
INITDBOPTS="--no-redwood-compat -U alice --locale=en_US.UTF-8"
Creates a database cluster (without compatibility features for Oracle) that contains a database named postgres that is owned by a user named alice; the cluster uses UTF-8 encoding.
In addition to the cluster configuration options documented in the PostgreSQL core documentation, Advanced Server supports the following initdb options:
--no-redwood-compat
Include the --no-redwood-compat keywords to instruct the server to create the cluster in PostgreSQL mode. When the cluster is created in PostgreSQL mode, the name of the database superuser will be postgres, the name of the default database will be postgres, and Advanced Server’s features compatible with Oracle databases will not be available to the cluster.
--redwood-like
Include the --redwood-like keywords to instruct the server to use an escape character (an empty string ('')) following the LIKE (or PostgreSQL-compatible ILIKE) operator in a SQL statement that is compatible with Oracle syntax.
--icu-short-form
Include the --icu-short-form keywords to create a cluster that uses a default ICU (International Components for Unicode) collation for all databases in the cluster. For more information about Unicode collations, please refer to the EDB Postgres Advanced Server Guide available at:
For more information about using initdb, and the available cluster configuration options, see the PostgreSQL Core Documentation available at:
You can also view online help for initdb by assuming superuser privileges and entering:
/path_to_initdb_installation_directory/initdb --help
Where path_to_initdb_installation_directory specifies the location of the initdb binary file.


3.4.3 Modifying the Data Directory Location on CentOS or Redhat 7.x
On a CentOS or RedHat version 7.x host, the unit file is named edb-as-11.service and resides in /usr/lib/systemd/system. The unit file contains references to the location of the Advanced Server data directory. You should avoid making any modifications directly to the unit file because it may be overwritten during package upgrades.
By default, data files reside under /var/lib/edb/as11/data directory. To use a data directory that resides in a non-default location, create a copy of the unit file under the /etc directory:
cp /usr/lib/systemd/system/edb-as-11.service
/etc/systemd/system/
After copying the unit file to the new location, modify the service file (/etc/systemd/system/edb-as-11.service) with your editor of choice, correcting any required paths.
Then, use the following command to reload systemd, updating the modified service scripts:
systemctl daemon-reload
Then, start the Advanced Server service with the following command:
systemctl start edb-as-11
 
 
3.5 Starting Multiple Postmasters with Different Clusters
You can configure Advanced Server to use multiple postmasters, each with its own database cluster. The steps required are version specific to the Linux host.
On RHEL or CentOS 6.x
The edb-as11-server-core RPM contains a script that starts the Advanced Server instance. The script can be copied, allowing you to run multiple services, with unique data directories and that monitor different ports. You must have root access to invoke or modify the script.
The example that follows creates a second instance on an Advanced Server host; the secondary instance is named secondary:
1.
Create a hard link in /etc/rc.d/init.d (or equivalent location) to the edb-as-11 service (named secondary-edb-as-11):
ln edb-as-11 secondary-edb-as-11
Be sure to pick a name that is not already used in /etc/rc.d/init.d.
2.
Create a file in /etc/sysconfig/edb/as11/ named secondary-edb-as-11. This file is where you would typically define PGDATA and PGOPTS. Since $PGDATA/postgresql.conf will override many of these settings (except PGDATA) you might notice unexpected results on startup.
3.
Create the target PGDATA directory.
4.
Assume the identity of the Advanced Server database superuser (enterprisedb) and invoke initdb on the target PGDATA. For information about using initdb, please see the PostgreSQL Core Documentation available at:
5.
Edit the postgresql.conf file to specify the port, address, TCP/IP settings, etc. for the secondary instance.
6.
service secondary-edb-as-11 start
 
On RHEL or CentOS 7.x
The edb-as11-server-core RPM for version 7.x contains a unit file that starts the Advanced Server instance. The file allows you to start multiple services, with unique data directories and that monitor different ports. You must have root access to invoke or modify the script.
The example that follows creates an Advanced Server installation with two instances; the secondary instance is named secondary:
1.
cp /usr/lib/systemd/system/edb-as-11.service /etc/systemd/system/secondary-edb-as-11.service
2.
Edit the file, changing PGDATA to point to the new data directory that you will create the cluster against.
3.
Create the target PGDATA with user enterprisedb.
4.
Run initdb, specifying the setup script:
/usr/edb/as11/bin/edb-as-11-setup initdb secondary-edb-as-11
5.
Edit the postgresql.conf file for the new instance, specifying the port, the IP address, TCP/IP settings, etc.
6.
systemctl enable secondary-edb-as-11
7.
systemctl start secondary-edb-as-11


3.6 Creating an Advanced Server Repository on an Isolated Network
You can create a local repository to act as a host for the Advanced Server RPM packages if the server on which you wish to install Advanced Server (or supporting components) cannot directly access the EnterpriseDB repository. Please note that this is a high-level listing of the steps requires; you will need to modify the process for your individual network.
To create and use a local repository, you must:
1.
Use yum to install the epel-release, yum-utils, and createrepo packages:
yum install epel-release
yum install yum-utils
yum install createrepo
2.
mkdir /srv/repos
3.
4.
reposync -r edbas11 -p /srv/repos
createrepo /srv/repos
5.
Install your preferred webserver on the host that will act as your local repository, and ensure that the repository directory is accessible to the other servers on your network.
6.
[edbas11]
name=EnterpriseDB Advanced Server 11
baseurl=https://yum.
your_domain.com/edbas11
enabled=1
gpgcheck=0
After specifying the location and connection information for your local repository, you can use yum commands to install Advanced Server and its supporting components on the isolated servers. For example:
yum install edb-as11-server
For more information about creating a local yum repository, visit:
https://wiki.centos.org/HowTos/CreateLocalRepos


4 Installation Troubleshooting
Difficulty Displaying Java-based Applications
If you encounter difficulty displaying Java-based server features (controls or text not being displayed correctly, or blank windows), upgrading to the latest libxcb-xlib libraries should correct the problem on most distributions. Please visit the following link for other possible work-arounds:
http://bugs.sun.com/bugdatabase/view_bug.do?bug_id=6532373
The Installation Fails to Complete Due to Existing data Directory Contents
If an installation fails to complete due to existing content in the data directory, the server will write an error message to the server logs:
A data directory is neither empty, or a recognisable data directory.
If you encounter a similar message, you should confirm that the data directory is empty; the presence of files (including the system-generated lost+found folder) will prevent the installation from completing. Either remove the files from the data directory, or specify a different location for the data directory before re-invoking the installer to complete the installation.


5 Managing an Advanced Server Installation
Unless otherwise noted, the commands and paths noted in the following section assume that you have performed an installation with the interactive installer.
 
5.1 Starting and Stopping Advanced Server and Supporting Components
A service is a program that runs in the background and requires no user interaction (in fact, a service provides no user interface); a service can be configured to start at boot time, or manually on demand. Services are best controlled using the platform-specific operating system service control utility. Many of the Advanced Server supporting components are services.
The following table lists the names of the services that control Advanced Server and services that control Advanced Server supporting components:
You can use the Linux command line to control Advanced Server's database server and the services of Advanced Server's supporting components. The commands that control the Advanced Server service on a Linux platform are host specific.
 
 
5.1.1 Controlling a Service on CentOS or RHEL 7.x
If your installation of Advanced Server resides on version 7.x of RHEL and CentOS, you must use the systemctl command to control the Advanced Server service and supporting components.
The systemctl command must be in your search path and must be invoked with superuser privileges. To use the command, open a command line, and enter:
systemctl action service_name
Where:
action
action specifies the action taken by the service command. Specify:
start to start the service.
stop to stop the service.
restart to stop and then start the service.
status to discover the current status of the service.
service_name
service_name specifies the name of the service.
 
5.1.2 Controlling a Service on CentOS or RHEL 6.x
On version 6.x of RHEL or CentOS Linux, you can control a service at the command line with the service command. The service command can be used to manage an Advanced Server cluster, as well as the services of component software installed with Advanced Server.
Using the service command to change the status of a service allows the Linux service controller to keep track of the server status (the pg_ctl command does not alert the service controller to changes in the status of a server). The command must be in your search path and must be invoked with superuser privileges. Open a command line, and issue the command:
service service_name action
The Linux service command invokes a script (with the same name as the service) that resides in /etc/init.d. If your Linux distribution does not support the service command, you can call the script directly by entering:
/etc/init.d/service_name action
Where:
service_name
service_name specifies the name of the service.
action
action specifies the action taken by the service command. Specify:
start to start the service.
stop to stop the service.
condstop to stop the service without displaying a notice if the server is already stopped.
restart to stop and then start the service.
condrestart to restart the service without displaying a notice if the server is already stopped.
try-restart to restart the service without displaying a notice if the server is already stopped.
status to discover the current status of the service.
 
5.1.3 Using pg_ctl to Control Advanced Server
You can use the pg_ctl utility to control an Advanced Server service from the command line on any platform. pg_ctl allows you to start, stop, or restart the Advanced Server database server, reload the configuration parameters, or display the status of a running server. To invoke the utility, assume the identity of the cluster owner, navigate into the home directory of Advanced Server, and issue the command:
./bin/pg_ctl -D data_directory action
data_directory
data_directory is the location of the data controlled by the Advanced Server cluster.
action
action specifies the action taken by the pg_ctl utility. Specify:
start to start the service.
stop to stop the service.
restart to stop and then start the service.
reload sends the server a SIGHUP signal, reloading configuration parameters
status to discover the current status of the service.
For more information about using the pg_ctl utility, or the command line options available, please see the official PostgreSQL Core Documentation available at:
 
Choosing Between pg_ctl and the service Command
You can use the pg_ctl utility to manage the status of an Advanced Server cluster, but it is important to note that pg_ctl does not alert the operating system service controller to changes in the status of a server, so it is beneficial to use the service command whenever possible.
 
5.1.4 Configuring Component Services to AutoStart at System Reboot
After installing, configuring, and starting the services of Advanced Server supporting components on a Linux system, you must manually configure your system to autostart the service when your system reboots. To configure a service to autostart on a Linux system, open a command line, assume superuser privileges, and enter the following command.
On a Redhat-compatible Linux system, enter:
/sbin/chkconfig service_name on
Where service_name specifies the name of the service.


5.2 Modifying the postgresql.conf File
Configuration parameters in the postgresql.conf file specify server behavior with regards to auditing, authentication, encryption, and other behaviors. The postgresql.conf file resides in the data directory under your Advanced Server installation.
Figure 5.1 - The postgresql.conf file.
 
Parameters that are preceded by a pound sign (#) are set to their default value (as shown in the parameter setting). To change a parameter value, remove the pound sign and enter a new value. After setting or changing a parameter, you must either reload or restart the server for the new parameter value to take effect.
Within the postgresql.conf file, some parameters contain comments that indicate change requires restart (see Figure 5.1). To view a list of the parameters that require a server restart, execute the following query at the psql command line:
SELECT name FROM pg_settings WHERE context = 'postmaster';
 
 
5.3 Modifying the pg_hba.conf File
Appropriate authentication methods provide protection and security. Entries in the pg_hba.conf file specify the authentication method or methods that the server will use when authenticating connecting clients. Before connecting to the server, you may be required to modify the authentication properties specified in the pg_hba.conf file.
When you invoke the initdb utility to create a cluster, initdb creates a pg_hba.conf file for that cluster that specifies the type of authentication required from connecting clients.
The default authentication configuration specified in the pg_hba.conf file is:
To modify the pg_hba.conf file, open the file with your choice of editor. After modifying the authentication settings in the pg_hba.conf file, use the Linux command line to restart the server and apply the changes.
For more information about authentication, and modifying the pg_hba.conf file, see the PostgreSQL Core Documentation at:


5.4 Connecting to Advanced Server with psql
psql is a command line client application that allows you to execute SQL commands and view the results. To open the psql client, the client must be in your search path. The executable resides in the bin directory, under your Advanced Server installation.
Use the following command and options to start the psql client (see Figure 5.2):
psql -d edb -U enterprisedb
C:\Users\susan\Desktop\two.png
Figure 5.2 - Connecting to the server.
Where:
-d specifies the database to which psql will connect;
-U specifies the identity of the database user that will be used for the session.
If you have performed an installation with the interactive installer, you can access the psql client by selecting EDB-PSQL from the EDB Postgres menu. When the client opens, provide connection information for your session.
For more information about using the command line client, please refer to the PostgreSQL Core Documentation at:
 
 
6 Uninstalling Advanced Server
Note that after uninstalling Advanced Server, the cluster data files remain intact and the service user persists. You may manually remove the cluster data and service user from the system.
 
6.1 Uninstalling an RPM Package
You can use variations of the rpm or yum command to remove installed packages. Note that removing a package does not damage the Advanced Server data directory.
Include the -e option when invoking the rpm command to remove an installed package; the command syntax is:
rpm -e package_name
Where package_name is the name of the package that you would like to remove.
You can use the yum remove command to remove a package installed by yum. To remove a package, open a terminal window, assume superuser privileges, and enter the command:
yum remove package_name
Where package_name is the name of the package that you would like to remove.
Note: yum and RPM will not remove a package that is required by another package. If you attempt to remove a package that satisfies a package dependency, yum or RPM will provide a warning.


Table of Contents

1 Introduction
1.1 Typographical Conventions Used in this Guide
2 Requirements Overview
2.1 Supported Platforms
2.2 Linux Installation Prerequisites
3 Using a Package Manager to Install Advanced Server
3.1 Installing an RPM Package
3.1.1 Advanced Server RPM Installers
3.2 Installing an RPM Package on a SLES Host
3.3 Performing a Minor Version Update of an RPM Installation
3.4 Configuring a Package Installation
3.4.1 Creating a Database Cluster and Starting the Service
3.4.2 Using a Service Configuration File on CentOS or Redhat 6.x
3.4.2.1 Specifying Cluster Options with INITDBOPTS
3.4.3 Modifying the Data Directory Location on CentOS or Redhat 7.x
3.5 Starting Multiple Postmasters with Different Clusters
3.6 Creating an Advanced Server Repository on an Isolated Network
4 Installation Troubleshooting
5 Managing an Advanced Server Installation
5.1 Starting and Stopping Advanced Server and Supporting Components
5.1.1 Controlling a Service on CentOS or RHEL 7.x
5.1.2 Controlling a Service on CentOS or RHEL 6.x
5.1.3 Using pg_ctl to Control Advanced Server
5.1.4 Configuring Component Services to AutoStart at System Reboot
5.2 Modifying the postgresql.conf File
5.3 Modifying the pg_hba.conf File
5.4 Connecting to Advanced Server with psql
6 Uninstalling Advanced Server
6.1 Uninstalling an RPM Package