• Enhanced Compatibility Features. Chapter 2 provides an overview of compatibility features supported by Advanced Server.
• Database Administration. Chapter 3 contains information about features and tools that are helpful to the database administrator.Index Advisor described in Section 3.2 helps to determine the additional indexes needed on tables to improve application performance.
SQL Profiler described in Section 3.3 locates and diagnoses poorly running SQL queries in applications.pgsnmpd described in Section 3.4 is an SNMP agent that returns hierarchical monitoring information regarding the current state of Advanced Server.
• Security. Chapter 4 contains information about security features supported by Advanced Server.SQL/Protect described in Section 4.1 provides protection against SQL injection attacks.
Virtual Private Database described in Section 4.2 provides fine-grained, row level access.Data redaction described in Section 4.4 provides protection against sensitive data exposure.
• EDB Resource Manager. Chapter 5 contains information about the EDB Resource Manager feature, which provides the capability to control system resource usage by Advanced Server processes.Resource Groups described in Section 5.1 shows how to create and maintain the groups on which resource limits can be defined.CPU Usage Throttling described in Section 5.2 provides a method to control CPU usage by Advanced Server processes.Dirty Buffer Throttling described in Section 5.3 provides a method to control the dirty rate of shared buffers by Advanced Server processes.
• The libpq C Library. The libpq C library described in Chapter 6 is the C application programming interface (API) language for Advanced Server.
• The PL Debugger. The PL Debugger described in Chapter 7 is a graphically oriented debugging tool for PL/pgSQL.
• Performance Analysis and Tuning. Chapter 8 contains the various tools for analyzing and improving application and database server performance.Dynatune described in Section 8.1 provides a quick and easy means for configuring Advanced Server depending upon the type of application usage.EDB wait states described in Section 8.2 provides a way to capture wait events and other data for performance diagnosis.
• EDB Clone Schema. Chapter 9 contains information about the EDB Clone Schema feature, which provides the capability to copy a schema and its database objects within a single database or from one database to another database.
•
• Enhanced SQL and Other Miscellaneous Features. Chapter 11 contains information on enhanced SQL functionality and other features that provide additional flexibility and convenience.
• System Catalog Tables. Chapter 12 contains additional system catalog tables added for Advanced Server specific database objects.
• Advanced Server Keywords. Chapter 13 contains information about the words that Advanced Server recognizes as keywords.
1.1 What’s New
•
• Advanced Server no longer creates the dbo system catalog in its databases. For more information, see Section 11.3.
• Advanced Server now supports data redaction, which is a technique for limiting the exposure of sensitive data to certain users. Data redaction results in the alteration of the displayed data to such users. This is accomplished by defining redaction policies for tables with sensitive data. For more information, see Section 4.4.
• Advanced Server now supports EDB wait states, which is a background worker that probes each running session at a regular interval collecting information such as the database connection, the logged in user, the running query, and the wait events. For more information, see Section 8.2.
• Advanced Server now permits an infinite number of tries for custom plan generation by setting the edb_custom_plan_tries parameter to -1. For more information, see Section 3.1.3.5.1.
• The output format of the version() function has been changed to appear more consistent with the PostgreSQL community version output. For more information, see Section 11.2.
• You can use the edb_filter_log.redact_password_commands extension to instruct the server to redact stored passwords from the log file. For more information, see Section 3.5.7.
In the following descriptions a term refers to any word or group of words that may be language keywords, user-supplied values, literals, etc. A term’s exact meaning depends upon the context in which it is used.
• Italic font introduces a new term, typically, in the sentence that defines it for the first time.
• Fixed-width (mono-spaced) font is used for terms that must be given literally such as SQL commands, specific table and column names used in the examples, programming language keywords, directory paths and file names, parameter values, etc. For example postgresql.conf, SELECT * FROM emp;
• Italic fixed-width font is used for terms for which the user must substitute values in actual usage. For example, DELETE FROM table_name;
• Square brackets [ ] denote that one or none of the enclosed term(s) may be substituted. For example, [ a | b ], means choose one of “a” or “b” or neither of the two.
• Braces {} denote that exactly one of the enclosed alternatives must be specified. For example, { a | b }, means exactly one of “a” or “b” must be specified.
• Ellipses ... denote that the proceeding term may be repeated. For example, [ a | b ] ... means that you may have the sequence, “b a a b a”.
• Some of the information in this document may apply interchangeably to the PostgreSQL and EDB Postgres Advanced Server database systems. The term Advanced Server is used to refer to EDB Postgres Advanced Server. The term Postgres is used to generically refer to both PostgreSQL and Advanced Server. When a distinction needs to be made between these two database systems, the specific names, PostgreSQL or Advanced Server are used.
• The installation directory path of the PostgreSQL or Advanced Server products is referred to as POSTGRES_INSTALL_HOME. For PostgreSQL Linux installations, this defaults to /opt/PostgreSQL/x.x for version 10 and earlier. For later versions, use the PostgreSQL community packages. For Advanced Server Linux installations accomplished using the interactive installer for version 10 and earlier, this defaults to /opt/edb/asx.x. For Advanced Server Linux installations accomplished using an RPM package, this defaults to /usr/edb/asxx. For Advanced Server Windows installations, this defaults to C:\Program Files\edb\asxx. The product version number is represented by x.x or by xx for version 10 and later.
The examples use the sample tables, dept, emp, and jobhist, created and loaded when Advanced Server is installed.where xx is the Advanced Server version number.
• Grants all permissions on the tables to the PUBLIC group.The following is the pg-sample.sql script:
Advanced Server includes extended functionality that provides compatibility for syntax supported by Oracle applications. Detailed information about all of the compatibility features supported by Advanced Server is provided in the Database Compatibility for Oracle Developers Guides; the information is broken into four guides:
• The Database Compatibility for Oracle Developers Guide provides an overview of the compatible procedural language, profile management, partitioning syntax, and sample applications supported by Advanced Server.
• The Database Compatibility for Oracle Developers Tools and Utilities Guide provides information about the compatible tools supported by Advanced Server: EDB*Plus, EDB*Loader, EDB*Wrap, and DRITA.
• The Database Compatibility for Oracle Developers Built-in Packages Guide provides information about using the compatible syntax available in the built-in packages.
• The Database Compatibility for Oracle Developers Reference Guide provides reference information about using Advanced Server compatibility features, including SQL syntax, compatible views and system tables, and data types.
• Use the INITDBOPTS variable (in the Advanced Server service configuration file) to specify --redwood-like before initializing your cluster.
•
For information about using the Stored Procedural Language, see the Database Compatibility for Oracle Developers Guide, available at:
2.3 Optimizer HintsWhen you invoke a DELETE, INSERT, SELECT, or UPDATE command, the server generates a set of execution plans; after analyzing those execution plans, the server selects a plan that will (generally) return the result set in the least amount of time. The server's choice of plan is dependent upon several factors:
•
• Column statistics that have been gathered by the ANALYZE command.An optimizer hint is a directive (or multiple directives) embedded in a comment-like syntax that immediately follows a DELETE, INSERT, SELECT or UPDATE command. Keywords in the comment instruct the server to employ or avoid a specific plan when producing the result set. For information about using optimizer hints, see the Database Compatibility for Oracle Developers Guide, available at:
Advanced Server includes a set of views that provide information about database objects in a manner compatible with the Oracle data dictionary views. For detailed information about the views available with Advanced Server, please see the Database Compatibility for Oracle Developers Reference Guide, available at:
2.5 dblink_oradblink_ora provides an OCI-based database link that allows you to SELECT, INSERT, UPDATE or DELETE data stored on an Oracle system from within Advanced Server. For detailed information about using dblink_ora, and the supported functions and procedures, see the Database Compatibility for Oracle Developers Guide, available at:
Advanced Server supports compatible SQL syntax for profile management. Profile management commands allow a database superuser to create and manage named profiles. Each profile defines rules for password management that augment password and md5 authentication. The rules in a profile can:For information about using profile management commands, see the Database Compatibility for Oracle Developers Guide, available at:
For detailed information about the procedures and functions available within each package, please see the Database Compatibility for Oracle Developers Built-In Package Guide, available at:
The Open Client Library provides application interoperability with the Oracle Call Interface – an application that was formerly “locked in” can now work with either an Advanced Server or an Oracle database with minimal to no changes to the application code. The EnterpriseDB implementation of the Open Client Library is written in C.The following diagram compares the Open Client Library and Oracle Call Interface application stacks.
2.9 UtilitiesFor detailed information about the compatible syntax supported by the utilities listed below, see the Database Compatibility for Oracle Developers Tools and Utilities Guide, available at:For detailed information about EDB*Plus, please see the EDB*Plus User's Guide.The Dynamic Runtime Instrumentation Tools Architecture (DRITA) allows a DBA to query catalog views to determine the wait events that affect the performance of individual sessions or the system as a whole. DRITA records the number of times each event occurs as well as the time spent waiting; you can use this information to diagnose performance problems. DRITA offers this functionality, while consuming minimal system resources.DRITA compares snapshots to evaluate the performance of a system. A snapshot is a saved set of system performance data at a given point in time. Each snapshot is identified by a unique ID number; you can use snapshot ID numbers with DRITA reporting functions to return system performance statistics.
2.10 ECPGPlus
• A CALL statement compatible with Oracle databasesFor information about using ECPGPlus, please see the EDB Postgres Advanced Server ECPG Connector Guide, available from the EnterpriseDB website at:
2.11 Table Partitioning
• A bulk load (or unload) can be implemented by adding or removing partitions, if you plan that requirement into the partitioning design. ALTER TABLE is far faster than a bulk operation. It also entirely avoids the VACUUM overhead caused by a bulk DELETE.For information about database compatibility features supported by Advanced Server see the Database Compatibility for Oracle Developer's Guide, available at:
The following is an example of some configuration parameter settings in the postgresql.conf file:
• Boolean. Acceptable values can be written as on, off, true, false, yes, no, 1, 0, or any unambiguous prefix of these.
• Integer. Number without a fractional part.
• Floating Point. Number with an optional fractional part separated by a decimal point.
• String. Text value. Enclose in single quotes if the value is not a simple identifier or number (that is, the value contains special characters such as spaces or other punctuation marks).
• Enum. Specific set of string values. The allowed values can be found in the system view pg_settings.enumvals. Enum values are case-insensitive.Some settings specify a memory or time value. Each of these has an implicit unit, which is kilobytes, blocks (typically 8 kilobytes), milliseconds, seconds, or minutes. Default units can be found by referencing the system view pg_settings.unit. A different unit can be specified explicitly.Valid memory units are kB (kilobytes), MB (megabytes), and GB (gigabytes). Valid time units are ms (milliseconds), s (seconds), min (minutes), h (hours), and d (days). The multiplier for memory units is 1024.
• The initial settings for almost all configurable parameters across the entire database cluster are listed in the configuration file, postgresql.conf. These settings are put into effect upon database server start or restart. Some of these initial parameter settings can be overridden as discussed in the following bullet points. All configuration parameters have built-in default settings that are in effect if not explicitly overridden.
• Configuration parameters in the postgresql.conf file are overridden when the same parameters are included in the postgresql.auto.conf file. The ALTER SYSTEM command is used to manage the configuration parameters in the postgresql.auto.conf file.
• The SQL commands ALTER DATABASE, ALTER ROLE, or ALTER ROLE IN DATABASE can be used to modify certain parameter settings. The modified parameter settings take effect for new sessions after the command is executed. ALTER DATABASE affects new sessions connecting to the specified database. ALTER ROLE affects new sessions started by the specified role. ALTER ROLE IN DATABASE affects new sessions started by the specified role connecting to the specified database. Parameter settings established by these SQL commands remain in effect indefinitely, across database server restarts, overriding settings established by the methods discussed in the second and third bullet points. Parameter settings established using the ALTER DATABASE, ALTER ROLE, or ALTER ROLE IN DATABASE commands can only be changed by: a) re-issuing these commands with a different parameter value, or b) issuing these commands using either of the SET parameter TO DEFAULT clause or the RESET parameter clause. These clauses change the parameter back to using the setting established by the methods set forth in the prior bullet points. See Section I, “SQL Commands” of Chapter VI “Reference” in the PostgreSQL Core Documentation for the exact syntax of these SQL commands.
• Changes can be made for certain parameter settings for the duration of individual sessions using the PGOPTIONS environment variable or by using the SET command within the EDB-PSQL or PSQL command line terminal programs. Parameter settings made in this manner override settings established using any of the methods described by the second, third, and fourth bullet points, but only for the duration of the session.
• Parameter. Configuration parameter name.
• Scope of Effect. Scope of effect of the configuration parameter setting. ‘Cluster’ – Setting affects the entire database cluster (that is, all databases managed by the database server instance). ‘Database’ – Setting can vary by database and is established when the database is created. Applies to a small number of parameters related to locale settings. ‘Session’ – Setting can vary down to the granularity of individual sessions. In other words, different settings can be made for the following entities whereby the latter settings in this list override prior ones: a) the entire database cluster, b) specific databases in the database cluster, c) specific roles, d) specific roles when connected to specific databases, e) a specific session.
• When Takes Effect. When a changed parameter setting takes effect. ‘Preset’ – Established when the Advanced Server product is built or a particular database is created. This is a read-only parameter and cannot be changed. ‘Restart’ – Database server must be restarted. ‘Reload’ – Configuration file must be reloaded (or the database server can be restarted). ‘Immediate’ – Immediately effective in a session if the PGOPTIONS environment variable or the SET command is used to change the setting in the current session. Effective in new sessions if ALTER DATABASE, ALTER ROLE, or ALTER ROLE IN DATABASE commands are used to change the setting.
• Authorized User. Type of operating system account or database role that must be used to put the parameter setting into effect. ‘EPAS service account’ – EDB Postgres Advanced Server service account (enterprisedb for an installation compatible with Oracle databases, postgres for a PostgreSQL compatible mode installation). ‘Superuser’ – Database role with superuser privileges. ‘User’ – Any database role with permissions on the affected database object (the database or role to be altered with the ALTER command). ‘n/a’ – Parameter setting cannot be changed by any user.
• Description. Brief description of the configuration parameter.
• EPAS Only. ‘X’ – Configuration parameter is applicable to EDB Postgres Advanced Server only. No entry in this column indicates the configuration parameter applies to PostgreSQL as well.Note: There are a number of parameters that should never be altered. These are designated as “Note: For internal use only” in the Description column.
Sort results of CONNECT BY queries with no ORDER BY to depth-first order. Note: For internal use only. Lists shared libraries to preload into each backend. (Can also be set with PGOPTIONS at session start.) Waits N seconds on connection startup after authentication. (Can also be set with PGOPTIONS at session start.)
• Parameter Type. Type of values the parameter can accept. See Section 3.1.1 for a discussion of parameter type values.
• Default Value. Default setting if a value is not explicitly set in the configuration file.
• Range. Permitted range of values.
• Minimum Scope of Effect. Smallest scope for which a distinct setting can be made. Generally, the minimal scope of a distinct setting is either the entire cluster (the setting is the same for all databases and sessions thereof, in the cluster), or per session (the setting may vary by role, database, or individual session). (This attribute has the same meaning as the “Scope of Effect” column in the table of Section 2.1.2.)
• When Value Changes Take Effect. Least invasive action required to activate a change to a parameter’s value. All parameter setting changes made in the configuration file can be put into effect with a restart of the database server; however certain parameters require a database server restart. Some parameter setting changes can be put into effect with a reload of the configuration file without stopping the database server. Finally, other parameter setting changes can be put into effect with some client side action whose result is immediate. (This attribute has the same meaning as the “When Takes Effect” column in the table of Section 2.1.2.)
• Required Authorization to Activate. The type of user authorization to activate a change to a parameter’s setting. If a database server restart or a configuration file reload is required, then the user must be a EPAS service account (enterprisedb or postgres depending upon the Advanced Server compatibility installation mode). This attribute has the same meaning as the “Authorized User” column in the table of Section 2.1.2.
3.1.3.1.1 shared_buffersParameter Type: IntegerDefault Value: 32MBRange: 128kB to system dependentMinimum Scope of Effect: ClusterWhen Value Changes Take Effect: RestartRequired Authorization to Activate: EPAS service accountSets the amount of memory the database server uses for shared memory buffers. The default is typically 32 megabytes (32MB), but might be less if your kernel settings will not support it (as determined during initdb). This setting must be at least 128 kilobytes. (Non-default values of BLCKSZ change the minimum.) However, settings significantly higher than the minimum are usually needed for good performance.If you have a dedicated database server with 1GB or more of RAM, a reasonable starting value for shared_buffers is 25% of the memory in your system. There are some workloads where even large settings for shared_buffers are effective, but because Advanced Server also relies on the operating system cache, it is unlikely that an allocation of more than 40% of RAM to shared_buffers will work better than a smaller amount.On systems with less than 1GB of RAM, a smaller percentage of RAM is appropriate, so as to leave adequate space for the operating system (15% of memory is more typical in these situations). Also, on Windows, large values for shared_buffers aren't as effective. You may find better results keeping the setting relatively low and using the operating system cache more instead. The useful range for shared_buffers on Windows systems is generally from 64MB to 512MB.Increasing this parameter might cause Advanced Server to request more System V shared memory than your operating system's default configuration allows. See Section 17.4.1, “Shared Memory and Semaphores” in the PostgreSQL Core Documentation for information on how to adjust those parameters, if necessary.3.1.3.1.2 work_memParameter Type: IntegerDefault Value: 1MBRange: 64kB to 2097151kBMinimum Scope of Effect: Per sessionWhen Value Changes Take Effect: ImmediateRequired Authorization to Activate: Session userSpecifies the amount of memory to be used by internal sort operations and hash tables before writing to temporary disk files. The value defaults to one megabyte (1MB). Note that for a complex query, several sort or hash operations might be running in parallel; each operation will be allowed to use as much memory as this value specifies before it starts to write data into temporary files. Also, several running sessions could be doing such operations concurrently. Therefore, the total memory used could be many times the value of work_mem; it is necessary to keep this fact in mind when choosing the value. Sort operations are used for ORDER BY, DISTINCT, and merge joins. Hash tables are used in hash joins, hash-based aggregation, and hash-based processing of IN subqueries.Reasonable values are typically between 4MB and 64MB, depending on the size of your machine, how many concurrent connections you expect (determined by max_connections), and the complexity of your queries.3.1.3.1.3 maintenance_work_memParameter Type: IntegerDefault Value: 16MBRange: 1024kB to 2097151kBMinimum Scope of Effect: Per sessionWhen Value Changes Take Effect: ImmediateRequired Authorization to Activate: Session userSpecifies the maximum amount of memory to be used by maintenance operations, such as VACUUM, CREATE INDEX, and ALTER TABLE ADD FOREIGN KEY. It defaults to 16 megabytes (16MB). Since only one of these operations can be executed at a time by a database session, and an installation normally doesn't have many of them running concurrently, it's safe to set this value significantly larger than work_mem. Larger settings might improve performance for vacuuming and for restoring database dumps.Note that when autovacuum runs, up to autovacuum_max_workers times this memory may be allocated, so be careful not to set the default value too high.3.1.3.1.4 wal_buffersParameter Type: IntegerDefault Value: 64kBRange: 32kB to system dependentMinimum Scope of Effect: ClusterWhen Value Changes Take Effect: RestartRequired Authorization to Activate: EPAS service accountThe amount of memory used in shared memory for WAL data. The default is 64 kilobytes (64kB). The setting need only be large enough to hold the amount of WAL data generated by one typical transaction, since the data is written out to disk at every transaction commit.Increasing this parameter might cause Advanced Server to request more System V shared memory than your operating system's default configuration allows. See Section 17.4.1, “Shared Memory and Semaphores” in the PostgreSQL Core Documentation for information on how to adjust those parameters, if necessary.Although even this very small setting does not always cause a problem, there are situations where it can result in extra fsync calls, and degrade overall system throughput. Increasing this value to 1MB or so can alleviate this problem. On very busy systems, an even higher value may be needed, up to a maximum of about 16MB. Like shared_buffers, this parameter increases Advanced Server’s initial shared memory allocation, so if increasing it causes an Advanced Server start failure, you will need to increase the operating system limit.3.1.3.1.5 checkpoint_segments3.1.3.1.6 checkpoint_completion_targetParameter Type: Floating pointDefault Value: 0.5Range: 0 to 1Minimum Scope of Effect: ClusterRequired Authorization to Activate: EPAS service account3.1.3.1.7 checkpoint_timeoutParameter Type: IntegerDefault Value: 5minRange: 30s to 3600sMinimum Scope of Effect: ClusterRequired Authorization to Activate: EPAS service accountMaximum time between automatic WAL checkpoints, in seconds. The default is five minutes (5min). Increasing this parameter can increase the amount of time needed for crash recovery.Increasing checkpoint_timeout to a larger value, such as 15 minutes, can reduce the I/O load on your system, especially when using large values for shared_buffers.The downside of making the aforementioned adjustments to the checkpoint parameters is that your system will use a modest amount of additional disk space, and will take longer to recover in the event of a crash. However, for most users, this is a small price to pay for a significant performance improvement.3.1.3.1.8 max_wal_sizeParameter Type: IntegerDefault Value: 1 GBRange: 2 to 2147483647Minimum Scope of Effect: ClusterRequired Authorization to Activate: EPAS service accountmax_wal_size specifies the maximum size that the WAL will reach between automatic WAL checkpoints. This is a soft limit; WAL size can exceed max_wal_size under special circumstances (when under a heavy load, a failing archive_command, or a high wal_keep_segments setting).Increasing this parameter can increase the amount of time needed for crash recovery. This parameter can only be set in the postgresql.conf file or on the server command line.3.1.3.1.9 min_wal_sizeParameter Type: IntegerDefault Value: 80 MBRange: 2 to 2147483647Minimum Scope of Effect: ClusterRequired Authorization to Activate: EPAS service accountIf WAL disk usage stays below the value specified by min_wal_size, old WAL files are recycled for future use at a checkpoint, rather than removed. This ensures that enough WAL space is reserved to handle spikes in WAL usage (like when running large batch jobs). This parameter can only be set in the postgresql.conf file or on the server command line.3.1.3.1.10 bgwriter_delayParameter Type: IntegerDefault Value: 200msRange: 10ms to 10000msMinimum Scope of Effect: ClusterRequired Authorization to Activate: EPAS service accountSpecifies the delay between activity rounds for the background writer. In each round the writer issues writes for some number of dirty buffers (controllable by the bgwriter_lru_maxpages and bgwriter_lru_multiplier parameters). It then sleeps for bgwriter_delay milliseconds, and repeats.The default value is 200 milliseconds (200ms). Note that on many systems, the effective resolution of sleep delays is 10 milliseconds; setting bgwriter_delay to a value that is not a multiple of 10 might have the same results as setting it to the next higher multiple of 10.Typically, when tuning bgwriter_delay, it should be reduced from its default value. This parameter is rarely increased, except perhaps to save on power consumption on a system with very low utilization.3.1.3.1.11 seq_page_costParameter Type: Floating pointRange: 0 to 1.79769e+308Minimum Scope of Effect: Per sessionWhen Value Changes Take Effect: ImmediateRequired Authorization to Activate: Session userSets the planner's estimate of the cost of a disk page fetch that is part of a series of sequential fetches. The default is 1.0. This value can be overridden for a particular tablespace by setting the tablespace parameter of the same name. (Refer to the ALTER TABLESPACE command in the PostgreSQL Core Documentation.)3.1.3.1.12 random_page_costParameter Type: Floating pointRange: 0 to 1.79769e+308Minimum Scope of Effect: Per sessionWhen Value Changes Take Effect: ImmediateRequired Authorization to Activate: Session userSets the planner's estimate of the cost of a non-sequentially-fetched disk page. The default is 4.0. This value can be overridden for a particular tablespace by setting the tablespace parameter of the same name. (Refer to the ALTER TABLESPACE command in the PostgreSQL Core Documentation.)Reducing this value relative to seq_page_cost will cause the system to prefer index scans; raising it will make index scans look relatively more expensive. You can raise or lower both values together to change the importance of disk I/O costs relative to CPU costs, which are described by the cpu_tuple_cost and cpu_index_tuple_cost parameters.Although the system will let you do so, never set random_page_cost less than seq_page_cost. However, setting them equal (or very close to equal) makes sense if the database fits mostly or entirely within memory, since in that case there is no penalty for touching pages out of sequence. Also, in a heavily-cached database you should lower both values relative to the CPU parameters, since the cost of fetching a page already in RAM is much smaller than it would normally be.3.1.3.1.13 effective_cache_sizeParameter Type: IntegerDefault Value: 128MBRange: 8kB to 17179869176kBMinimum Scope of Effect: Per sessionWhen Value Changes Take Effect: ImmediateRequired Authorization to Activate: Session userIf this parameter is set too low, the planner may decide not to use an index even when it would be beneficial to do so. Setting effective_cache_size to 50% of physical memory is a normal, conservative setting. A more aggressive setting would be approximately 75% of physical memory.3.1.3.1.14 synchronous_commitParameter Type: BooleanDefault Value: trueRange: {true | false}Minimum Scope of Effect: Per sessionWhen Value Changes Take Effect: ImmediateRequired Authorization to Activate: Session userUnlike fsync, setting this parameter to off does not create any risk of database inconsistency: an operating system or database crash might result in some recent allegedly-committed transactions being lost, but the database state will be just the same as if those transactions had been aborted cleanly.So, turning synchronous_commit off can be a useful alternative when performance is more important than exact certainty about the durability of a transaction. See Section 29.3, Asynchronous Commit in the PostgreSQL Core Documentation for information.This parameter can be changed at any time; the behavior for any one transaction is determined by the setting in effect when it commits. It is therefore possible, and useful, to have some transactions commit synchronously and others asynchronously. For example, to make a single multistatement transaction commit asynchronously when the default is the opposite, issue SET LOCAL synchronous_commit TO OFF within the transaction.3.1.3.1.15 edb_max_spins_per_delayParameter Type: IntegerDefault Value: 1000Range: 10 to 1000Minimum Scope of Effect: Per clusterWhen Value Changes Take Effect: RestartRequired Authorization to Activate: EPAS service accountUse edb_max_spins_per_delay to specify the maximum number of times that a session will 'spin' while waiting for a spin-lock. If a lock is not acquired, the session will sleep. If you do not specify an alternative value for edb_max_spins_per_delay, the server will enforce the default value of 1000.3.1.3.1.16 pg_prewarm.autoprewarmParameter Type: BooleanDefault Value: trueMinimum Scope of Effect: ClusterWhen Value Changes Take Effect: RestartRequired Authorization to Activate: EPAS service accountThis parameter controls whether or not the database server should run autoprewarm, which is a background worker process that automatically dumps shared buffers to disk before a shutdown. It then prewarms the shared buffers the next time the server is started, meaning it loads blocks from the disk back into the buffer pool.If pg_prewarm.autoprewarm is set to on, the autoprewarm worker is enabled. If the parameter is set to off, autoprewarm is disabled. The parameter is on by default.Before autoprewarm can be used, you must add $libdir/pg_prewarm to the libraries listed in the shared_preload_libraries configuration parameter of the postgresql.conf file as shown by the following example:After modifying the shared_preload_libraries parameter, restart the database server after which the autoprewarm background worker is launched immediately after the server has reached a consistent state.The autoprewarm process will start loading blocks that were previously recorded in $PGDATA/autoprewarm.blocks until there is no free buffer space left in the buffer pool. In this manner, any new blocks that were loaded either by the recovery process or by the querying clients, are not replaced.Once the autoprewarm process has finished loading buffers from disk, it will periodically dump shared buffers to disk at the interval specified by the pg_prewarm.autoprewarm_interval parameter (see Section 3.1.3.1.17). Upon the next server restart, the autoprewarm process will prewarm shared buffers with the blocks that were last dumped to disk.3.1.3.1.17 pg_prewarm.autoprewarm_intervalParameter Type: IntegerDefault Value: 300sRange: 0s to 2147483sMinimum Scope of Effect: ClusterRequired Authorization to Activate: EPAS service accountThis is the minimum number of seconds after which the autoprewarm background worker dumps shared buffers to disk. The default is 300 seconds. If set to 0, shared buffers are not dumped at regular intervals, but only when the server is shut down.
3.1.3.2 Resource Usage / Memory3.1.3.2.1 edb_dynatuneParameter Type: IntegerRange: 0 to 100Minimum Scope of Effect: ClusterWhen Value Changes Take Effect: RestartRequired Authorization to Activate: EPAS service accountWhen Advanced Server is initially installed, the edb_dynatune parameter is set in accordance with the selected usage of the host machine on which it was installed (i.e., development machine, mixed use machine, or dedicated server). For most purposes, there is no need for the database administrator to adjust the various configuration parameters in the postgresql.conf file in order to improve performance.The edb_dynatune parameter can be set to any integer value between 0 and 100, inclusive. A value of 0, turns off the dynamic tuning feature thereby leaving the database server resource usage totally under the control of the other configuration parameters in the postgresql.conf file.Once a value of edb_dynatune is selected, database server performance can be further fine-tuned by adjusting the other configuration parameters in the postgresql.conf file. Any adjusted setting overrides the corresponding value chosen by edb_dynatune. You can change the value of a parameter by un-commenting the configuration parameter, specifying the desired value, and restarting the database server.3.1.3.2.2 edb_dynatune_profileParameter Type: EnumDefault Value: oltpMinimum Scope of Effect: ClusterWhen Value Changes Take Effect: RestartRequired Authorization to Activate: EPAS service account
• oltp. Recommended when the database server is processing heavy online transaction processing workloads.
• reporting. Recommended for database servers used for heavy data reporting.
• mixed. Recommended for servers that provide a mix of transaction processing and data reporting.
3.1.3.3.1 edb_max_resource_groupsParameter Type: IntegerRange: 0 to 65536Minimum Scope of Effect: ClusterWhen Value Changes Take Effect: RestartRequired Authorization to Activate: EPAS service accountThis parameter controls the maximum number of resource groups that can be used simultaneously by EDB Resource Manager. More resource groups can be created than the value specified by edb_max_resource_groups, however, the number of resource groups in active use by processes in these groups cannot exceed this value.Parameter edb_max_resource_groups should be set comfortably larger than the number of groups you expect to maintain so as not to run out.3.1.3.3.2 edb_resource_groupParameter Type: StringDefault Value: noneRange: n/aMinimum Scope of Effect: Per sessionWhen Value Changes Take Effect: ImmediateRequired Authorization to Activate: Session userSet the edb_resource_group parameter to the name of the resource group to which the current session is to be controlled by EDB Resource Manager according to the group’s resource type settings.
3.1.3.4 Query Tuning3.1.3.4.1 enable_hintsParameter Type: BooleanDefault Value: trueRange: {true | false}Minimum Scope of Effect: Per sessionWhen Value Changes Take Effect: ImmediateRequired Authorization to Activate: Session userOptimizer hints embedded in SQL commands are utilized when enable_hints is on. Optimizer hints are ignored when this parameter is off.3.1.3.5.1 edb_custom_plan_triesParameter Type: IntegerRange: -1 to 100Minimum Scope of Effect: Per sessionWhen Value Changes Take Effect: ImmediateRequired Authorization to Activate: Session UserWhen a client application repeatedly executes a prepared statement, the server may decide to evaluate several execution plans before deciding to choose a custom plan or a generic plan.In certain workloads, this extra planning can have a negative impact on performance. You can adjust the edb_custom_plan_tries configuration parameter to decrease the number of custom plans considered before evaluating a generic plan.The $1 token in this query is a parameter marker - the client application must provide a value for each parameter marker each time the statement executes.If an index has been defined on customer.salesman, the optimizer may choose to execute this query using a sequential scan, or using an index scan. In some cases, an index is faster than a sequential scan; in other cases, the sequential scan will win. The optimal plan will depend on the distribution of salesman values in the table and on the search value (the value provided for the $1 parameter).When the client application repeatedly executes the custQuery prepared statement, the optimizer will generate some number of parameter-value-specific execution plans (custom plans), followed by a generic plan (a plan that ignores the parameter values), and then decide whether to stick with the generic plan or to continue to generate custom plans for each execution. The decision process takes into account not only the cost of executing the plans, but the cost of generating custom plans as well.3.1.3.5.2 edb_enable_pruningParameter Type: BooleanDefault Value: trueRange: {true | false}Minimum Scope of Effect: Per sessionWhen Value Changes Take Effect: ImmediateRequired Authorization to Activate: Session userWhen set to TRUE, edb_enable_pruning allows the query planner to early-prune partitioned tables. Early-pruning means that the query planner can “prune” (i.e., ignore) partitions that would not be searched in a query before generating query plans. This helps improve performance time as it eliminates the generation of query plans of partitions that would not be searched.Conversely, late-pruning means that the query planner prunes partitions after generating query plans for each partition. (The constraint_exclusion configuration parameter controls late-pruning.)The ability to early-prune depends upon the nature of the query in the WHERE clause. Early-pruning can be utilized in only simple queries with constraints of the type WHERE column = literal (e.g., WHERE deptno = 10).Early-pruning is not used for more complex queries such as WHERE column = expression (e.g., WHERE deptno = 10 + 5).
3.1.3.6.1 trace_hintsParameter Type: BooleanDefault Value: falseRange: {true | false}Minimum Scope of Effect: Per sessionWhen Value Changes Take Effect: ImmediateRequired Authorization to Activate: Session userUse with the optimizer hints feature to provide more detailed information regarding whether or not a hint was used by the planner. Set the client_min_messages and trace_hints configuration parameters as follows:The SELECT command with the NO_INDEX hint shown below illustrates the additional information produced when the aforementioned configuration parameters are set.3.1.3.6.2 edb_log_every_bulk_valueParameter Type: BooleanDefault Value: falseRange: {true | false}Minimum Scope of Effect: Per sessionWhen Value Changes Take Effect: ImmediateRequired Authorization to Activate: SuperuserBulk processing logs the resulting statements into both the Advanced Server log file and the EDB Audit log file. However, logging each and every statement in bulk processing is costly. This can be controlled by the edb_log_every_bulk_value configuration parameter. When set to true, each and every statement in bulk processing is logged. When set to false, a log message is recorded once per bulk processing. In addition, the duration is emitted once per bulk processing. Default is set to false.
3.1.3.7 Auditing Settings3.1.3.7.1 edb_auditParameter Type: EnumDefault Value: noneMinimum Scope of Effect: ClusterRequired Authorization to Activate: EPAS service accountEnables or disables database auditing. The values xml or csv will enable database auditing. These values represent the file format in which auditing information will be captured. none will disable database auditing and is also the default.3.1.3.7.2 edb_audit_directoryParameter Type: StringDefault Value: edb_auditRange: n/aMinimum Scope of Effect: ClusterRequired Authorization to Activate: EPAS service accountSpecifies the directory where the audit log files will be created. The path of the directory can be absolute or relative to the Advanced Server data directory.3.1.3.7.3 edb_audit_filenameParameter Type: StringDefault Value: audit-%Y%m%d_%H%M%SRange: n/aMinimum Scope of Effect: ClusterRequired Authorization to Activate: EPAS service accountSpecifies the file name of the audit file where the auditing information will be stored. The default file name will be audit-%Y%m%d_%H%M%S. The escape sequences, %Y, %m etc., will be replaced by the appropriate current values according to the system date and time.3.1.3.7.4 edb_audit_rotation_dayParameter Type: StringDefault Value: everyMinimum Scope of Effect: ClusterRequired Authorization to Activate: EPAS service accountSpecifies the day of the week on which to rotate the audit files. Valid values are sun, mon, tue, wed, thu, fri, sat, every, and none. To disable rotation, set the value to none. To rotate the file every day, set the edb_audit_rotation_day value to every. To rotate the file on a specific day of the week, set the value to the desired day of the week.3.1.3.7.5 edb_audit_rotation_sizeParameter Type: IntegerDefault Value: 0MBRange: 0MB to 5000MBMinimum Scope of Effect: ClusterRequired Authorization to Activate: EPAS service account3.1.3.7.6 edb_audit_rotation_secondsParameter Type: IntegerRange: 0s to 2147483647sMinimum Scope of Effect: ClusterRequired Authorization to Activate: EPAS service account3.1.3.7.7 edb_audit_connectParameter Type: EnumDefault Value: failedMinimum Scope of Effect: ClusterRequired Authorization to Activate: EPAS service accountEnables auditing of database connection attempts by users. To disable auditing of all connection attempts, set edb_audit_connect to none. To audit all failed connection attempts, set the value to failed. To audit all connection attempts, set the value to all.3.1.3.7.8 edb_audit_disconnectParameter Type: EnumDefault Value: noneMinimum Scope of Effect: ClusterRequired Authorization to Activate: EPAS service accountEnables auditing of database disconnections by connected users. To enable auditing of disconnections, set the value to all. To disable, set the value to none.3.1.3.7.9 edb_audit_statementParameter Type: StringDefault Value: ddl, errorRange: {none | ddl | dml | insert | update | delete | truncate | select | error | create | drop | alter | grant | revoke | rollback | all} ...Minimum Scope of Effect: ClusterRequired Authorization to Activate: EPAS service accountThis configuration parameter is used to specify auditing of different categories of SQL statements as well as those statements related to specific SQL commands. To log errors, set the parameter value to error. To audit all DDL statements such as CREATE TABLE, ALTER TABLE, etc., set the parameter value to ddl. To audit specific types of DDL statements, the parameter values can include those specific SQL commands (create, drop, or alter). In addition, the object type may be specified following the command such as create table, create view, drop role, etc. All modification statements such as INSERT, UPDATE, DELETE or TRUNCATE can be audited by setting edb_audit_statement to dml. To audit specific types of DML statements, the parameter values can include the specific SQL commands, insert, update, delete, or truncate. Include parameter values select, grant, revoke, or rollback to audit statements regarding those SQL commands. Setting the value to all will audit every statement while none disables this feature.3.1.3.7.10 edb_audit_tagParameter Type: StringDefault Value: noneMinimum Scope of Effect: SessionWhen Value Changes Take Effect: ImmediateUse edb_audit_tag to specify a string value that will be included in the audit log when the edb_audit parameter is set to csv or xml.3.1.3.7.11 edb_audit_destinationParameter Type: EnumDefault Value: fileMinimum Scope of Effect: ClusterRequired Authorization to Activate: EPAS service accountSpecifies whether the audit log information is to be recorded in the directory as given by the edb_audit_directory parameter or to the directory and file managed by the syslog process. Set to file to use the directory specified by edb_audit_directory (the default setting). Set to syslog to use the syslog process and its location as configured in the /etc/syslog.conf file. Note: In recent Linux versions, syslog has been replaced by rsyslog and the configuration file is in /etc/rsyslog.conf.3.1.3.7.12 edb_log_every_bulk_value
3.1.3.8.1 icu_short_formParameter Type: StringDefault Value: noneRange: n/aMinimum Scope of Effect: DatabaseThe configuration parameter icu_short_form is a parameter containing the default ICU short form name assigned to a database or to the Advanced Server instance. See Section 3.6 for general information about the ICU short form and the Unicode Collation Algorithm.This configuration parameter is set either when the CREATE DATABASE command is used with the ICU_SHORT_FORM parameter (see Section 3.6.3.2) in which case the specified short form name is set and appears in the icu_short_form configuration parameter when connected to this database, or when an Advanced Server instance is created with the initdb command used with the --icu_short_form option (see Section 3.6.3.3) in which case the specified short form name is set and appears in the icu_short_form configuration parameter when connected to a database in that Advanced Server instance, and the database does not override it with its own ICU_SHORT_FORM parameter with a different short form.Once established in the manner described, the icu_short_form configuration parameter cannot be changed.3.1.3.9.1 default_heap_fillfactorParameter Type: IntegerDefault Value: 100Range: 10 to 100Minimum Scope of Effect: Per sessionWhen Value Changes Take Effect: ImmediateRequired Authorization to Activate: Session userSets the fillfactor for a table when the FILLFACTOR storage parameter is omitted from a CREATE TABLE command.The fillfactor for a table is a percentage between 10 and 100. 100 (complete packing) is the default. When a smaller fillfactor is specified, INSERT operations pack table pages only to the indicated percentage; the remaining space on each page is reserved for updating rows on that page. This gives UPDATE a chance to place the updated copy of a row on the same page as the original, which is more efficient than placing it on a different page. For a table whose entries are never updated, complete packing is the best choice, but in heavily updated tables smaller fillfactors are appropriate.3.1.3.9.2 edb_data_redactionParameter Type: BooleanDefault Value: trueRange: {true | false}Minimum Scope of Effect: Per sessionWhen Value Changes Take Effect: ImmediateRequired Authorization to Activate: Session userThe default setting is TRUE so the data redaction is applied to all users except for superusers and the table owner:If the parameter is disabled by setting it to FALSE, then the following occurs:
3.1.3.10.1 oracle_homeParameter Type: StringDefault Value: noneRange: n/aMinimum Scope of Effect: ClusterWhen Value Changes Take Effect: RestartRequired Authorization to Activate: EPAS service accountBefore creating an Oracle Call Interface (OCI) database link to an Oracle server, you must direct Advanced Server to the correct Oracle home directory. Set the LD_LIBRARY_PATH environment variable on Linux (or PATH on Windows) to the lib directory of the Oracle client installation directory.For Windows only, you can instead set the value of the oracle_home configuration parameter in the postgresql.conf file. The value specified in the oracle_home configuration parameter will override the Windows PATH environment variable.The LD_LIBRARY_PATH environment variable on Linux (PATH environment variable or oracle_home configuration parameter on Windows) must be set properly each time you start Advanced Server.For Windows only: To set the oracle_home configuration parameter in the postgresql.conf file, edit the file, adding the following line:oracle_home = 'lib_directory'After setting the oracle_home configuration parameter, you must restart the server for the changes to take effect. Restart the server from the Windows Services console.3.1.3.10.2 odbc_lib_pathParameter Type: StringDefault Value: noneRange: n/aMinimum Scope of Effect: ClusterWhen Value Changes Take Effect: RestartRequired Authorization to Activate: EPAS service accountIf you will be using an ODBC driver manager, and if it is installed in a non-standard location, you specify the location by setting the odbc_lib_path configuration parameter in the postgresql.conf file:odbc_lib_path = 'complete_path_to_libodbc.so'
3.1.3.11 Compatibility Options3.1.3.11.1 edb_redwood_dateParameter Type: BooleanDefault Value: falseMinimum Scope of Effect: Per sessionWhen Value Changes Take Effect: ImmediateRequired Authorization to Activate: Session userWhen DATE appears as the data type of a column in the commands, it is translated to TIMESTAMP at the time the table definition is stored in the database if the configuration parameter edb_redwood_date is set to TRUE. Thus, a time component will also be stored in the column along with the date.If edb_redwood_date is set to FALSE the column’s data type in a CREATE TABLE or ALTER TABLE command remains as a native PostgreSQL DATE data type and is stored as such in the database. The PostgreSQL DATE data type stores only the date without a time component in the column.Regardless of the setting of edb_redwood_date, when DATE appears as a data type in any other context such as the data type of a variable in an SPL declaration section, or the data type of a formal parameter in an SPL procedure or SPL function, or the return type of an SPL function, it is always internally translated to a TIMESTAMP and thus, can handle a time component if present.3.1.3.11.2 edb_redwood_greatest_leastParameter Type: BooleanDefault Value: trueMinimum Scope of Effect: Per sessionWhen Value Changes Take Effect: ImmediateRequired Authorization to Activate: Session userThe GREATEST function returns the parameter with the greatest value from its list of parameters. The LEAST function returns the parameter with the least value from its list of parameters.When edb_redwood_greatest_least is set to TRUE, the GREATEST and LEAST functions return null when at least one of the parameters is null.When edb_redwood_greatest_least is set to FALSE, null parameters are ignored except when all parameters are null in which case null is returned by the functions.3.1.3.11.3 edb_redwood_raw_namesParameter Type: BooleanDefault Value: falseMinimum Scope of Effect: Per sessionWhen Value Changes Take Effect: ImmediateRequired Authorization to Activate: Session userWhen edb_redwood_raw_names is set to its default value of FALSE, database object names such as table names, column names, trigger names, program names, user names, etc. appear in uppercase letters when viewed from Redwood catalogs (that is, system catalogs prefixed by ALL_, DBA_, or USER_). In addition, quotation marks enclose names that were created with enclosing quotation marks.When edb_redwood_raw_names is set to TRUE, the database object names are displayed exactly as they are stored in the PostgreSQL system catalogs when viewed from the Redwood catalogs. Thus, names created without enclosing quotation marks appear in lowercase as expected in PostgreSQL. Names created with enclosing quotation marks appear exactly as they were created, but without the quotation marks.When connected to the database as reduser, the following tables are created.When viewed from the Redwood catalog, USER_TABLES, with edb_redwood_raw_names set to the default value FALSE, the names appear in uppercase except for the Mixed_Case name, which appears as created and also with enclosing quotation marks.When viewed with edb_redwood_raw_names set to TRUE, the names appear in lowercase except for the Mixed_Case name, which appears as created, but now without the enclosing quotation marks.These names now match the case when viewed from the PostgreSQL pg_tables catalog.3.1.3.11.4 edb_redwood_stringsParameter Type: BooleanDefault Value: falseMinimum Scope of Effect: Per sessionWhen Value Changes Take Effect: ImmediateRequired Authorization to Activate: Session userIf the edb_redwood_strings parameter is set to TRUE, when a string is concatenated with a null variable or null column, the result is the original string. If edb_redwood_strings is set to FALSE, the native PostgreSQL behavior is maintained, which is the concatenation of a string with a null variable or null column gives a null result.The sample application contains a table of employees. This table has a column named comm that is null for most employees. The following query is run with edb_redwood_string set to FALSE. The concatenation of a null column with non-empty strings produces a final result of null, so only employees that have a commission appear in the query result. The output line for all other employees is null.The following is the same query executed when edb_redwood_strings is set to TRUE. Here, the value of a null column is treated as an empty string. The concatenation of an empty string with a non-empty string produces the non-empty string.3.1.3.11.5 edb_stmt_level_txParameter Type: BooleanDefault Value: falseMinimum Scope of Effect: Per sessionWhen Value Changes Take Effect: ImmediateRequired Authorization to Activate: Session userThe term statement level transaction isolation describes the behavior whereby when a runtime error occurs in a SQL command, all the updates on the database caused by that single command are rolled back. For example, if a single UPDATE command successfully updates five rows, but an attempt to update a sixth row results in an exception, the updates to all six rows made by this UPDATE command are rolled back. The effects of prior SQL commands that have not yet been committed or rolled back are pending until a COMMIT or ROLLBACK command is executed.In Advanced Server, if an exception occurs while executing a SQL command, all the updates on the database since the start of the transaction are rolled back. In addition, the transaction is left in an aborted state and either a COMMIT or ROLLBACK command must be issued before another transaction can be started.If edb_stmt_level_tx is set to TRUE, then an exception will not automatically roll back prior uncommitted database updates. If edb_stmt_level_tx is set to FALSE, then an exception will roll back uncommitted database updates.Note: Use edb_stmt_level_tx set to TRUE only when absolutely necessary, as this may cause a negative performance impact.The following example run in PSQL shows that when edb_stmt_level_tx is FALSE, the abort of the second INSERT command also rolls back the first INSERT command. Note that in PSQL, the command \set AUTOCOMMIT off must be issued, otherwise every statement commits automatically defeating the purpose of this demonstration of the effect of edb_stmt_level_tx.In the following example, with edb_stmt_level_tx set to TRUE, the first INSERT command has not been rolled back after the error on the second INSERT command. At this point, the first INSERT command can either be committed or rolled back.A ROLLBACK command could have been issued instead of the COMMIT command in which case the insert of employee number 9001 would have been rolled back as well.3.1.3.11.6 db_dialectParameter Type: EnumDefault Value: postgresMinimum Scope of Effect: Per sessionWhen Value Changes Take Effect: ImmediateRequired Authorization to Activate: Session userIn addition to the native PostgreSQL system catalog, pg_catalog, Advanced Server contains an extended catalog view. This is the sys catalog for the expanded catalog view. The db_dialect parameter controls the order in which these catalogs are searched for name resolution.When set to postgres, the namespace precedence is pg_catalog then sys, giving the PostgreSQL catalog the highest precedence. When set to redwood, the namespace precedence is sys then pg_catalog, giving the expanded catalog views the highest precedence.3.1.3.11.7 default_with_rowidsParameter Type: BooleanDefault Value: falseMinimum Scope of Effect: Per sessionWhen Value Changes Take Effect: ImmediateRequired Authorization to Activate: Session userWhen set to on, CREATE TABLE includes a ROWID column in newly created tables, which can then be referenced in SQL commands.3.1.3.11.8 optimizer_modeParameter Type: EnumDefault Value: chooseMinimum Scope of Effect: Per sessionWhen Value Changes Take Effect: ImmediateRequired Authorization to Activate: Session user
3.1.3.12 Customized OptionsIn previous releases of Advanced Server, the custom_variable_classes was required by those parameters not normally known to be added by add-on modules (such as procedural languages).3.1.3.12.1 custom_variable_classesThe custom_variable_classes parameter is deprecated in Advanced Server 9.2; parameters that previously depended on this parameter no longer require its support.3.1.3.12.2 dbms_alert.max_alertsParameter Type: IntegerDefault Value: 100Range: 0 to 500Minimum Scope of Effect: ClusterWhen Value Changes Take Effect: RestartRequired Authorization to Activate: EPAS service accountSpecifies the maximum number of concurrent alerts allowed on a system using the DBMS_ALERTS package.3.1.3.12.3 dbms_pipe.total_message_bufferParameter Type: IntegerDefault Value: 30 KbRange: 30 Kb to 256 KbMinimum Scope of Effect: ClusterWhen Value Changes Take Effect: RestartRequired Authorization to Activate: EPAS service account3.1.3.12.4 index_advisor.enabledParameter Type: BooleanDefault Value: trueMinimum Scope of Effect: Per sessionWhen Value Changes Take Effect: ImmediateRequired Authorization to Activate: Session userProvides the capability to temporarily suspend Index Advisor in an EDB-PSQL or PSQL session. The Index Advisor plugin, index_advisor, must be loaded in the EDB-PSQL or PSQL session in order to use the index_advisor.enabled configuration parameter.Use the SET command to change the parameter setting to control whether or not Index Advisor generates an alternative query plan as shown by the following example:3.1.3.12.5 edb_sql_protect.enabledParameter Type: BooleanDefault Value: falseMinimum Scope of Effect: ClusterRequired Authorization to Activate: EPAS service accountControls whether or not SQL/Protect is actively monitoring protected roles by analyzing SQL statements issued by those roles and reacting according to the setting of edb_sql_protect.level. When you are ready to begin monitoring with SQL/Protect set this parameter to on.3.1.3.12.6 edb_sql_protect.levelParameter Type: EnumDefault Value: passiveMinimum Scope of Effect: ClusterRequired Authorization to Activate: EPAS service accountThe edb_sql_protect.level configuration parameter can be set to one of the following values to use either learn mode, passive mode, or active mode:
• learn. Tracks the activities of protected roles and records the relations used by the roles. This is used when initially configuring SQL/Protect so the expected behaviors of the protected applications are learned.
• passive. Issues warnings if protected roles are breaking the defined rules, but does not stop any SQL statements from executing. This is the next step after SQL/Protect has learned the expected behavior of the protected roles. This essentially behaves in intrusion detection mode and can be run in production when properly monitored.
• active. Stops all invalid statements for a protected role. This behaves as a SQL firewall preventing dangerous queries from running. This is particularly effective against early penetration testing when the attacker is trying to determine the vulnerability point and the type of database behind the application. Not only does SQL/Protect close those vulnerability points, but it tracks the blocked queries allowing administrators to be alerted before the attacker finds an alternate method of penetrating the system.3.1.3.12.7 edb_sql_protect.max_protected_relationsParameter Type: IntegerDefault Value: 1024Range: 1 to 2147483647Minimum Scope of Effect: ClusterWhen Value Changes Take Effect: RestartRequired Authorization to Activate: EPAS service accountIf the server is started when edb_sql_protect.max_protected_relations is set to a value outside of the valid range (for example, a value of 2,147,483,648), then a warning message is logged in the database server log file:The database server starts successfully, but with edb_sql_protect.max_protected_relations set to the default value of 1024.3.1.3.12.8 edb_sql_protect.max_protected_rolesParameter Type: IntegerRange: 1 to 2147483647Minimum Scope of Effect: ClusterWhen Value Changes Take Effect: RestartRequired Authorization to Activate: EPAS service accountEvery protected role consumes space in shared memory. Please note that the server will reserve space for the number of protected roles times the number of protected relations (edb_sql_protect.max_protected_relations). The space for the maximum possible protected roles is reserved during database server startup.If the database server is started when edb_sql_protect.max_protected_roles is set to a value outside of the valid range (for example, a value of 2,147,483,648), then a warning message is logged in the database server log file:The database server starts successfully, but with edb_sql_protect.max_protected_roles set to the default value of 64.3.1.3.12.9 edb_sql_protect.max_queries_to_saveParameter Type: IntegerDefault Value: 5000Range: 100 to 2147483647Minimum Scope of Effect: ClusterWhen Value Changes Take Effect: RestartRequired Authorization to Activate: EPAS service accountSets the maximum number of offending queries to save in view edb_sql_protect_queries.If the database server is started when edb_sql_protect.max_queries_to_save is set to a value outside of the valid range (for example, a value of 10), then a warning message is logged in the database server log file:The database server starts successfully, but with edb_sql_protect.max_queries_to_save set to the default value of 5000.3.1.3.12.10 edb_wait_states.directoryParameter Type: StringDefault Value: edb_wait_statesRange: n/aMinimum Scope of Effect: ClusterWhen Value Changes Take Effect: RestartRequired Authorization to Activate: EPAS service accountSets the directory path where the EDB wait states log files are stored. The specified path should be a full, absolute path and not a relative path. However, the default setting is edb_wait_states, which makes $PGDATA/edb_wait_states the default directory location. See Section 8.2 for information on EDB wait states.3.1.3.12.11 edb_wait_states.retention_periodParameter Type: IntegerDefault Value: 604800sRange: 86400s to 2147483647sMinimum Scope of Effect: ClusterWhen Value Changes Take Effect: RestartRequired Authorization to Activate: EPAS service accountSets the period of time after which the log files for EDB wait states will be deleted. The default is 604800 seconds, which is 7 days. See Section 8.2 for information on EDB wait states.3.1.3.12.12 edb_wait_states.sampling_intervalParameter Type: IntegerRange: 1s to 2147483647sMinimum Scope of Effect: ClusterRequired Authorization to Activate: EPAS service accountSets the timing interval between two sampling cycles for EDB wait states. The default setting is 1 second. See Section 8.2 for information on EDB wait states.3.1.3.12.13 edbldr.empty_csv_fieldParameter Type: EnumDefault Value: NULLMinimum Scope of Effect: Per sessionWhen Value Changes Take Effect: ImmediateRequired Authorization to Activate: Session userUse the edbldr.empty_csv_field parameter to specify how EDB*Loader will treat an empty string. The valid values for the edbldr.empty_csv_field parameter are:
An empty field is treated as a NULL if it does not contain quotes and as an empty string if it contains quotes.For more information about the edbldr.empty_csv_field parameter in EDB*Loader, see the Database Compatibility for Oracle Developers Tools and Utilities Guide at the EnterpriseDB website:3.1.3.12.14 utl_encode.uudecode_redwoodParameter Type: BooleanDefault Value: falseMinimum Scope of Effect: Per sessionWhen Value Changes Take Effect: ImmediateRequired Authorization to Activate: Session userWhen set to TRUE, Advanced Server’s UTL_ENCODE.UUDECODE function can decode uuencoded data that was created by the Oracle implementation of the UTL_ENCODE.UUENCODE function.When set to the default setting of FALSE, Advanced Server’s UTL_ENCODE.UUDECODE function can decode uuencoded data created by Advanced Server’s UTL_ENCODE.UUENCODE function.3.1.3.12.15 utl_file.umaskParameter Type: StringDefault Value: 0077Range: Octal digits for umask settingsMinimum Scope of Effect: Per sessionWhen Value Changes Take Effect: ImmediateRequired Authorization to Activate: Session userThe utl_file.umask parameter sets the file mode creation mask or simply, the mask, in a manner similar to the Linux umask command. This is for usage only within the Advanced Server UTL_FILE package.Note: The utl_file.umask parameter is not supported on Windows systems.The value specified for utl_file.umask is a 3 or 4-character octal string that would be valid for the Linux umask command. The setting determines the permissions on files created by the UTL_FILE functions and procedures. (Refer to any information source regarding Linux or Unix systems for information on file permissions and the usage of the umask command.)The following shows the results of the default utl_file.umask setting of 0077. Note that all permissions are denied on users belonging to the enterprisedb group as well as all other users. Only user enterprisedb has read and write permissions on the file.
3.1.3.13 Ungrouped3.1.3.13.1 nls_length_semanticsParameter Type: EnumDefault Value: byteMinimum Scope of Effect: Per sessionWhen Value Changes Take Effect: ImmediateRequired Authorization to Activate: SuperuserFor example, the form of the ALTER SESSION command is accepted in Advanced Server without throwing a syntax error, but does not alter the session environment:Note: Since the setting of this parameter has no effect on the server environment, it does not appear in the system view pg_settings.3.1.3.13.2 query_rewrite_enabledParameter Type: EnumDefault Value: falseMinimum Scope of Effect: Per sessionWhen Value Changes Take Effect: ImmediateRequired Authorization to Activate: Session userFor example, the following form of the ALTER SESSION command is accepted in Advanced Server without throwing a syntax error, but does not alter the session environment:Note: Since the setting of this parameter has no effect on the server environment, it does not appear in the system view pg_settings.3.1.3.13.3 query_rewrite_integrityParameter Type: EnumDefault Value: enforcedMinimum Scope of Effect: Per sessionWhen Value Changes Take Effect: ImmediateRequired Authorization to Activate: SuperuserFor example, the following form of the ALTER SESSION command is accepted in Advanced Server without throwing a syntax error, but does not alter the session environment:Note: Since the setting of this parameter has no effect on the server environment, it does not appear in the system view pg_settings.3.1.3.13.4 timed_statisticsParameter Type: BooleanDefault Value: trueMinimum Scope of Effect: Per sessionWhen Value Changes Take Effect: ImmediateRequired Authorization to Activate: Session userNote: When Advanced Server is installed, the postgresql.conf file contains an explicit entry setting timed_statistics to off. If this entry is commented out letting timed_statistics to default, and the configuration file is reloaded, timed statistics collection would be turned on.
3.2 Index AdvisorIndex Advisor works with Advanced Server's query planner by creating hypothetical indexes that the query planner uses to calculate execution costs as if such indexes were available. Index Advisor identifies the indexes by analyzing SQL queries supplied in the workload.
• Invoke the Index Advisor utility program, supplying a text file containing the SQL queries that you wish to analyze; Index Advisor will generate a text file with CREATE INDEX statements for the recommended indexes.Index Advisor will attempt to make indexing recommendations on INSERT, UPDATE, DELETE and SELECT statements. When invoking Index Advisor, you supply the workload in the form of a set of queries (if you are providing the command in an SQL file) or an EXPLAIN statement (if you are specifying the SQL statement at the psql command line). Index Advisor displays the query plan and estimated execution cost for the supplied query, but does not actually execute the query.During the analysis, Index Advisor compares the query execution costs with and without hypothetical indexes. If the execution cost using a hypothetical index is less than the execution cost without it, both plans are reported in the EXPLAIN statement output, metrics that quantify the improvement are calculated, and Index Advisor generates the CREATE INDEX statement needed to create the index.If no hypothetical index can be found that reduces the execution cost, Index Advisor displays only the original query plan output of the EXPLAIN statement.3.2.1 Index Advisor ComponentsThe Index Advisor shared library interacts with the query planner to make indexing recommendations. On Windows, the Advanced Server installer creates the following shared library in the libdir subdirectory of your Advanced Server home directory. For Linux, install the edb-asxx-server-indexadvisor RPM package where xx is the Advanced Server version number.Please note that libraries in the libdir directory can only be loaded by a superuser. A database administrator can allow a non-superuser to use Index Advisor by manually copying the Index Advisor file from the libdir directory into the libdir/plugins directory (under your Advanced Server home directory). Only a trusted non-superuser should be allowed access to the plugin; this is an unsafe practice in a production environment.pg_advise_index is a utility program that reads a user-supplied input file containing SQL queries and produces a text file containing CREATE INDEX statements that can be used to create the indexes recommended by the Index Advisor. The pg_advise_index program is located in the bin subdirectory of the Advanced Server home directory.index_advisor.sql is a script that creates a permanent Index Advisor log table along with a function and view to facilitate reporting of recommendations from the log table. The script is located in the share/contrib subdirectory of the Advanced Server directory.The index_advisor.sql script creates the index_advisor_log table, the show_index_recommendations() function and the index_recommendations view. These database objects must be created in a schema that is accessible by, and included in the search path of the role that will invoke Index Advisor.Index Advisor logs indexing recommendations in the index_advisor_log table. If Index Advisor does not find the index_advisor_log table in the user's search path, Index Advisor will store any indexing recommendations in a temporary table of the same name. The temporary table exists only for the duration of the current session.show_index_recommendations() is a PL/pgSQL function that interprets and displays the recommendations made during a specific Index Advisor session (as identified by its backend process ID).Index Advisor creates the index_recommendations view based on information stored in the index_advisor_log table during a query analysis. The view produces output in the same format as the show_index_recommendations() function, but contains Index Advisor recommendations for all stored sessions, while the result set returned by the show_index_recommendations() function are limited to a specified session.Index Advisor does not require any configuration to generate recommendations that are available only for the duration of the current session; to store the results of multiple sessions, you must create the index_advisor_log table (where Advanced Server will store Index Advisor recommendations). To create the index_advisor_log table , you must run the index_advisor.sql script.When selecting a storage schema for the Index Advisor table, function and view, keep in mind that all users that invoke Index Advisor (and query the result set) must have USAGE privileges on the schema. The schema must be in the search path of all users that are interacting with the Index Advisor.
1. Place the selected schema at the start of your search_path parameter. For example, if your search path is currently:and you want the Index Advisor objects to be created in a schema named advisor, use the command:
2. Run the index_advisor.sql script to create the database objects. If you are running the psql client, you can use the command:
3. Grant privileges on the index_advisor_log table to all Index Advisor users; this step is not necessary if the Index Advisor user is a superuser, or the owner of these database objects.
• Grant SELECT and INSERT privileges on the index_advisor_log table to allow a user to invoke Index Advisor.
• Grant DELETE privileges on the index_advisor_log table to allow the specified user to delete the table contents.
• The following example demonstrates the creation of the Index Advisor database objects in a schema named ia, which will then be accessible to an Index Advisor user with user name ia_user:While using Index Advisor, the specified schema (ia) must be included in ia_user's search_path parameter.
3.2.3 Using Index AdvisorWhen you invoke Index Advisor, you must supply a workload; the workload is either a query (specified at the command line), or a file that contains a set of queries (executed by the pg_advise_index() function). After analyzing the workload, Index Advisor will either store the result set in a temporary table, or in a permanent table. You can review the indexing recommendations generated by Index Advisor and use the CREATE INDEX statements generated by Index Advisor to create the recommended indexes.The following examples assume that superuser enterprisedb is the Index Advisor user, and the Index Advisor database objects have been created in a schema in the search_path of superuser enterprisedb.CREATE TABLE t( a INT, b INT );
INSERT INTO t SELECT s, 99999 - s FROM generate_series(0,99999) AS s;When invoking the pg_advise_index utility, you must include the name of a file that contains the queries that will be executed by pg_advise_index; the queries may be on the same line, or on separate lines, but each query must be terminated by a semicolon. Queries within the file should not begin with the EXPLAIN keyword.The following example shows the contents of a sample workload.sql file:Run the pg_advise_index program as shown in the code sample below:-s is an optional parameter that limits the maximum size of the indexes recommended by Index Advisor. If Index Advisor does not return a result set, -s may be set too low.The information displayed by the pg_advise_index program is logged in the index_advisor_log table. In response to the command shown in the example, Index Advisor writes the following CREATE INDEX statements to the advisory.sql output fileYou can create the recommended indexes at the psql command line with the CREATE INDEX statements in the file, or create the indexes by executing the advisory.sql script.
1. Connect to the server with the edb-psql command line utility, and load the Index Advisor plugin:
2. Use the edb-psql command line to invoke each SQL command that you would like Index Advisor to analyze. Index Advisor stores any recommendations for the queries in the index_advisor_log table. If the index_advisor_log table does not exist in the user's search_path, a temporary table is created with the same name. This temporary table exists only for the duration of the user's session.If you do not preface the statement with the EXPLAIN keyword, Index Advisor will analyze the statement while the statement executes, writing the indexing recommendations to the index_advisor_log table for later review.In the example that follows, the EXPLAIN statement displays the normal query plan, followed by the query plan of the same query, if the query were using the recommended hypothetical index:After loading the Index Advisor plugin, the default value of index_advisor.enabled is on. The Index Advisor plugin must be loaded to use a SET or SHOW command to display the current value of index_advisor.enabled.You can use the index_advisor.enabled parameter to temporarily disable Index Advisor without interrupting the psql session:
• Query the index_advisor_log table.
• Run the show_index_recommendations function.
• Query the index_recommendations view.To review the recommendations of the Index Advisor utility using the show_index_recommendations() function, call the function, specifying the process ID of the session:Where pid is the process ID of the current session. If you do not know the process ID of your current session, passing a value of NULL will also return a result set for the current session.In the example, create index idx_t_a on t(a) is the SQL statement needed to create the index suggested by Index Advisor. Each row in the result set shows:Index Advisor stores indexing recommendations in a table named index_advisor_log. Each row in the index_advisor_log table contains the result of a query where Index Advisor determines it can recommend a hypothetical index to reduce the execution cost of that query.
You can query the index_advisor_log table at the psql command line. The following example shows the index_advisor_log table entries resulting from two Index Advisor sessions. Each session contains two queries, and can be identified (in the table below) by a different backend_pid value. For each session, Index Advisor generated two index recommendations.Index Advisor added the first two rows to the table after analyzing the following two queries executed by the pg_advise_index utility:The value of 3442 in column backend_pid identifies these results as coming from the session with process ID 3442.The value of 1 in column attrs in the first row indicates that the hypothetical index is on the first column of the table (column a of table t).The value of 2 in column attrs in the second row indicates that the hypothetical index is on the second column of the table (column b of table t).The values in the benefit column of the index_advisor_log table are calculated using the following formula:The value of the benefit column for the last row of the index_advisor_log table (shown in the example) is calculated using the query plan for the following SQL statement:You can delete rows from the index_advisor_log table when you no longer have the need to review the results of the queries stored in the row.The index_recommendations view contains the calculated metrics and the CREATE INDEX statements to create the recommended indexes for all sessions whose results are currently in the index_advisor_log table. You can display the results of all stored Index Advisor sessions by querying the index_recommendations view as shown below:Using the example shown in the previous section (Querying the index_advisor_log Table), the index_recommendations view displays the following:3.2.5 LimitationsIndex Advisor ignores any computations found in the WHERE clause. Effectively, the index field in the recommendations will not be any kind of expression; the field will be a simple column name.Restoration of a pg_dump backup file that includes the index_advisor_log table or any tables for which indexing recommendations were made and stored in the index_advisor_log table, may result in "broken links" between the index_advisor_log table and the restored tables referenced by rows in the index_advisor_log table because of changes in object identifiers (OIDs).If it is necessary to display the recommendations made prior to the backup, you can replace the old OIDs in the reloid column of the index_advisor_log table with the new OIDs of the referenced tables using the SQL UPDATE statement:
3.3 SQL ProfilerSQL Profiler helps you locate and optimize poorly running SQL code.
• On-Demand Traces. You can capture SQL traces at any time by manually setting up your parameters and starting the trace.
• Scheduled Traces. For inconvenient times, you can also specify your trace parameters and schedule them to run at some later time.
• Save Traces. Execute your traces and save them for later review.
• Trace Filters. Selectively filter SQL captures by database and by user, or capture every SQL statement sent by all users against all databases.
• Trace Output Analyzer. A graphical table lets you quickly sort and filter queries by duration or statement, and a graphical or text based EXPLAIN plan lays out your query paths and joins.
• Index Advisor Integration. Once you have found your slow queries and optimized them, you can also let the Index Advisor recommend the creation of underlying table indices to further improve performance.Step 1: Install SQL ProfilerSQL Profiler is installed by the Advanced Server installer on Windows or from the edb-asxx-server-sqlprofiler RPM package on Linux where xx is the Advanced Server version number.Step 2: Add the SQL Profiler libraryModify the postgresql.conf parameter file for the instance to include the SQL Profiler library in the shared_preload_libraries configuration parameter.Step 3: Create the functions used by SQL ProfilerThe SQL Profiler installation program places a SQL script (named sql-profiler.sql) in:Use the psql command line interface to run the sql-profiler.sql script in the database specified as the Maintenance Database on the server you wish to profile. If you are using Advanced Server, the default maintenance database is named edb. If you are using a PostgreSQL instance, the default maintenance database is named postgres.The following command uses the psql command line to invoke the sql-profiler.sql script on a Linux system:Step 4: Stop and restart the server for the changes to take effect.To correct this error, you must replace the existing query set with a new query set. First, uninstall SQL Profiler by invoking the uninstall-sql-profiler.sql script, and then reinstall SQL Profiler by invoking the sql-profiler.sql script.
3.4 pgsnmpdpgsnmpd is an SNMP agent that can return hierarchical information about the current state of Advanced Server on a Linux system. pgsnmpd is distributed and installed using the edb-asxx-pgsnmpd RPM package where xx is the Advanced Server version number. The pgsnmpd agent can operate as a stand-alone SNMP agent, as a pass-through sub-agent, or as an AgentX sub-agent.After installing Advanced Server, you will need to update the LD_LIBRARY_PATH variable. Use the command:This command does not persistently alter the value of LD_LIBRARY_PATH. Consult the documentation for your distribution of Linux for information about persistently setting the value of LD_LIBRARY_PATH.The examples that follow demonstrate the simplest usage of pgsnmpd, implementing read only access. pgsnmpd is based on the net-snmp library; for more information about net-snmp, visit:3.4.1 Configuring pgsnmpdThe pgsnmpd configuration file is named snmpd.conf. For information about the directives that you can specify in the configuration file, please review the snmpd.conf man page (man snmpd.conf).You can create the configuration file by hand, or you can use the snmpconf perl script to create the configuration file. The perl script is distributed with net-snmp package.When the configuration file wizard opens, it may prompt you to read in an existing configuration file. Enter none to generate a new configuration file (not based on a previously existing configuration file).snmpconf is a menu-driven wizard. Select menu item 1: snmpd.conf to start the configuration wizard. As you select each top-level menu option displayed by snmpconf, the wizard walks through a series of questions, prompting you for information required to build the configuration file. When you have provided information in each of the category relevant to your system, enter Finished to generate a configuration file named snmpd.conf. Copy the file to:By default, pgsnmpd listens on port 161. If the listener port is already being used by another service, you may receive the following error:agentaddress $host_address:2000The example instructs pgsnmpd to listen on UDP port 2000, where $host_address is the IP address of the server (e.g., 127.0.0.1).3.4.3 Invoking pgsnmpdEnsure that an instance of Advanced Server is up and running (pgsnmpd will connect to this server). Open a command line and assume superuser privileges, before invoking pgsnmpd with a command that takes the following form:POSTGRES_INSTALL_HOME/bin/pgsnmpd -b-c POSTGRES_INSTALL_HOME/share/snmpd.confWhere POSTGRES_INSTALL_HOME specifies the Advanced Server installation directory.Include connection information for your installation of Advanced Server (in the form of a libpq connection string) after the -C option.3.4.4 Viewing pgsnmpd HelpInclude the --help option when invoking the pgsnmpd utility to view other pgsnmpd command line options:-v 2c option instructs the snmpgetnext client to send the request in SNMP version 2c format.-c public specifies the community name.localhost indicates the host machine running the pgsnmpd server..1.3.6.1.4.1.5432.1.4.2.1.1.0 is the identity of the requested object. To see a list of all databases, increment the last digit by one (e.g. .1.1, .1.2, .1.3 etc.).
Advanced Server allows database and security administrators, auditors, and operators to track and analyze database activities using the EDB Audit Logging functionality. EDB Audit Logging generates audit log files, which contains all of the relevant information. The audit logs can be configured to record information such as:The parameters specified in the configuration files, postgresql.conf or postgresql.auto.conf, control the information included in the audit logs.Use the following configuration parameters to control database auditing. See Section 3.1.2 to determine if a change to the configuration parameter takes effect immediately, or if the configuration needs to be reloaded, or if the database server needs to be restarted.Enables or disables database auditing. The values xml or csv will enable database auditing. These values represent the file format in which auditing information will be captured. none will disable database auditing and is also the default.Specifies the directory where the log files will be created. The path of the directory can be relative or absolute to the data folder. The default is the PGDATA/edb_audit directory.Specifies the file name of the audit file where the auditing information will be stored. The default file name will be audit-%Y%m%d_%H%M%S. The escape sequences, %Y, %m etc., will be replaced by the appropriate current values according to the system date and time.Specifies the day of the week on which to rotate the audit files. Valid values are sun, mon, tue, wed, thu, fri, sat, every, and none. To disable rotation, set the value to none. To rotate the file every day, set the edb_audit_rotation_day value to every. To rotate the file on a specific day of the week, set the value to the desired day of the week. every is the default value.Enables auditing of database connection attempts by users. To disable auditing of all connection attempts, set edb_audit_connect to none. To audit all failed connection attempts, set the value to failed, which is the default. To audit all connection attempts, set the value to all.Enables auditing of database disconnections by connected users. To enable auditing of disconnections, set the value to all. To disable, set the value to none, which is the default.This configuration parameter is used to specify auditing of different categories of SQL statements. Various combinations of the following values may be specified: none, dml, insert, update, delete, truncate, select, error, rollback, ddl, create, drop, alter, grant, revoke, and all. The default is ddl and error. See Section 3.5.2 for information regarding the setting of this parameter.Bulk processing logs the resulting statements into both the Advanced Server log file and the EDB Audit log file. However, logging each and every statement in bulk processing is costly. This can be controlled by the edb_log_every_bulk_value configuration parameter. When set to true, each and every statement in bulk processing is logged. When set to false, a log message is recorded once per bulk processing. In addition, the duration is emitted once per bulk processing. Default is false.Specifies whether the audit log information is to be recorded in the directory as given by the edb_audit_directory parameter or to the directory and file managed by the syslog process. Set to file to use the directory specified by edb_audit_directory, which is the default setting. Set to syslog to use the syslog process and its location as configured in the /etc/syslog.conf file. Note: In recent Linux versions, syslog has been replaced by rsyslog and the configuration file is in /etc/rsyslog.conf.The following section describes selection of specific SQL statements for auditing using the edb_audit_statement parameter.The edb_audit_statement permits inclusion of one or more, comma-separated values to control which SQL statements are to be audited. The following is the general format:
• all – Results in the auditing and logging of every statement including any error messages on statements.
• none – Disables all auditing and logging. A value of none overrides any other value included in the list.
• ddl – Results in the auditing of all data definition language (DDL) statements (CREATE, ALTER, and DROP) as well as GRANT and REVOKE data control language (DCL) statements.
• dml – Results in the auditing of all data manipulation language (DML) statements (INSERT, UPDATE, DELETE, and TRUNCATE).
• select – Results in the auditing of SELECT statements.
• rollback – Results in the auditing of ROLLBACK statements.
• error – Results in the logging of all error messages that occur. Unless the error value is included, no error messages are logged regarding any errors that occur on SQL statements related to any of the other preceding parameter values except when all is used.Section 3.5.2.1 describes additional parameter values for selecting particular DDL or DCL statements for auditing.Section 3.5.2.2 describes additional parameter values for selecting particular DML statements for auditing.If an unsupported value is included in the edb_audit_statement parameter, then an error occurs when applying the setting to the database server. See the database server log file for the error such as in the following example where create materialized vw results in the error. (The correct value is create materialized view.)This section describes values that can be included in the edb_audit_statement parameter to audit DDL and DCL statements.
• If the edb_audit_statement parameter includes either ddl or all, then all DDL statements are audited. In addition, the DCL statements GRANT and REVOKE are audited as well.
•
• Specific types of DDL and DCL statements can be chosen for auditing by including a combination of values within the edb_audit_statement parameter.Use the following syntax to specify an edb_audit_statement parameter value for DDL statements:{ create | alter | drop } [ object_type ]object_type is any of the following:If object_type is omitted from the parameter value, then all of the specified command statements (either create, alter, or drop) are audited.Use the following syntax to specify an edb_audit_statement parameter value for DCL statements:The following is an example where edb_audit_connect and edb_audit_statement are set with the following non-default values:Thus, only SQL statements invoked by the CREATE and ALTER commands are audited. Error messages are also included in the audit log.The CREATE and ALTER statements for the adminuser role and auditdb database are audited. The error for the ALTER ROLE adminuser statement is also logged since error is included in the edb_audit_statement parameter.Note that the DROP TABLE department statement is not in the audit log since there is no edb_audit_statement setting that would result in the auditing of successfully processed DROP statements such as ddl, all, or drop.The following is an example where edb_audit_connect and edb_audit_statement are set with the following non-default values:Thus, only SQL statements invoked by the CREATE VIEW , CREATE MATERIALIZED VIEW, CREATE SEQUENCE and GRANT commands are audited.The CREATE VIEW and CREATE MATERIALIZED VIEW statements are audited. Note that the prior CREATE TABLE emp statement is not audited since none of the values create, create table, ddl, nor all are included in the edb_audit_statement parameter.The CREATE SEQUENCE and GRANT statements are audited since those values are included in the edb_audit_statement parameter.This section describes the values that can be included in the edb_audit_statement parameter to audit DML statements.
• If the edb_audit_statement parameter includes either dml or all, then all DML statements are audited.
•
• Specific types of DML statements can be chosen for auditing by including a combination of values within the edb_audit_statement parameter.Use the following syntax to specify an edb_audit_statement parameter value for SQL INSERT, UPDATE, DELETE, or TRUNCATE statements:The following is an example where edb_audit_connect and edb_audit_statement are set with the following non-default values:Thus, only SQL statements invoked by the UPDATE and DELETE commands are audited. All errors are also included in the audit log (even errors not related to the UPDATE and DELETE commands).The UPDATE dept and DELETE FROM emp statements are audited. Note that all of the prior INSERT statements are not audited since none of the values insert, dml, nor all are included in the edb_audit_statement parameter.The SELECT * FROM dept statement is not audited as well since neither select nor all is included in the edb_audit_statement parameter.Since error is specified in the edb_audit_statement parameter, but not the truncate value, the error on the TRUNCATE employee statement is logged in the audit file, but not the successful TRUNCATE emp statement.3.5.3 Enabling Audit Logging
1.
2. Set the file rotation day when the new file will be created by setting the parameter edb_audit_rotation_day to the desired value.
3.
4.
5. To audit DDL, DCL, DML and other statements, set the parameter, edb_audit_statement according to the instructions in Section 3.5.2.The setting of the edb_audit_statement parameter in the configuration file affects the entire database cluster.The type of statements that are audited as controlled by the edb_audit_statement parameter can be further refined according to the database in use as well as the database role running the session:
• The edb_audit_statement parameter can be set as an attribute of a specified database with the ALTER DATABASE dbname SET edb_audit_statement command. This setting overrides the edb_audit_statement parameter in the configuration file for statements executed when connected to database dbname.
• The edb_audit_statement parameter can be set as an attribute of a specified role with the ALTER ROLE rolename SET edb_audit_statement command. This setting overrides the edb_audit_statement parameter in the configuration file as well as any setting assigned to the database by the previously described ALTER DATABASE command when the specified role is running the current session.
• The edb_audit_statement parameter can be set as an attribute of a specified role when using a specified database with the ALTER ROLE rolename IN DATABASE dbname SET edb_audit_statement command. This setting overrides the edb_audit_statement parameter in the configuration file as well as any setting assigned to the database by the previously described ALTER DATABASE command as well as any setting assigned to the role with the ALTER ROLE command without the IN DATABASE clause as previously described.The database cluster is established with edb_audit_statement set to all as shown in its postgresql.conf file:A database and role are established with the following settings for the edb_audit_statement parameter:
•
•
• Case 1: Changes made in database auditdb by role enterprisedb. Only ddl, insert, update, and delete statements are audited:The following audit log file shows entries only for the CREATE TABLE, INSERT INTO audit_tbl, and UPDATE audit_tbl statements. The SELECT * FROM audit_tbl and TRUNCATE audit_tbl statements were not audited.Case 2: Changes made in database edb by role admin. Only select and truncate statements are audited:Continuation of the audit log file now appears as follows. The last two entries representing the second case show only the SELECT * FROM edb_tbl and TRUNCATE edb_tbl statements. The CREATE TABLE edb_tbl and INSERT INTO edb_tbl statements were not audited.Case 3: Changes made in database auditdb by role admin. Only create table, insert, and update statements are audited:Continuation of the audit log file now appears as follows. The next to last two entries representing the third case show only CREATE TABLE audit_tbl_2 and INSERT INTO audit_tbl_2 statements. The SELECT * FROM audit_tbl_2 and TRUNCATE audit_tbl_2 statements were not audited.3.5.4 Audit Log FileThe audit log file can be generated in either CSV or XML format depending upon the setting of the edb_audit configuration parameter. The XML format contains less information than the CSV format.
• Field. Name of the field as shown in the sample table definition in the PostgreSQL documentation as previously referenced.
• XML Element/Attribute. For the XML format, name of the XML element and its attribute (if used), referencing the value. Note: n/a indicates that there is no XML representation for this field.
• Data Type. Data type of the field as given by the PostgreSQL sample table definition.
• Description. Description of the field. For certain fields, no output is generated in the audit log as those fields are not supported by auditing. Those fields are indicated by “Not supported”.The fields with the Description of “Not supported” appear as consecutive commas (,,) in the CSV format.
Statement severity. Values are AUDIT for audited statements and ERROR for any resulting error messages. The non-default audit settings in the postgresql.conf file are as follows:Advanced Server includes an extension that you can use to exclude log file entries that include a user-specified error code from the Advanced Server log files. To filter audit log entries, you must first enable the extension by modifying the postgresql.conf file, adding the following value to the values specified in the shared_preload_libraries parameter:Then, use the edb_filter_log.errcodes parameter to specify any error codes you wish to omit from the log files:Where error_code specifies one or more error codes that you wish to omit from the log file. Provide multiple error codes in a comma-delimited list.For example, if edb_filter_log is enabled, and edb_filter_log.errcode is set to '23505,23502,22012', any log entries that return one of the following SQLSTATE errors:23505 (for violating a unique constraint)23502 (for violating a not-null constraint)22012 (for dividing by zero)Each entry in the log file except for those displaying an error message contains a command tag, which is the SQL command executed for that particular log entry.The command tag is displayed as the command_tag attribute of the event element with values CREATE ROLE, ALTER ROLE, and DROP ROLE in the example.The following is the same example in CSV form. The command tag is the next to last column of each entry. (The last column appears empty as "", which would be the value provided by the edb_audit_tag parameter.)You can use the edb_filter_log.redact_password_commands extension to instruct the server to redact stored passwords from the log file. Note that the module only recognizes the following syntax:{CREATE|ALTER} {USER|ROLE|GROUP} identifier { [WITH] [ENCRYPTED] PASSWORD 'nonempty_string_literal' | IDENTIFIED BY { 'nonempty_string_literal' | bareword } } [ REPLACE { 'nonempty_string_literal' | bareword } ]When such a statement is logged by log_statement, the server will redact the old and new passwords to 'x'. For example, the command:To enable password redaction, you must first enable the extension by modifying the postgresql.conf file, adding the following value to the values specified in the shared_preload_libraries parameter:After modifying the postgresql.conf file, you must restart the server for the changes to take effect.
The Unicode Collation Algorithm (UCA) is a specification (Unicode Technical Report #10) that defines a customizable method of collating and comparing Unicode data. Collation means how data is sorted as with a SELECT … ORDER BY clause. Comparison is relevant for searches that use ranges with less than, greater than, or equal to operators.Note: In addition, another advantage for using ICU collations (the implementation of the Unicode Collation Algorithm) is for performance. Sorting tasks, including B-tree index creation, can complete in less than half the time it takes with a non-ICU collation. The exact performance gain depends on your operating system version, the language of your text data, and other factors.
The official information for the Unicode Collation Algorithm is specified in Unicode Technical Report #10, which can be found on The Unicode Consortium website at:
• Level 1 – Primary Level for Base Characters. The order of basic characters such as letters and digits determines the difference such as A < B.
• Level 2 – Secondary Level for Accents. If there are no primary level differences, then the presence or absence of accents and other such characters determine the order such as a < á.
• Level 3 – Tertiary Level for Case. If there are no primary level or secondary level differences, then a difference in case determines the order such as a < A.
• Level 4 – Quaternary Level for Punctuation. If there are no primary, secondary, or tertiary level differences, then the presence or absence of white space characters, control characters, and punctuation determine the order such as -A < A.
• Level 5 – Identical Level for Tie-Breaking. If there are no primary, secondary, tertiary, or quaternary level differences, then some other difference such as the code point values determines the order.
The Unicode Collation Algorithm is implemented by open source software provided by the International Components for Unicode (ICU). The software is a set of C/C++ and Java libraries.3.6.2.1 Locale CollationsAn ICU short form is a method of specifying collation attributes, which are the properties of a collation. Section 3.6.2.2 provides additional information on collation attributes.The system catalog pg_catalog.pg_icu_collate_names contains a list of the names of the ICU short forms for locales. The ICU short form name is listed in column icu_short_form.3.6.2.2 Collation AttributesWhen creating an ICU collation, the desired characteristics of the collation must be specified. As discussed in Section 3.6.2.1, this can typically be done with an ICU short form for the desired locale. However, if more specific information is required, the specification of the collation properties can be done by using collation attributes.Each collation attribute is represented by an uppercase letter, which are listed in the following bullet points. The possible valid values for each attribute are given by codes shown within the parentheses. Some codes have general meanings for all attributes. X means to set the attribute off. O means to set the attribute on. D means to set the attribute to its default value.
• A – Alternate (N, S, D). Handles treatment of variable characters such as white spaces, punctuation marks, and symbols. When set to non-ignorable (N), differences in variable characters are treated with the same importance as differences in letters. When set to shifted (S), then differences in variable characters are of minor importance (that is, the variable character is ignored when comparing base characters).
• C – Case First (X, L, U, D). Controls whether a lowercase letter sorts before the same uppercase letter (L), or the uppercase letter sorts before the same lowercase letter (U). Off (X) is typically specified when lowercase first (L) is desired.
• E – Case Level (X, O, D). Set in combination with the Strength attribute, the Case Level attribute is used when accents are to be ignored, but not case.
• F – French Collation (X, O, D). When set to on, secondary differences (presence of accents) are sorted from the back of the string as done in the French Canadian locale.
• H – Hiragana Quaternary (X, O, D). Introduces an additional level to distinguish between the Hiragana and Katakana characters for compatibility with the JIS X 4061 collation of Japanese character strings.
• N – Normalization Checking (X, O, D). Controls whether or not text is thoroughly normalized for comparison. Normalization deals with the issue of canonical equivalence of text whereby different code point sequences represent the same character, which then present issues when sorting or comparing such characters. Languages such as Arabic, ancient Greek, Hebrew, Hindi, Thai, or Vietnamese should be used with Normalization Checking set to on.
• S – Strength (1, 2, 3, 4, I, D). Maximum collation level used for comparison. Influences whether accents or case are taken into account when collating or comparing strings. Each number represents a level. A setting of I represents identical strength (that is, level 5).
• T – Variable Top (hexadecimal digits). Applicable only when the Alternate attribute is not set to non-ignorable (N). The hexadecimal digits specify the highest character sequence that is to be considered ignorable. For example, if white space is to be ignorable, but visible variable characters are not to be ignorable, then Variable Top set to 0020 would be specified along with the Alternate attribute set to S and the Strength attribute set to 3. (The space character is hexadecimal 0020. Other non-visible variable characters such as backspace, tab, line feed, carriage return, etc. have values less than 0020. All visible punctuation marks have values greater than 0020.)The following is an example where the ICU short form named LROOT is modified with a number of other collation attribute/value pairs.In the preceding example, the Alternate attribute (A) is set to non-ignorable (N). The Case First attribute (C) is set to off (X). The Case Level attribute (E) is set to off (X). The Normalization attribute (N) is set to on (O). The Strength attribute (S) is set to the tertiary level 3. LROOT is the ICU short form to which these other attributes are applying modifications.
• When creating a new database cluster with the initdb command, the --icu-short-form option can be specified to define the ICU collation to be used by default by all databases in the cluster.
• When creating a new database with the CREATE DATABASE command, the ICU_SHORT_FORM parameter can be specified to define the ICU collation to be used by default in that database.
• In an existing database, the CREATE COLLATION command can be used with the ICU_SHORT_FORM parameter to define an ICU collation to be used under specific circumstances such as when assigned with the COLLATE clause onto selected columns of certain tables or when appended with the COLLATE clause onto an expression such as ORDER BY expr COLLATE "collation_name".3.6.3.1 CREATE COLLATIONTo be able to create a collation, you must have CREATE privilege on the destination schema where the collation is to reside.For information about the general usage of the CREATE COLLATION command, please refer to the PostgreSQL core documentation available at:UTF-8 character encoding of the database is required. Any LOCALE, or LC_COLLATE and LC_CTYPE settings that are accepted with UTF-8 encoding can be used.The locale to be used. Short cut for setting LC_COLLATE and LC_TYPE. If LOCALE is specified, then LC_COLLATE and LC_TYPE must be omitted.The collation to be used. If LC_CTYPE is specified, then LC_COLLATE must also be specified and LOCALE must be omitted.The character classification to be used. If LC_COLLATE is specified, then LC_CTYPE must also be specified and LOCALE must be omitted.The text string specifying the collation attributes and their settings. This typically consists of an ICU short form name, possibly appended with additional collation attribute/value pairs. A list of ICU short form names is available from column icu_short_form in system catalog pg_catalog.pg_icu_collate_names.The following creates a collation using the LROOT ICU short form.3.6.3.2 CREATE DATABASECREATE DATABASE database_nameFor complete information about the general usage, syntax, and parameters of the CREATE DATABASE command, please refer to the PostgreSQL core documentation available at:When using the CREATE DATABASE command to create a database using an ICU collation, the TEMPLATE template0 clause must be specified and the database encoding must be UTF-8.The following is an example of creating a database using the LROOT ICU short form collation, but sorts an uppercase form of a letter before its lowercase counterpart (CU) and treats variable characters as non-ignorable (AN).The following psql command shows the newly created database.The following query shows that the uppercase form of a letter sorts before the lowercase form of the same base letter, and in addition, variable characters are taken into account when sorted as they appear at the beginning of the sort list. (The default behavior for en_US.UTF-8 is to sort the lowercase form of a letter before the uppercase form of the same base letter, and to ignore variable characters.)3.6.3.3 initdbA database cluster can be created with a default ICU collation for all databases in the cluster by using the --icu-short-form option with the initdb command.For complete information about the general usage, syntax, and parameters of the initdb command, please refer to the PostgreSQL core documentation available at:
3.6.4 Using a CollationA newly defined ICU collation can be used anywhere the COLLATION "collation_name" clause can be used in a SQL command such as in the column specifications of the CREATE TABLE command or appended to an expression in the ORDER BY clause of a SELECT command.Collation icu_collate_lowercase forces the lowercase form of a letter to sort before its uppercase counterpart (CL).Collation icu_collate_uppercase forces the uppercase form of a letter to sort before its lowercase counterpart (CU).Collation icu_collate_ignore_punct causes variable characters (white space and punctuation marks) to be ignored during sorting (AS).Collation icu_collate_ignore_white_sp causes white space and other non-visible variable characters to be ignored during sorting, but visible variable characters (punctuation marks) are not ignored (AS, T0020).Note: When creating collations, ICU may generate notice and warning messages when attributes are given to modify the LROOT collation.The following psql command lists the collations.The following query sorts on column c2 using the default collation. Note that variable characters (white space and punctuation marks) with id column values of 9, 10, and 11 are ignored and sort with the letter B.The following query sorts on column c2 using collation icu_collate_lowercase, which forces the lowercase form of a letter to sort before the uppercase form of the same base letter. Also note that the AN attribute forces variable characters to be included in the sort order at the same level when comparing base characters so rows with id values of 9, 10, and 11 appear at the beginning of the sort list before all letters and numbers.The following query sorts on column c2 using collation icu_collate_uppercase, which forces the uppercase form of a letter to sort before the lowercase form of the same base letter.The following query sorts on column c2 using collation icu_collate_ignore_punct, which causes variable characters to be ignored so rows with id values of 9, 10, and 11 sort with the letter B as that is the character immediately following the ignored variable character.The following query sorts on column c2 using collation icu_collate_ignore_white_sp. The AS and T0020 attributes of the collation cause variable characters with code points less than or equal to hexadecimal 0020 to be ignored while variable characters with code points greater than hexadecimal 0020 are included in the sort.The row with id value of 11, which starts with a space character (hexadecimal 0020) sorts with the letter B. The rows with id values of 9 and 10, which start with visible punctuation marks greater than hexadecimal 0020, appear at the beginning of the sort list as these particular variable characters are included in the sort order at the same level when comparing base characters.
When a database cluster is created with the initdb utility program, the default size of each WAL segment file is 16 MB.The Advanced Server initdb utility provides an additional --wal-segsize option to specify the size of WAL segment files when creating a new data base cluster.size is the WAL segment file size in megabytes, which must be a power of 2 (for example, 1, 2, 4, 8, 16, 32, etc.). The minimum permitted value of size is 1 and the maximum permitted value is 1024. The database cluster is to be created in directory.For more information on the initdb utility and its other options, see the PostgreSQL core documentation available at:After the database server is started, the display of the wal_segment_size parameter also confirms the file size:
4 Security
Advanced Server provides protection against SQL injection attacks. A SQL injection attack is an attempt to compromise a database by running SQL statements whose results provide clues to the attacker as to the content, structure, or security of that database.SQL/Protect is a module that allows a database administrator to protect a database from SQL injection attacks. SQL/Protect provides a layer of security in addition to the normal database security policies by examining incoming queries for common SQL injection profiles.
4.1.1 SQL/Protect Overview4.1.1.1 Types of SQL Injection AttacksThere are a number of different techniques used to perpetrate SQL injection attacks. Each technique is characterized by a certain signature. SQL/Protect examines queries for the following signatures:While Advanced Server allows administrators to restrict access to relations (tables, views, etc.), many administrators do not perform this tedious task. SQL/Protect provides a learn mode that tracks the relations a user accesses.When SQL/Protect is switched to either passive or active mode, the incoming queries are checked against the list of learned relations.The most frequent technique used in SQL injection attacks is issuing a tautological WHERE clause condition (that is, using a condition that is always true).A dangerous action taken during SQL injection attacks is the running of unbounded DML statements. These are UPDATE and DELETE statements with no WHERE clause. For example, an attacker may update all users’ passwords to a known value or initiate a denial of service attack by deleting all of the data in a key table.4.1.1.2 Monitoring SQL Injection Attacks4.1.1.2.1 Protected RolesMonitoring for SQL injection attacks involves analyzing SQL statements originating in database sessions where the current user of the session is a protected role. A protected role is an Advanced Server user or group that the database administrator has chosen to monitor using SQL/Protect. (In Advanced Server, users and groups are collectively referred to as roles.)Note: A role with the superuser privilege cannot be made a protected role. If a protected non-superuser role is subsequently altered to become a superuser, certain behaviors are exhibited whenever an attempt is made by that superuser to issue any command:
• The statistic in column superusers of edb_sql_protect_stats is incremented with every command issued by the protected superuser. See Section 4.1.1.2.2 for information on the edb_sql_protect_stats view.4.1.1.2.2 Attack Attempt StatisticsEach usage of a command by a protected role that is considered an attack by SQL/Protect is recorded. Statistics are collected by type of SQL injection attack as discussed in Section 4.1.1.1.These statistics are accessible from view edb_sql_protect_stats that can be easily monitored to identify the start of a potential attack.The columns in edb_sql_protect_stats monitor the following:
• username. Name of the protected role.
• superusers. Number of SQL statements issued when the protected role is a superuser. In effect, any SQL statement issued by a protected superuser increases this statistic. See Section 4.1.1.2.1 for information on protected superusers.
• relations. Number of SQL statements issued referencing relations that were not learned by a protected role. (That is, relations that are not in a role’s protected relations list.)
• commands. Number of DDL statements issued by a protected role.
• tautology. Number of SQL statements issued by a protected role that contained a tautological condition.
• dml. Number of UPDATE and DELETE statements issued by a protected role that did not contain a WHERE clause.Note: SQL/Protect statistics are maintained in memory while the database server is running. When the database server is shut down, the statistics are saved to a binary file named edb_sqlprotect.stat in the data/global subdirectory of the Advanced Server home directory.4.1.1.2.3 Attack Attempt QueriesEach usage of a command by a protected role that is considered an attack by SQL/Protect is recorded in view edb_sql_protect_queries.View edb_sql_protect_queries contains the following columns:
• username. Database user name of the attacker used to log into the database server.
• ip_address. IP address of the machine from which the attack was initiated.
• port. Port number from which the attack originated.
• machine_name. Name of the machine, if known, from which the attack originated.
• date_time. Date and time at which the query was received by the database server. The time is stored to the precision of a minute.
• query. The query string sent by the attacker.The maximum number of offending queries that are saved in edb_sql_protect_queries is controlled by configuration parameter edb_sql_protect.max_queries_to_save.
4.1.2 Configuring SQL/ProtectThe library file (sqlprotect.so on Linux, sqlprotect.dll on Windows) necessary to run SQL/Protect should be installed in the lib subdirectory of your Advanced Server home directory. For Windows, this should be done by the Advanced Server installer. For Linux, install the edb-asxx-server-sqlprotect RPM package where xx is the Advanced Server version number.You will also need the SQL script file sqlprotect.sql located in the share/contrib subdirectory of your Advanced Server home directory.
• The database server configuration file, postgresql.conf, must be modified by adding and enabling configuration parameters used by SQL/Protect.Step 1: Edit the following configuration parameters in the postgresql.conf file located in the data subdirectory of your Advanced Server home directory.
• shared_preload_libraries. Add $libdir/sqlprotect to the list of libraries.
• edb_sql_protect.enabled. Controls whether or not SQL/Protect is actively monitoring protected roles by analyzing SQL statements issued by those roles and reacting according to the setting of edb_sql_protect.level. When you are ready to begin monitoring with SQL/Protect set this parameter to on. If this parameter is omitted, the default is off.
• edb_sql_protect.level. Sets the action taken by SQL/Protect when a SQL statement is issued by a protected role. If this parameter is omitted, the default behavior is passive. Initially, set this parameter to learn. See Section 4.1.2.1.2 for further explanation of this parameter.
• edb_sql_protect.max_protected_roles. Sets the maximum number of roles that can be protected. If this parameter is omitted, the default setting is 64. See Section 3.1.3.12.8 for information on the maximum range of this parameter.
• edb_sql_protect.max_protected_relations. Sets the maximum number of relations that can be protected per role. If this parameter is omitted, the default setting is 1024.See Section 3.1.3.12.7 for information about the maximum range of this parameter.
• edb_sql_protect.max_queries_to_save. Sets the maximum number of offending queries to save in the edb_sql_protect_queries view. If this parameter is omitted, the default setting is 5000. If the number of offending queries reaches the limit, additional queries are not saved in the view, but are accessible in the database server log file. Note: The minimum valid value for this parameter is 100. If a value less than 100 is specified, the database server starts using the default setting of 5000. A warning message is recorded in the database server log file. See Section 3.1.3.12.9 for information on the maximum range of this parameter.The following example shows the settings of these parameters in the postgresql.conf file:Step 2: Restart the database server after you have modified the postgresql.conf file.On Linux: Invoke the Advanced Server service script with the restart option:Step 3: For each database that you want to protect from SQL injection attacks, connect to the database as a superuser (either enterprisedb or postgres, depending upon your installation options) and run the script sqlprotect.sql located in the share/contrib subdirectory of your Advanced Server home directory. The script creates the SQL/Protect database objects in a schema named sqlprotect.4.1.2.1 Selecting Roles to Protect4.1.2.1.1 Setting the Protected Roles ListFor each database that you want to protect, you must determine the roles you want to monitor and then add those roles to the protected roles list of that database.Step 1: Connect as a superuser to a database that you wish to protect using either psql or Postgres Enterprise Manager Client.Step 2: Since the SQL/Protect tables, functions, and views are built under the sqlprotect schema, use the SET search_path command to include the sqlprotect schema in your search path. This eliminates the need to schema-qualify any operation or query involving SQL/Protect database objects.Step 3: Each role that you wish to protect must be added to the protected roles list. This list is maintained in the table edb_sql_protect.4.1.2.1.2 Setting the Protection LevelConfiguration parameter edb_sql_protect.level sets the protection level, which defines the behavior of SQL/Protect when a protected role issues a SQL statement. The defined behavior applies to all roles in the protected roles lists of all databases configured with SQL/Protect in the database server.In the postgresql.conf file the edb_sql_protect.level configuration parameter can be set to one of the following values to use either learn mode, passive mode, or active mode:
• learn. Tracks the activities of protected roles and records the relations used by the roles. This is used when initially configuring SQL/Protect so the expected behaviors of the protected applications are learned.
• passive. Issues warnings if protected roles are breaking the defined rules, but does not stop any SQL statements from executing. This is the next step after SQL/Protect has learned the expected behavior of the protected roles. This essentially behaves in intrusion detection mode and can be run in production when properly monitored.
• active. Stops all invalid statements for a protected role. This behaves as a SQL firewall preventing dangerous queries from running. This is particularly effective against early penetration testing when the attacker is trying to determine the vulnerability point and the type of database behind the application. Not only does SQL/Protect close those vulnerability points, but it tracks the blocked queries allowing administrators to be alerted before the attacker finds an alternate method of penetrating the system.If the edb_sql_protect.level parameter is not set or is omitted from the configuration file, the default behavior of SQL/Protect is passive.4.1.2.2 Monitoring Protected RolesWith a new SQL/Protect installation, the first step is to determine the relations that protected roles should be permitted to access during normal operation. Learn mode allows a role to run applications during which time SQL/Protect is recording the relations that are accessed. These are added to the role’s protected relations list stored in table edb_sql_protect_rel.However, if a role attempts to access a relation that is not in its protected relations list, a WARNING or ERROR severity level message is returned by SQL/Protect. The role’s attempted action on the relation may or may not be carried out depending upon whether the mode is passive or active.4.1.2.2.1 Learn ModeStep 1: To activate SQL/Protect in learn mode, set the following parameters in the postgresql.conf file as shown below:Step 2: Reload the postgresql.conf file.Note: For an alternative method of reloading the configuration file, use the pg_reload_conf function. Be sure you are connected to a database as a superuser and execute function pg_reload_conf as shown by the following example:Step 3: Allow the protected roles to run their applications.SQL/Protect generates a NOTICE severity level message indicating the relation has been added to the role’s protected relations list.Step 4: As a protected role runs applications, the SQL/Protect tables can be queried to observe the addition of relations to the role’s protected relations list.Connect as a superuser to the database you are monitoring and set the search path to include the sqlprotect schema.Query the edb_sql_protect_rel table to see the relations added to the protected relations list:The view list_protected_rels is provided that gives more comprehensive information along with the object names instead of the OIDs.4.1.2.2.2 Passive ModeStep 1: To activate SQL/Protect in passive mode, set the following parameters in the postgresql.conf file as shown below:Now SQL/Protect is in passive mode. For relations that have been learned such as the dept and emp tables of the prior examples, SQL statements are permitted with no special notification to the client by SQL/Protect as shown by the following queries run by user appuser:SQL/Protect does not prevent any SQL statement from executing, but issues a message of WARNING severity level for SQL statements executed against relations that were not learned, or for SQL statements that contain a prohibited signature as shown in the following example:Step 3: Monitor the statistics for suspicious activity.By querying the view edb_sql_protect_stats, you can see the number of times SQL statements were executed that referenced relations that were not in a role’s protected relations list, or contained SQL injection attack signatures. See Section 4.1.1.2.2 for more information on view edb_sql_protect_stats.The following is a query on edb_sql_protect_stats:Step 4: View information on specific attacks.By querying the view edb_sql_protect_queries, you can see the SQL statements that were executed that referenced relations that were not in a role’s protected relations list, or contained SQL injection attack signatures. See Section 4.1.1.2.3 for more information on view edb_sql_protect_queries.The following is a query on edb_sql_protect_queries:Note: The ip_address and port columns do not return any information if the attack originated on the same host as the database server using the Unix-domain socket (that is, pg_hba.conf connection type local).4.1.2.2.3 Active ModeIn active mode, disallowed SQL statements are prevented from executing. Also, the message issued by SQL/Protect has a higher severity level of ERROR instead of WARNING.Step 1: To activate SQL/Protect in active mode, set the following parameters in the postgresql.conf file as shown below:The following example illustrates SQL statements similar to those given in the examples of Step 2 in Section 4.1.2.2.2, but executed by user appuser when edb_sql_protect.level is set to active:The following is a query on edb_sql_protect_queries:
You must be connected as a superuser to perform these operations and have included schema sqlprotect in your search path.Note: The variation of the function using the OID is useful if you remove the role using the DROP ROLE or DROP USER SQL statement before removing the role from the protected roles list. If a query on a SQL/Protect relation returns a value such as unknown (OID=16458) for the user name, use the unprotect_role(roleoid) form of the function to remove the entry for the deleted role from the protected roles list.The statistics for a role that has been removed are not deleted until you use the drop_stats function as described in Section 4.1.3.5.The offending queries for a role that has been removed are not deleted until you use the drop_queries function as described in Section 4.1.3.6.The following is an example of the unprotect_role function:Change the Boolean value for the column in edb_sql_protect corresponding to the type of SQL injection attack for which protection of a role is to be disabled or enabled.Be sure to qualify the following columns in your WHERE clause of the statement that updates edb_sql_protect:
• dbid. OID of the database for which you are making the change
• roleid. OID of the role for which you are changing the Boolean settingsFor example, to allow a given role to issue utility commands, update the allow_utility_cmds column as follows:You can verify the change was made by querying edb_sql_protect or list_protected_users. In the following query note that column allow_utility_cmds now contains t.Delete its entry from the edb_sql_protect_rel table using any of the following functions:If the relation given by relname is not in your current search path, specify the relation’s schema using the second function format.The following example illustrates the removal of the public.emp relation from the protected relations list of the role appuser.SQL/Protect will now issue a warning or completely block access (depending upon the setting of edb_sql_protect.level) whenever the role attempts to utilize that relation.4.1.3.5 Deleting StatisticsYou can delete statistics from view edb_sql_protect_stats using either of the two following functions:Note: The variation of the function using the OID is useful if you remove the role using the DROP ROLE or DROP USER SQL statement before deleting the role’s statistics using drop_stats('rolename'). If a query on edb_sql_protect_stats returns a value such as unknown (OID=16458) for the user name, use the drop_stats(roleoid) form of the function to remove the deleted role’s statistics from edb_sql_protect_stats.The following is an example of the drop_stats function:The following is an example of using the drop_stats(roleoid) form of the function when a role is dropped before deleting its statistics:4.1.3.6 Deleting Offending QueriesYou can delete offending queries from view edb_sql_protect_queries using either of the two following functions:Note: The variation of the function using the OID is useful if you remove the role using the DROP ROLE or DROP USER SQL statement before deleting the role’s offending queries using drop_queries('rolename'). If a query on edb_sql_protect_queries returns a value such as unknown (OID=16454) for the user name, use the drop_queries(roleoid) form of the function to remove the deleted role’s offending queries from edb_sql_protect_queries.The following is an example of the drop_queries function:The following is an example of using the drop_queries(roleoid) form of the function when a role is dropped before deleting its queries:The entry for edb_sql_protect.enabled should look like the following:The entry for edb_sql_protect.enabled should look like the following:
Note: This section is applicable if your backup and restore procedures result in the re-creation of database objects in the new database with new OIDs such as is the case when using the pg_dump backup program.SQL/Protect uses two tables, edb_sql_protect and edb_sql_protect_rel, to store information on database objects such as databases, roles, and relations. References to these database objects in these tables are done using the objects’ OIDs, and not the objects’ text names. The OID is a numeric data type used by Advanced Server to uniquely identify each database object.When a database object is created, Advanced Server assigns an OID to the object, which is then used whenever a reference is needed to the object in the database catalogs. If you create the same database object in two databases, such as a table with the same CREATE TABLE statement, each table is assigned a different OID in each database.In a backup and restore operation that results in the re-creation of the backed up database objects, the restored objects end up with different OIDs in the new database than what they were assigned in the original database. As a result, the OIDs referencing databases, roles, and relations stored in the edb_sql_protect and edb_sql_protect_rel tables are no longer valid when these tables are simply dumped to a backup file and then restored to a new database.The following sections describe two functions, export_sqlprotect and import_sqlprotect, that are used specifically for backing up and restoring SQL/Protect tables in order to ensure the OIDs in the SQL/Protect tables reference the correct database objects after the SQL/Protect tables are restored.4.1.4.2 Backing Up the DatabaseStep 1: Create a backup file using pg_dump.The following example shows a plain-text backup file named /tmp/edb.dmp created from database edb using the pg_dump utility program:Step 2: Connect to the database as a superuser and export the SQL/Protect data using the export_sqlprotect('sqlprotect_file') function where sqlprotect_file is the fully qualified path to a file where the SQL/Protect data is to be saved.The enterprisedb operating system account (postgres if you installed Advanced Server in PostgreSQL compatibility mode) must have read and write access to the directory specified in sqlprotect_file.4.1.4.3 Restoring From the Backup FilesStep 1: Restore the backup file to the new database.The following example uses the psql utility program to restore the plain-text backup file /tmp/edb.dmp to a newly created database named newdb:Step 2: Connect to the new database as a superuser and delete all rows from the edb_sql_protect_rel table.This step removes any existing rows in the edb_sql_protect_rel table that were backed up from the original database. These rows do not contain the correct OIDs relative to the database where the backup file has been restored.Step 3: Delete all rows from the edb_sql_protect table.This step removes any existing rows in the edb_sql_protect table that were backed up from the original database. These rows do not contain the correct OIDs relative to the database where the backup file has been restored.Step 4: Delete any statistics that may exist for the database.For each row that appears in the preceding query, use the drop_stats function specifying the role name of the entry.For example, if a row appeared with appuser in the username column, issue the following command to remove it:Step 5: Delete any offending queries that may exist for the database.For each row that appears in the preceding query, use the drop_queries function specifying the role name of the entry.For example, if a row appeared with appuser in the username column, issue the following command to remove it:Step 6: Make sure the role names that were protected by SQL/Protect in the original database exist in the database server where the new database resides.Step 7: Run the function import_sqlprotect('sqlprotect_file') where sqlprotect_file is the fully qualified path to the file you created in Step 2 of Section 4.1.4.2.Tables edb_sql_protect and edb_sql_protect_rel are now populated with entries containing the OIDs of the database objects as assigned in the new database. The statistics view edb_sql_protect_stats also now displays the statistics imported from the original database.
•
• Also note that in table edb_sql_protect_rel, the values in the relid column match the values in the oid column of pg_class for relations dept and appuser_tab.Step 8: Verify that the SQL/Protect configuration parameters are set as desired in the postgresql.conf file for the database server running the new database. Restart the database server or reload the configuration file as appropriate.
Virtual Private Database is a type of fine-grained access control using security policies. Fine-grained access control in Virtual Private Database means that access to data can be controlled down to specific rows as defined by the security policy.The rules that encode a security policy are defined in a policy function, which is an SPL function with certain input parameters and return value. The security policy is the named association of the policy function to a particular database object, typically a table.Note: In Advanced Server, the policy function can be written in any language supported by Advanced Server such as SQL and PL/pgSQL in addition to SPL.Note: The database objects currently supported by Advanced Server Virtual Private Database are tables. Policies cannot be applied to views or synonyms.
• Provides a fine-grained level of security. Database object level privileges given by the GRANT command determine access privileges to the entire instance of a database object, while Virtual Private Database provides access control for the individual rows of a database object instance.
• A different security policy can be applied depending upon the type of SQL command (INSERT, UPDATE, DELETE, or SELECT).Note: The only way security policies can be circumvented is if the EXEMPT ACCESS POLICY system privilege has been granted to a user. The EXEMPT ACCESS POLICY privilege should be granted with extreme care as a user with this privilege is exempted from all policies in the database.The DBMS_RLS package provides procedures to create policies, remove policies, enable policies, and disable policies.
4.3 sslutilssslutils is a Postgres extension that provides SSL certificate generation functions to Advanced Server for use by the EDB Postgres Enterprise Manager server. sslutils is installed by using the edb-asxx-server-sslutils RPM package where xx is the Advanced Server version number.The sslutils package provides the functions shown in the following sections.In these sections, each parameter in the function’s parameter list is described by parameter n under the Parameters subsection where n refers to the nth ordinal position (for example, first, second, third, etc.) within the function’s parameter list.4.3.1 openssl_rsa_generate_keyThe openssl_rsa_generate_key function generates an RSA private key. The function signature is:4.3.2 openssl_rsa_key_to_csrThe openssl_rsa_key_to_csr function generates a certificate signing request (CSR). The signature is:The common name (e.g., agentN) of the agent that will use the signing request.4.3.3 openssl_csr_to_crtThe openssl_csr_to_crt function generates a self-signed certificate or a certificate authority certificate. The signature is:The path to the certificate authority certificate, or NULL if generating a certificate authority certificate.The path to the certificate authority’s private key or (if argument 2 is NULL) the path to a private key.4.3.4 openssl_rsa_generate_crlThe openssl_rsa_generate_crl function generates a default certificate revocation list. The signature is:
4.4 Data RedactionData redaction is a technique that limits sensitive data exposure by dynamically changing data as it is displayed for certain users.For example, a social security number (SSN) is stored as 021-23-9567. Privileged users can see the full SSN, while other users only see the last four digits xxx-xx-9567.So for example, for the SSN field, the redaction function would return xxx-xx-9567 for an input SSN of 021-23-9567.For a salary field, a redaction function would always return $0.00 regardless of the input salary value.These functions are then incorporated into a redaction policy by using the CREATE REDACTION POLICY command. This command specifies the table on which the policy applies, the table columns to be affected by the specified redaction functions, expressions to determine which session users are to be affected, and other options.The edb_data_redaction parameter in the postgresql.conf file then determines whether or not data redaction is to be applied.If the parameter is disabled by having it set to FALSE during the session, then the following occurs:A redaction policy can be changed by using the ALTER REDACTION POLICY command, or it can be eliminated using the DELETE REDACTION POLICY command.
4.4.1 CREATE REDACTION POLICYCREATE REDACTION POLICY defines a new data redaction policy for a table.[ FOR ( expression ) ]where redaction_option is:The CREATE REDACTION POLICY command defines a new column-level security policy for a table by redacting column data using redaction function. A newly created data redaction policy will be enabled by default. The policy can be disabled using ALTER REDACTION POLICY ... DISABLE.This optional form adds a column of the table to the data redaction policy. The USING specifies a redaction function expression. Multiple ADD [ COLUMN ] form can be used, if you want to add multiple columns of the table to the data redaction policy being created. The optional WITH OPTIONS ( ... ) clause specifies a scope and/or an exception to the data redaction policy to be applied. If the scope and/or exception are not specified, the default values for scope and exception will be query and none respectively.The scope identified the query part where redaction to be applied for the column. Scope value could be query, top_tlist or top_tlist_or_error. If the scope is query then, the redaction applied on the column irrespective of where it appears in the query. If the scope is top_tlist then, the redaction applied on the column only when it appears in the query’s top target list. If the scope is top_tlist_or_error the behavior will be same as the top_tlist, but throws an errors when the column appears anywhere else in the query.The exception identified the query part where redaction to be exempted. Exception value could be none, equal or leakproof. If exception is none then there is no exemption. If exception is equal, then the column is not redacted when used in an equality test. If exception is leakproof, the column will is not redacted when a leakproof function is applied to it.Below is an example of how this feature can be used in production environments. Create the components for a data redaction policy on employees table:Now create a data redaction policy on employees to redact column ssn which should be accessible in equality condition and salary with default scope and exception. The redaction policy will be exempt for the hr user.The visible data for the hr user will be:The visible data for the normal user alice will be:
2. If the superuser or the table owner has created any materialized view on the table and has provided the access rights GRANT SELECT on the table and the materialized view to any non-superuser, then the non-superuser will be able to access the non-redacted data through the materialized view.
3. CREATE REDACTION POLICY is an EnterpriseDB extension.
4.4.2 ALTER REDACTION POLICYALTER REDACTION POLICY changes the definition of data redaction policy for a table.[ WITH OPTIONS ( [ redaction_option ][, redaction_option ] )MODIFY [ COLUMN ] column_name[ USING funcname_clause ][ WITH OPTIONS ( [ redaction_option ][, redaction_option ] )DROP [ COLUMN ] column_namewhere redaction_option is:ALTER REDACTION POLICY changes the definition of an existing data redaction policy.To use ALTER REDACTION POLICY, you must own the table that the data redaction policy applies to.This form adds a column of the table to the existing redaction policy. See CREATE REDACTION POLICY for the details.This form modifies the data redaction policy on the column of the table. You can update the redaction function clause and/or the redaction options for the column. The USING clause specifies the redaction function expression to be updated and the WITH OPTIONS ( ... ) clause specifies the scope and/or the exception. For more details on the redaction function clause, the redaction scope and the redaction exception, see CREATE REDACTION POLICY.The scope identified the query part where redaction to be applied for the column. See CREATE REDACTION POLICY for the details.The exception identified the query part where redaction to be exempted. See CREATE REDACTION POLICY for the details.And to update data redaction function for the column ssn in the same policy:ALTER REDACTION POLICY is an EnterpriseDB extension.
4.4.3 DROP REDACTION POLICYDROP REDACTION POLICY removes a data redaction policy from a table.DROP REDACTION POLICY removes the specified data redaction policy from the table.To use DROP REDACTION POLICY, you must own the table that the redaction policy applies to.DROP REDACTION POLICY is an EnterpriseDB extension.
4.4.4 System Catalogs4.4.4.1 edb_redaction_columnThe catalog edb_redaction_column stores information of data redaction policy attached to the columns of the table.
Note: The described column will be redacted if the redaction policy edb_redaction_column.rdpolicyid on the table is enabled and the redaction policy expression edb_redaction_policy.rdexpr evaluates to true.4.4.4.2 edb_redaction_policyThe catalog edb_redaction_policy stores information of the redaction policies for tables.
Note: The data redaction policy applies for the table if it is enabled and the expression ever evaluated true.
EDB Resource Manager is an Advanced Server feature that provides the capability to control the usage of operating system resources used by Advanced Server processes.
• The basic component of EDB Resource Manager is a resource group. A resource group is a named, global group, available to all databases in an Advanced Server instance, on which various resource usage limits can be defined. Advanced Server processes that are assigned as members of a given resource group are then controlled by EDB Resource Manager so that the aggregate resource usage of all processes in the group is kept near the limits defined on the group.
• The desired, aggregate consumption level of all processes belonging to a resource group is defined by resource type parameters. There are different resource type parameters for the different types of system resources currently supported by EDB Resource Manager.
• The edb_max_resource_groups configuration parameter sets the maximum number of resource groups that can be active simultaneously with running processes. The default setting is 16 resource groups. Changes to this parameter take effect on database server restart.
• Use the SET edb_resource_group TO group_name command to assign the current process to a specified resource group. Use the RESET edb_resource_group command or SET edb_resource_group TO DEFAULT to remove the current process from a resource group.
• A default resource group can be assigned to a role using the ALTER ROLE ... SET command, or to a database by the ALTER DATABASE ... SET command. The entire database server instance can be assigned a default resource group by setting the parameter in the postgresql.conf file.
• In order to include resource groups in a backup file of the database server instance, use the pg_dumpall backup utility with default settings (That is, do not specify any of the --globals-only, --roles-only, or --tablespaces-only options.)
5.1.1 CREATE RESOURCE GROUPUse the CREATE RESOURCE GROUP command to create a new resource group.The CREATE RESOURCE GROUP command creates a resource group with the specified name. Resource limits can then be defined on the group with the ALTER RESOURCE GROUP command. The resource group is accessible from all databases in the Advanced Server instance.To use the CREATE RESOURCE GROUP command you must have superuser privileges.The following example results in the creation of three resource groups named resgrp_a, resgrp_b, and resgrp_c.The following query shows the entries for the resource groups in the edb_resource_group catalog.5.1.2 ALTER RESOURCE GROUPUse the ALTER RESOURCE GROUP command to change the attributes of an existing resource group. The command syntax comes in three forms.The first form with the RENAME TO clause assigns a new name to an existing resource group.The second form with the SET resource_type TO clause either assigns the specified literal value to a resource type, or resets the resource type when DEFAULT is specified. Resetting or setting a resource type to DEFAULT means that the resource group has no defined limit on that resource type.The third form with the RESET resource_type clause resets the resource type for the group as described previously.To use the ALTER RESOURCE GROUP command you must have superuser privileges.value | DEFAULTWhen value is specified, the literal value to be assigned to resource_type. When DEFAULT is specified, the assignment of resource_type is reset for the resource group.The following are examples of the ALTER RESOURCE GROUP command.The following query shows the results of the ALTER RESOURCE GROUP commands to the entries in the edb_resource_group catalog.5.1.3 DROP RESOURCE GROUPUse the DROP RESOURCE GROUP command to remove a resource group.The DROP RESOURCE GROUP command removes a resource group with the specified name.To use the DROP RESOURCE GROUP command you must have superuser privileges.Use the SET edb_resource_group TO group_name command to assign the current process to a specified resource group as shown by the following.A default resource group can be assigned to a role using the ALTER ROLE ... SET command. For more information about the ALTER ROLE command, please refer to the PostgreSQL core documentation available at:A default resource group can be assigned to a database by the ALTER DATABASE ... SET command. For more information about the ALTER DATABASE command, please refer to the PostgreSQL core documentation available at:The entire database server instance can be assigned a default resource group by setting the edb_resource_group configuration parameter in the postgresql.conf file as shown by the following.A change to edb_resource_group in the postgresql.conf file requires a configuration file reload before it takes effect on the database server instance.Set edb_resource_group to DEFAULT or use RESET edb_resource_group to remove the current process from a resource group as shown by the following.For removing a default resource group from a role, use the ALTER ROLE ... RESET form of the ALTER ROLE command.For removing a default resource group from a database, use the ALTER DATABASE ... RESET form of the ALTER DATABASE command.For removing a default resource group from the database server instance, set the edb_resource_group configuration parameter to an empty string in the postgresql.conf file and reload the configuration file.After resource groups have been created, the number of processes actively using these resource groups can be obtained from the view edb_all_resource_groups.The columns in edb_all_resource_groups are the following:
• group_name. Name of the resource group.
• active_processes. Number of active processes in the resource group.
• cpu_rate_limit. The value of the CPU rate limit resource type assigned to the resource group.
• per_process_cpu_rate_limit. The CPU rate limit applicable to an individual, active process in the resource group.
• dirty_rate_limit. The value of the dirty rate limit resource type assigned to the resource group.
• per_process_dirty_rate_limit. The dirty rate limit applicable to an individual, active process in the resource group.Note: Columns per_process_cpu_rate_limit and per_process_dirty_rate_limit do not show the actual resource consumption used by the processes, but indicate how EDB Resource Manager sets the resource limit for an individual process based upon the number of active processes in the resource group.The following shows edb_all_resource_groups when resource group resgrp_a contains no active processes, resource group resgrp_b contains two active processes, and resource group resgrp_c contains one active process.In the edb_all_resource_groups view, note that the per_process_cpu_rate_limit and per_process_dirty_rate_limit values are roughly the corresponding CPU rate limit and dirty rate limit divided by the number of active processes.
CPU usage of a resource group is controlled by setting the cpu_rate_limit resource type parameter.Set the cpu_rate_limit parameter to the fraction of CPU time over wall-clock time to which the combined, simultaneous CPU usage of all processes in the group should not exceed. Thus, the value assigned to cpu_rate_limit should typically be less than or equal to 1.The valid range of the cpu_rate_limit parameter is 0 to 1.67772e+07. A setting of 0 means no CPU rate limit has been set for the resource group.When multiplied by 100, the cpu_rate_limit can also be interpreted as the CPU usage percentage for a resource group.EDB Resource Manager utilizes CPU throttling to keep the aggregate CPU usage of all processes in the group within the limit specified by the cpu_rate_limit parameter. A process in the group may be interrupted and put into sleep mode for a short interval of time to maintain the defined limit. When and how such interruptions occur is defined by a proprietary algorithm used by EDB Resource Manager.The ALTER RESOURCE GROUP command with the SET cpu_rate_limit clause is used to set the CPU rate limit for a resource group.In the following example the CPU usage limit is set to 50% for resgrp_a, 40% for resgrp_b and 30% for resgrp_c. This means that the combined CPU usage of all processes assigned to resgrp_a is maintained at approximately 50%. Similarly, for all processes in resgrp_b, the combined CPU usage is kept to approximately 40%, etc.The following query shows the settings of cpu_rate_limit in the catalog.Changing the cpu_rate_limit of a resource group not only affects new processes that are assigned to the group, but any currently running processes that are members of the group are immediately affected by the change. That is, if the cpu_rate_limit is changed from .5 to .3, currently running processes in the group would be throttled downward so that the aggregate group CPU usage would be near 30% instead of 50%.To illustrate the effect of setting the CPU rate limit for resource groups, the following examples use a CPU-intensive calculation of 20000 factorial (multiplication of 20000 * 19999 * 19998, etc.) performed by the query SELECT 20000!; run in the psql command line utility.The following shows that the current process is set to use resource group resgrp_b. The factorial calculation is then started.In a second session, the Linux top command is used to display the CPU usage as shown under the %CPU column. The following is a snapshot at an arbitrary point in time as the top command output periodically changes.The psql session performing the factorial calculation is shown by the row where edb-postgres appears under the COMMAND column. The CPU usage of the session shown under the %CPU column shows 39.9, which is close to the 40% CPU limit set for resource group resgrp_b.By contrast, if the psql session is removed from the resource group and the factorial calculation is performed again, the CPU usage is much higher.Under the %CPU column for edb-postgres, the CPU usage is now 93.6, which is significantly higher than the 39.9 when the process was part of the resource group.The factorial calculation is performed simultaneously in two separate psql sessions, each of which has been added to resource group resgrp_b that has cpu_rate_limit set to .4 (CPU usage of 40%).There are now two processes named edb-postgres with %CPU values of 19.9 and 19.6, whose sum is close to the 40% CPU usage set for resource group resgrp_b.The following command sequence displays the sum of all edb-postgres processes sampled over half second time intervals. This shows how the total CPU usage of the processes in the resource group changes over time as EDB Resource Manager throttles the processes to keep the total resource group CPU usage near 40%.In this example, two additional psql sessions are used along with the previous two sessions. The third and fourth sessions perform the same factorial calculation within resource group resgrp_c with a cpu_rate_limit of .3 (30% CPU usage).The top command displays the following output.The two resource groups in use have CPU usage limits of 40% and 30%. The sum of the %CPU column for the first two edb-postgres processes is 39.5 (approximately 40%, which is the limit for resgrp_b) and the sum of the %CPU column for the third and fourth edb-postgres processes is 31.6 (approximately 30%, which is the limit for resgrp_c).By contrast, if three sessions are processing where two sessions remain in resgrp_b, but the third session does not belong to any resource group, the top command shows the following output.The second and third edb-postgres processes belonging to the resource group where the CPU usage is limited to 40%, have a total CPU usage of 37.8. However, the first edb-postgres process has a 58.6% CPU usage as it is not within a resource group, and basically utilizes the remaining, available CPU resources on the system.
Writing to shared buffers is controlled by setting the dirty_rate_limit resource type parameter.Set the dirty_rate_limit parameter to the number of kilobytes per second for the combined rate at which all the processes in the group should write to or “dirty” the shared buffers. An example setting would be 3072 kilobytes per seconds.The valid range of the dirty_rate_limit parameter is 0 to 1.67772e+07. A setting of 0 means no dirty rate limit has been set for the resource group.EDB Resource Manager utilizes dirty buffer throttling to keep the aggregate, shared buffer writing rate of all processes in the group near the limit specified by the dirty_rate_limit parameter. A process in the group may be interrupted and put into sleep mode for a short interval of time to maintain the defined limit. When and how such interruptions occur is defined by a proprietary algorithm used by EDB Resource Manager.The ALTER RESOURCE GROUP command with the SET dirty_rate_limit clause is used to set the dirty rate limit for a resource group.In the following example the dirty rate limit is set to 12288 kilobytes per second for resgrp_a, 6144 kilobytes per second for resgrp_b and 3072 kilobytes per second for resgrp_c. This means that the combined writing rate to the shared buffer of all processes assigned to resgrp_a is maintained at approximately 12288 kilobytes per second. Similarly, for all processes in resgrp_b, the combined writing rate to the shared buffer is kept to approximately 6144 kilobytes per second, etc.The following query shows the settings of dirty_rate_limit in the catalog.Changing the dirty_rate_limit of a resource group not only affects new processes that are assigned to the group, but any currently running processes that are members of the group are immediately affected by the change. That is, if the dirty_rate_limit is changed from 12288 to 3072, currently running processes in the group would be throttled downward so that the aggregate group dirty rate would be near 3072 kilobytes per second instead of 12288 kilobytes per second.The FILLFACTOR = 10 clause results in INSERT commands packing rows up to only 10% per page. This results in a larger sampling of dirty shared blocks for the purpose of these examples.The pg_stat_statements module is used to display the number of shared buffer blocks that are dirtied by a SQL command and the amount of time the command took to execute. This provides the information to calculate the actual kilobytes per second writing rate for the SQL command, and thus compare it to the dirty rate limit set for a resource group.In order to use the pg_stat_statements module, perform the following steps.Step 1: In the postgresql.conf file, add $libdir/pg_stat_statements to the shared_preload_libraries configuration parameter as shown by the following.Step 2: Restart the database server.The pg_stat_statements_reset() function is used to clear out the pg_stat_statements view for clarity of each example.The following sequence of commands shows the creation of table t1. The current process is set to use resource group resgrp_b. The pg_stat_statements view is cleared out by running the pg_stat_statements_reset() function.Finally, the INSERT command generates a series of integers from 1 to 10,000 to populate the table, and dirty approximately 10,000 blocks.The following shows the results from the INSERT command.
• The number of blocks dirtied per millisecond (ms) is 10003 blocks / 13496.184 ms, which yields 0.74117247 blocks per millisecond.
•
• The following shows the results from the INSERT command without the usage of a resource group.
• The number of blocks dirtied per millisecond (ms) is 10003 blocks / 2432.165 ms, which yields 4.112797 blocks per millisecond.
•
• For this example the inserts are performed simultaneously on two different tables in two separate psql sessions, each of which has been added to resource group resgrp_b that has a dirty_rate_limit set to 6144 kilobytes per second.Note: The INSERT commands in session 1 and session 2 were started after the SELECT pg_stat_statements_reset() command in session 2 was run.The following shows the results from the INSERT commands in the two sessions. RECORD 3 shows the results from session 1. RECORD 2 shows the results from session 2.
• The number of blocks dirtied per millisecond (ms) is 10003 blocks / 33215.334 ms, which yields 0.30115609 blocks per millisecond.
•
•
• The number of blocks dirtied per millisecond (ms) is 10003 blocks / 30591.551 ms, which yields 0.32698571 blocks per millisecond.
•
• In this example, two additional psql sessions are used along with the previous two sessions. The third and fourth sessions perform the same INSERT command in resource group resgrp_c with a dirty_rate_limit of 3072 kilobytes per second.Sessions 1 and 2 are repeated as illustrated in the prior example using resource group resgrp_b. with a dirty_rate_limit of 6144 kilobytes per second.Note: The INSERT commands in all four sessions were started after the SELECT pg_stat_statements_reset() command in session 4 was run.The following shows the results from the INSERT commands in the four sessions. RECORD 3 shows the results from session 1. RECORD 2 shows the results from session 2. RECORD 4 shows the results from session 3. RECORD 5 shows the results from session 4.First note that the times of session 1 (28407.435) and session 2 (31343.458) are close to each other as they are both in the same resource group with dirty_rate_limit set to 6144, as compared to the times of session 3 (52727.846) and session 4 (56063.697), which are in the resource group with dirty_rate_limit set to 3072. The latter group has a slower dirty rate limit so the expected processing time is longer as is the case for sessions 3 and 4.
• The number of blocks dirtied per millisecond (ms) is 10003 blocks / 28407.435 ms, which yields 0.35212612 blocks per millisecond.
•
•
• The number of blocks dirtied per millisecond (ms) is 10003 blocks / 31343.458 ms, which yields 0.31914156 blocks per millisecond.
•
•
• The number of blocks dirtied per millisecond (ms) is 10003 blocks / 52727.846 ms, which yields 0.18971001 blocks per millisecond.
•
•
• The number of blocks dirtied per millisecond (ms) is 10003 blocks / 56063.697 ms, which yields 0.17842205 blocks per millisecond.
•
•
5.4 System Catalogs5.4.1 edb_all_resource_groupsThe following table lists the information available in the edb_all_resource_groups catalog:
5.4.2 edb_resource_groupThe following table lists the information available in the edb_resource_group catalog:
Client programs that use libpq must include the header file libpq-fe.h and must link with the libpq library.
•
• structs and typedefs
•
• IN/OUT/IN OUT parameters
In earlier releases, Advanced Server provided support for REFCURSORs through the following libpq functions; these functions should now be considered deprecated:You may now use PQexec() and PQgetvalue() to retrieve a REFCURSOR returned by an SPL (or PL/pgSQL) function. A REFCURSOR is returned in the form of a null-terminated string indicating the name of the cursor. Once you have the name of the cursor, you can execute one or more FETCH statements to retrieve the values exposed through the cursor.CREATE OR REPLACE FUNCTION getEmployees(p_deptno NUMERIC) RETURN REFCURSOR AS
result REFCURSOR;
BEGIN
OPEN result FOR SELECT * FROM emp WHERE deptno = p_deptno;
RETURN result;
END;This function expects a single parameter, p_deptno, and returns a REFCURSOR that holds the result set for the SELECT query shown in the OPEN statement. The OPEN statement executes the query and stores the result set in a cursor. The server constructs a name for that cursor and stores the name in a variable (named result). The function then returns the name of the cursor to the caller.char *commandText = malloc(commandLength);
PGresult *result;
int row;
sprintf(commandText, "FETCH ALL FROM \"%s\"", cursorName);
result = PQexec(conn, commandText);
if (PQresultStatus(result) != PGRES_TUPLES_OK)
fail(conn, PQerrorMessage(conn));
printf("-- %s --\n", description);
for (row = 0; row < PQntuples(result); row++)
{
const char *delimiter = "\t";
int col;
for (col = 0; col < PQnfields(result); col++)
{
printf("%s%s", delimiter, PQgetvalue(result, row, col));
delimiter = ",";
}
printf("\n");
}
PQclear(result);
free(commandText);
}
static void
fail(PGconn *conn, const char *msg)
{
fprintf(stderr, "%s\n", msg);
if (conn != NULL)
PQfinish(conn);
exit(-1);
}The code sample contains a line of code that calls the getEmployees() function, and returns a result set that contains all of the employees in department 10:The PQexec() function returns a result set handle to the C program. The result set will contain exactly one value; that value is the name of the cursor as returned by getEmployees().Once you have the name of the cursor, you can use the SQL FETCH statement to retrieve the rows in that cursor. The function fetchAllRows() builds a FETCH ALL statement, executes that statement, and then prints the result set of the FETCH ALL statement.
• The first REFCURSOR contains the name of a cursor (employees) that contains all employees who work in a department within the range specified by the caller.
• The second REFCURSOR contains the name of a cursor (departments) that contains all of the departments in the range specified by the caller.In this example, instead of returning a single REFCURSOR, the function returns a SETOF REFCURSOR (which means 0 or more REFCURSORS). One other important difference is that the libpq program should not expect a single REFCURSOR in the result set, but should expect two rows, each of which will contain a single value (the first row contains the name of the employees cursor, and the second row contains the name of the departments cursor).If you call getEmpsAndDepts(20, 30), the server will return a cursor that contains all employees who work in department 20 or 30, and a second cursor containing the description of departments 20 and 30.
6.3 Array BindingDetails of PQprepare() can be found in the prepared statement section.
• PQBulkStart (see Section 6.3.1)
• PQexecBulk (see Section 6.3.2)
• PQBulkFinish (see Section 6.3.3)
• PQexecBulkPrepared (see Section 6.3.4)6.3.1 PQBulkStartPQBulkStart() initializes bulk operations on the server. You must call this function before sending bulk data to the server. PQBulkStart() initializes the prepared statement specified in stmtName to receive data in a format specified by paramFmts.6.3.2 PQexecBulkPQexecBulk() is used to supply data (paramValues) for a statement that was previously initialized for bulk operation using PQBulkStart().This function can be used more than once after PQBulkStart() to send multiple blocks of data. See the example for more details.6.3.3 PQBulkFinish6.3.4 PQexecBulkPreparedAlternatively, you can use the PQexecBulkPrepared() function to perform a bulk operation with a single function call. PQexecBulkPrepared() sends a request to execute a prepared statement with the given parameters, and waits for the result. This function combines the functionality of PQbulkStart(), PQexecBulk(), and PQBulkFinish(). When using this function, you are not required to initialize or terminate the bulk operation; this function starts the bulk operation, passes the data to the server, and terminates the bulk operation.Specify a previously prepared statement in the place of stmtName. Commands that will be used repeatedly will be parsed and planned just once, rather than each time they are executed.The following example uses PQexecBulkPrepared.
7 DebuggerThe Debugger is integrated with and invoked from pgAdmin 4. On Linux, the edb-asxx-server-pldebugger RPM package where xx is the Advanced Server version number, must be installed as well. Information on pgAdmin 4 is available at:
• Standalone Debugging. The Debugger is used to start the program to be tested. You supply any input parameter values required by the program and you can immediately observe and step through the code of the program. Standalone debugging is the typical method used for new programs and for initial problem investigation.
• In-Context Debugging. The program to be tested is initiated by an application other than the Debugger. You first set a global breakpoint on the program to be tested. The application that makes the first call to the program encounters the global breakpoint. The application suspends execution at which point the Debugger takes control of the called program. You can then observe and step through the code of the called program as it runs within the context of the calling application. After you have completely stepped through the code of the called program in the Debugger, the suspended application resumes execution. In-context debugging is useful if it is difficult to reproduce a problem using standalone debugging due to complex interaction with the calling application.
Before using the Debugger, edit the postgresql.conf file (located in the data subdirectory of your Advanced Server home directory), adding $libdir/plugin_debugger to the libraries listed in the shared_preload_libraries configuration parameter:
Use pgAdmin 4 to access the Debugger for standalone debugging. To open the Debugger, highlight the name of the stored procedure or function you wish to debug in the pgAdmin 4 Browser panel. Then, navigate through the Object menu to the Debugging menu and select Debug from the submenu.You can also right-click on the name of the stored procedure or function in the pgAdmin 4 Browser, and select Debugging, and the Debug from the context menu.Note that triggers cannot be debugged using standalone debugging. Triggers must be debugged using in-context debugging. See Section 7.5.3 for information on setting a global breakpoint for in-context debugging.
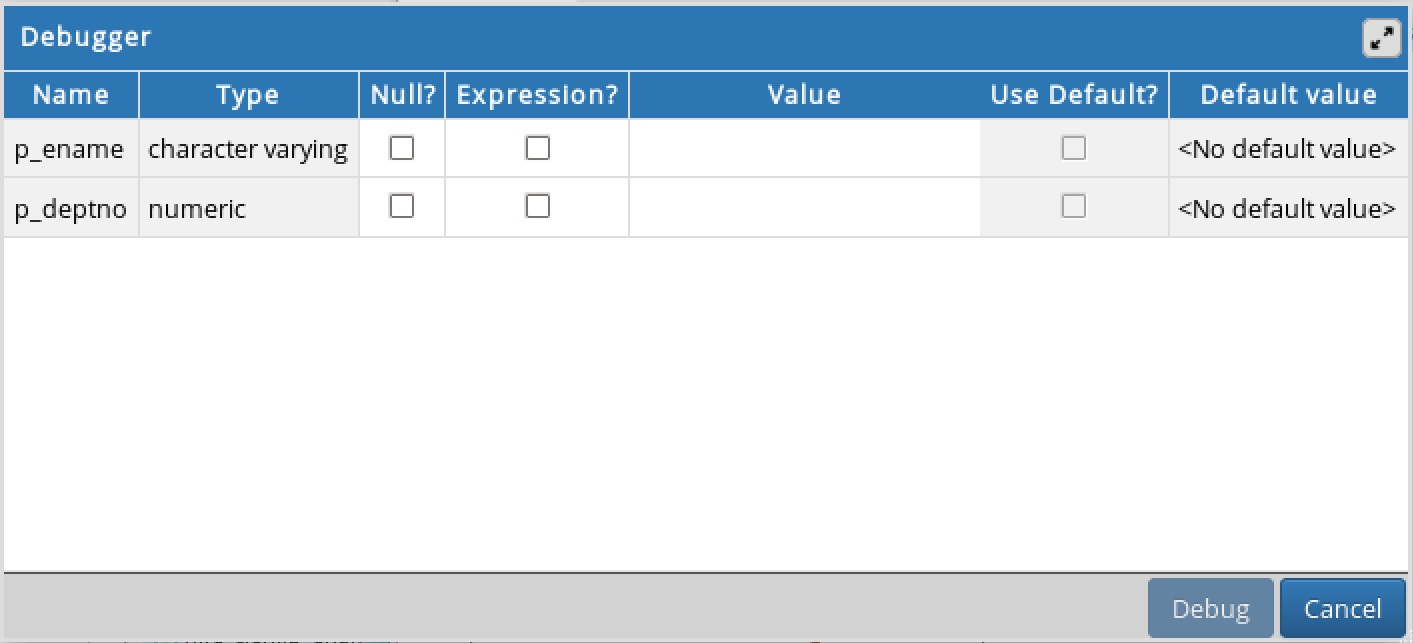
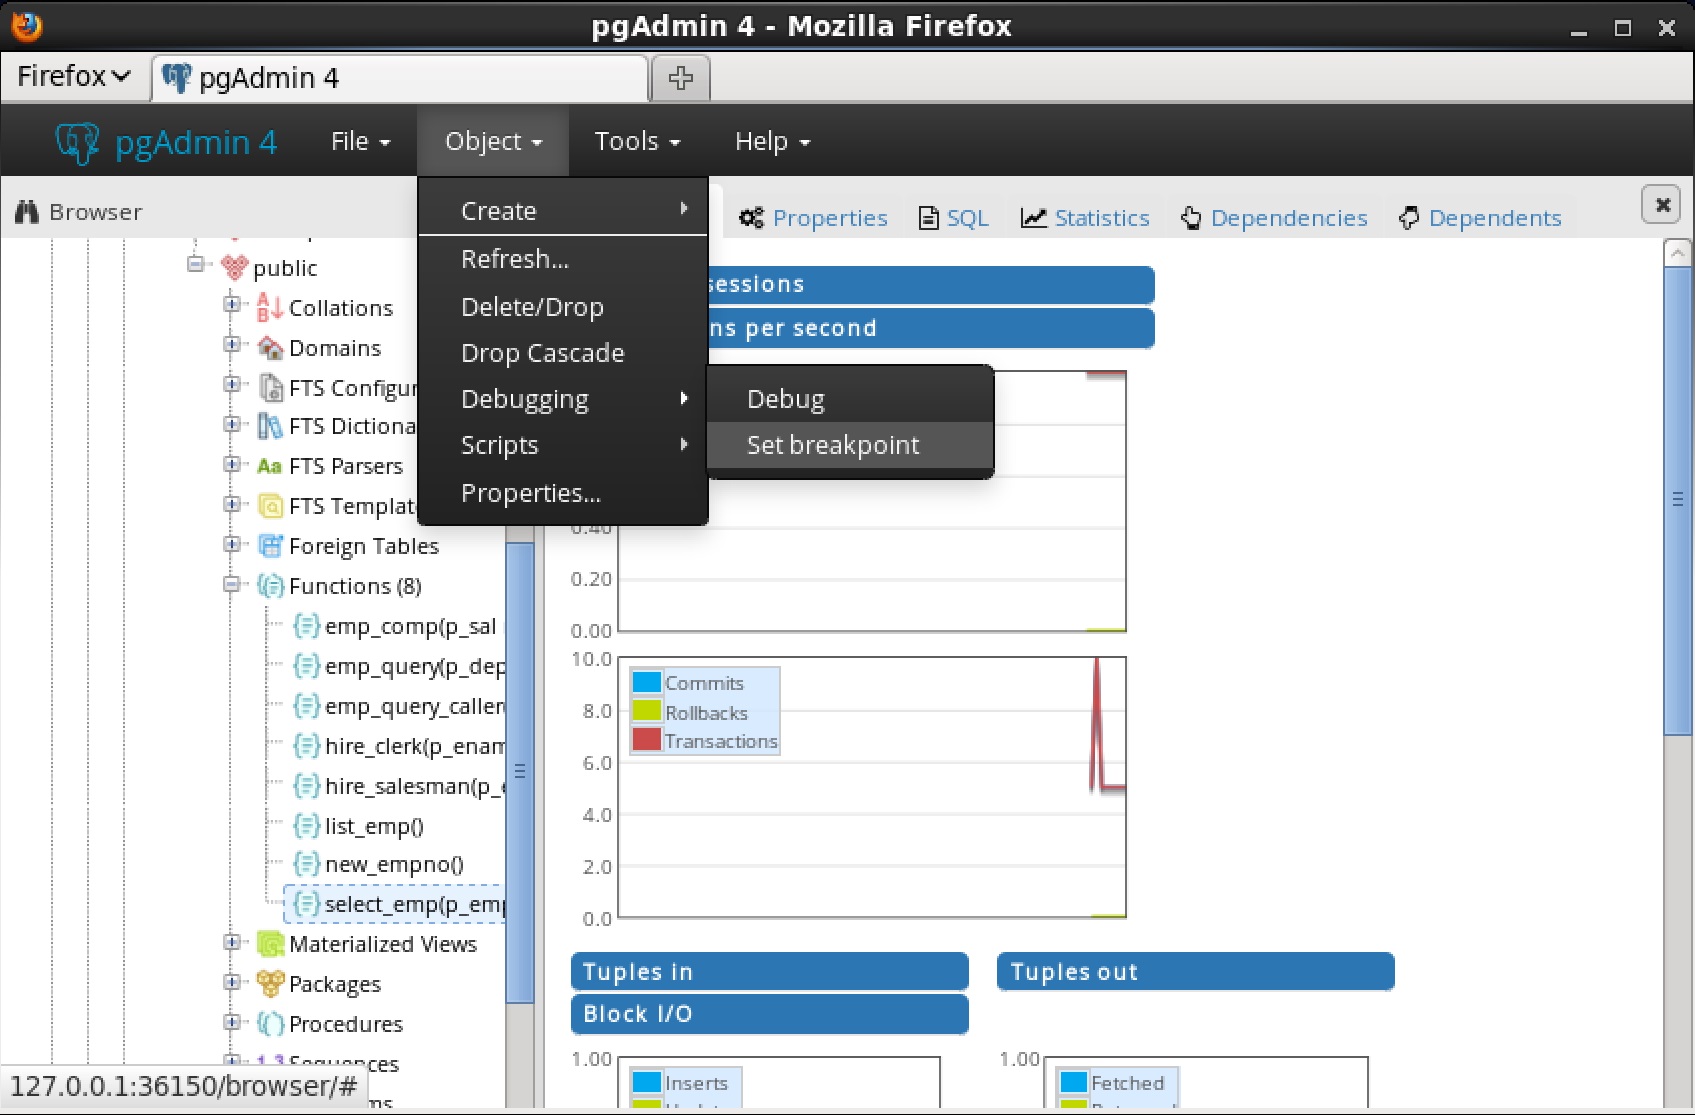
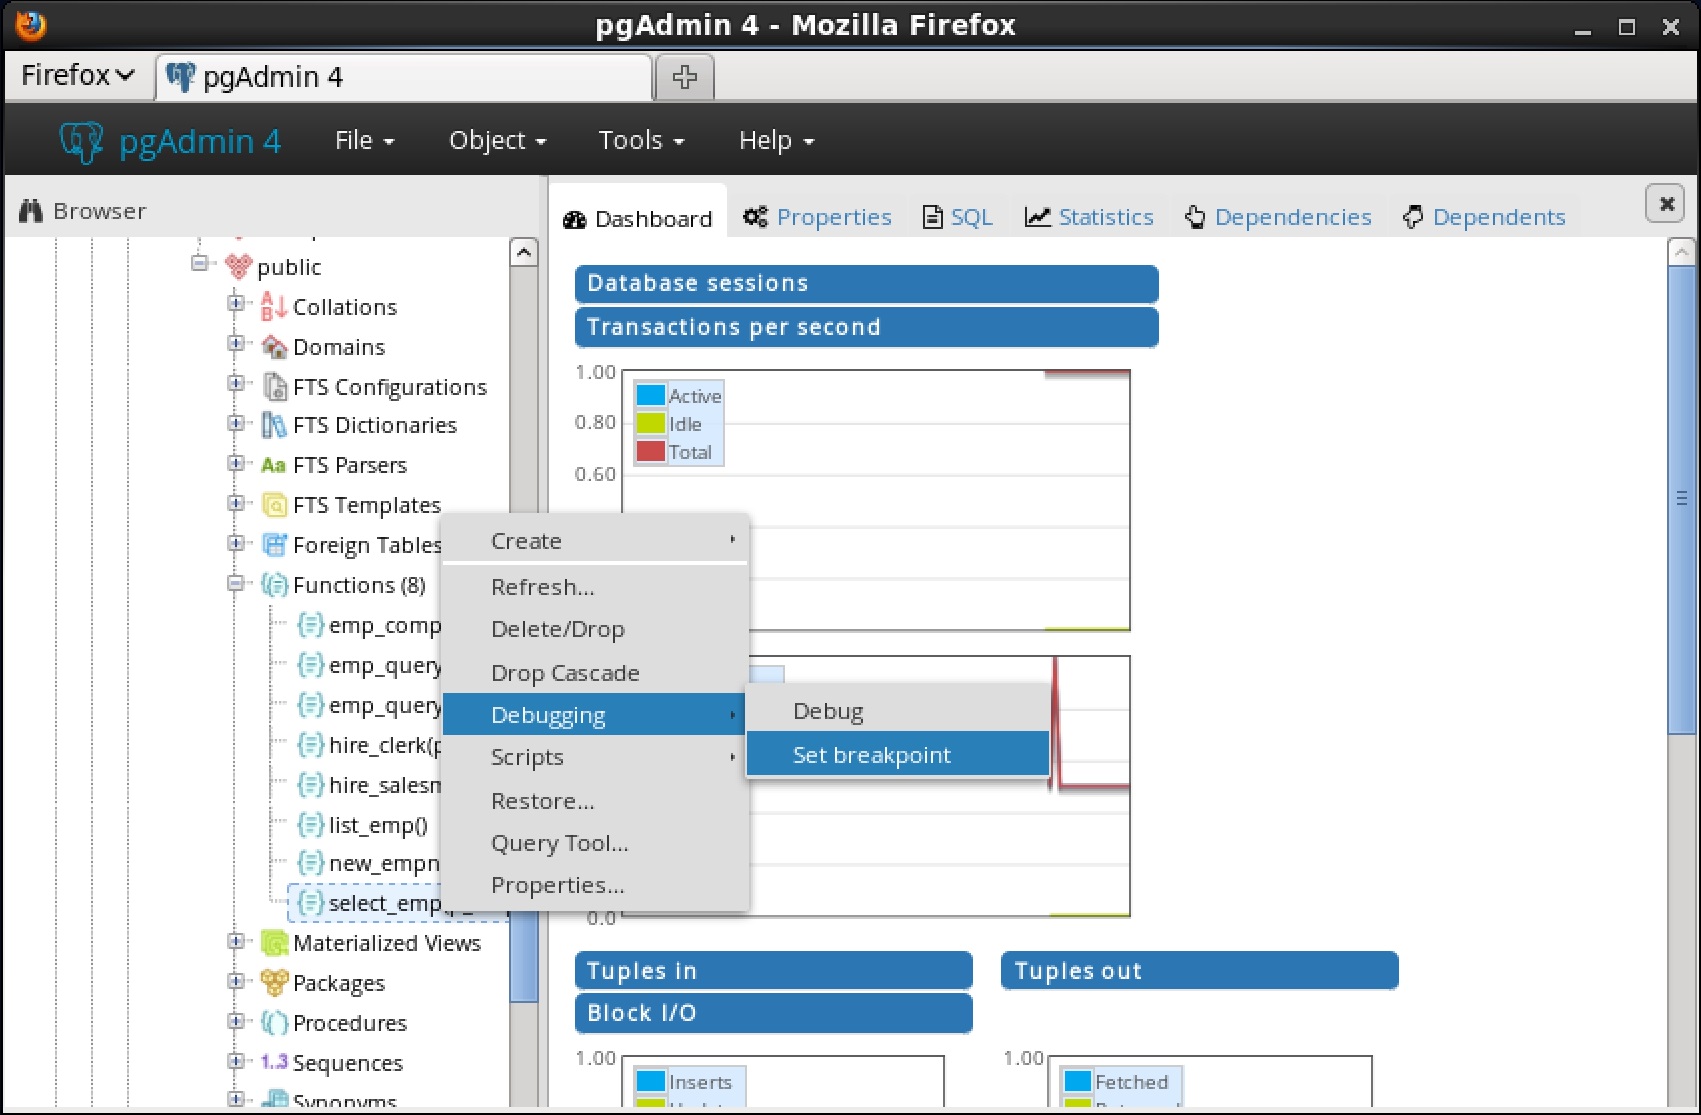
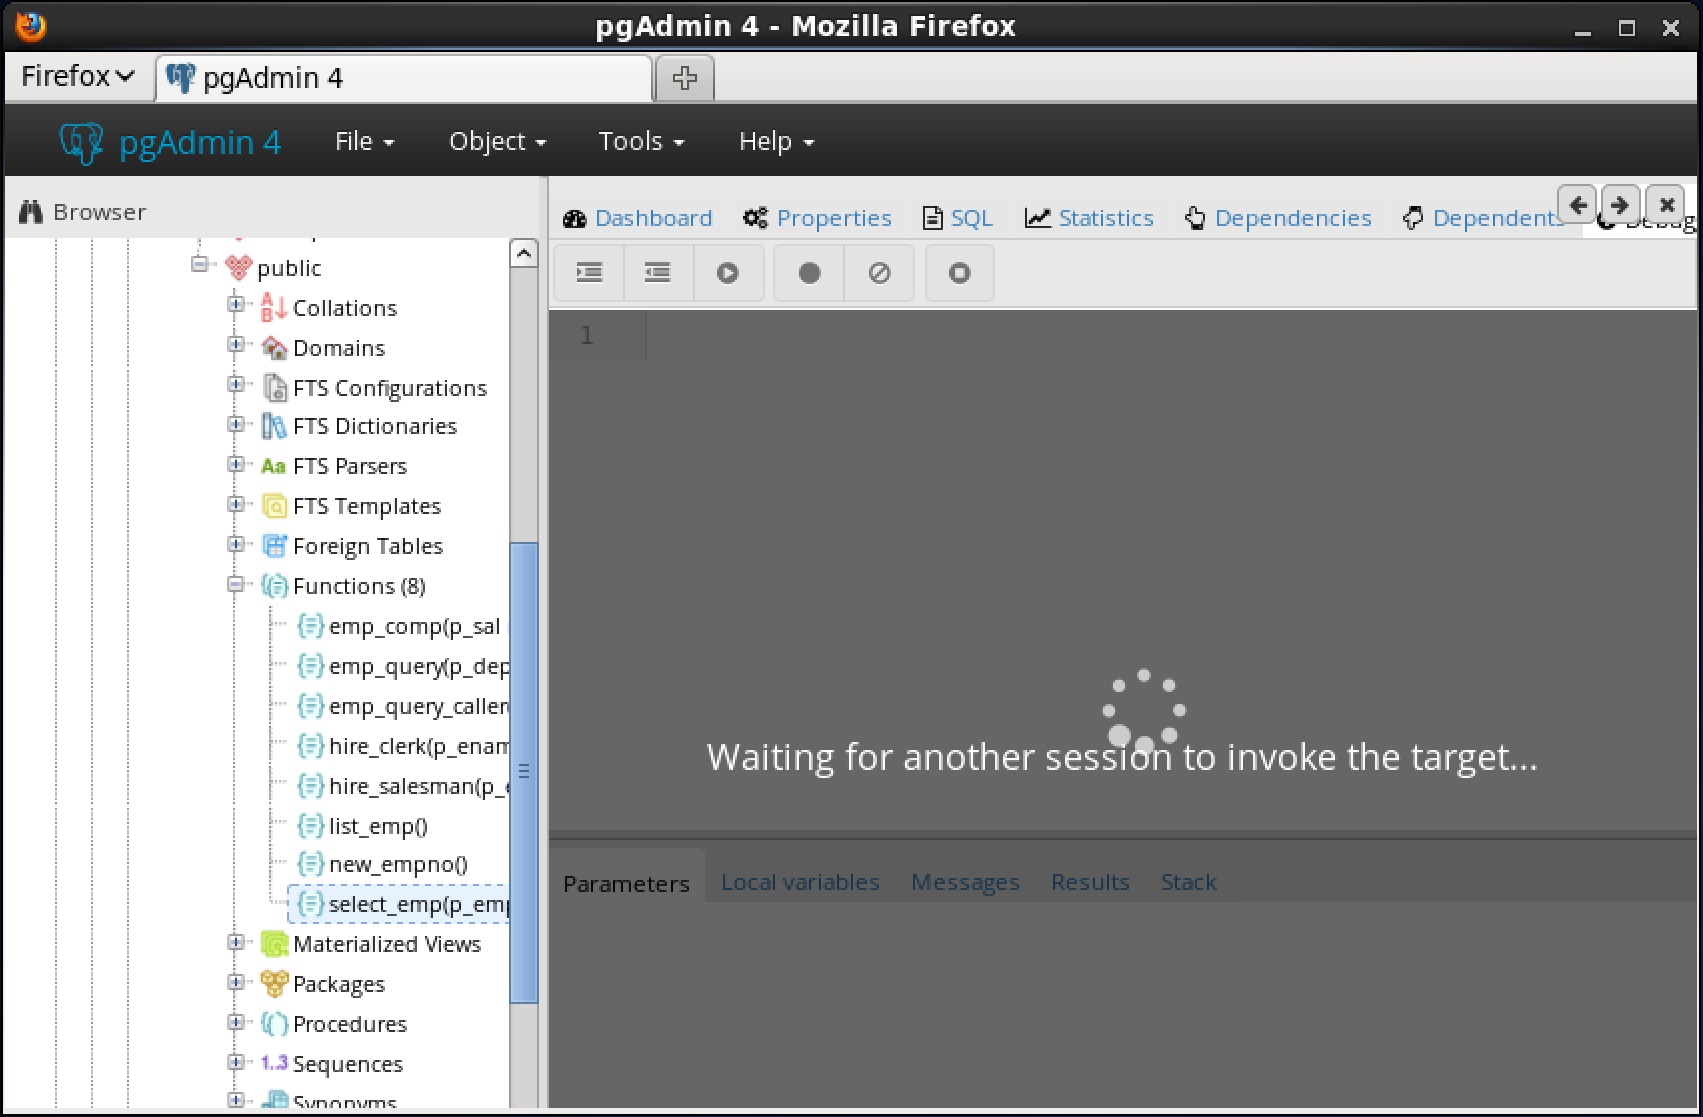
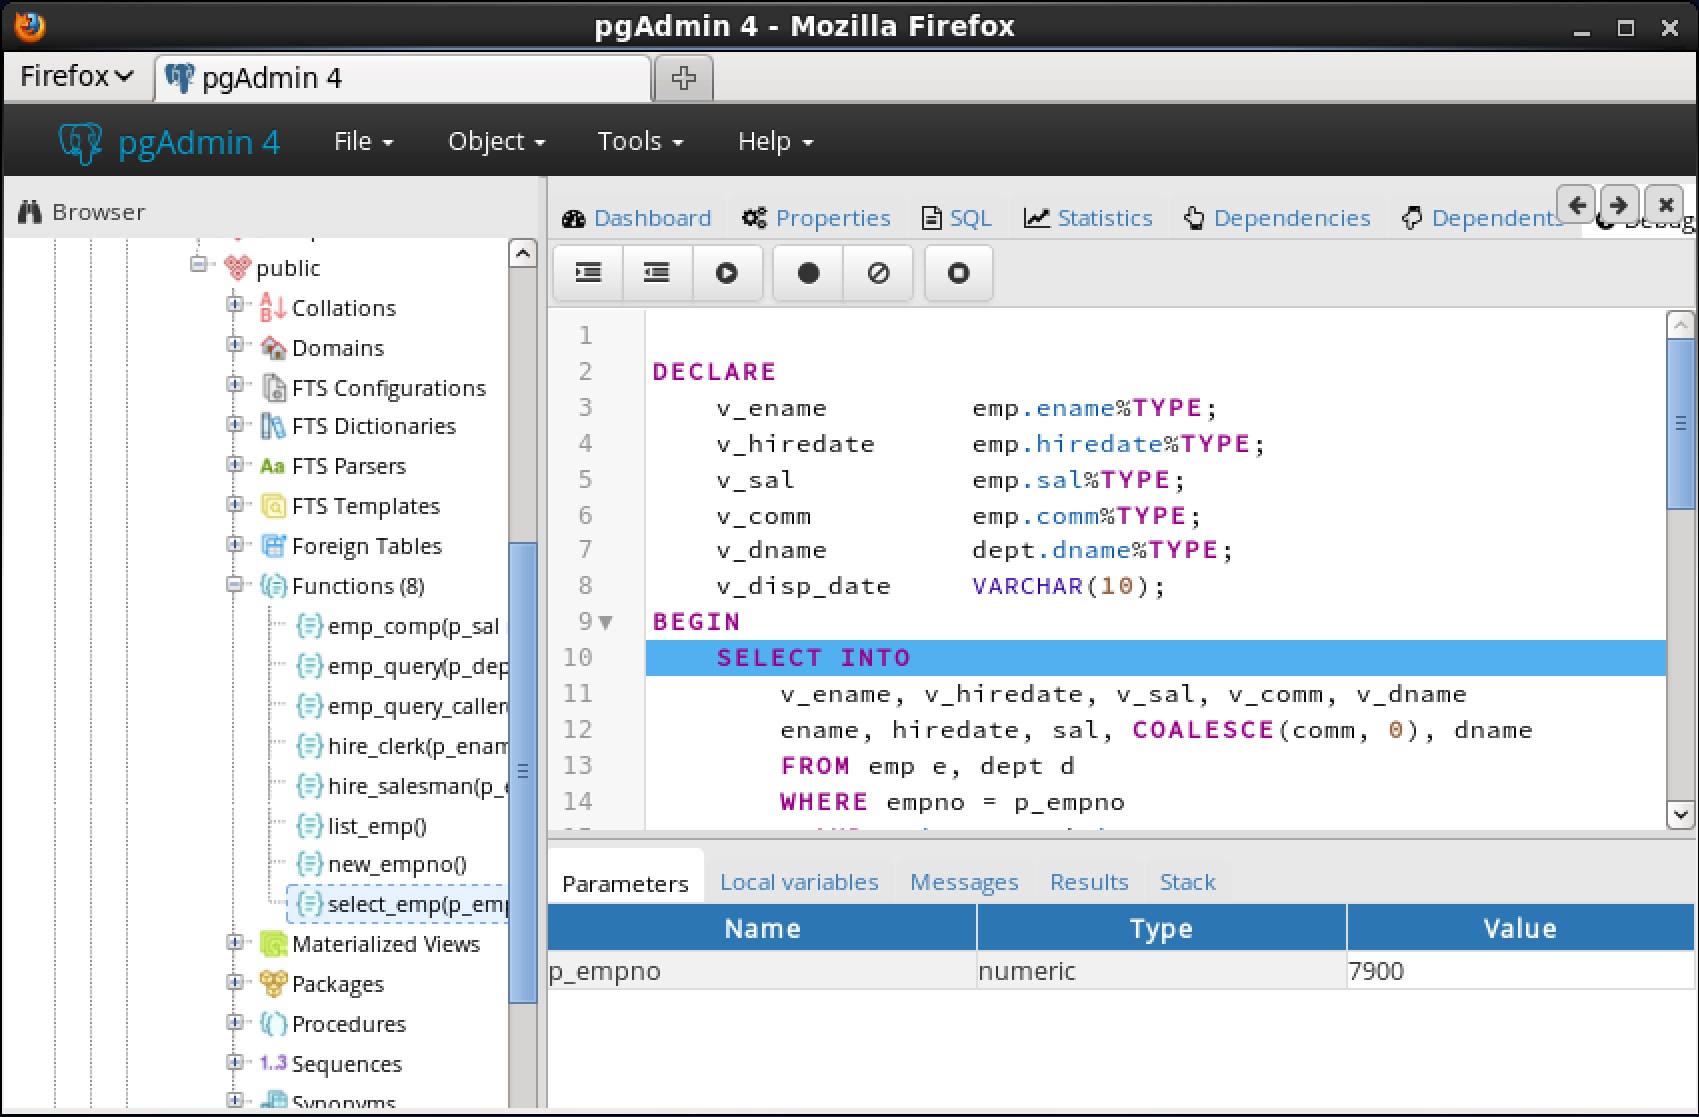
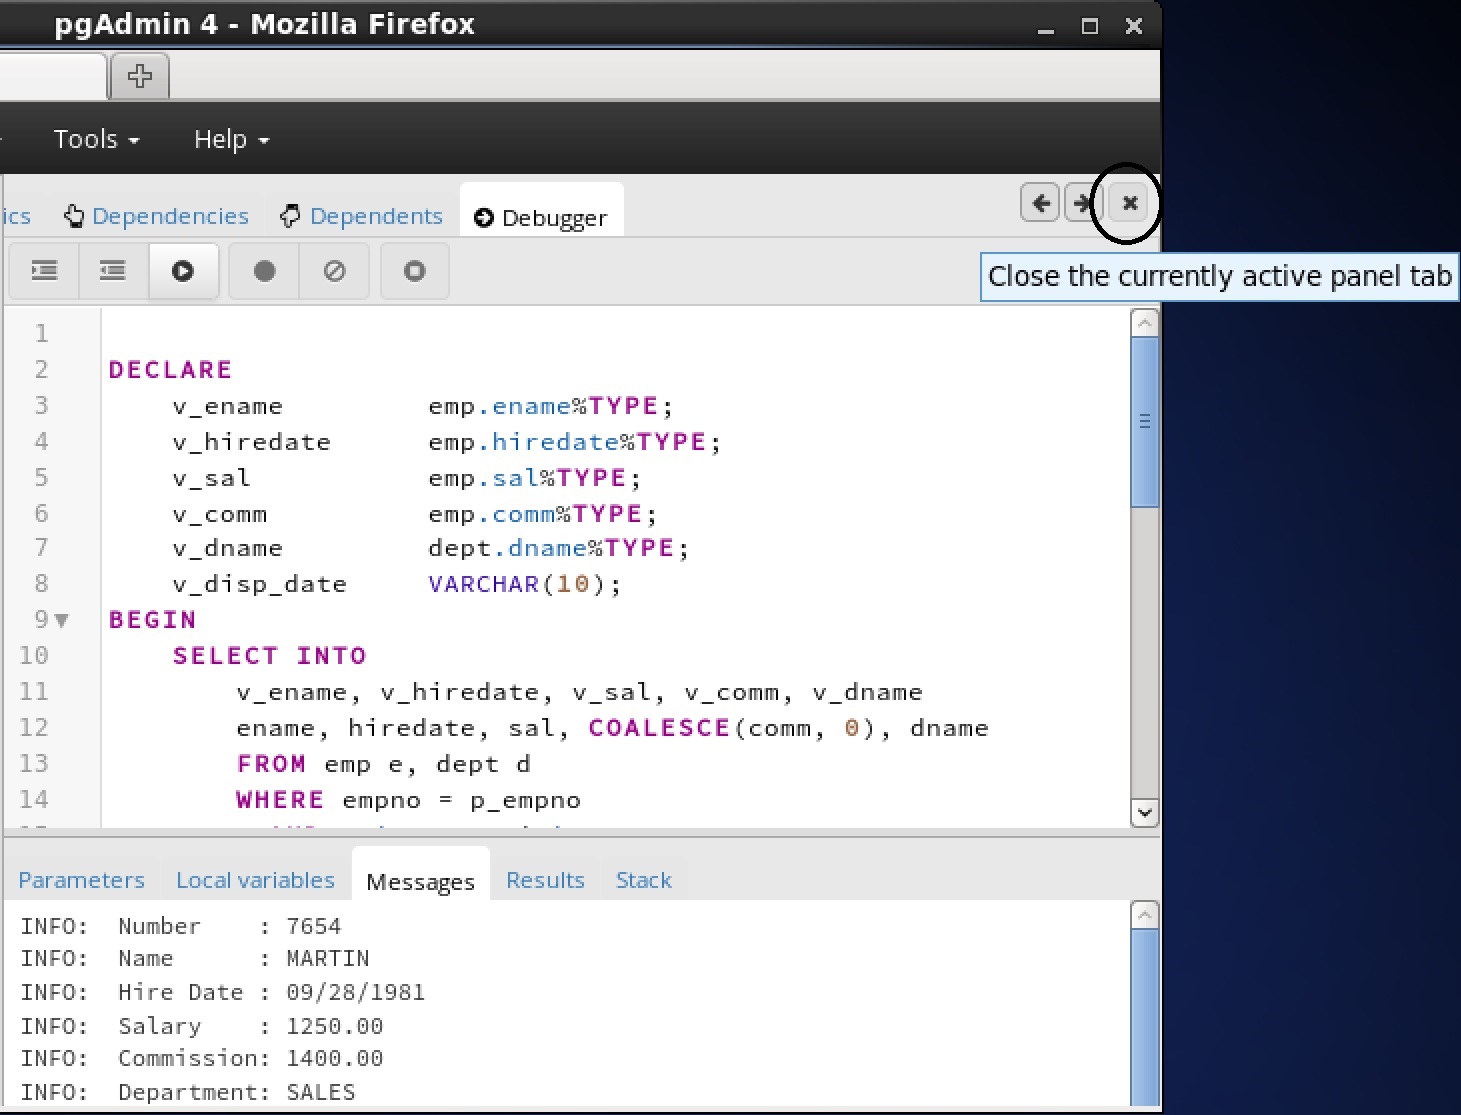
You can use the Debugger window to pass parameter values when you are standalone-debugging a program that expects parameters. When you start the debugger, the Debugger window opens automatically to display any IN or IN OUT parameters expected by the program. If the program declares no IN or IN OUT parameters, the Debugger window does not open.Use the fields on the Debugger window to provide a value for each parameter:
• The Name field contains the formal parameter name.
• The Type field contains the parameter data type.
•
•
• The Value field contains the parameter value that will be passed to the program.
• Check the Use Default? checkbox to indicate that the program should use the value in the Default Value field.
• Press the Tab key to select the next parameter in the list for data entry, or click on a Value field to select the parameter for data entry.If you are debugging a procedure or function that is a member of a package that has an initialization section, check the Debug Package Initializer check box to instruct the Debugger to step into the package initialization section, allowing you to debug the initialization section code before debugging the procedure or function. If you do not select the check box, the Debugger executes the package initialization section without allowing you to see or step through the individual lines of code as they are executed.After entering the desired parameter values, click the Debug button to start the debugging process. Click the Cancel button to terminate the Debugger.Note: The Debugger window does not open during in-context debugging. Instead, the application calling the program to be debugged must supply any required input parameter values.When you have completed a full debugging cycle by stepping through the program code, the Debugger window re-opens, allowing you to enter new parameter values and repeat the debugging cycle, or end the debugging session.
• The top Program Body panel displays the program source code.
• The bottom Tabs panel provides a set of tabs for different information.Use the Tool Bar icons located at the top panel to access debugging functions.7.4.1 The Program Body PanelThe Program Body panel displays the source code of the program that is being debugged.Figure 7.5 shows that the Debugger is about to execute the SELECT statement. The blue indicator in the program body highlights the next statement to execute.7.4.2 The Tabs PanelYou can use the bottom Tabs panel to view or modify parameter values or local variables, or to view messages generated by RAISE INFO and function results.
• The Parameters tab displays the current parameter values.
• The Local variables tab displays the value of any variables declared within the program.
• The Messages tab displays any results returned by the program as it executes.
• The Results tab displays program results (if applicable) such as the value from the RETURN statement of a function.7.4.3 The Stack TabThe Stack tab displays a list of programs that are currently on the call stack (programs that have been invoked, but which have not yet completed). When a program is called, the name of the program is added to the top of the list displayed in the Stack tab. When the program ends, its name is removed from the list.Figure 7.10 shows that emp_query_caller is about to call a subprogram named emp_query. emp_query_caller is currently at the top of the call stack.After the call to emp_query executes, emp_query is displayed at the top of the Stack tab, and its code is displayed in the Program Body panel as shown in Figure 7.11.Upon completion of execution of the subprogram, control returns to the calling program (emp_query_caller), now displayed at the top of the Stack tab as shown in Figure 7.12.
• Step into. Click the Step into icon to execute the currently highlighted line of code.
• Step over. Click the Step over icon to execute a line of code, stepping over any sub-functions invoked by the code. The sub-function executes, but is not debugged unless it contains a breakpoint.
• Continue/Start. Click the Continue/Start icon to execute the highlighted code, and continue until the program encounters a breakpoint or completes.
• Stop. Click the Stop icon to halt the execution of a program.7.5.2 Using BreakpointsLocal Breakpoint - A local breakpoint can be set at any executable line of code within a program. The Debugger pauses execution when it reaches a line where a local breakpoint has been set.Global Breakpoint - A global breakpoint will trigger when any session reaches that breakpoint. Set a global breakpoint if you want to perform in-context debugging of a program. When a global breakpoint is set on a program, the debugging session that set the global breakpoint waits until that program is invoked in another session. A global breakpoint can only be set by a superuser.To remove a local breakpoint, left-click the mouse on the breakpoint dot in the grey shaded margin of the Program Body panel. The dot disappears, indicating that the breakpoint has been removed.You can remove all of the breakpoints from the program that currently appears in the Program Body frame by clicking the Clear all breakpoints icon.Note: When you perform any of the preceding actions, only the breakpoints in the program that currently appears in the Program Body panel are removed. Breakpoints in called subprograms or breakpoints in programs that call the program currently appearing in the Program Body panel are not removed.To set a global breakpoint for in-context debugging, highlight the stored procedure, function, or trigger on which you wish to set the breakpoint in the Browser panel. Navigate through the Object menu to select Debugging, and then Set Breakpoint.Alternatively, you can right-click on the name of the stored procedure, function, or trigger on which you wish to set a global breakpoint and select Debugging, then Set Breakpoint from the context menu as shown by the following.After you choose Set Breakpoint, the Debugger window opens and waits for an application to call the program to be debugged.The PSQL client invokes the select_emp function (on which a global breakpoint has been set).The select_emp function does not complete until you step through the program in the Debugger.You can now debug the program using any of the previously discussed operations such as step into, step over, and continue, or set local breakpoints. When you have stepped through execution of the program, the calling application (PSQL) regains control and the select_emp function completes execution and its output is displayed.At this point, you can end the Debugger session as shown in Section 7.5.4. If you do not end the Debugger session, the next application that invokes the program will encounter the global breakpoint and the debugging cycle will begin again.7.5.4 Exiting the DebuggerTo end a Debugger session and exit the Debugger, click on the close icon (x) located in the upper-right corner to close the tab when you are finished using the tool.
8.1 DynatuneAdvanced Server supports dynamic tuning of the database server to make the optimal usage of the system resources available on the host machine on which it is installed. The two parameters that control this functionality are located in the postgresql.conf file. These parameters are:8.1.1 edb_dynatuneedb_dynatune determines how much of the host system's resources are to be used by the database server based upon the host machine's total available resources and the intended usage of the host machine.When Advanced Server is initially installed, the edb_dynatune parameter is set in accordance with the selected usage of the host machine on which it was installed - i.e., development machine, mixed use machine, or dedicated server. For most purposes, there is no need for the database administrator to adjust the various configuration parameters in the postgresql.conf file in order to improve performance.You can change the value of the edb_dynatune parameter after the initial installation of Advanced Server by editing the postgresql.conf file. The postmaster must be restarted in order for the new configuration to take effect.The edb_dynatune parameter can be set to any integer value between 0 and 100, inclusive. A value of 0, turns off the dynamic tuning feature thereby leaving the database server resource usage totally under the control of the other configuration parameters in the postgresql.conf file.Once a value of edb_dynatune is selected, database server performance can be further fine-tuned by adjusting the other configuration parameters in the postgresql.conf file. Any adjusted setting overrides the corresponding value chosen by edb_dynatune. You can change the value of a parameter by un-commenting the configuration parameter, specifying the desired value, and restarting the database server.8.1.2 edb_dynatune_profileThe edb_dynatune_profile parameter is used to control tuning aspects based upon the expected workload profile on the database server. This parameter takes effect upon startup of the database server.The possible values for edb_dynatune_profile are:
8.2 EDB Wait StatesThe EDB wait states contribution module contains two main components.This information is saved in a set of files in a user-configurable path and directory folder given by the edb_wait_states.directory parameter to be added to the postgresql.conf file. The specified path must be a full, absolute path and not a relative path.EDB wait states is installed with the edb-asxx-server-edb-modules RPM package where xx is the Advanced Server version number.To launch the worker, it must be registered in the postgresql.conf file using the shared_preload_libraries parameter, for example:To terminate the EDB wait states worker, remove $libdir/edb_wait_states from the shared_preload_libraries parameter and restart the database server.
• start_ts and end_ts (IN). Together these specify the time interval and the data within which is to be read. If only start_ts is specified, the data starting from start_ts is output. If only end_ts is provided, data up to end_ts is output. If none of those are provided, all the data is output. Every function outputs different data. The output of each function will be explained below.
• query_id (OUT). Identifies a normalized query. It is internal hash code computed from the query.
• session_id (OUT). Identifies a session.
• ref_start_ts and ref_end_ts (OUT). Provide the timestamps of a file containing a particular data point. A data point may be a wait event sample record or a query record or a session record.Note: The examples shown in the following sections are based on the following three queries executed on four different sessions connected to different databases using different users, simultaneously:8.2.1 edb_wait_states_dataIN start_ts timestamptz default '-infinity'::timestamptz,IN end_ts timestamptz default 'infinity'::timestamptz,OUT session_id int4,OUT dbname text,OUT username text,OUT query text,OUT query_start_time timestamptz,OUT sample_time timestamptz,OUT wait_event_type text,OUT wait_event textThe queries running in the given duration (defined by start_ts and end_ts) in all the sessions, and the wait events, if any, they were waiting on. For example:The following is a sample output from the edb_wait_states_data() function.8.2.2 edb_wait_states_queriesIN start_ts timestamptz default '-infinity'::timestamptz,IN end_ts timestamptz default 'infinity'::timestamptz,OUT query_id int8,OUT query text,OUT ref_start_ts timestamptzOUT ref_end_ts timestamptzIn other words, the function may output queries that did not run in the given interval. To exactly know that the user should use edb_wait_states_data().The following is a sample output from the edb_wait_states_queries() function.8.2.3 edb_wait_states_sessionsIN start_ts timestamptz default '-infinity'::timestamptz,IN end_ts timestamptz default 'infinity'::timestamptz,OUT session_id int4,OUT dbname text,OUT username text,OUT ref_start_ts timestamptzOUT ref_end_ts timestamptzSimilar to edb_wait_states_queries(), this function outputs all the sessions logged in session files that contain sessions sampled within the given interval and not necessarily only the sessions sampled within the given interval. To identify that one should use edb_wait_states_data().The following is a sample output from the edb_wait_states_sessions() function.8.2.4 edb_wait_states_samplesIN start_ts timestamptz default '-infinity'::timestamptz,IN end_ts timestamptz default 'infinity'::timestamptz,OUT query_id int8,OUT session_id int4,OUT query_start_time timestamptz,OUT sample_time timestamptz,OUT wait_event_type text,OUT wait_event textThe following is a sample output from the edb_wait_states_samples() function.8.2.5 edb_wait_states_purgeThe function deletes all the sampled data files (queries, sessions and wait event samples) that were created after start_ts and aged (rotated) before end_ts.IN start_ts timestamptz default '-infinity'::timestamptz,IN end_ts timestamptz default 'infinity'::timestamptzIn order to know the duration for which the samples have been retained, use edb_wait_states_data() as explained in the previous examples of that function.
EDB Clone Schema is an extension module for Advanced Server that allows you to copy a schema and its database objects from a local or remote database (the source database) to a receiving database (the target database).
• localcopyschema. This function makes a copy of a schema and its database objects from a source database back into the same database (the target), but with a different schema name than the original. Use this function when the original source schema and the resulting copy are to reside within the same database. See Section 9.2.1 for information on the localcopyschema function.
• localcopyschema_nb. This function performs the same purpose as localcopyschema, but as a background job, thus freeing up the terminal from which the function was initiated. This is referred to as a non-blocking function. See Section 9.2.2 for information on the localcopyschema_nb function.
• remotecopyschema. This function makes a copy of a schema and its database objects from a source database to a different target database. Use this function when the original source schema and the resulting copy are to reside in two, separate databases. The separate databases can reside in the same, or in different Advanced Server database clusters. See Section 9.2.3 for information on the remotecopyschema function.
• remotecopyschema_nb. This function performs the same purpose as remotecopyschema, but as a background job, thus freeing up the terminal from which the function was initiated. This is referred to as a non-blocking function. See Section 9.2.4 for information on the remotecopyschema_nb function.
• process_status_from_log. This function displays the status of the cloning functions. The information is obtained from a log file that must be specified when a cloning function is invoked. See Section 9.2.5 for information on the process_status_from_log function.
• remove_log_file_and_job. This function deletes the log file created by a cloning function. This function can also be used to delete a job created by the non-blocking form of the function. See Section 9.2.6 for information on the remove_log_file_and_job function.
•
•
•
•
•
• EDB Clone Schema is supported on Advanced Server only when a dialect of Compatible with Oracle is specified on the Advanced Server Dialect dialog during installation, or when the --redwood-like keywords are included during a text mode installation or cluster initialization.
• For remote cloning, if an object in the source schema is dependent upon an extension, then this extension must be created in the public schema of the remote database before invoking the remote cloning function.
9.1 Setup ProcessIn addition, some configuration parameters in the postgresql.conf file of the database servers may benefit from some modification.Step 1: The following extensions must be installed on the database:
•
• Ensure that pgAgent is installed before creating the pgagent extension. On Linux, you can use the edb-asxx-pgagent RPM package where xx is the Advanced Server version number to install pgAgent. On Windows, use StackBuilder Plus to download and install pgAgent.For more information about using the CREATE EXTENSION command, see the PostgreSQL core documentation at:Step 2: Modify the postgresql.conf file.Modify the postgresql.conf file by adding $libdir/parallel_clone to the shared_preload_libraries configuration parameter as shown by the following example:Step 3: The Perl Procedural Language (PL/Perl) must be installed on the database and the CREATE TRUSTED LANGUAGE plperl command must be run. For Linux, install PL/Perl using the edb-asxx-server-plperl RPM package where xx is the Advanced Server version number. For Windows, use the EDB Postgres Language Pack. For information on EDB Language Pack, see the EDB Postgres Language Pack Guide available at:Step 4: Connect to the database as a superuser and run the following command:For more information about using the CREATE LANGUAGE command, see the PostgreSQL core documentation at:The following sections describe certain configuration parameters that may need to be altered in the postgresql.conf file.The configuration parameters in the postgresql.conf file that may need to be tuned include the following:
• work_mem. Specifies the amount of memory to be used by internal sort operations and hash tables before writing to temporary disk files.
• maintenance_work_mem. Specifies the maximum amount of memory to be used by maintenance operations, such as VACUUM, CREATE INDEX, and ALTER TABLE ADD FOREIGN KEY.
• max_worker_processes. Sets the maximum number of background processes that the system can support.
• checkpoint_timeout. Maximum time between automatic WAL checkpoints, in seconds.
• checkpoint_completion_target. Specifies the target of checkpoint completion, as a fraction of total time between checkpoints.
• checkpoint_flush_after. Whenever more than checkpoint_flush_after bytes have been written while performing a checkpoint, attempt to force the OS to issue these writes to the underlying storage.
• max_wal_size. Maximum size to let the WAL grow to between automatic WAL checkpoints.
• max_locks_per_transaction. This parameter controls the average number of object locks allocated for each transaction; individual transactions can lock more objects as long as the locks of all transactions fit in the lock table.9.1.2.2 Status LoggingStatus logging by the cloning functions creates log files in the directory specified by the log_directory parameter in the postgresql.conf file for the database server to which you are connected when invoking the cloning function.The default location is PGDATA/log as shown by the following:To display the status from a log file, use the process_status_from_log function as described in Section 9.2.5.To delete a log file, use the remove_log_file_and_job function as described in Section 9.2.6, or simply navigate to the log directory and delete it manually.Step 1: If you had previously installed an older version of the edb_cloneschema extension, then you must run the following command:This command also drops the edb_cloneschema extension.Step 2: Install the extensions using the following commands:When using one of the local cloning functions, localcopyschema or localcopyschema_nb, one of the required parameters includes a single, foreign server for identifying the database server along with its database that is the source and the receiver of the cloned schema.When using one of the remote cloning functions, remotecopyschema or remotecopyschema_nb, two of the required parameters include two foreign servers. The foreign server specified as the first parameter identifies the source database server along with its database that is the provider of the cloned schema. The foreign server specified as the second parameter identifies the target database server along with its database that is the receiver of the cloned schema.For the localcopyschema and localcopyschema_nb functions, the source and target schemas are both within the same database of the same database server. Thus, only one foreign server must be defined and specified for these functions. This foreign server is also referred to as the local server.This server is referred to as the local server because this server is the one to which you must be connected when invoking the localcopyschema or localcopyschema_nb function.For more information about using the CREATE SERVER command, see the PostgreSQL core documentation at:For more information about using the CREATE USER MAPPING command, see the PostgreSQL core documentation at:The following psql commands show the foreign server and user mapping:When database superuser enterprisedb invokes a cloning function, the database user enterprisedb with its password is used to connect to local_server on the localhost with port 5444 to database edb.In this case, the mapped database user, enterprisedb, and the database user, enterprisedb, used to connect to the local edb database happen to be the same, identical database user, but that is not an absolute requirement.For specific usage of these foreign server and user mapping examples, see the example given in Section 9.2.1.For the remotecopyschema and remotecopyschema_nb functions, the source and target schemas are in different databases of either the same or different database servers. Thus, two foreign servers must be defined and specified for these functions.The foreign server defining the originating database server and its database containing the source schema to be cloned is referred to as the source server or the remote server.The foreign server defining the database server and its database to receive the schema to be cloned is referred to as the target server or the local server.The target server is also referred to as the local server because this server is the one to which you must be connected when invoking the remotecopyschema or remotecopyschema_nb function.The following psql commands show the foreign servers and user mappings:When database superuser enterprisedb invokes a cloning function, the database user tgtuser with password tgtpassword is used to connect to tgt_server on the localhost with port 5444 to database tgtdb.In addition, database user srcuser with password srcpassword connects to src_server on host 192.168.2.28 with port 5444 to database srcdb.Note: Be sure the pg_hba.conf file of the database server running the source database srcdb has an appropriate entry permitting connection from the target server location (address 192.168.2.27 in the following example) connecting with the database user srcuser that was included in the user mapping for the foreign server src_server defining the source server and database.
The EDB Clone Schema functions are created in the edb_util schema when the parallel_clone and edb_cloneschema extensions are installed.
• You are connected to the target or local database as the database superuser defined in the CREATE USER MAPPING command for the foreign server of the target or local database. See Section 9.1.4.1 for information on the user mapping for the localcopyschema or localcopyschema_nb function. See Section 9.1.4.2 for information on the user mapping for the remotecopyschema or remotecopyschema_nb function.
• The edb_util schema is in the search path, or the cloning function is to be invoked with the edb_util prefix.
• When using the remote copy functions, if the on_tblspace parameter is to be set to true, then the target database cluster contains all tablespaces that are referenced by objects in the source schema, otherwise creation of the DDL statements for those database objects will fail in the target schema. This causes a failure of the cloning process.
• When using the remote copy functions, if the copy_acls parameter is to be set to true, then all roles that have GRANT privileges on objects in the source schema exist in the target database cluster, otherwise granting of privileges to those roles will fail in the target schema. This causes a failure of the cloning process.9.2.1 localcopyschemaThe localcopyschema function copies a schema and its database objects within a local database specified within the source_fdw foreign server from the source schema to the specified target schema within the same database.[, on_tblspace BOOLEAN[, verbose_on BOOLEAN[, copy_acls BOOLEAN[, worker_count INTEGER ]]]]A BOOLEAN value is returned by the function. If the function succeeds, then true is returned. If the function fails, then false is returned.The source_fdw, source_schema, target_schema, and log_filename are required parameters while all other parameters are optional.Name of the foreign server managed by the postgres_fdw foreign data wrapper from which database objects are to be cloned.Name of the log file in which information from the function is recorded. The log file is created under the directory specified by the log_directory configuration parameter in the postgresql.conf file.BOOLEAN value to specify whether or not database objects are to be created within their tablespaces. If false is specified, then the TABLESPACE clause is not included in the applicable CREATE DDL statement when added to the target schema. If true is specified, then the TABLESPACE clause is included in the CREATE DDL statement when added to the target schema. If the on_tblspace parameter is omitted, the default value is false.BOOLEAN value to specify whether or not the DDLs are to be printed in log_filename when creating objects in the target schema. If false is specified, then DDLs are not printed. If true is specified, then DDLs are printed. If omitted, the default value is false.BOOLEAN value to specify whether or not the access control list (ACL) is to be included while creating objects in the target schema. The access control list is the set of GRANT privilege statements. If false is specified, then the access control list is not included for the target schema. If true is specified, then the access control list is included for the target schema. If the copy_acls parameter is omitted, the default value is false.The following example shows the cloning of schema edb containing a set of database objects to target schema edbcopy, both within database edb as defined by local_server.
•
•
• Foreign server (local_server) and user mapping (see Section 9.1.4.1) with the information of the preceding bullet points
• Source schema: edb
• Target schema: edbcopy
• The following displays the logging status using the process_status_from_log function:After the clone has completed, the following shows some of the database objects copied to the edbcopy schema:9.2.2 localcopyschema_nbThe localcopyschema_nb function copies a schema and its database objects within a local database specified within the source_fdw foreign server from the source schema to the specified target schema within the same database, but in a non-blocking manner as a job submitted to pgAgent.[, on_tblspace BOOLEAN[, verbose_on BOOLEAN[, copy_acls BOOLEAN[, worker_count INTEGER ]]]]An INTEGER value job ID is returned by the function for the job submitted to pgAgent. If the function fails, then null is returned.The source_fdw, source, target, and log_filename are required parameters while all other parameters are optional.After completion of the pgAgent job, remove the job with the remove_log_file_and_job function (see Section 9.2.6).Name of the foreign server managed by the postgres_fdw foreign data wrapper from which database objects are to be cloned.Name of the log file in which information from the function is recorded. The log file is created under the directory specified by the log_directory configuration parameter in the postgresql.conf file.BOOLEAN value to specify whether or not database objects are to be created within their tablespaces. If false is specified, then the TABLESPACE clause is not included in the applicable CREATE DDL statement when added to the target schema. If true is specified, then the TABLESPACE clause is included in the CREATE DDL statement when added to the target schema. If the on_tblspace parameter is omitted, the default value is false.BOOLEAN value to specify whether or not the DDLs are to be printed in log_filename when creating objects in the target schema. If false is specified, then DDLs are not printed. If true is specified, then DDLs are printed. If omitted, the default value is false.BOOLEAN value to specify whether or not the access control list (ACL) is to be included while creating objects in the target schema. The access control list is the set of GRANT privilege statements. If false is specified, then the access control list is not included for the target schema. If true is specified, then the access control list is included for the target schema. If the copy_acls parameter is omitted, the default value is false.The same cloning operation is performed as the example in Section 9.2.1, but using the non-blocking function localcopyschema_nb.If pgAgent is not running, it can be started as shown by the following. The pgagent program file is located in the bin subdirectory of the Advanced Server installation directory.Note: the pgagent -l 2 option starts pgAgent in DEBUG mode, which logs continuous debugging information into the log file specified with the -s option. Use a lower value for the -l option, or omit it entirely to record less information.9.2.3 remotecopyschemaThe remotecopyschema function copies a schema and its database objects from a source schema in the remote source database specified within the source_fdw foreign server to a target schema in the local target database specified within the target_fdw foreign server.[, on_tblspace BOOLEAN[, verbose_on BOOLEAN[, copy_acls BOOLEAN[, worker_count INTEGER ]]]]A BOOLEAN value is returned by the function. If the function succeeds, then true is returned. If the function fails, then false is returned.The source_fdw, target_fdw, source_schema, target_schema, and log_filename are required parameters while all other parameters are optional.Name of the foreign server managed by the postgres_fdw foreign data wrapper from which database objects are to be cloned.Name of the foreign server managed by the postgres_fdw foreign data wrapper to which database objects are to be cloned.Name of the log file in which information from the function is recorded. The log file is created under the directory specified by the log_directory configuration parameter in the postgresql.conf file.BOOLEAN value to specify whether or not database objects are to be created within their tablespaces. If false is specified, then the TABLESPACE clause is not included in the applicable CREATE DDL statement when added to the target schema. If true is specified, then the TABLESPACE clause is included in the CREATE DDL statement when added to the target schema. If the on_tblspace parameter is omitted, the default value is false.Note: If true is specified and a database object has a TABLESPACE clause, but that tablespace does not exist in the target database cluster, then the cloning function fails.BOOLEAN value to specify whether or not the DDLs are to be printed in log_filename when creating objects in the target schema. If false is specified, then DDLs are not printed. If true is specified, then DDLs are printed. If omitted, the default value is false.BOOLEAN value to specify whether or not the access control list (ACL) is to be included while creating objects in the target schema. The access control list is the set of GRANT privilege statements. If false is specified, then the access control list is not included for the target schema. If true is specified, then the access control list is included for the target schema. If the copy_acls parameter is omitted, the default value is false.Note: If true is specified and a role with GRANT privilege does not exist in the target database cluster, then the cloning function fails.The following example shows the cloning of schema srcschema within database srcdb as defined by src_server to target schema tgtschema within database tgtdb as defined by tgt_server.
• Host on which the source database server is running: 192.168.2.28
•
• Foreign server (src_server) and user mapping (see Section 9.1.4.2) with the information of the preceding bullet points
• Source schema: srcschema
•
• Foreign server (tgt_server) and user mapping (see Section 9.1.4.2) with the information of the preceding bullet points
• Target schema: tgtschema
• Before invoking the function, the connection is made by database user enterprisedb to database tgtdb. A worker_count of 4 is specified for this function.When the remotecopyschema function was invoked, four background workers were specified.The following portion of the log file clone_rmt_src_tgt shows the status of the parallel data copying operation using four background workers:The first number is the job index whereas the second number is the worker index. The worker index values range from 0 to 3 for the four background workers.In case two clone schema jobs are running in parallel, the first log file will have 0 as the job index whereas the second will have 1 as the job index.9.2.4 remotecopyschema_nbThe remotecopyschema_nb function copies a schema and its database objects from a source schema in the remote source database specified within the source_fdw foreign server to a target schema in the local target database specified within the target_fdw foreign server, but in a non-blocking manner as a job submitted to pgAgent.[, on_tblspace BOOLEAN[, verbose_on BOOLEAN[, copy_acls BOOLEAN[, worker_count INTEGER ]]]]An INTEGER value job ID is returned by the function for the job submitted to pgAgent. If the function fails, then null is returned.The source_fdw, target_fdw, source, target, and log_filename are required parameters while all other parameters are optional.After completion of the pgAgent job, remove the job with the remove_log_file_and_job function (see Section 9.2.6).Name of the foreign server managed by the postgres_fdw foreign data wrapper from which database objects are to be cloned.Name of the foreign server managed by the postgres_fdw foreign data wrapper to which database objects are to be cloned.Name of the log file in which information from the function is recorded. The log file is created under the directory specified by the log_directory configuration parameter in the postgresql.conf file.BOOLEAN value to specify whether or not database objects are to be created within their tablespaces. If false is specified, then the TABLESPACE clause is not included in the applicable CREATE DDL statement when added to the target schema. If true is specified, then the TABLESPACE clause is included in the CREATE DDL statement when added to the target schema. If the on_tblspace parameter is omitted, the default value is false.Note: If true is specified and a database object has a TABLESPACE clause, but that tablespace does not exist in the target database cluster, then the cloning function fails.BOOLEAN value to specify whether or not the DDLs are to be printed in log_filename when creating objects in the target schema. If false is specified, then DDLs are not printed. If true is specified, then DDLs are printed. If omitted, the default value is false.BOOLEAN value to specify whether or not the access control list (ACL) is to be included while creating objects in the target schema. The access control list is the set of GRANT privilege statements. If false is specified, then the access control list is not included for the target schema. If true is specified, then the access control list is included for the target schema. If the copy_acls parameter is omitted, the default value is false.Note: If true is specified and a role with GRANT privilege does not exist in the target database cluster, then the cloning function fails.The same cloning operation is performed as the example in Section 9.2.3, but using the non-blocking function remotecopyschema_nb.The following command starts pgAgent on the target database tgtdb. The pgagent program file is located in the bin subdirectory of the Advanced Server installation directory.9.2.5 process_status_from_logThe process_status_from_log function provides the status of a cloning function from its log file.
The following shows usage of the process_status_from_log function:9.2.6 remove_log_file_and_jobThe remove_log_file_and_job function performs cleanup tasks by removing the log files created by the schema cloning functions and the jobs created by the non-blocking functions.{ log_file TEXT |Values for any or both of the two parameters may be specified when invoking the remove_log_file_and_job function:
• If only log_file is specified, then the function will only remove the log file.
• If only job_id is specified, then the function will only remove the job.
10 PL/JavaThe PL/Java package provides access to Java stored procedures, triggers, and functions via the JDBC interface. Unless otherwise noted, the commands and paths noted in the following section assume that you have performed an installation with the edb-asxx-pljava RPM package where xx is the Advanced Server version number.
Step 1: Edit the postgresql.conf file located under the data directory of your Advanced Server installation and add (or modify) the following settings:pljava.classpath = 'path_to_pljava.jar'pljava.libjvm_location = 'path_to_libjvm.so'Where path_to_pljava.jar specifies the location of the pljava.jar file and path_to_libjvm.so specifies the location of the libjvm.so file.Step 2: Restart the database server.Step 3: You can use the CREATE EXTENSION command to install PL/Java. To install the PL/Java extension, login to the database in which you want to install PL/Java with the psql or pgAdmin client, and invoke the following command:Step 4: To confirm that PL/Java is installed, invoke the following command:The edb-psql client displays two rows indicating that java and javau (Java Untrusted) have been installed in the database.
Step 1: Edit the postgresql.conf file and add (or modify) the following settings:pljava.classpath = 'POSTGRES_INSTALL_HOME\lib\pljava.jar'pljava.libjvm_location = 'path_to_libjvm.so'Where POSTGRES_INSTALL_HOME specifies the location of the Advanced Server installation. For example, the following is the configuration setting for a default installation:Step 2: Restart the database server.Step 3: Modify the PATH setting used by the server, adding the following two entries:Where JRE_HOME specifies the installation directory of your Java runtime environment. If you have a Java development kit, substitute the location of $JDK_HOME/jre for JRE_HOME.Step 4: Use the Postgres CREATE EXTENSION command to install PL/Java. To run the installation script, use the psql or pgAdmin client to connect to the database in which you wish to install PL/Java and invoke the following command:Step 5: To confirm that PL/Java is installed, invoke the following command:
10.3 Using PL/JavaTo create a PL/Java program, you must first create a Java class that contains at least one static method, and then you must compile that class into a .class or .jar file. Next, you declare the Java function within SQL using the CREATE FUNCTION command. The CREATE FUNCTION command gives a SQL name to the function and associates the compiled class (and method name) with that function name.When invoked, getsysprop will execute the getProperty (static) method defined within the java.lang.System class.The example that follows demonstrates the procedures used to create and install a simple HelloWorld program:Step 1: Save the following code sample to a file named HelloWorld.java:Step 2: Compile the file.Step 3: Create an archive file (a JAR file) named helloworld.jar:Step 4: Open the edb-psql client, and install the jar file with the following command:SELECT sqlj.install_jar('file:///file_path/helloworld.jar', 'helloworld', true);Where file_path is the directory containing the helloworld.jar file. For example, if the /tmp directory is the file_path:To confirm that the jar file has been loaded correctly, perform a SELECT statement on the sqlj.jar_entry and sqlj.jar_repository tables.Step 5: Set the classpath as:Step 6: Create a function that uses Java to call the static function declared in the jar file:Step 7: Execute the function:
Advanced Server includes enhanced SQL functionality and various other features that provide additional flexibility and convenience. This chapter discusses some of these additions.
11.1 COMMENTIn addition to commenting on objects supported by the PostgreSQL COMMENT command, Advanced Server supports comments on additional object types. The complete supported syntax is:COMMENT ON
{
AGGREGATE aggregate_name ( aggregate_signature ) |
CAST (source_type AS target_type) |
COLLATION object_name |
COLUMN relation_name.column_name |
CONSTRAINT constraint_name ON table_name |
CONSTRAINT constraint_name ON DOMAIN domain_name |
CONVERSION object_name |
DATABASE object_name |
DOMAIN object_name |
EXTENSION object_name |
EVENT TRIGGER object_name |
FOREIGN DATA WRAPPER object_name |
FOREIGN TABLE object_name |
FUNCTION func_name ([[argmode] [argname] argtype [, ...]])|
INDEX object_name |
LARGE OBJECT large_object_oid |
MATERIALIZED VIEW object_name |
OPERATOR operator_name (left_type, right_type) |
OPERATOR CLASS object_name USING index_method |
OPERATOR FAMILY object_name USING index_method |
PACKAGE object_name
POLICY policy_name ON table_name |
[ PROCEDURAL ] LANGUAGE object_name |
PROCEDURE proc_name [([[argmode] [argname] argtype [, ...]])]
PUBLIC SYNONYM object_name
ROLE object_name |
RULE rule_name ON table_name |
SCHEMA object_name |
SEQUENCE object_name |
SERVER object_name |
TABLE object_name |
TABLESPACE object_name |
TEXT SEARCH CONFIGURATION object_name |
TEXT SEARCH DICTIONARY object_name |
TEXT SEARCH PARSER object_name |
TEXT SEARCH TEMPLATE object_name |
TRANSFORM FOR type_name LANGUAGE lang_name |
TRIGGER trigger_name ON table_name |
TYPE object_name |
VIEW object_name
} IS 'text'* |
[ argmode ] [ argname ] argtype [ , ... ] |
[ [ argmode ] [ argname ] argtype [ , ... ] ]
ORDER BY [ argmode ] [ argname ] argtype [ , ... ]Include the AGGREGATE clause to create a comment about an aggregate. aggregate_name specifies the name of an aggregate, and aggregate_signature specifies the associated signature in one of the following forms:* |
[ argmode ] [ argname ] argtype [ , ... ] |
[ [ argmode ] [ argname ] argtype [ , ... ] ]
ORDER BY [ argmode ] [ argname ] argtype [ , ... ]Where argmode is the mode of a function, procedure, or aggregate argument; argmode may be IN, OUT, INOUT, or VARIADIC. If omitted, the default is IN.argname is the name of an aggregate argument.argtype is the data type of an aggregate argument.Include the CAST clause to create a comment about a cast. When creating a comment about a cast, source_type specifies the source data type of the cast, and target_type specifies the target data type of the cast.Include the COLUMN clause to create a comment about a column. column_name specifies name of the column to which the comment applies. relation_name is the table, view, composite type, or foreign table in which a column resides.Include the CONSTRAINT clause to add a comment about a constraint. When creating a comment about a constraint, constraint_name specifies the name of the constraint; table_name or domain_name specifies the name of the table or domain on which the constraint is defined.Include the FUNCTION clause to add a comment about a function. func_name specifies the name of the function. argmode specifies the mode of the function; argmode may be IN, OUT, INOUT, or VARIADIC. If omitted, the default is IN. argname specifies the name of a function, procedure, or aggregate argument. argtype specifies the data type of a function, procedure, or aggregate argument.large_object_oid is the system-assigned OID of the large object about which you are commenting.Include the OPERATOR clause to add a comment about an operator. operator_name specifies the (optionally schema-qualified) name of an operator on which you are commenting. left_type and right_type are the (optionally schema-qualified) data type(s) of the operator's arguments.Include the OPERATOR CLASS clause to add a comment about an operator class. object_name specifies the (optionally schema-qualified) name of an operator on which you are commenting. index_method specifies the associated index method of the operator class.Include the OPERATOR FAMILY clause to add a comment about an operator family. object_name specifies the (optionally schema-qualified) name of an operator family on which you are commenting. index_method specifies the associated index method of the operator family.Include the POLICY clause to add a comment about a policy. policy_name specifies the name of the policy, and table_name specifies the table that the policy is associated with.Include the PROCEDURE clause to add a comment about a procedure. proc_name specifies the name of the procedure. argmode specifies the mode of the procedure; argmode may be IN, OUT, INOUT, or VARIADIC. If omitted, the default is IN. argname specifies the name of a function, procedure, or aggregate argument. argtype specifies the data type of a function, procedure, or aggregate argument.Include the RULE clause to specify a COMMENT on a rule. rule_name specifies the name of the rule, and table_name specifies the name of the table on which the rule is defined.Include the TRANSFORM FOR clause to specify a COMMENT on a TRANSFORM. type_name specifies the name of the data type of the transform and lang_name specifies the name of the language of the transform.Include the TRIGGER clause to specify a COMMENT on a trigger. trigger_name specifies the name of the trigger, and table_name specifies the name of the table on which the trigger is defined.For more information about using the COMMENT command, please see the PostgreSQL core documentation at:
The text string output of the version() function displays the name of the product, its version, and the host system on which it has been installed.For Advanced Server, the version() output is in a format similar to the PostgreSQL community version in that the first text word is PostgreSQL instead of EnterpriseDB as in Advanced Server version 10 and earlier.
Prior to Advanced Server 11, a system catalog named dbo was available. The dbo system catalog contained views of database objects for similarity with Microsoft® SQL Server®.Now, for Advanced Server neither the dbo system catalog nor a schema named dbo exist in any database.If it is desired to have such a schema with its SQL Server compatible views, use the CREATE EXTENSION edb_dbo command to create the dbo schema and its content.The following example shows the creation of the dbo schema and its views:
12.1 edb_dirThe edb_dir table contains one row for each alias that points to a directory created with the CREATE DIRECTORY command. A directory is an alias for a pathname that allows a user limited access to the host file system.You can use a directory to fence a user into a specific directory tree within the file system. For example, the UTL_FILE package offers functions that permit a user to read and write files and directories in the host file system, but only allows access to paths that the database administrator has granted access to via a CREATE DIRECTORY command.
The edb_all_resource_groups table contains one row for each resource group created with the CREATE RESOURCE GROUP command and displays the number of active processes in each resource group.
12.3 edb_password_historyThe edb_password_history table contains one row for each password change. The table is shared across all databases within a cluster.
12.4 edb_policy
12.5 edb_profileThe edb_profile table stores information about the available profiles. edb_profiles is shared across all databases within a cluster.
12.6 edb_redaction_columnThe catalog edb_redaction_column stores information of data redaction policy attached to the columns of the table.
Note: The described column will be redacted if the redaction policy edb_redaction_column.rdpolicyid on the table is enabled and the redaction policy expression edb_redaction_policy.rdexpr evaluates to true.
12.7 edb_redaction_policyThe catalog edb_redaction_policy stores information of the redaction policies for tables.
Note: The data redaction policy applies for the table if it is enabled and the expression ever evaluated true.
12.8 edb_resource_groupThe edb_resource_group table contains one row for each resource group created with the CREATE RESOURCE GROUP command.
12.9 edb_variableThe edb_variable table contains one row for each package level variable (each variable declared within a package).
12.10 pg_synonymThe pg_synonym table contains one row for each synonym created with the CREATE SYNONYM command or CREATE PUBLIC SYNONYM command.
The product_component_version table contains information about feature compatibility; an application can query this table at installation or run time to verify that features used by the application are available with this deployment.
A keyword is a word that is recognized by the Advanced Server parser as having a special meaning or association. You can use the pg_get_keywords() function to retrieve an up-to-date list of the Advanced Server keywords:pg_get_keywords returns a table containing the keywords recognized by Advanced Server:
• The word column displays the keyword.
• The catcode column displays a category code.
• The catdesc column displays a brief description of the category to which the keyword belongs.Note that any character can be used in an identifier if the name is enclosed in double quotes. You can selectively query the pg_get_keywords() function to retrieve an up-to-date list of the Advanced Server keywords that belong to a specific category:Where code is:R - The word is reserved. Reserved keywords may never be used as an identifier; they are reserved for use by the server.U - The word is unreserved. Unreserved words are used internally in some contexts, but may be used as a name for a database object.T - The word is used internally, but may be used as a name for a function or type.C - The word is used internally, and may not be used as a name for a function or type.