|
2.
|
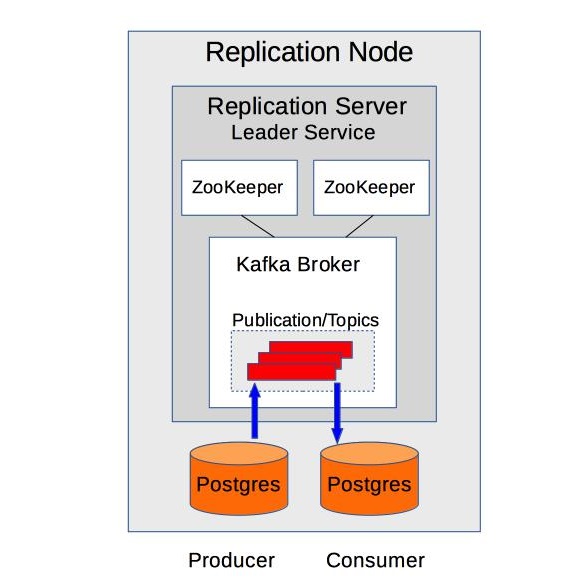
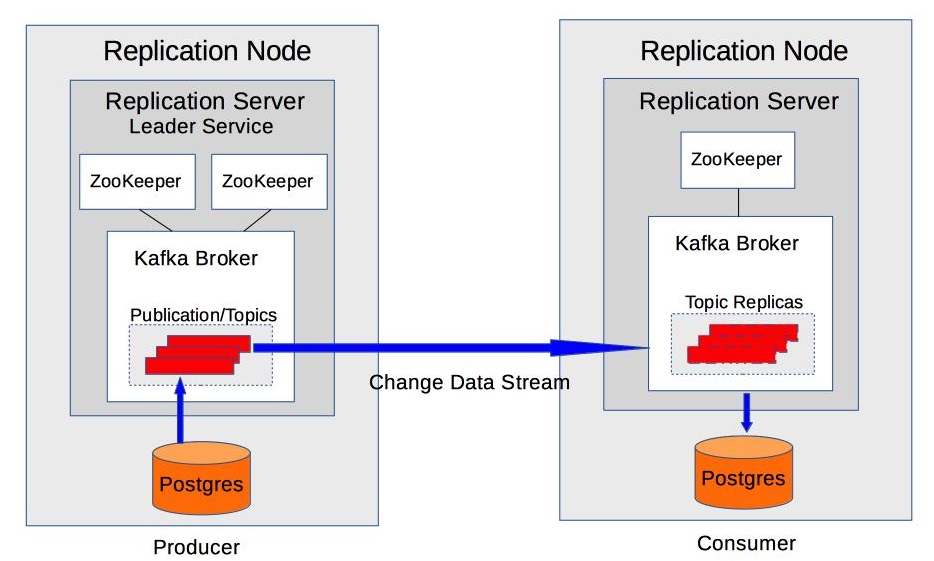
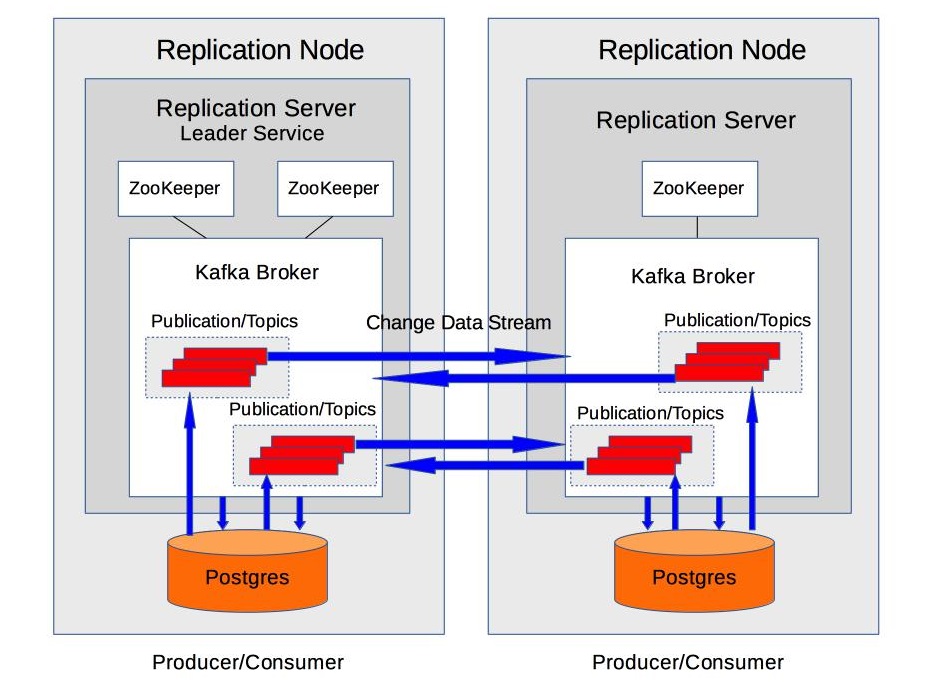
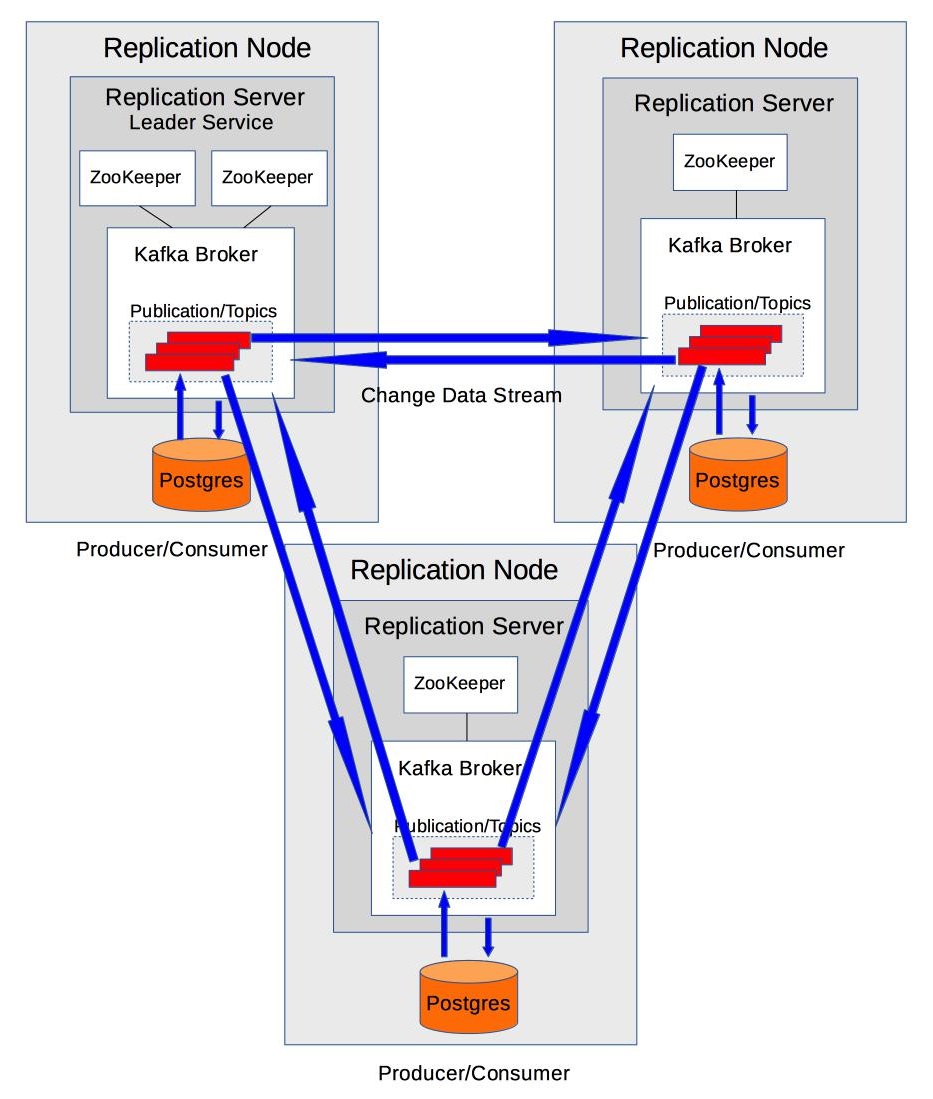
Join the replication server to the replication network. The first replication server that is joined to the network becomes the replication server acting as the leader service of the replication network. There is one and only one leader service per replication network. This first command to join the network as the leader service as well as all subsequent commands for adding other replication servers to this replication network and to perform all of the following processes in this list must be run from the EPRS_HOME/client/bin directory located on the host running the leader service. During this step, ZooKeeper is started up. Two instances of ZooKeeper are started on the leader service. A single ZooKeeper instance is started on each additional replication server that is joined to the network. In addition, after starting the leader service, an administrative user named admin is created. You must then set the password for the admin user. See Section 4.2.3 for setting the admin user password. See Section 4.2.2 for joining the network.
|
|
•
|
When setting up within a given host. Step 1 (starting the replication server) and Step 2 (joining the network) must be done first. Step 3 (adding a database) can then be followed by Step 4 (creating a publication). For the consumers, Step 3 (adding a database) is repeated followed by Step 5 (joining a publication). Alternatively, Step 3 (adding a database) can be done several times for multiple databases before proceeding with Step 4 (creating a publication) and Step 5 (joining a publication) on consumer databases that have been added.
|
As the root account, run the following from the
EPRS_HOME/server/bin directory:
-h,
--host host_ip_address
-c,
--config EPRS_HOME/server/etc
The full directory path to the EPRS_HOME/server/etc directory. If you want to have multiple replication servers running on the same host machine, you need to make a copy of the
EPRS_HOME/server directory and modify certain properties files located in the
EPRS_HOME/server/etc directory of the additional replication server. See the
EDB Postgres Replication Server Reference Guide for information on those properties files that must be modified.
The directory containing the .ngxpass password file. If the option is omitted, the
.ngxpass file will be searched for in the user’s home directory or by the setting of environment variable
NGXPASSPATH.
After the first joinnetwork command has been run establishing the leader service, additional replication servers are added to the network by running the
joinnetwork command specifying a unique
servername to identify the replication server and
host_ip_address to specify the host location where this additional replication server is running.
The -port 8082 option is the default port number assigned to the replication server as given by the
ngen.server.port parameter in the
application.properties file. If this port number was modified in order to run multiple replication servers on the same host, the
-port option must specify the altered port number.
When joinnetwork is used to establish the leader service, an
admin user is created with the administrator role, which has all permissions. The password for the
admin user must then be set with the
-setadminpassword command as in the following:
A prompt then appears for the admin user password. The password must then be entered for all subsequent RepCLI commands when
-user admin is specified stating that
admin is the user running the command unless the
-savepassword option had been included.
Specify postgresql if the database is a PostgreSQL database or
enterprisedb if it is an Advanced Server database.
The directory containing the .ngxpass password file. If the option is omitted, the
.ngxpass file will be searched for in the user’s home directory or by the setting of environment variable
NGXPASSPATH.
Specify W if the database can only write to this publication, which makes it a producer only. Specify
RW if the database can also accept changed data from other databases that have joined this publication. The latter makes this database both a consumer and producer of the publication. If
-nodetype is omitted, the default is
W.
The directory containing the .ngxpass password file. If the option is omitted, the
.ngxpass file will be searched for in the user’s home directory or by the setting of environment variable
NGXPASSPATH.
Note: All the tables to be replicated must have a primary key otherwise, it will throw an error while creating a publication.
Specify R if the database can only read from this publication, which makes it a consumer only. Specify
W if the database can only write to this publication, which makes it a producer only. Specify
RW if the database can stream and receive changed data to and from other databases that have joined this publication. The latter makes this database both a consumer and producer of the publication. If
-nodetype is omitted, the default is
R.
The directory containing the .ngxpass password file. If the option is omitted, the
.ngxpass file will be searched for in the user’s home directory or by the setting of environment variable
NGXPASSPATH.
Note that typically, the joinpub command is used when creating the initial replication network before snapshots are taken to all target databases and streaming has started.
Note that the startstreaming command must be re-executed even if streaming is already running on the replication network.
The directory containing the .ngxpass password file. If the option is omitted, the
.ngxpass file will be searched for in the user’s home directory or by the setting of environment variable
NGXPASSPATH.
|
•
|
To use the addtables command you should have the create_pub permission.
|
The directory containing the .ngxpass password file. If the option is omitted, the
.ngxpass file will be searched for in the user’s home directory or by the setting of environment variable
NGXPASSPATH.
|
•
|
To use the removetables command you should have the remove_pub permission.
|
Note: To check the tables in the specified publication use the
listpubtable command.
Note (For MMR only): When using table filters in a multi-master replication system, the master definition node, which provides the source of the table content for a snapshot, should contain a superset of all the data contained in the other master nodes of the multi-master replication system. This ensures that the target of a snapshot receives all of the data that satisfies any filtering criteria enabled on the other master nodes.
Note: In the following discussion, a result set refers to the set of rows in a table satisfying the selection criteria of an UPDATE or DELETE statement executed on that table.
When an INSERT statement is executed on a source table followed by a synchronization replication, the row is inserted into the target table of the synchronization if the row satisfies the filtering criteria. Otherwise, the row is excluded from insertion into the target table.
When an UPDATE statement is executed on a source table followed by a synchronization replication, the
UPDATE result set of the source table determines the action on the target table of the synchronization as follows.
When a DELETE statement is executed on a source table followed by a synchronization replication, the DELETE result set of the source table determines the action on the target table of the synchronization as follows.
The REPLICA IDENTITY FULL setting is required on tables in the following databases of a log-based replication system:
The REPLICA IDENTITY FULL setting on a source table ensures that certain types of transactions on the source table result in the proper updates to the target tables on which filters have been enabled.
The REPLICA IDENTITY setting can be displayed by the PSQL utility using the \d+ command:
Note: The following permission is required for taking the snapshot:
The directory containing the .ngxpass password file. If the option is omitted, the
.ngxpass file will be searched for in the user’s home directory or by the setting of environment variable
NGXPASSPATH.
The checksnapshot command confirms if the data is replicated to the target node.
Now run checksnapshot command after you run the
startSnapshot command (after a delay of few seconds) to confirm if data is replicated to target node. The status should be completed (for Data Publishing as well as Data Import).
Note: The following permissions are required for taking and checking the snapshot status:
The directory containing the .ngxpass password file. If the option is omitted, the
.ngxpass file will be searched for in the user’s home directory or by the setting of environment variable
NGXPASSPATH.
Stop streaming before you execute the startsnapshot command with the
reload option, otherwise, the operation will fail (an error message is logged in the server). Once the snapshot is completed explicitly restart the streaming.
Note: The
reload option does not work for an offline snapshot.
The directory containing the .ngxpass password file. If the option is omitted, the
.ngxpass file will be searched for in the user’s home directory or by the setting of environment variable
NGXPASSPATH.
Note: Filters do not work for an offline snapshot as the data movement takes place outside the replication server.
Step 1 (
Optional): If you already have the published tables and schemas on the target database omit this step. Make sure that schema definition for all the publication tables is proper on the target database.
Note: If partial set of tables are a part of the publication, take a partial backup (for selected tables with the
–tables option).
Step 2 (Optional): If you already have the published tables and schemas on the target database omit this step. Make sure that the schema definition for all the publication tables is proper on the target database.
Step 4: Join a publication on the target node.
Step 5: Take the snapshot (specify the
offline option).
The directory containing the .ngxpass password file. If the option is omitted, the
.ngxpass file will be searched for in the user’s home directory or by the setting of environment variable
NGXPASSPATH.
Step 6: Run the
checksnapshot command and note down the exported
Snapshot Id.
Step 7: Take a backup of the publication database (data only) using the exported
Snapshot Id. Skip control schema
_ngx_rep_cluster from the backup.
Run the following command from the /opt/edb/ database_server_installation_directory/bin directory after replacing the
Snapshot_Id with the exported
Snapshot Id from step 6:
Note: The control schema name is configurable. The default control schema name is
_ngx_rep_cluster.
Step 8: Restore the database dump (data only) on the subscription database. To restore the dump on the target database you can use any method that is convenient for you. Here, the
pg_restore utility is used to restore the dump on the target PostgreSQL database as follows:
Step 9: Start streaming for the target database.
The directory containing the .ngxpass password file. If the option is omitted, the
.ngxpass file will be searched for in the user’s home directory or by the setting of environment variable
NGXPASSPATH.
The directory containing the .ngxpass password file. If the option is omitted, the
.ngxpass file will be searched for in the user’s home directory or by the setting of environment variable
NGXPASSPATH.
|
•
|
In a separate terminal as the root user, issue the command lsof -i tcp:8082 to return the process ID of the replication server, then run the command kill -9 process_id to stop the replication server. In the lsof command, 8082 is the port used by the replication server as given by the ngen.server.port parameter in the EPRS_HOME/server/etc/application.properties file.
|
|
•
|
leavepub removes a database from a publication to which it had been joined to with the joinpub command.
|
|
•
|
removepub deletes a publication from the replication server in which it had been created with the createpub command.
|
|
•
|
removedb removes a database from a replication server that had been added with the adddb command.
|
|
•
|
leavenetwork removes a replication server from the replication network that had been added with the joinnetwork command.
|
See the EDB Postgres Replication Server Reference Guide for information about these commands.
Note: For receiving all the messages uncomment the following line in
EPRS_HOME/server/etc/logback.xml file.
Note: If the producer database is also to be a consumer, see Section
4.4 for consumer setup requirements that need to be added as well.
|
•
|
max_wal_senders. Specifies the maximum number of concurrent connections (that is, the maximum number of simultaneously running WAL sender processes). Should be set to a value greater than the total number of producer databases on the database server.
|
|
•
|
max_replication_slots. Specifies the maximum number of replication slots. Should be set to a value greater than the total number of producer databases on the database server.
|
The value you substitute for pub_dbname is the name of the Postgres producer database you want to use (specified with the
-database option of the
-adddb RepCLI command). The value you substitute for
pub_dbuser is the database user name to be specified with the
-dbuser option of the
adddb RepCLI command. The value you substitute for
pub_ipaddr is the host IP address of the replication server that will connect to the database.
The pg_hba.conf file must contain an additional entry with the DATABASE field set to
replication for
pub_dbname,
pub_dbuser, and
pub_ipaddr to allow replication connections from the replication server on the host on which it is running.
where 127.0.0.1 is the address of the
rep_server_1 in the above
-adddb command.
node1 is the dbname specified with the -database option of the
-adddb RepCLI command.
where 192.168.2.27 is the address of the
rep_server_1, specified in the above -
adddb command.
node1 is the dbname specified with the -database option of the -
adddb RepCLI command.
|
•
|
REPLICATION privilege if the database user is not a superuser
|
In the pg_hba.conf file, this database user must be included as shown by the
pub_dbuser variable in Section
4.3.1.2.
Note: Be sure the database objects have been created in the producer and consumer databases as described in Section
4.1.1.
The dept table in the consumer database
subdb contains no rows.
Step 1: As the Linux
root user account, start the replication server on the host to be started as the leader service by invoking the
runServer.sh script from the
EPRS_HOME/server/bin directory. The IP address of the host on which this script is being run must be specified with the
--host option.
Step 2: Open a second terminal on the same host using any Linux user account that has read and execute permissions on the
EPRS_HOME/client/bin directory. From the
EPRS_HOME/client/bin directory, join the replication network by invoking the
runRepCLI.sh script with the
joinnetwork command.
When using the joinnetwork command, you specify the IP address of the host running the replication server that is to become a member of the replication network along with the replication server’s port number. In this case, the replication server is running on the host you have logged into in Step 1 and the port number is the replication server’s default setting of 8082.
The first usage of the joinnetwork command on the host on which the replication server has been started results in its usage as the
leader service assigning the name given by the
-servername option, which is
localService in this example.
Step 3: You must now use the
setadminpassword command to set the administrator password for the EDB Replication Server administrative user that is given the username of
admin. The
admin user has the authority to run any RepCLI command. The response you enter for the
Enter admin password prompt becomes the administrator password for the
admin user.
For the remaining RepCLI commands in these examples, -user admin is given to run the command as the administrative user. There is a set of RepCLI commands that give you the ability to create other usernames and assign them certain roles and permissions for what the user can accomplish. See the
EDB Postgres Replication Server Reference Guide for this information.
Step 4: Use the
adddb command to add the publication database to the leader service. The replication server name
localService, which was assigned in Step 2 is given with the
-servername option.
Use the -dbid option to assign a unique database identifier to this database. This database identifier must then be specified in other RepCLI commands. The database identifier
db1 is given for this example.
Step 5: Use the
createpub command to create the publication to specify the tables whose changed data is to be captured and streamed to other consumer databases.
The -pubname option specifies the publication name you assign to the publication.
The -dbid option specifies the database that contains the tables that are to be in this publication.
The -servername option specifies that this publication is to be part of this replication server,
localService.
The -tables option lists one or more tables with their schema that are to be part of the publication.
A multiple list of schema.table_name must be separated by commas with no spaces before or after the comma.
Step 6: Add the subscription database to the replication server to act as the consumer.
Note that db2 is the identifier assigned to this database with the
-dbid option, which will be referenced by the
joinpub command described in the next step.
Step 7: Join the publication so the subscription database can receive the changed data from the publication tables. This is done by using the
joinpub command where the
-pubname option specifies the publication from which the changed data is to be received.
The -dbid option identifies the subscription database that is to receive this changed data.
The -servername option specifies the replication server to which this subscription database has been added in Step 6.
Note that by default, the joinpub command only allows the database to read changed data from the publication database. Changes that may occur on the subscription database tables are not streamed to other consumers unless the
-nodetype RW option is specified with the
joinpub command.
Step 8: Perform a snapshot to load these subscription database tables with the rows that are present in the publication database tables.
The -pubname option of the
startsnapshot command specifies the publication name.
The -dbid option specifies the target consumer database to receive the snapshot.
Step 9: Run
checksnapshot command (after a few seconds) to confirm if the data is replicated to the target node.
Step 10: After the row content of all publication tables is consistent across the publication and subscription databases, start the streaming.
$ ./runRepCLI.sh -startstreaming -pubname deptpub -user admin
Note: Be sure the database objects have been created in the producer and consumer databases as described in Section
4.1.1.
The dept table in the consumer database
node2 contains no rows.
Step 1: Start the replication server on the host to be started as the leader service by invoking the
runServer.sh script from the
EPRS_HOME/server/bin directory.
Step 2: Open a second terminal on the same host. From the
EPRS_HOME/client/bin directory, join the replication network by invoking the
runRepCLI.sh script with the
joinnetwork command.
Step 3: Set the administrator password for the
admin user. Use this password when prompted for it when invoking the subsequent RepCLI commands with the
-user admin option.
Step 4: Add the publication database to the leader service. The replication server name that was specified in Step 2 is given with the
-servername option.
Use the -dbid option to assign a unique database identifier to this database. This database identifier must then be specified in other RepCLI commands.
Step 5: Create the publication to specify the tables whose changed data is to be captured and streamed to the subscription database.
Step 6: Log into the host machine that is to run the subscriber and invoke the
runServer.sh script from the
EPRS_HOME/server/bin directory installed on that host.
Step 7: Join the replication server on the subscription host machine to the replication network by running the
joinnetwork command specifying the host IP address of the subscription host with the
-host option.
Note: Be sure you run the
joinnetwork command and all additional RepCLI commands from the leader service host machine and not from the subscriber host you logged into for Step 6.
Step 8: Add the subscription database to the replication server on the subscription host by specifying the replication server name
remoteService with the
-servername option. The specified replication server in the subsequent
joinpub command becomes the source to which the connection to the database is made.
Use the -dbid option to assign a unique database identifier for the database. The database identifier is then specified in other RepCLI commands.
Step 9: Join the publication so the subscription database can receive the changed data from the publication tables. The
joinpub command with the
-pubname option specifies the publication from which the changed data is to be received.
The -dbid option identifies the subscription database that is to receive this changed data.
The -servername option specifies the replication server from which the database connection is made to receive the replication.
Step 10: Perform a snapshot to load the subscription database tables with the rows that are present in the publication database tables.
The -pubname option of the
startsnapshot command specifies the publication name.
The -dbid option specifies the target consumer database to receive the snapshot.
Step 11: Run
checksnapshot command (after a few seconds) to confirm if the data is replicated to the target node.
Step 12: After the row content of all publication tables is consistent across the publication and subscription databases, start the streaming.
Note: Be sure the database objects have been created in the producer and consumer databases as described in Section
4.1.1.
Step 1: Start the replication server on the host to be started as the leader service by invoking the
runServer.sh script from the
EPRS_HOME/server/bin directory.
Step 2: Open a second terminal on the same host. From the
EPRS_HOME/client/bin directory, join the replication network by invoking the
runRepCLI.sh script with the
joinnetwork command.
Step 3: Set the administrator password for the
admin user. Use this password when prompted for it when invoking the subsequent RepCLI commands with the
-user admin option.
Step 4: Add the publication database to the leader service. The replication server name that was specified in Step 2 is given with the
-servername option.
Use the -dbid option to assign a unique database identifier to this database. This database identifier must then be specified in other RepCLI commands.
Step 5: Create the first publication.
The use of the -nodetype RW option, which is
read/write on the publication, specifies that the database that owns the tables of the publication, identified by the
-dbid option, is to accept and apply changed data to its own tables in addition to streaming its own changes to other consumer databases.
The use of the -nodetype RW option on the
createpub command as well as on the
joinpub command is what results in an MMR cluster where publication table changes on any database are replicated and applied to all other databases in the cluster.
For the createpub command, if the
-nodetype option is omitted, the default effect is
-nodetype W, which is
write-only, meaning that the database owning the publication tables can have its changes streamed to other database consumers, but it will not accept and apply changes to its own tables from other databases.
Step 6: Create the second publication with the
-nodetype RW option.
Step 7: Log into the host machine that is to serve as the second replication node and invoke the
runServer.sh script from the
EPRS_HOME/server/bin directory installed on that host.
Step 8: Join the replication server on the second replication node host machine to the replication network by running the
joinnetwork command specifying the host IP address of the second replication node host with the
-host option.
Note: Be sure you run the
joinnetwork command from the leader service host machine and not from the second replication node host you logged into for Step 7.
Step 9: Add the other database of the MMR cluster to the replication server on the second replication node host by specifying the replication server name
remoteService with the
-servername option.
Use the -dbid option to assign a unique database identifier for the database. The database identifier is then specified in other RepCLI commands.
Step 10: Join the first publication so this second MMR database can receive the changed data from the publication tables. The
joinpub command with the
-pubname option specifies the publication from which the changed data is to be received.
The -dbid option identifies the database that is to receive this changed data.
The -servername option specifies the replication server to which this database has been added in Step 9.
Note that by default, the joinpub command only allows the database to read changed data from the publication database. Changes that may occur on these database tables are not streamed to other consumers unless the
-nodetype RW option is specified with the
joinpub command.
Step 12: Perform snapshots to load these database tables with the rows that are present in the publication database tables.
The -pubname option of the
startsnapshot command specifies the publication name.
The -dbid option specifies the target database to receive the snapshot.
Step 13: Run
checksnapshot command (after a delay of a few seconds) to confirm if the data is replicated on the target node.
Step 14: Perform a snapshot on the second publication.
Step 15: Run
checksnapshot command (after a delay of a few seconds) to confirm if the data is replicated to the target node.
Step 16: After the row content of all publication tables is consistent across the databases, start the streaming.
The -pubname option of the
startstreaming command specifies the publication name.
Step 17: Start the streaming on the second publication.
Note: Be sure the database objects have been created in the producer and consumer databases as described in Section
4.1.1.
Step 1: Start the replication server on all nodes.
Step 2: Join all replication servers to the replication network.
From the EPRS_HOME/client/bin directory, join the replication network by invoking the
runRepCLI.sh script with the
joinnetwork command.
The first joinnetwork command you run establishes its usage as the leader service:
Step 3: Add databases to all replication servers. The
-servername option of the
adddb command specifies the replication server on the host to which the database is to be added.
Use the -dbid option to assign a unique database identifier for each database. The database identifier is then specified in other RepCLI commands.
Step 4: Create the publication on the leader service with the
-nodetype RW option to enable acceptance of changed data from other producers as well as streaming its own changed data to other consumers that have joined the publication.
Step 5: Join the publication so the database can receive the changed data from the publication tables. The
joinpub command with the
-pubname option specifies the publication from which the changed data is to be received.
The -dbid option identifies the database that is to receive this changed data.
The -servername option specifies the replication server to which the database has been added.
Note that by default, the joinpub command only allows the database to read changed data from the publication database. Changes that may occur on these database tables are not streamed to other consumers unless the
-nodetype RW option is specified with the
joinpub command.
Step 6: Perform snapshots to load these consumer database tables with the rows that are present in the publication database table.
The -pubname option of the
startsnapshot command specifies the publication name.
The -dbid option specifies the target database to receive the snapshot.
Step 7: Run
checksnapshot command (after a delay of a few seconds) to confirm if the data is replicated to the target node.
Step 8: Perform snapshots to load these consumer database tables with the rows that are present in the publication database table.
Step 9: After the row content of all publication tables is consistent across the publication and subscription databases, start the streaming.
The -pubname option of the
startstreaming command specifies the publication name.
schema_name is the name of the schema in the source database containing the tables to be validated. The choices for
option are listed later in this section within the Options subsection.
-ss,
--source-schema schema
-ts,
--target-schema schema
-it,
--include-tables table_1 [,table_2 ] ...
-et,
--exclude-tables table_1 [,table_2 ] ...
-srs,
--skip-rowsonlyin-source { true | false }
When true is specified, the logging of differences for rows that exist only in the source database table are skipped. The default is
false.
-srt,
--skip-rowsonlyin-target { true | false }
When true is specified, the logging of differences for rows that exist only in the target database table are skipped. The default is
false.
-srb,
--skip-rowsin-both { true | false }
When true is specified, the logging of differences for rows that exist both in the source and target database tables with the same primary key, but with different non-primary key values are skipped. The default is
false.
-ld,
--logging-dir log_directory_path
Directory path to where the Data Validator log and diff files are to be created and stored. If log_directory_path does not exist, Data Validator attempts to create it. If a full directory path is not specified
log_directory_path is created or assumed to be located relative to the
EPRS_HOME/datavalidator/ bin subdirectory where the
runValidation.sh script is invoked. (That is, the logs directory is
EPRS_HOME/datavalidator/bin/log_directory_path.) Be sure the operating system account used to invoke the
runValidation.sh script has the privileges to create the directory if it does not already exist, or to create files in the specified directory if it does already exist. If omitted, the default is the
EPRS_HOME/bin/logs directory.
-ds,
--display-summary { true | false }
Specify true to display only the Data Validator summary. This omits the source and target database connection information as well as the detailed breakdown of the results by source database table. Specify
false to display all of the Data Validator results. The type and amount of information that is displayed at the command line console when the Data Validator is invoked is the same information that is also stored in the log file for that run. If omitted, the default is
false (that is, all of the Data Validator results is displayed).
-sdbms,
--source-dbms database_type
-sdb,
--source-database dbname
-spw,
--source-password password
-tdbms,
--target-dbms database_type
-tdb,
--target-database dbname
-tpw,
--target-password password
-bs,
--batch-size row_count
The -bs option specifies the number of rows to group in a batch to be used for comparison across the source and target database tables. For example, if a table contains 1000 rows, then a
-bs setting of 100 requires 10 batch iterations to complete the comparison across the source and target databases. The Data Validator reads 100 rows, both from the source and target tables, and adds them in source and target buffers. The validation thread then reads the 100 rows from the source and target buffers and performs the comparison. It will then move to read and prepare the next 100 rows for comparison and so on. Note that the actual database round trips required to bring in 100 rows from the database depends on the
-fs option for the fetch size. For example, an
-fs setting of 100 needs just one round trip whereas an
-fs setting of 10 requires 10 database round trips.
-fs,
--fetch-size row_count
|
•
|
The Source DEPT table contains one extra row with DEPTNO 50 that does not exist in the target Advanced Server dept table.
|
|
•
|
The rows in the EMP table with EMPNO values 9001 and 9002 have column values that differ between the Source and target Advanced Server tables
|
|
•
|
In this example, the JOBHIST table contains identical rows for both the source and target Advanced Server tables.
|
The Data Validator log files are created in directory /EPRS_home/datavalidator/bin/logs/ as specified with the
-ld option. The operating system account used to invoke the
runValidation.sh script has write access to the
EPRS_home directory so the Data Validator can create the
/EPRS_home/datavalidator/bin/logs subdirectory.
Validated tables count: 3
Tables having only unsupported datatypes count: 0
Tables having primary key limitation count: 0
|
•
|
The JOBHIST table contains no errors.
|
|
1.
|
Error: Set admin password first before execution of other command(s).
|
Cause: The admin password is not set before adding a database to the replication server.
Workaround: Set the admin password before adding a database to the replication server.
|
2.
|
Error: Unable to encrypt password. Reason Invalid user name or password.
|
Cause: Incorrect username or password given.
|
3.
|
Error: Error encountered: Failed to add database with id database_Id.
|
Causes: This error can occur in the following scenarios
Workaround: Provide the correct encrypted password. Provide the correct IP address (IP address of the database host). Check if the database server is running or not.
Encrypt the database password using encrypt command and use the same while adding the database.
|
4.
|
Error: Failed to add database with id db1. WARNING: Connection error: FATAL: no pg_hba.conf entry for host "x.x.x.x", user "xxx", database "database_Id", SSL off.
|
Cause: The IP address for the database host is not present in
pg_hba.conf file.
Workaround: Add the IP address of the database host in the
pg_hba.conf file
located at
var/lib/edb/asx/. For a cluster the
pg_hba.conf file is located at
/var/lib/edb/asx/clusterx.
asx is the EDB Advanced Version and
clusterx is the cluster on which the database is running, for example, cluster1 or cluster2 and so on.
|
5.
|
Error: The database id database_Id is not registered with the network.
|
Cause: The database does not exist or an incorrect database id is provided.
Workaround: Provide the correct database id or create the database with the
create database command.
|
6.
|
Error: The server server_name is not registered with the network.
|
Cause: Incorrect servername is provided or the server does not exist in the network.
Workaround: Provide the correct servername or register the server in the network with the
joinnetwork command.
|
7.
|
Error: Publication publication_name not found.
|
Cause: Publication does not exist or an incorrect publication name is given.
Workaround: Provide the correct publication name or create a publication.
|
8.
|
Error: Subscription with DB id database_Id not found for Publication publication_name.
|
Cause: Incorrect
database_Id provided or the database does not exist.
Workaround: Provide the correct
database_Id or
create the database if it does not exist.
|
9.
|
Error: Snapshot cannot be performed, Publication database id database_Id is same as the Consumer database id database_Id.
|
Cause: The publication database is the same as the consumer database.
Workaround: The publication and consumer database should be different.
|
10.
|
Error: One or more Subscriptions are associated with Publication publication_name. Please un-subscribe (via leavepub command) before removing the Publication.
|
Cause: removepub command is run before the publication leaves the network.
Workaround: Run
leavepub command
for all the subscription databases before removing the publication.
Error: Cannot register database because it is already registered by a publication service.
Cause: Database can be registered with the replication cluster only once.
Workaround: Database is already registered. You can create a publication with required tables with the
createpub command.
Error: Exception in thread "main" javax.ws.rs.ProcessingException: java.net.ConnectException: Connection refused (Connection refused
Cause: Occurs whenever a connection cannot be made to the EDB Replication Server.
Workaround: Check that you have entered the correct host IP address and port number of the server. Check that the server is running. Check that in the pg_hba.conf file, the hostname is mapped to the correct network IP address, which matches the IP address returned by the Linux ifconfig command. Check if the publication server has access to the database in the pg_hba.conf file.
Error: Connection refused. Check that the hostname and port are correct and that the postmaster is accepting TCP/IP connections.
Cause: Occurs when attempting to save a publication database definition. The publication server cannot connect to the database server network location.
Workaround: Verify that the correct IP address and port for the database server are given. Verify that the database server is running and is accessible from the host running the publication server.
Error: Could not connect to the database server. Reason: FATAL: number of requested standby connections exceeds max_wal_senders (currently n)
Cause: Occurs when attempting a snapshot replication from a publication database which is by default configured with the log-based method of synchronization replication (that is, WAL based logical replication), and the additional concurrent connection for logical replication exceeds the current setting, n, of the max_wal_senders configuration parameter in the postgresql.conf file.
Workaround: Increase the value of max_wal_senders in the postgresql.conf file for the database server running the publication database. Restart the database server containing the publication database.
asx is the EDB Advanced Version and
clusterx is the cluster on which the database is running, for example, cluster1 or cluster2 and so on.
Error: Currently no publication exists on the publication server. Please create at least one publication on the server and then retry.
Cause: If you join a publication when there are no publications on the specified publication server, then this error message is thrown.
Workaround: Create a publication with the createpub command and then join a publication.
Error: Database cannot be removed. Reason: Publication database connection cannot be removed as one or more publications are defined against it.
Cause: There are existing publications on the database.
Workaround: Make sure all the publications pertaining to the publication database have been removed. Use leavepub command to leave the publication and removepub command to remove the publication.
Error: Database connection cannot be added. FATAL: no pg_hba.conf entry for host "xxx.xxx.xx.xxx", user "user_name", database "database_name", SSL off
Cause: Occurs when attempting to save a database definition using the adddb command.
Workaround: Verify that the database host IP address, port number, database user name, password, and database identifier are correct. Verify there is an entry in the pg_hba.conf file permitting access to the database by the given user name originating from the IP address where the EDB Replication Server is running.
Error: Filter cannot be defined for Binary data type column(s) e.g. BYTEA, BLOB, RAW.
Cause: Occurs when attempting to define a filter rule on a column with a binary data type in a publication table. Filter rules are not permitted on such columns.
Workaround: Do not add filters on binary data type columns.
Error: Filter with same name/clause already exist on table/view: schema.table_name
Cause: When adding a filter rule on a publication table, the same filter name or the same filter clause (WHERE clause) cannot be used more than once on a given table.
Workaround: Modify the duplicate filter name or filter clause so it is unique for the table.
Error: The triggers creation failed for one or more publication tables. Make sure the database is in valid state and user is granted the required privileges.
Cause: Either the user does not have the trigger creation privilege or there is a database server problem. The database server message is displayed as part of the error.
Workaround: Provide a username with sufficient privileges while adding a database.
Error: Problem occurred in publish process. Reason: Connection refused. Check that the hostname and port are correct and that the postmaster is accepting TCP/IP connections.
Resolution: Occurs when attempting synchronization replication and the controller database is not accessible by the publication server.
Workaround: Verify that the correct IP address and the port have been defined in the publication database definition of the controller database. Verify that the database server is running and is accessible from the host running the publication server.
|
1.
|
Error: Publication cannot be created. Publication publication_name already exists on the publisher server. Please choose a different name and then proceed.
|
Cause: Publication names must be unique within a publication server.
|
2.
|
Error: Publication cannot be created. Table schema.table_name replica identity is set to replica_identity_setting. To define a Filter, the table replica identity should be set to FULL.
|
Cause: Occurs when a table filter is attempted to be defined on a publication table used in a log-based replication system.
Workaround: Use the ALTER TABLE statement to change REPLICA IDENTITY to FULL.
|
3.
|
Error: Publication cannot be created. Table table_name does not contain a primary key. Transactional replication is not supported for a non-pk table.
|
Cause: All tables used for synchronization replication must have primary keys.
Error: The publication schema cannot be created. Reason: ERROR: Permission denied for database db_name.
Cause: Occurs when attempting to create the publication database definition and the specified publication database user does not have the privilege to create a schema in database db_name.
Workaround: Grant the CREATE privilege on the database to the publication database user.
Error: A replication slot is not available on the target database server. Please configure the max_replication_slots GUC on the database server.
Cause: Occurs when attempting to add a publication database definition with the log-based method of synchronization replication, and the max_replication_slots configuration parameter in the
postgresql.conf file is not set to a large enough value to accommodate the additional database.
Workaround: Increase the value of the max_replication_slots parameter and restart the database server.
Error: main" javax.ws.rs.ProcessingException: java.net.ConnectException: Connection refused (Connection refused)
Cause: EDB Replication Server is not running.
Note: Make sure that the following directories are present after installing EDB Replication Server.