Managing a PEM Server
The sections that follow provide information about tasks related to PEM server such as restarting the PEM server and agent, controlling the PEM server or PEM agent, controlling the HTTPD
service on Linux and Windows, controlling the HTTPD server, managing PEM authentication and security, modifying the pg_hba.conf file, modifying PEM to use a proxy server etc.
Starting and Stopping the PEM Server and Agents
The PEM server starts, stops and restarts when the Postgres server instance on which it resides starts, stops or restarts; use the same commands to control the PEM server that you would use to control the Postgres server. On Linux platforms, the command that stops and starts the service script will vary by platform and OS version.
The PEM agent is controlled by a service named pemagent.
The Windows operating system includes a graphical service controller
that displays the server status, and offers point-and-click server
control. The Services utility can be accessed through the Windows
Control Panel. When the utility opens, use the scroll bar to navigate
through the listed services to highlight the service name.

The PEM service in the Windows Services window
Use the Stop, Pause, Start, or Restart buttons to control the state of
the service.
Please note that any user (or client application) connected to the Postgres server will be abruptly disconnected if you stop the service. For more information about controlling a service, please consult the EDB Postgres Advanced Server Installation Guide, available from the EnterpriseDB website at:
https://www.enterprisedb.com/resources/product-documentation
Remotely Starting and Stopping Monitored Servers
PEM allows you to startup and shutdown managed server instances with the PEM client. To configure a server to allow PEM to manage the service, complete the Server registration dialog, registering the database server with a PEM agent and:
specify the
Store on PEM Serveroption on thePropertiesdialog.specify the name of a service script in the
Service IDfield on theAdvancedtab:For Advanced Server, the service name is
edb-as-<x>orppas-<x>.For PostgreSQL, the service name is
postgresql-<x>.
Where x indicates the server version number.
After connecting to the server, you can start or stop the server by highlighting the server name in the tree control, and selecting Queue Server Startup or Queue Server Shutdown from the Management menu.
The Management menu of a managed server
Controlling the PEM Server or PEM Agent on Linux
On Linux platforms, the name of the service script that controls:
a PEM server on Advanced Server is
edb-as-<x>orppas-<x>a PEM server on PostgreSQL is
postgresql-<x>a PEM agent is
pemagent
Where x indicates the server version number.
You can use the service script to control the service.
To control a service on RHEL or CentOS version 6.x, open a command line, assume superuser privileges, and enter:
/etc/init.d/<service_name> <action>To control a service on RHEL or CentOS version 7.x, open a command line, assume superuser privileges, and issue the command:
systemctl <service_name> <action>
Where:
service_name is the name of the service.
action specifies the action taken by the service. Specify:
startto start the service.stopto stop the service.restartto stop and then start the service.statusto check the status of the service.
Controlling the PEM Server or PEM Agent on Windows
The Windows operating system includes a graphical service controller that displays the server status, and offers point-and-click server control. The registered name of the service that controls:
a PEM server host on PostgreSQL is
postgresql-<x>a PEM server host on Advanced Server is
edb-as-<x>, orppas-<x>a PEM agent is
Postgres Enterprise Manager - pemAgent
Where x indicates the server version number.
Navigate through the Windows Control Panel to open the Services utility.
When the utility opens, use the scroll bar to browse the list of
services.
The Windows Services window
Use the Stop the service option to stop a service. Any user (or client
application) connected to the server will be abruptly disconnected if
you stop the service.
Use the Pause the service option to instruct Postgres to reload a
service’s configuration parameters. The Pause the service option is an
effective way to reset parameters without disrupting user sessions for
many of the configuration parameters.
Use the Start the service option to start a service.
Controlling the HTTPD Server
On Linux, you can confirm the status of the PEM-HTTPD service by opening
a command line, and entering the following command:
ps -ef \| grep httpd
If Linux responds with an answer that is similar to the following
example, httpd is not running:
user 13321 13267 0 07:37 pts/1 00:00:00 grep httpd
To start the service on a CentOS or RHEL 6.x system, use the command:
/etc/init.d/httpd start
To start the service on a CentOS or RHEL 7.x system, use the command:
systemctl start httpd
On Windows, you can use the Services applet to check the status of the
PEM HTTPD service. After opening the Services applet, scroll through the
list to locate the PEM HTTPD service.
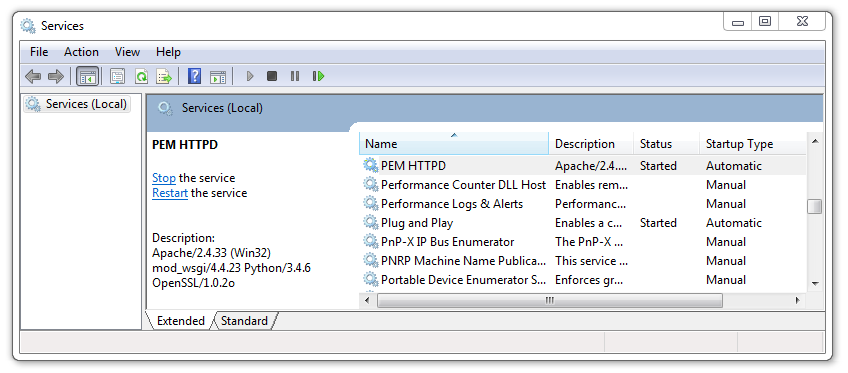
The PEM HTTPD Windows service
The Status column displays the current state of the server. Click the
Start link to start PEM HTTPD if the service is not running.
Modifying the pg_hba.conf File
Entries in the pg_hba.conf file control network authentication and
authorization. The pg_hba.conf file on the PEM server host must allow
connections between the PEM server and PEM-HTTPD, the PEM agent, and the
monitored servers.
During the PEM server installation process, you are prompted for the IP
address and connection information for hosts that will be monitored by
PEM; this information is added to the top of the pg_hba.conf file of the
PEM backing database.
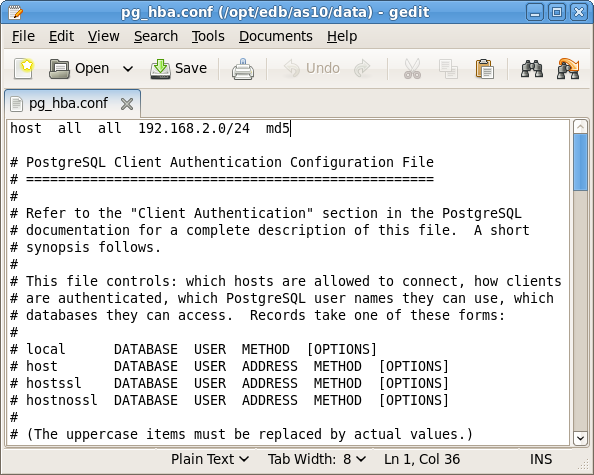
PEM entries in the pg_hba.conf file
You may also need to manually modify the pg_hba.conf file to allow
connections between the PEM server and other components. For example, if
your PEM-HTTPD installation does not reside on the same host as the PEM
server, you must modify the pg_hba.conf file on the PEM server host to
allow PEM-HTTPD to connect to the server.
By default, the pg_hba.conf file resides in the data directory, under
your Postgres installation; for example, on an Advanced Server 10 host,
the default location of the pg_hba.conf is:
/opt/edb/as10/data/pg_hba.conf
You can modify the pg_hba.conf file with your editor of choice. After
modifying the file, restart the server for changes to take effect.
The following example shows a pg_hba.conf entry that allows an md5
password authenticated connection from a user named postgres, to the
postgres database on the host on which the pg_hba.conf file resides. The
connection is coming from an IP address of 192.168.10.102:
# TYPE     DATABASE        USER        CIDR-ADDRESS         METHOD
# IPv4 local connections:
 host     postgres       postgres    192.168.10.102/32       md5
You may specify the address of a network host, or a network address
range. For example, if you wish to allow connections from servers with
the addresses 192.168.10.23, 192.168.10.76 and 192.168.10.184, enter a
CIDR-ADDRESS of 192.168.10.0/24 to allow connections from all of the
hosts in that network:
# TYPE     DATABASE        USER        CIDR-ADDRESS       METHOD
# IPv4 local connections:
  host      postgres         all       192.168.10.0/24       md5
For more information about formatting a pg_hba.conf file entry, please
see the PostgreSQL core documentation at:
Before you can connect to a Postgres server with PEM, you must ensure
that the pg_hba.conf file on both servers allows the connection.
If you receive this error when connecting to the database server, modify
the pg_hba.conf file, adding an entry that allows the connection.
Creating and Maintaining Databases and Objects
Each instance of a Postgres server manages one or more databases; each user must provide authentication information to connect to the database before accessing the information contained within it. The PEM client provides dialogs that allow you to create and manage databases, and all of the various objects that comprise a database (e.g. tables, indexes, stored procedures, etc.).
Creating a database is easy in PEM: simply right click on any managed server’s Databases node and select Database… from the Create menu. After
defining a database, you can create objects within the new database.
For example, to create a new table, right click on a Tables node, and select Table… from the Create menu. When the New Table dialog opens, specify the attributes of the new table.
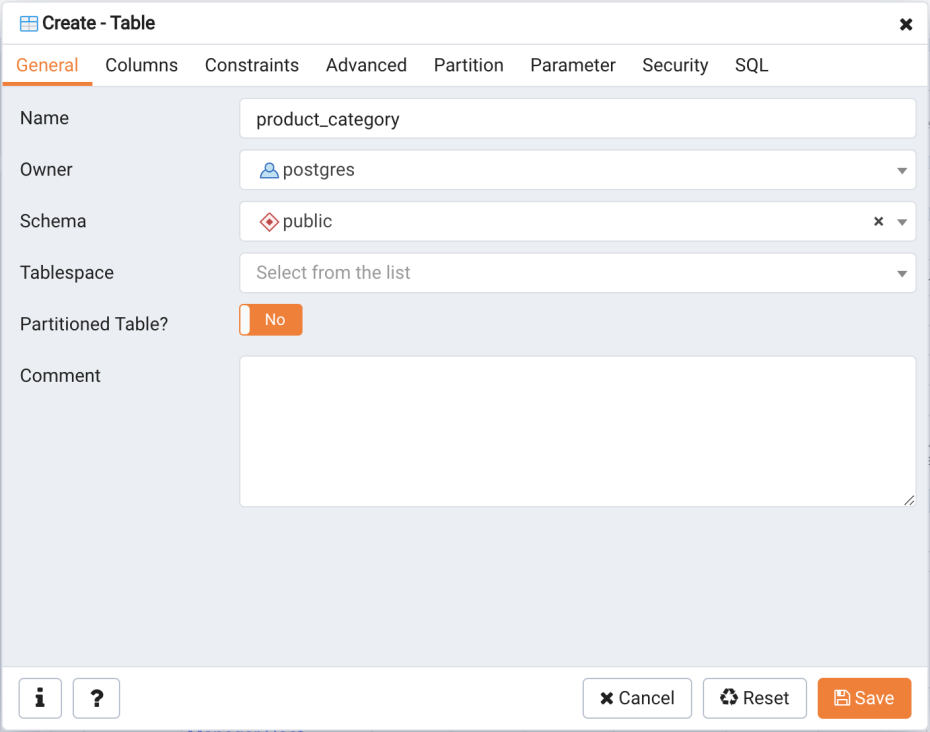
Use PEM’s dialogs to create and manage database objects
PEM provides similar dialogs for the creation and management of other database objects:
tables
indexes
stored procedures
functions
triggers
views
constraints, etc.
Each object type is displayed in the tree control; right click on the node that corresponds to an object type to access the Create menu and create a new object, or select Properties from the context menu of a named node to perform administrative tasks for the highlighted object.
Managing PEM Authentication
Postgres supports a number of authentication methods:
Secure password (md5)
GSSAPI
SSPI
Kerberos
Ident
LDAP
RADIUS
Certificate (SSL)
PAM
Postgres (and PEM) authentication is controlled by the pg_hba.conf configuration file. Entries within the configuration file specify who
may connect to a specific database, and the type of authentication required before that user is allowed to connect.
A typical entry in the pg_hba.conf file that allows a user named postgres to connect to all databases from the local host (127.0.0.1/32)
using secure password (md5) authentication connections would take the form:
host all postgres 127.0.0.1/32 md5
Depending on your system’s configuration, you may also need to create a
password file for the user account that the PEM agent uses to connect to
the server, to allow the agent to properly respond to the server’s
authentication request. An entry in the password file for a user named
postgres, with a password of 1safepwd would take the form:
localhost:5432:*:postgres:1safepwd
The password file is usually named ~root/.pgpass on Linux systems, or
%APPDATA%\postgresql\pgpass.conf (on Windows). For more information
about configuring a password file, visit the EnterpriseDB website at:
For more information about the authentication methods supported by Postgres, see the PostgreSQL core documentation at:
Modifying PEM to Use a Proxy Server
If your network configuration prevents direct communication between PEM and the EnterpriseDB website, you can configure a proxy server for use by PEM when:
updating the
package_catalogtable with information about the packages that are available for installation or updatereading package options
downloading packages
After configuring a proxy server on your network, modify the PEM server configuration, specifying the connection properties of the proxy, and instructing PEM to use the proxy server.
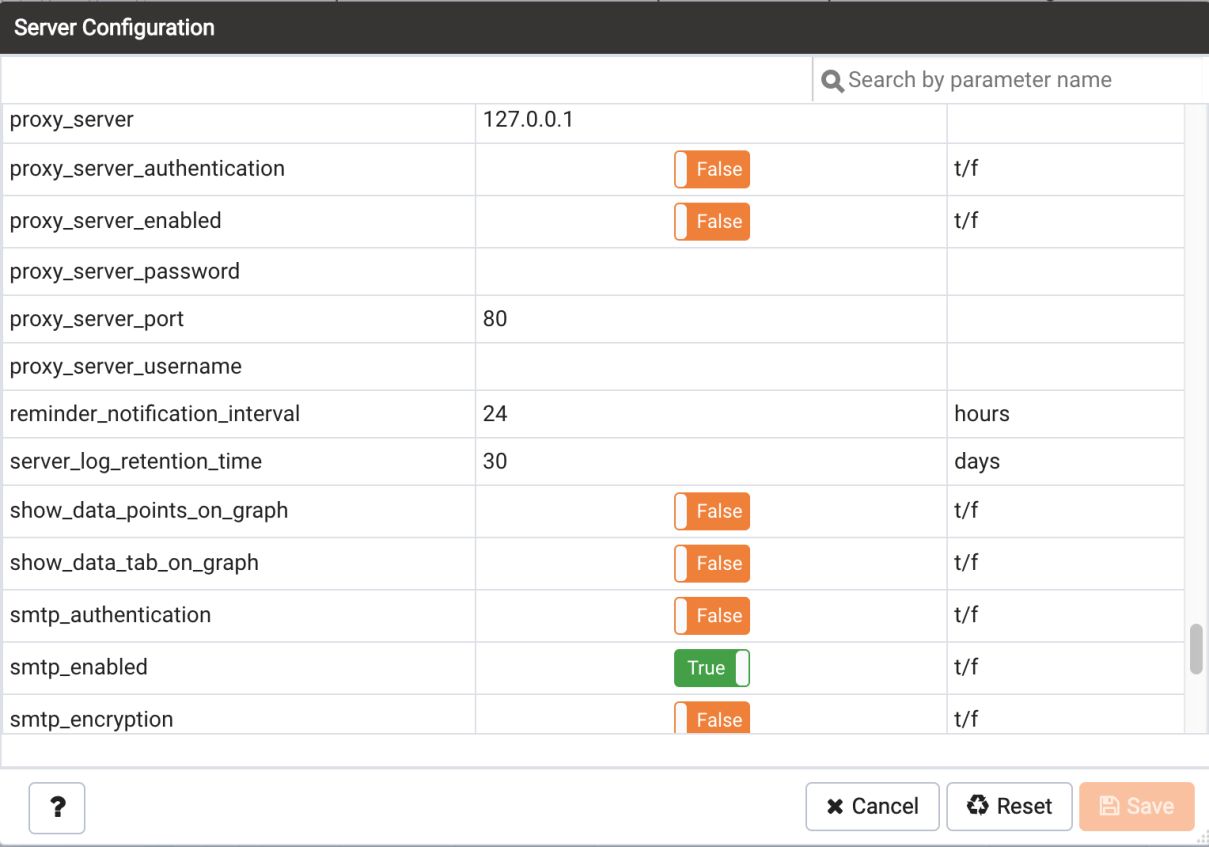
The PEM Server Configuration dialog
To access the Server Configuration dialog and modify the server
configuration, connect to the PEM web interface, and select Server
Configuration… from the Management menu.
To modify a parameter value, locate the parameter, and modify the parameter value in the Value column. Use the following PEM Server configuration parameters to specify connection details that allow PEM to connect to the proxy server:
Use the
proxy_serverparameter to specify the IP address of the proxy server.Specify a value of
tin theproxy_server_authenticationparameter to indicate that the proxy server will require PEM to authenticate when connecting; specifyfif authentication is not required.Specify a value of
tin theproxy_server_enabledparameter if PEM is required to use a proxy server when retrieving the package list, orfif a proxy server is not configured.Use the
proxy_server_passwordparameter to provide the password associated with the user specified inproxy_server_username.Specify the port number of the proxy server in the
proxy_server_portparameter.Specify the user name that should be used when authenticating with the proxy server in the
proxy_server_usernameparameter.
When you’ve finished updating the parameters required to configure the proxy server, click the Save icon in the upper-right corner of the
dialog before closing the dialog.
Editing the PEM Server Configuration
You can use the PEM client to graphically manage the configuration parameters of the PEM server to enable features or modify default settings. To open the Server Configuration dialog, select Server Configuration… from the Management menu.

The Server Configuration dialog
To modify a parameter value, edit the content displayed in the Value field to the right of a parameter name. Click the Save button to preserve your changes, or click the Close button to exit the dialog without applying the changes. Use the Reset button to return the parameters to their original value.
Managing Security
PEM provides a graphical way to manage your Postgres roles and servers.
Login Roles
When you connect to the PEM server, you must provide role credentials that allow access to the database on which the PEM server stores data. By default, the postgres superuser account is used to initially connect to the server, but it is strongly recommended (for both security and
auditing purposes) that individual roles are created for each connecting user. You can use the PEM Query Tool, the PEM web interface Create – Login/Group Role dialog, or a command line client (such as psql) to create a role.
To use the Create – Login/Group Role dialog to create a role, expand the
node for the server on which the role will reside in the PEM tree
control, and right-click on the Login/Group Roles node to access the
context menu. Then, select Login/Group Role… from the Create menu.
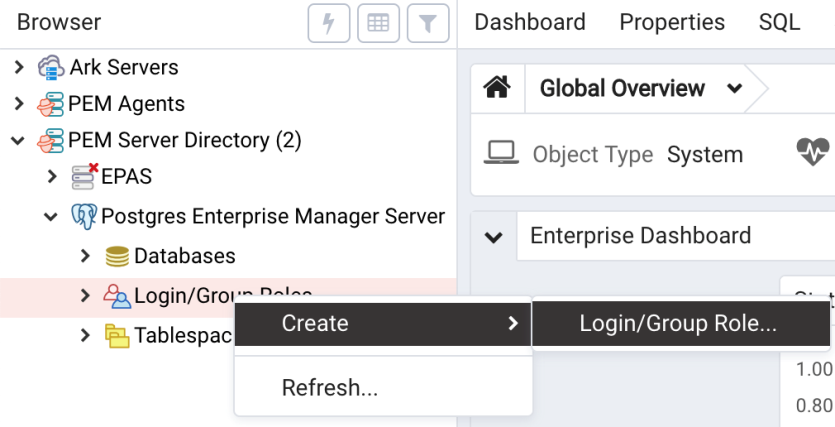
The context menu of the Login Roles node
Use fields on the tabs of the Create – Login/Group Role dialog to define the role. To display the PEM online help in a
browser tab, click the help (?) button located in the lower-left corner of the dialog.
When you’ve finished defining the new role, click Save to create the role.

The Login Role dialog
To modify the properties of an existing login role, right click on the
name of a login role in the tree control, and select Properties from the
context menu. To delete a login role, right click on the name of the
role, and select Delete/Drop from the context menu.
For more complete information about creating and managing a role, see the PostgreSQL online documentation:
Group Roles
Group roles can serve as containers, used to dispense system privileges (such as creating databases) and object privileges (e.g. inserting data into a particular table). The primary purpose of a group role is to make the mass management of system and object permissions much easier for a DBA. Rather than assigning or modifying privileges individually across many different login accounts, you can assign or change privileges for a single role and then grant that role to many login roles at once.
Use the Group Roles node (located beneath the name of each registered
server in the PEM tree control) to create and manage group roles.
Options on the context menu provide access to a dialog that allows you
to create a new role or modify the properties of an existing role. You
can find more information about creating roles at:
Using PEM Pre-Defined Roles to Manage Access to PEM Functionality
You can use the Login/Group Role dialog to allow a role with limited
privileges to access PEM features such as the Audit Manager, Capacity
Manager, or SQL Profiler. PEM pre-defined roles allow access to PEM
functionality; roles that are assigned membership in these roles can
access the associated feature.

The Membership tab
When defining a user, use the Membership tab to specify the roles in
which the new user is a member. The new user will share the privileges
associated with each role in which it is a member. For a user to have
access to PEM extended functionality, the role must be a member of the
pem_user role and the pre-defined role that grants access to the
feature. Use the Roles field to select pre-defined role names from a
drop down list.
The SQL tab displays the SQL command that the server will execute when
you click Save.

The SQL tab
The example shown above creates a login role named acctg_clerk that will
have access to the Audit Manager; the role can make unlimited
connections to the server at any given time.
You can use PEM pre-defined roles to allow access to the functionality listed in the table below:
Value |
Parent Role |
Description |
|---|---|---|
pem_super_admin |
Role to manage/configure everything on Postgres Enteprise Manager. |
|
pem_admin |
pem_super_admin |
Role for administration/management/configuration of all visible agents/servers, and monitored objects. |
pem_config |
pem_admin |
Role for configuration management of Postgres Enterprise Manager. |
pem_component |
pem_admin |
Role to run/execute all wizard/dialog based components. |
pem_rest_api |
pem_admin |
Role to access the REST API. |
pem_server_service_manager |
pem_admin |
Role for allowing to restart/reload the monitored database server (if server-id provided). |
pem_manage_schedule_task |
pem_admin |
Role to configure the schedule tasks. |
pem_manage_alert |
pem_admin |
Role for managing/configuring alerts, and its templates. |
pem_config_alert |
pem_config, pem_manage_alert |
Role for configuring the alerts on any monitored objects. |
pem_manage_probe |
pem_admin |
Role to create, update, delete the custom probes, and change custom probe configuration. |
pem_config_probe |
pem_config, pem_manage_probe |
Role for probe configuration (history retention, execution frequency, enable/disable the probe) on all visible monitored objects. |
pem_database_server_registration |
pem_admin |
Role to register a database server. |
pem_comp_postgres_expert |
pem_component |
Role to run the Postgres Expert. |
pem_comp_auto_discovery |
pem_component |
Role to run the Auto discovery of a database server dialog. |
pem_comp_log_analysis_expert |
pem_component |
Role to run the Log Analysis Expert. |
pem_comp_sqlprofiler |
pem_component |
Role to run the SQL Profiler. |
pem_manage_efm |
pem_admin |
Role to manage Failover Manager functionality. |
pem_comp_capacity_manager |
pem_component |
Role to run the Capacity Manager. |
pem_comp_log_manager |
pem_component |
Role to run the Log Manager. |
pem_comp_audit_manager |
pem_component |
Role to run the Audit Manager. |
pem_comp_package_deployment |
pem_component |
Role to run the Package Deployment Wizard. |
pem_comp_streaming_replication |
pem_component |
Role to run the Streaming Replication Wizard. |
pem_comp_tuning_wizard |
pem_component |
Role to run the Tuning Wizard. |
Using a Team Role
When you register a server for monitoring by PEM, you can specify a Team that will be associated with the server. A Team is a group role that can be used to allow or restrict access to one or more monitored servers to a limited group of role members. The PEM client will only display a server with a specified Team to those users who are:
a member of the Team role
the role that created the server
a role with superuser privileges on the PEM server.
To create a team role, expand the node for the server on which the role
will reside in the PEM tree control, and right-click on the Login/Group
Roles node to access the context menu. Then, select Login/Group Role…
from the Create menu; when the Create - Login/Group Role dialog opens,
use the fields provided to specify the properties of the team role.
Object Permissions
A role must be granted sufficient privileges before accessing,
executing, or creating any database object. PEM allows you to assign
(GRANT) and remove (REVOKE) object permissions to group roles or login
accounts using the graphical interface of the PEM client.
Object permissions are managed via the graphical object editor for each particular object. For example, to assign privileges to access a database table, right click on the table name in the tree control, and select the Properties option from the context menu. Use the options displayed on the Privileges tab to assign privileges for the table.
The PEM client also contains a Grant Wizard (accessed through the Tools
menu) that allows you to manage many object permissions at once.
Managing Job Notifications
You can configure the settings in PEM console for sending the SMTP trap on success or failure of a system-generated job (listed under scheduled tasks) or a custom-defined agent job. For information on custom-defined agent job, see ‘Creating PEM Scheduled Jobs’. These email notification settings can be configured at following three levels (in order of precedence) to send email notifications to the specified user group:
Job level
Agent level
PEM server level (default level)
Configuring job notifications at job level
You can configure email notification settings at job level only for a custom-defined agent job in one of the following ways:
For a new agent job, you can configure the email notification settings in the Notification tab of Create-Agent Job wizard while creating the job itself.
For an existing custom-defined job, you can edit the properties of the job and configure the notification settings.

Job notification configuration: job level
Use the fields on the Notifications tab to configure the email notification settings on job level:
Use the Send the notifications field to specify when you want the email notifications to be sent.
Use the Email group field to specify the email group that should receive the email notification.
Configuring job notifications at agent level
Select the agent in the tree view, right click and select Properties. In the Properties dialog, select the Job notifications tab.

Job notification configuration: agent level
Use the fields on the Job notifications tab to configure the email notification settings on agent level:
Use the Override default configuration? switch to specify if you want the agent level job notification settings to override the default job notification settings. If you select Yes for this switch, you can use the rest of the settings on this dialog to define when and to whom the job notifications should be sent. Please note that the rest of the settings on this dialog work only if you enable the Override default configuration? switch.
Use the Email on job completion? switch to specify if the job notification should be sent on the successful job completion.
Use the Email on a job failure? switch to specify if the job notification should be sent on the failure of a job.
Use the Email group field to specify the email group to whom the job notification should be sent.
Configuring job notifications at server level
You can use the Server Configuration dialog to provide information about your email notification configuration at PEM server level. To open Server Configuration dialog, select Server Configuration… from the PEM client’s Management menu.

Job notification configuration: server level
Four server configuration parameters specify information about your job notification preferences at PEM server level:
Use the job_failure_notification switch to specify if you want to send email notification after each job failure.
Use the job_notification_email_group parameter to specify the email group that should receive the email notification.
Use the job_retention_time parameter to specify the number of days that non-recurring scheduled tasks should be retained in the system.
Use the job_status_change_notification switch to specify if you want to send email notification after each job status change, irrespective of its status being a failure, success, or interrupted.
Managing PEM Scheduled Jobs
You can create a PEM scheduled job to perform a set of custom-defined steps in the specified sequence. These steps may contain SQL code or a batch/shell script that you may run on a server that is bound with the agent. You can schedule these jobs to suit your business requirements. For example, you can create a job for taking a backup of a particular database server and schedule it to run on a specific date and time of every month.
To create or manage a PEM scheduled job, use the PEM tree control to browse to the PEM agent for which you want to create the job. The tree control will display a Jobs node, under which currently defined jobs are displayed. To add a new job, right click on the Jobs node, and select Create Job... from the context menu.
When the Create - Agent Job dialog opens, use the tabs on the Create - Agent Job dialog to define the steps and schedule that make up a PEM scheduled job.

PEM scheduled job dialog create schedule
Use the fields on the General tab to provide general information about a job:
Provide a name for the job in the
Namefield.Move the
Enabledswitch to theYesposition to enable a job, orNoto disable a job.Use the
Commentfield to store notes about the job.

PEM scheduled job dialog add steps
Use the Steps tab to define and manage the steps that the job will perform. Click the Add icon (+) to add a new step; then click the compose icon (located at the left side of the header) to open the step definition dialog:

PEM scheduled job steps definition
Use fields on the step definition dialog to define the step:
Provide a name for the step in the
Namefield; please note that steps will be performed in alphanumeric order by name.Use the
Enabledswitch to include the step when executing the job (True) or to disable the step (False).Use the
Kindswitch to indicate if the job step invokes SQL code (SQL) or a batch script (Batch).If you select
SQL, use theCodetab to provide SQL code for the step.If you select
Batch, use theCodetab to provide the batch script that will be executed during the step.
Use the
On errordrop-down to specify the behavior of pgAgent if it encounters an error while executing the step. Select from:Fail - Stop the job if you encounter an error while processing this step.
Success - Mark the step as completing successfully, and continue.
Ignore - Ignore the error, and continue.
If you have selected SQL as your input for
Kindswitch, provide the following additional information:Use the
Serverfield to specify the server that is bound with the agent for which you are creating the PEM scheduled job.Use the
Databasefield to specify the database that is associated with the server that you have selected.
Use the
Commentfield to provide a comment about the step.

PEM scheduled job steps definition code
Use the context-sensitive field on the step definition dialog’s
Codetab to provide the SQL code or batch script that will be executed during the step:If the step invokes SQL code, provide one or more SQL statements in the
SQL queryfield.If the step invokes a batch script, provide the script in the
Codefield. If you are running on a Windows server, standard batch file syntax must be used. When running on a Linux server, any shell script may be used, provided that a suitable interpreter is specified on the first line (e.g. #!/bin/sh). Along with the defined inline code, you can also provide the path of any batch script, shell script, or SQL file on the filesystem.To invoke a script on a Linux system, you must modify the entry for batch_script_user parameter of agent.cfg file and specify the user that should be used to run the script. You can either specify a non-root user or root for this parameter. If you do not specify a user, or the specified user does not exist, then the script will not be executed. Restart the agent after modifying the file.
To invoke a script on a Windows system, set the registry entry for AllowBatchJobSteps as true and restart the PEM agent. PEM registry entries are located in HKEY_LOCAL_MACHINE\Software\Wow6432Node\EnterpriseDB\PEM\agent.
After providing all the information required by the step, click the Save button to save and close the step definition dialog.
Click the add icon (+) to add each additional step, or select the Schedules tab to define the job schedule.
Click the Add icon (+) to add a schedule for the job; then click the compose icon (located at the left side of the header) to open the schedule definition dialog:

PEM scheduled job dialog add schedule tab
Use the fields on the Schedules definition tab to specify the days and times at which the job will execute.
Provide a name for the schedule in the
Namefield.Use the Enabled switch to indicate that pgAgent should use the schedule (
Yes) or to disable the schedule (No).Use the calendar selector in the
Startfield to specify the starting date and time for the schedule.Use the calendar selector in the
Endfield to specify the ending date and time for the schedule.Use the
Commentfield to provide a comment about the schedule.
Select the Repeat tab to define the days on which the schedule will execute.

PEM scheduled job dialog schedule repeat tab
Use the fields on the Repeat tab to specify the details about the schedule in a cron-style format. The job will execute on each date or time element selected on the Repeat tab.
Click within a field to open a list of valid values for that field; click on a specific value to add that value to the list of selected values for the field. To clear the values from a field, click the X located at the right-side of the field.
Use the fields within the
Daysbox to specify the days on which the job will execute:Use the
Week Daysfield to select the days on which the job will execute.Use the
Month Daysfield to select the numeric days on which the job will execute. Specify theLast Dayto indicate that the job should be performed on the last day of the month, irregardless of the date.Use the
Monthsfield to select the months in which the job will execute.
Use the fields within the
Timesbox to specify the times at which the job will execute:Use the
Hoursfield to select the hour at which the job will execute.Use the
Minutesfield to select the minute at which the job will execute.
Select the Exceptions tab to specify any days on which the schedule will not execute.

PEM scheduled job dialog exceptions tab
Use the fields on the Exceptions tab to specify days on which you wish the job to not execute; for example, you may wish for jobs to not execute on national holidays.
Click the Add icon (+) to add a row to the exception table, then:
Click within the
Datecolumn to open a calendar selector, and select a date on which the job will not execute. Specify<Any>in theDatecolumn to indicate that the job should not execute on any day at the time selected.Click within the
Timecolumn to open a time selector, and specify a time on which the job will not execute. Specify<Any>in theTimecolumn to indicate that the job should not execute at any time on the day selected.
Select the Notifications tab to configure the email notification settings on job level:

PEM scheduled job dialog notifications tab
Use the fields on the Notifications tab to configure the email notification settings for a job:
Use the
Send the notificationsfield to specify when you want the email notifications to be sent.Use the
Email groupfield to specify the email group that should receive the email notification.
When you’ve finished defining the schedule, you can use the SQL tab to review the code that will create or modify your job.

PEM scheduled job dialog SQL tab
Click the Save button to save the job definition, or Cancel to exit the job without saving. Use the Reset button to remove your unsaved entries from the dialog.
After saving a job, the job will be listed under the Jobs node of the PEM tree control of the server on which it was defined. The Properties tab in the PEM console will display a high-level overview of the selected job, and the Statistics tab will show the details of each run of the job.
To modify an existing job or to review detailed information about a job, right-click on a job name, and select Properties from the context menu.