EDB Ark provisions EDB Postgres Advanced Server or PostgreSQL databases in single instances, high-availability clusters, or application development sandboxes on Amazon AWS, Azure, and OpenStack hosts. EDB Ark offers an elastic and highly scalable environment that frees DBAs and application developers from the rigors of setting up and administering modern and robust database environments.Throughout this guide, the term Postgres refers to either a PostgreSQL or an Advanced Server installation, where either is appropriate.
1.1 What's New
•
• You can use the X-FRAME-OPTIONS setting to manage page rendering and prevent clickjacking; the default is SAMEORIGIN.
In the following descriptions a term refers to any word or group of words that are language keywords, user-supplied values, literals, etc. A term’s exact meaning depends upon the context in which it is used.
• Italic font introduces a new term, typically, in the sentence that defines it for the first time.
• Fixed-width (mono-spaced) font is used for terms that must be given literally such as SQL commands, specific table and column names used in the examples, programming language keywords, etc. For example, SELECT * FROM emp;
• Italic fixed-width font is used for terms for which the user must substitute values in actual usage. For example, DELETE FROM table_name;
• Square brackets [ ] denote that one or none of the enclosed term(s) may be substituted. For example, [ a | b ], means choose one of “a” or “b” or neither of the two.
• Braces {} denote that exactly one of the enclosed alternatives must be specified. For example, { a | b }, means exactly one of “a” or “b” must be specified.
• Ellipses ... denote that the proceeding term may be repeated. For example, [ a | b ] ... means that you may have the sequence, “b a a b a”.
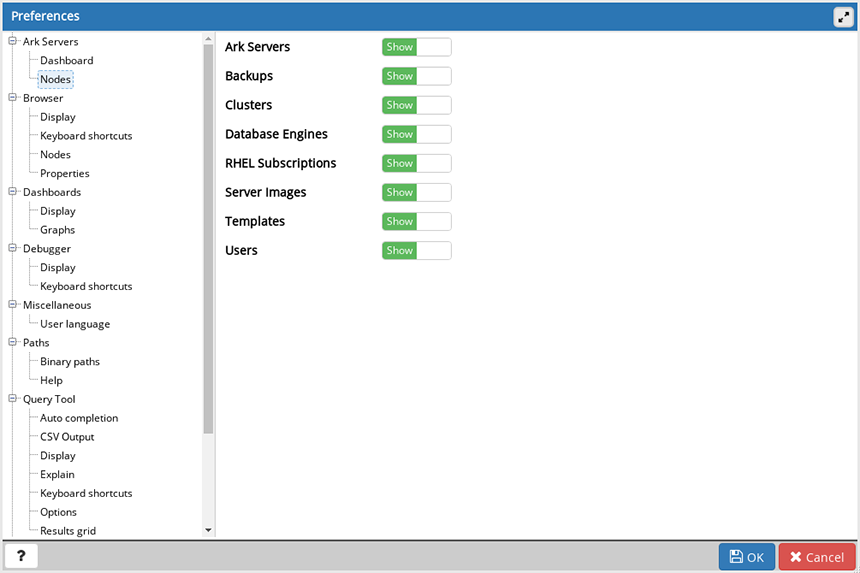
1.3 PrerequisitesYou must modify the display preferences for your PEM web interface to display the Ark Servers node in the tree control. Navigate through the File menu to open the Preferences dialog; then, click on the Nodes panel in the Ark Servers node to control the object types that are displayed.Use the controls to Show or Hide each type of object that is associated with an Ark server. When you've specified your preferences, select OK to preserve your changes, or Cancel to exit without saving.
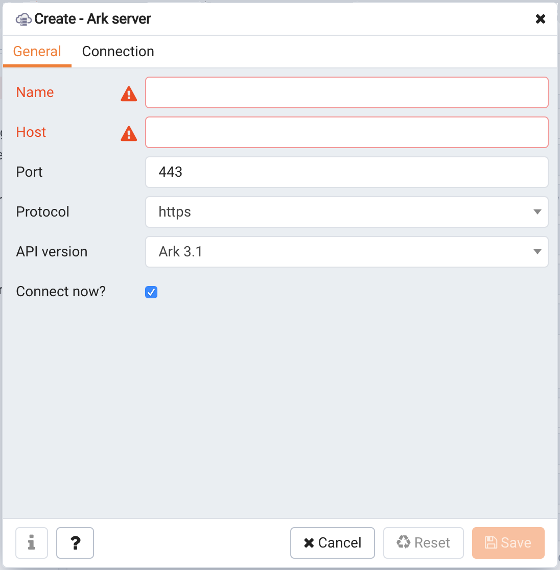
You can use the Create - Server dialog to register an existing Ark console with the PEM server. To access the dialog, right-click on an Ark Server node to access the context menu; navigate through the Create option to select Ark Server....Use the fields on the General tab to describe the general properties of the Ark console:
• Use the Name field to specify a user-friendly name for the server. The name specified will identify the server in the PEM Browser tree control.
• Use the Host field to provide the name of the Ark console host.
• Use the Port field to specify the port that the PEM server will use when connecting to the Ark console.
• Use the Protocol drop-down listbox to select the connection protocol that the PEM server will use when connecting to the Ark console.
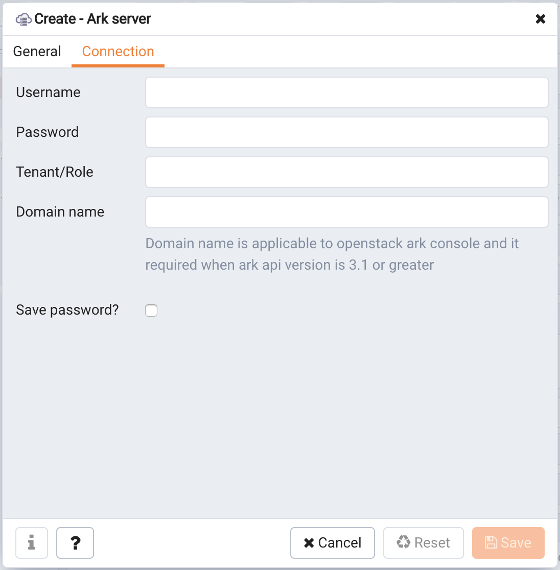
• Use the API version drop-down listbox to select the version of the Ark API that the PEM server will use when managing the Ark console.Use fields on the Connection tab to specify connection details for the Ark console:
• Specify the name of the connecting user in the Username field. The specified user must be an existing user in the backing database of the Ark console.
• Provide the password associated with the specified user in the Password field.
•
• Use the Domain name field to specify the name of the OpenStack domain to which the server will connect if the Ark API version specified on the General tab is version 3.1 or greater.
• Check the box next to Save password? to save the password associated with the console registration; if do not save the password, you will be prompted for the password when you attempt to connect to the server.When you have provided registration information for the Ark console, click the Save button to save the Ark console definition.
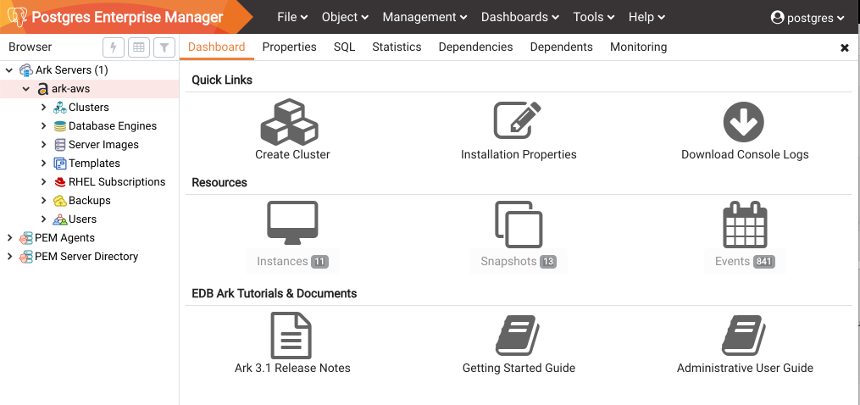
The Dashboard tab displays icons that provide quick access to Ark information and features. If the tab is accessed from the top-level Ark Servers node, it includes informational links that are applicable to all consoles. If the tab is accessed from a console name node, the tab includes information specific to that console:
•
• Click the Installation Properties icon to review the deployment properties for the selected console.
• The Resources icons provide access to information about the objects that reside on the console:
• Click the Instances icon to review information about the instances that reside on the console.
• Click the Snapshots icon to review information about console backups.
• Click the Events icon to review information about events that have been logged for the selected console.The EDB Ark Tutorials & Documents icons provide access to information that is specific to the Ark version that is deployed on the console:
•
•
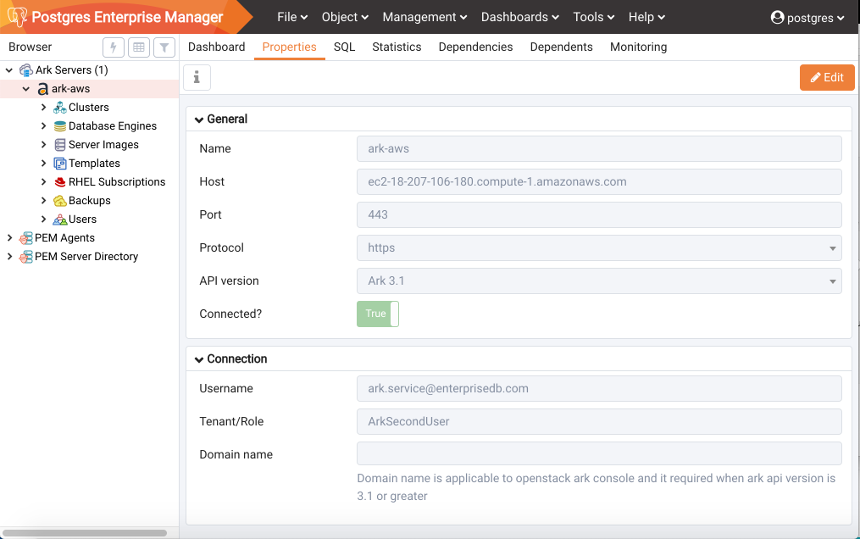
• To view console properties, select the name of a console in the PEM Browser tree control and select the Properties tab.Panels on the Properties tab display configuration details for the console.The General panel displays:
• The Name field displays the console name.
• The Host name displays the IP address of the console.
• The Port field displays the port at which a browser can connect to the console.
• The Protocol field displays the connection protocol used to connect to the console.
•
• The Connected? field displays the current state of the console.The Connection panel displays:
• The Username field displays the name of the user that deployed the console.
•
• If deployed on an OpenStack host and using API version 3.1 or later, the Domain name field displays the OpenStack domain in which the console is hosted.
Select Connect Server to connect to the selected Ark console. After authenticating with the Ark console host, the tree control will display a host-specific icon to the left of the console name. Expand the tree control to review and manage objects that reside on the console. Select Delete/Drop to delete the registration of the selected Ark console. Please note that deleting a console registration does not remove the console from the backing database. PEM will confirm that you wish to delete the registration before removing it. Select Installation options to open the Installation options dialog and review or modify console deployment properties. Select Properties to review the properties specified when registering an Ark console; if the server is disconnected, you may modify the property values. After modifying property values, select Save to preserve your changes.
2.2.1 Downloading Console LogsUse options on the console Dashboard panel or context menu to download a zip file that contains the server logs for the underlying application server. You can use the log file to confirm changes to server status or verify server activity. To download a console log you can either:
• Right click on the console name in the PEM Browser tree control and select Download console logs from the context menu.
• Highlight a console name in the tree control and navigate to the Dashboard tab; then, select the Download console logs option from the Quick Links panel.A popup will ask you to confirm your selection; click OK to download the log file.You can also review the console logs via an ssh session. Log files are stored in /var/log/edb-ark; the current log file is /var/log/edb-ark/ark.log. Use the Linux tail utility to display the most recent entries in any of the server logs. For example, to review the last 10 lines in the server log file, use SSH to connect to the console host's backing database and enter:Where file_name specifies the complete path to the log file. Include the -F option to instruct the tail utility to display only the last 10 lines of the log file, and new log file entries as they are added to the file:
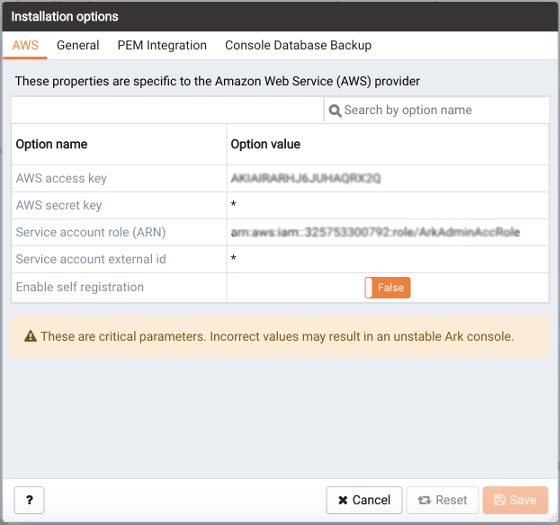
The Installation options dialog displays the deployment properties of the selected console. To open the dialog, right-click on a console name and select Installation options from the context menu.The first tab of the Installation options dialog displays provider-specific details about the console deployment. The properties displayed may include:
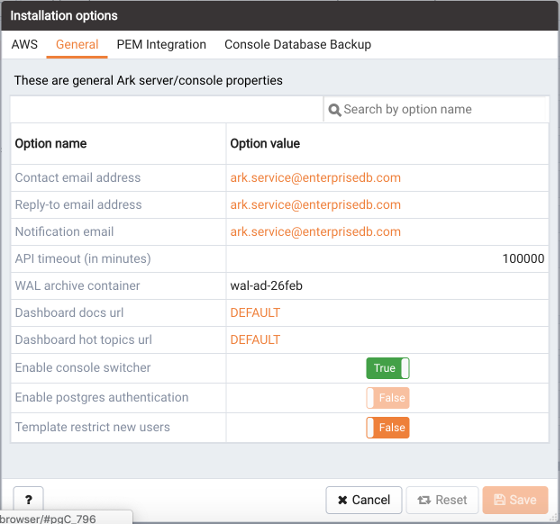
The General tab displays details about behavior related aspects of the console deployment. Displayed information may include:
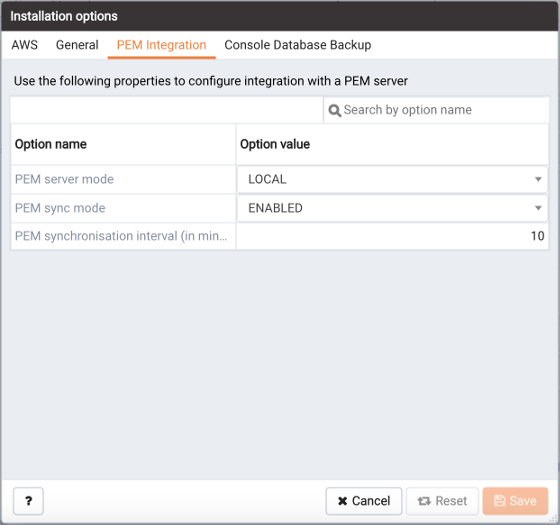
The PEM integration tab displays details about behavior related to PEM. The properties displayed may include:
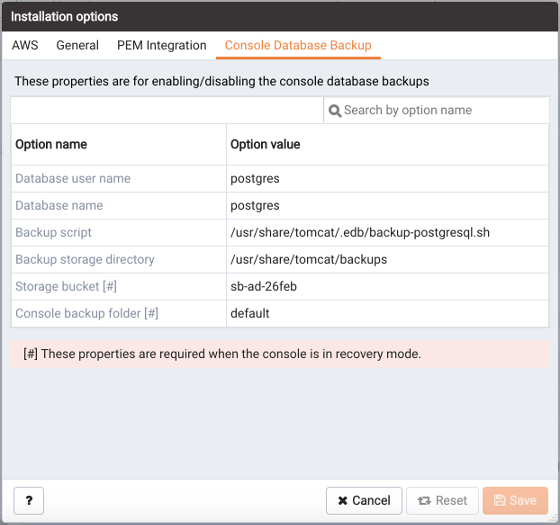
The Console database backup tab displays details about backup behavior. The properties displayed may include:
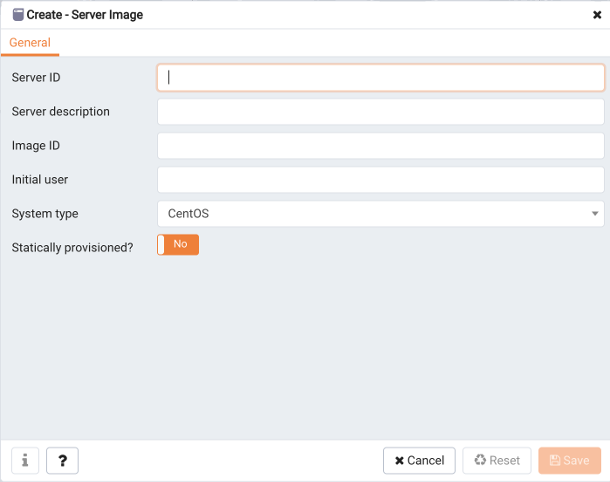
2.3.1 Defining a Server ImageA server image definition describes the virtual machine that will reside on the console host, and provide the environment for an instance of Advanced Server or PostgreSQL. To create a new server image, right-click on the Server Images node, and select Create, then Server Image....
• Use the Server ID field to provide an identifier for the server image. The Server ID must be unique, and may not be modified after saving the server image.
•
•
• Use the Initial user field to provide the name of the default operating system user. This user must have sudo root privileges to perform the initial provisioning of software on the node.
• Use the System type field drop-down listbox to select the operating system type of the server; select CentOS or RHEL.
• Set the Statically provisioned? slider to Yes to indicate that the server is statically provisioned. A statically provisioned server is a pre-installed image that contains the software required to create a database cluster.To delete a server image, right-click on the image name in the PEM browser tree control, and select Delete/Drop from the context menu. The PEM server will prompt you to confirm that you wish to delete the sesrver image. Please note that you cannot remove a server image that is currently in use by an engine; before deleting the server, you must delete any dependent engines.
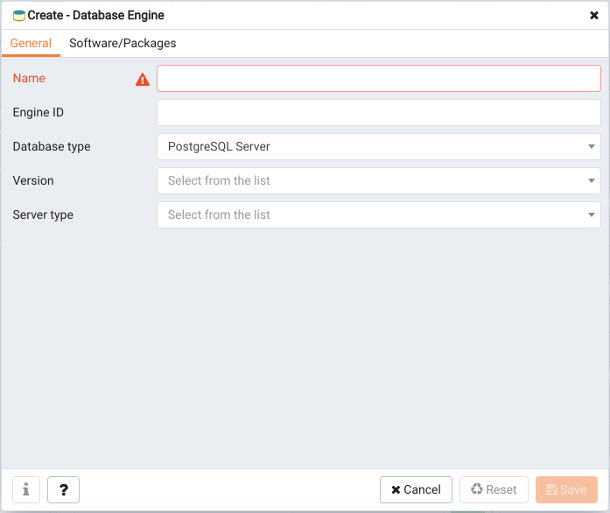
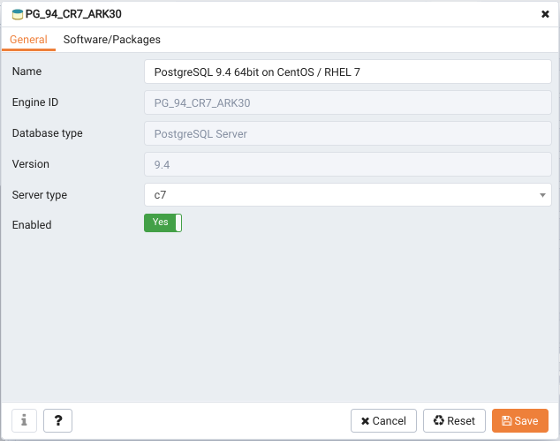
You can also create custom database engines. To create a new database engine, right-click on the Database Engines node, and select Create, then Database Engine....Use fields on the General tab to provide information about the engine:
• Use the Name field to provide a user-friendly name for the engine.
• Use the Engine ID field to specify the identifier of the engine. The identifier must be unique, and cannot be modified after the engine definition is saved.
• Use the Database Type drop-down listbox to select the database type (PostgreSQL or Advanced Server) that will be deployed on the engine. The database type cannot be modified after the engine definition is saved.
• Use the Version drop-down listbox to select the database server version of the engine. The version cannot be modified after the engine definition is saved.
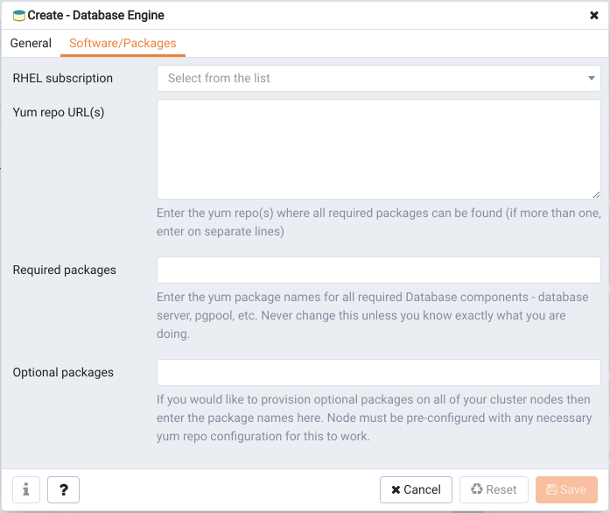
• Use the Server type drop-down listbox to select the backing operating system that will be used by the engine.Use fields on the Software/Packages tab to provide information about the software that will be deployed on the engine:
• Use the RHEL subscription drop-down listbox to select the RHEL subscription service that will be used when provisioning the engine. You can use the Create - RHEL Subscription dialog to propagate the RHEL subscription list.
• Use the Yum repo URL(s) field to provide the names and credentials associated with one or more yum repositories from which software will be installed.
• Use the Required packages field to provide a list of the software packages that are required by the specified server.
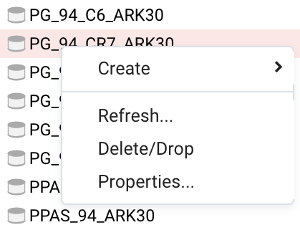
• Use the Optional packages field to provide a list of the additional software packages that will be installed on clusters that are provisioned using the engine.To modify a database engine, right-click on the name of the database engine, and select Properties... from the context menu, or highlight the engine's name and select Properties... from the Object dialog. Use fields on the engine's properties dialog to update the properties associated with the engine.
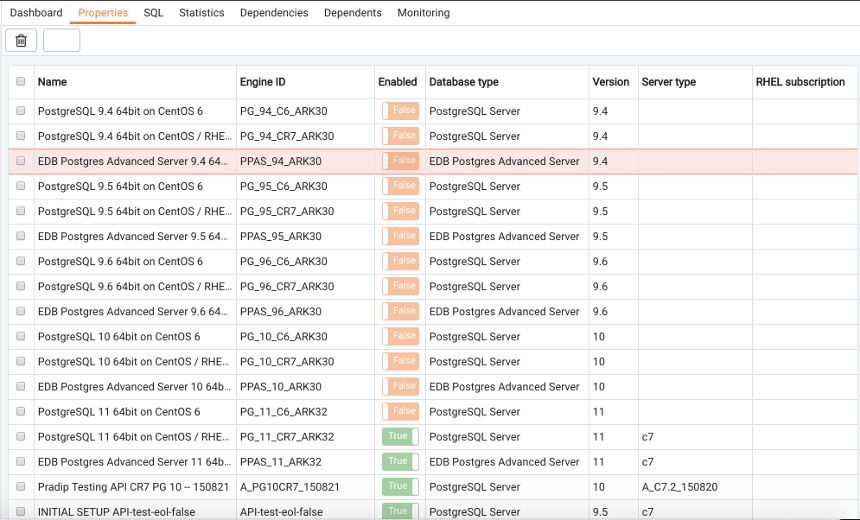
2.3.2.1 Managing Database EnginesTo view a list of the currently defined engines, select the Database Engines node in the PEM Browser tree control and navigate to the Properties tab.The Properties tab displays detailed information about the currently defined engines:
• The Name field displays the user-friendly name of the database engine.
•
• The Enabled field displays the current state of the database engine.
•
• The Version field displays the server version used by the engine.
•
• If applicable, the RHEL subscription field displays the identifier of the RHEL subscription used by the engine.
• Right-click on the engine name in the PEM browser tree control and select Enable database engine or Disable database engine from the context menu.
• To open the Properties dialog, right-click on the engine name and select Properties... from the context menu or highlight the engine's name and select Properties… from the Object menu.Move the Enabled slider to the Yes position to make the engine available for cluster provisioning. To disable an engine, move the slider to the No position.To delete an engine definition, right-click on the engine name in the PEM browser tree control, and select Delete/Drop from the context menu. The PEM server will prompt you to confirm that you wish to delete the engine before the engine is deleted. Please note that you cannot remove an engine that is referenced by one or more clusters and/or backups.
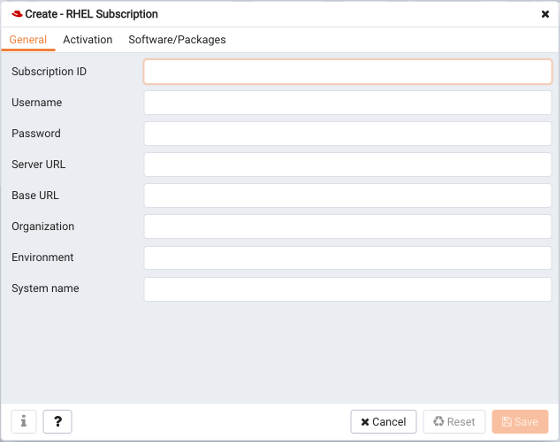
To create a RHEL subscription definition, right-click on the RHEL Subscriptions node, and select Create, then RHEL Subscription....Use fields on the General tab to provide information about the subscription:
• Use the Subscription ID field to provide a user-friendly name for the subscription. The name will identify the subscription in the RHEL Subscription drop-down on the engine details dialog.
• Use the Username field to provide the name of the user account registered with the Red Hat content server.
• Use the Password field to provide the password associated with the user account.
• Use the Server Url field to provide the host name of the subscription server used by the service; if left blank, the default value of subscription.rhn.redhat.com will be used.
• Use the Base Url field to provide the host name of the content delivery server used by the service; if left blank, the default value of https://cdn.redhat.com will be used.
• Use the Organization field to provide the organization that will be registered with the Red Hat subscription system.
• Use the Environment field to provide the name of the environment (within the organization that will be registered).
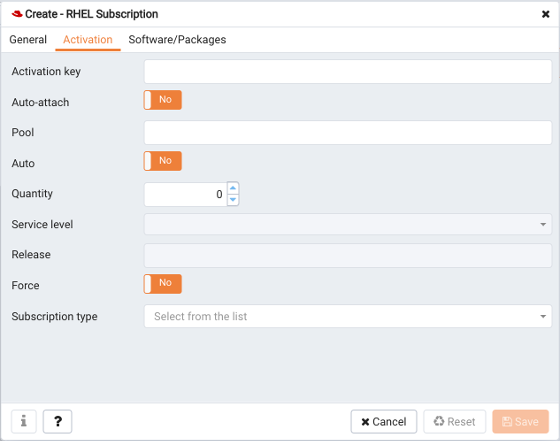
• Use fields on the Activation tab to provide information about subscription behaviors:
•
• When the Auto-attach slider is set to Yes, any node associated with the subscription will automatically attach to the service.
• Use the Pool field to provide the pool identifier for the Red Hat subscription service.
• When the Auto slider is set to Yes, nodes provisioned with engines associated with the pool will automatically attach to the subscription service.
• Use the Quantity selector to specify the number of subscriptions in the subscription pool.
•
• Use the Release field to provide the operating system minor release that will be used when identifying updates to any nodes provisioned with the subscription.
•
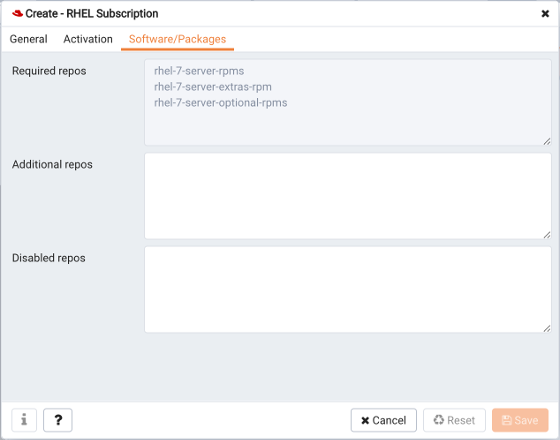
• Use the Subscription type drop-down listbox to specify the type of consumer that is being registered.Use fields on the Software/Packages tab to provide information about the software that will be deployed on engines that use the repository:
• The Required repos list is populated by the Ark console, and displays a list of the repositories required by the subscription definition.
• Use the Additional repos field to provide the names of any additional repositories that should be enabled on the cluster node(s).
• Use the Disabled repos field to provide the names of any repositories that should be disabled on the cluster node(s).
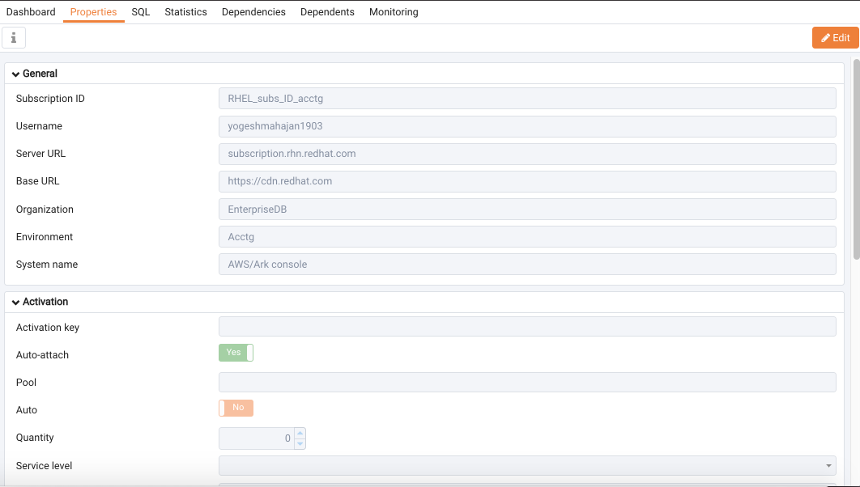
2.3.3.1 Managing RHEL SubscriptionsTo view a list of the currently defined RHEL subscriptions, highlight the RHEL Subscriptions node in the PEM browser tree control and navigate to the Properties tab.To review detailed information about a specific subscription, select the subscription name and navigate to the Properties tab.Panels on the Properties tab display details about the subscription. Select the edit button in the header to open a dialog that allows you to edit the subscription properties. Please note that to modify subscription information, you must provide the password associated with the subscription.
• The General panel displays subscription information such as the registered user name, your organization information, and the URLs used to connect to the subscription.
• The Activation panel displays information about the RHEL subscription service and its behavior.
• The Software/Packages panel displays the names of repositories used by the subscription and the subscription manager command.
To modify the properties associated with a RHEL subscription, right-click on a subscription name and select Properties... from the context menu.Before modifying properties, you must provide the Password associated with the subscription. After entering a password and making any desired changes to the subscription definition, click Save to preserve your changes and exit the dialog.To delete a subscription definition, right-click on the name of a subscription in the PEM Browser tree control, and select Delete/Drop from the context menu. The PEM server will prompt you to confirm that you wish to delete the subscription before the subscription is deleted.
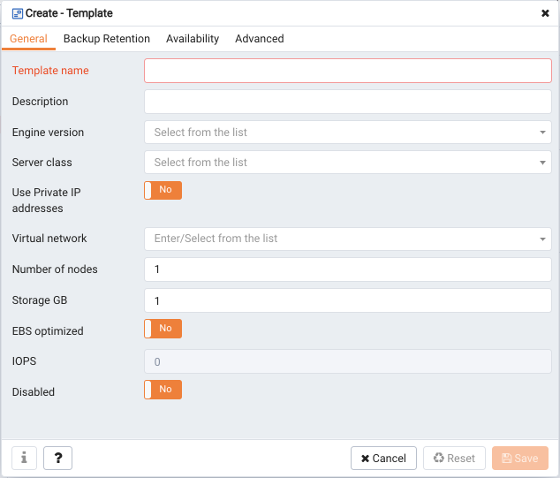
An administrative user can specify that a user is a template only user. A template only user must adhere to cluster definitions provided in a template when deploying an Ark cluster. A template only user will have access to only those templates that specify a role or tenant in which they have membership in the Select Roles (on Amazon or Azure) or Select Tenants (on OpenStack) section of the Add Template dialog.To define a new template, right click on the Templates node, and select Create then Templates... from the context menu.Use fields on the General tab to specify general behavioral preferences for the template:
•
• Use the Description field to provide a description of the template.
• Use the drop-down listbox in the Engine version field to select the version of the Postgres engine that you wish to use on clusters configured by the template.
• Use the drop-down listbox in the Server class field to specify the size of each cluster node. The server class determines the size and type (compute power and RAM) of any cluster configured by the template.
• If your cluster resides on an OpenStack host, use the drop-down listbox in the Virtual network field to specify the identity of the network in which clusters configured by the template should reside.
• If your cluster resides on an Amazon AMI, use the drop-down listbox in the VPC field to specify the identity of the network in which clusters configured by the template should reside.
• If your cluster resides on an OpenStack host, use the drop-down listbox in the Floating IP pool field to select the address pool in which clusters configured by the template should reside.
• Use the drop-down listbox in the Number of nodes field to specify the number of nodes that should be created in each cluster.
•
• Use fields on the Backup Retention tab to specify the backup policies that will be applied for the template:
• Use the Number of automatic backups to retain field to specify the number of backups that will be retained for the cluster. When the specified number of server backups is reached, EDB Ark will delete the oldest backup to make room for a new backup.
• Use the Backup Window drop-down listbox to specify a time that it is convenient to perform a cluster backup.
• Set the Continuous Archiving (Point-in-Time Recovery) slider to Yes to enable point-in-time recovery for the cluster. When enabled, a base backup is automatically performed that can to be used to restore to a specific point in time. All subsequent automatic scheduled backups will also support point-in-time recovery.Use the Availability tab to specify the users that will have access to the template:
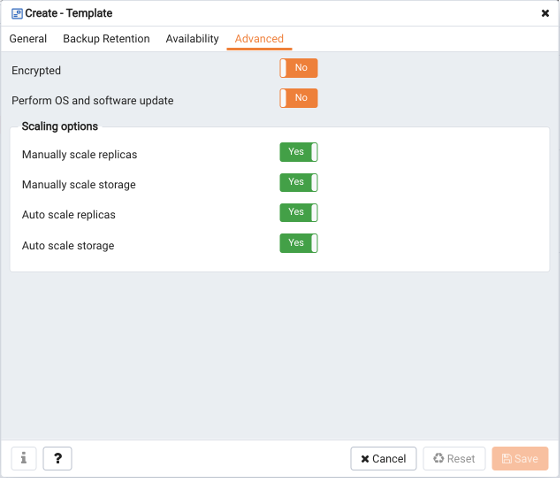
• Specify one or more tenants, roles, or groups that will be allowed to use the template in the Available to tenant/role/group field.Use fields on the Advanced tab to specify additional template policies:
• Set the Encrypted slider to Yes to indicate that the cluster should be encrypted. EDB Ark uses the aes-xts-plain (512-bit) cipher suite to provide an encryption environment that is both secure and transparent to connecting clients. When encryption is enabled, everything residing on the cluster is encrypted except for the root filesystem.
• Set the Perform OS and Software update slider to Yes to specify that a software update should be performed whenever the cluster is provisioned. Please note: this option is disabled if the cluster uses a statically provisioned server.
• Set the Manually scale replicas slider to Yes to specify that users of this template will be allowed to manually scale replica nodes configured by this template.
• Set the Manually scale storage slider to Yes to specify that users of this template will be allowed to manually scale storage on clusters configured by this template.
• Set the Auto scale replicas slider to Yes to specify that users of this template will be able to configure automatic node scaling for clusters configured by this template.
• Set the Auto scale storage slider to Yes to specify that users of this template will be able to configure automatic storage scaling for clusters configured by this template.
2.3.4.1 Managing TemplatesTo view a list of the currently defined templates, select the Templates node in the PEM Browser tree control and navigate to the Properties tab.The Properties tab displays detailed information about the currently defined templates:
•
•
•
•
• The Available to column displays the names of the groups/roles/tenants that have access to the template.
• Right-click on the engine name in the PEM browser tree control and select Enable template or Disable template from the context menu.
• Use the Enabled slider on the template Properties dialog to control the state of the template. To open the Properties dialog, right-click on the template name and select Properties... from the context menu:To modify a template definition, right-click on the template name in the PEM browser tree control, and select Properties... from the context menu. The template definition dialog will open, allowing you to modify the template properties. Please note that you cannot modify the Template ID field; the Template ID is a system-assigned identifier.After modifying the template definition, click Save to preserve your changes and close the dialog.To delete a template, right-click on the template name in the PEM browser tree control, and select Delete/Drop from the context menu. The PEM server will prompt you to confirm that you wish to delete the template before the template is deleted.
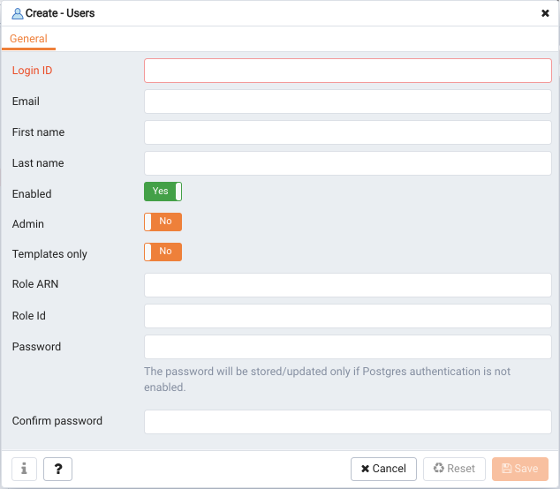
2.3.5 User ManagementTo define a new user, right-click on the Users node and select Create, then User... from the context menu.Use fields on the General tab to provide information about the user:
• Use the Login ID field to provide the identifier that will be provided when the user logs in to the Ark server.
• Use the Email field to provide a notification email for the user.
•
•
• Set the Enabled slider to Yes to indicate that the user account is active, and to allow the user to login.
• Set the Admin slider to Yes to specify that the uesr will have administrative access to the Ark console.
• Set the Templates only slider to Yes to require the user to use a template when defining a new cluster.
• Use the Password field to provide a password for the user.
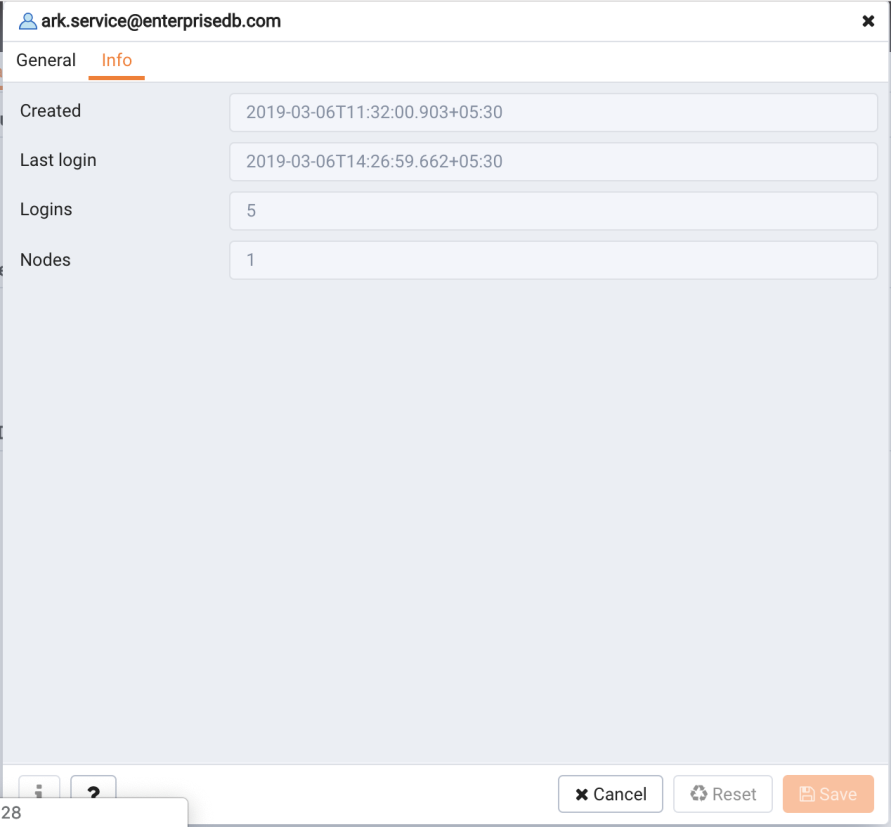
• The Info tab provides information about console usage by the selected user:
• The Created field displays the date and time that the user account was created.
•
• The Logins field displays a count of the number of logins by the user.
• The Nodes field displays the number of nodes created by the user.To delete a user account, right-click on the name of a user, and select Delete/Drop from the context menu. PEM will prompt you to confirm that you wish to delete the user before the account is deleted.
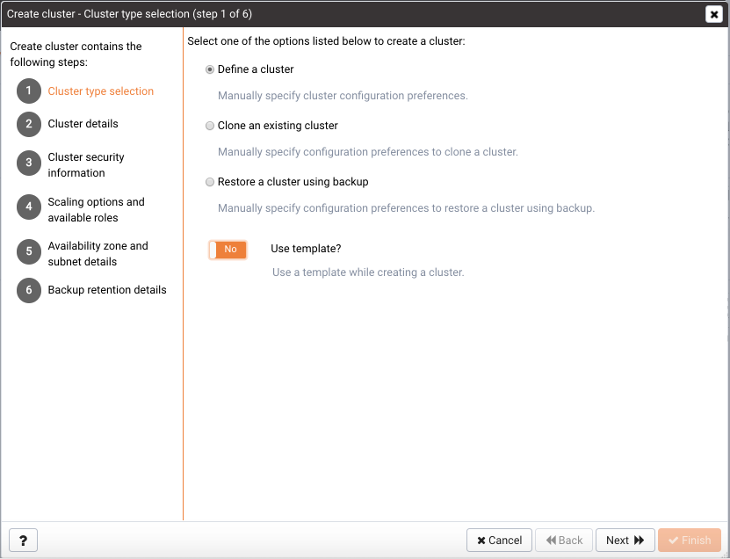
To open the wizard, connect to the hosting server and expand the PEM browser tree control. Then, right-click on the Clusters node and navigate through the Create menu option and select Cluster....
•
•
• Select Restore a cluster using backup to clone a backup into the master node of a cluster. When you clone from backup, the server configuration will match the original configuration, but the server addresses will change. When the cluster creation completes, you may need to modify parameters in the postgresql.conf file on the restored cluster to reflect the available memory of the new instance if the server class has changed from the original setting. After modifying the server configuration, restart the server for the changes to take effect.A template contains a predefined set of server options that determine the configuration of a database cluster. A template can simplify creation of clusters that use a common configuration, or limit user access to costly resources such as large server classes. An administrative user can specify that a user is a template only user; a template only user must adhere to cluster definitions provided in a template when deploying an Ark cluster.
• Click Next to continue.
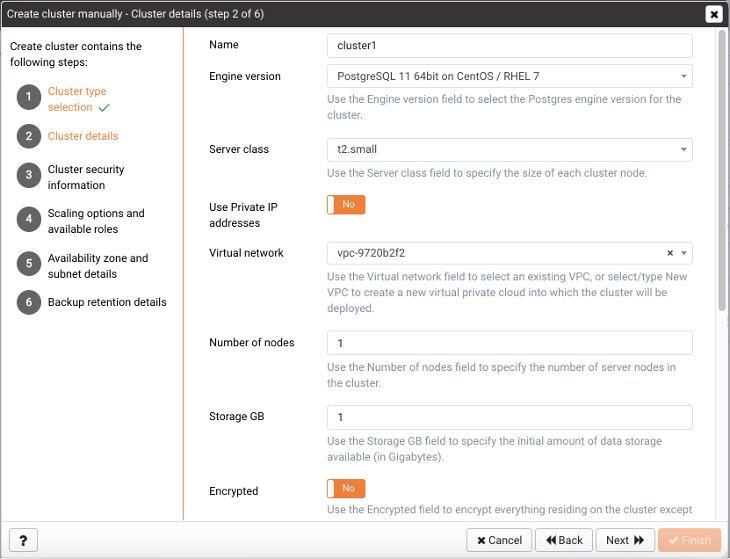
• Specify a name for the new cluster in the Name field. Please Note: EDB Ark uses the name specified in the Name field to identify the cluster when performing management functions. The cluster name is also part of the instance name on the OpenStack console; you must not modify the name in the OpenStack management console. Changing the cluster name in the OpenStack console can break key EDB Ark features (i.e. failover).
•
•
• The Backup start time field displays the time at which the backup was taken; this field is not modifiable.
• If applicable, use the Recovery point date selector to specify the date and time to which you wish to recover. The specified time may not precede the timestamp of the specified backup..
• If applicable, use the Template name drop-down listbox to select a template that will provide deployment details for the cluster.
• Use the drop-down listbox in the Engine version field to select the version of the Postgres engine that you wish to use.
• Use the drop-down listbox in the Server class field to specify the size of each cluster node. The server class determines the size and type (compute power and RAM) of each node within the cluster. You can adjust the amount of storage used by the cluster, or number of replicas in the cluster as your resource demands change. For example, you can start with a m1.small instance, and later, easily upgrade to a more capable c1.medium instance as your performance requirements dictate.
• To create a cluster on an Amazon host that resides in a private cloud, move the Use Private IP addresses slider to Yes; then use the Virtual network field to select the virtual private cloud into which the cluster will be deployed.
• If your cluster resides on an Azure host, use the drop-down listbox in the Virtual network field to specify the network in which the cluster will reside.
• If your cluster resides on an OpenStack host, use the Virtual network drop-down listbox to select the network in which the cluster will be deployed; then, use the Floating IP pool drop-down listbox to select an address pool in which the cluster will reside.
• Use the Number of nodes field to specify the number of server nodes that you wish to create. The name specified in the Name field will apply to the master node; each additional node will act as a replication server for the master node.
• Use the Storage GB field to specify the initial amount of the data space (in Gigabytes) available for the cluster.
• Set the Encrypted slider to Yes to indicate that the cluster should be encrypted. EDB Ark uses the aes-xts-plain (512-bit) cipher suite to provide an encryption environment that is both secure and transparent to connecting clients. When encryption is enabled, everything residing on the cluster is encrypted except for the root filesystem.
• If your cluster resides on an AWS host, set the EBS Optimized slider to Yes to specify that your cluster should use an Amazon EBS-optimized instance and provisioned IOPS to guarantee a level of I/O performance. The IOPS field is enabled for those clusters that will reside on an EBS-optimized instance. Use the IOPS field to specify the level of I/O performance that will be maintained for the cluster by automatic scaling. The maximum value is 30 times the size of your cluster; for example, if you have a 4 Gigabyte cluster, you can specify a maximum value of 120.

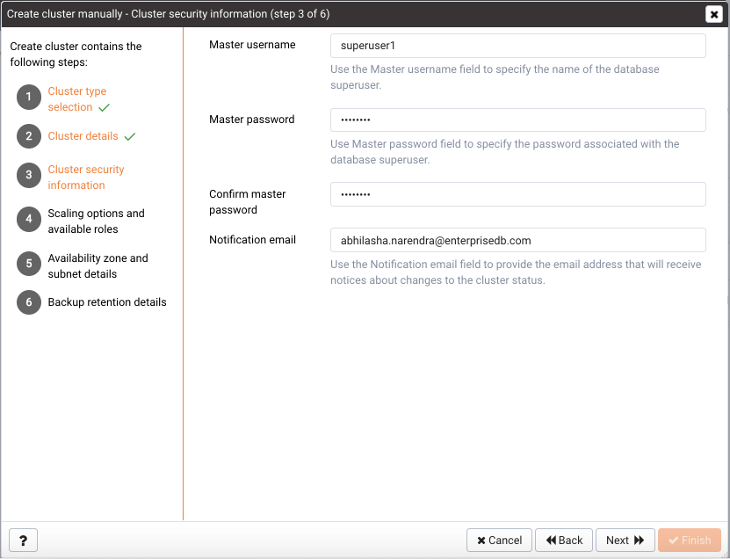
• Set the Perform OS and software update slider to Yes to instruct the server to perform a software update when the cluster is provisioned. Please note: this option is disabled if the cluster uses a statically provisioned server.Click Next to continue.Use fields on the Cluster security information dialog to provide connection and notification details for the cluster:
•
•
•
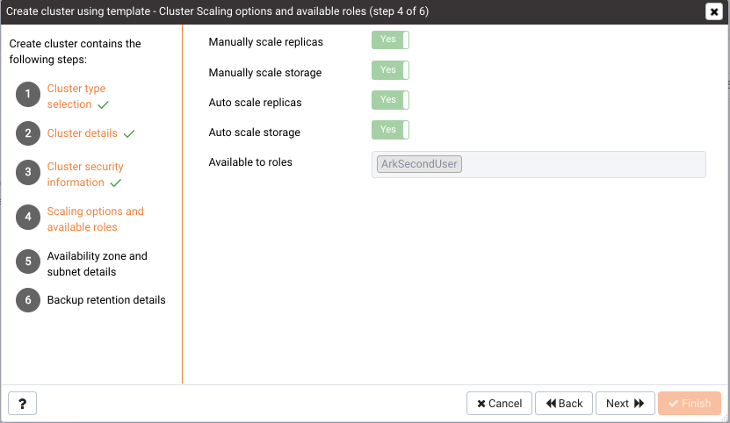
• Use the Notification email field to provide the email address that will receive notices about changes to the cluster status.Click Next to continue.If you are using a template to define the cluster, the Scaling options and available roles dialog displays the scaling configuration of the new cluster as designated on the template. The information displayed on the dialog is not modifiable:
• If the Manually scale replicas slider is set to Yes, manual replica scaling will be enabled for the new cluster; cluster users will be able to manually add replicas to the cluster.
• If the Manually scale storage slider is set to Yes, manual scaling of storage will be enabled for the new cluster; cluster users will be able to manually add storage to the cluster when needed.
• If the Auto scale replicas slider is set to Yes, automatic replica scaling will be enabled for the cluster; the cluster will automatically add replicas when cluster usage reaches the threshold specified in the template.
• If the Auto scale storage slider is set to Yes, automatic scaling of storage available to the cluster will be enabled; the cluster will automatically add storage when the cluster reaches the threshold specified in the template.
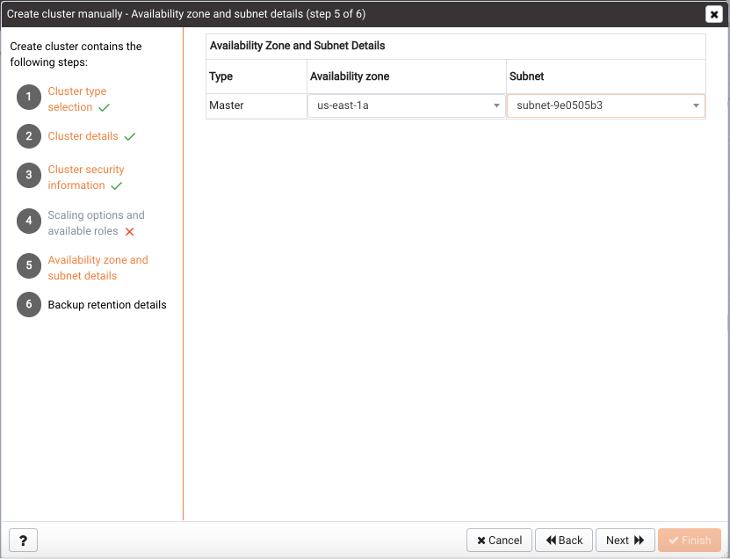
• The Available to tenant/role/group field displays the names of the platform-specific user groups that can access the new cluster.Click Next to continue.Use fields on the Availability zone and subnet details dialog to specify an availability zone/subnet pair for each node of the cluster:
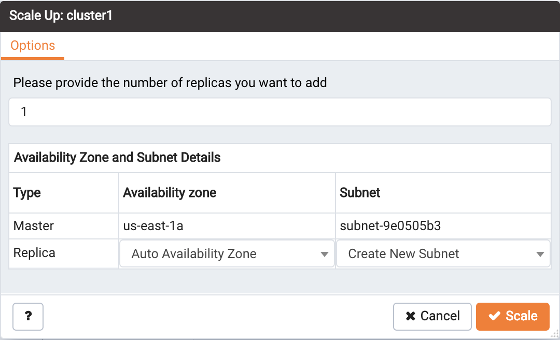
• Use the drop-down listbox in the Availability zone column to specify the data center in which the node listed in the Type column will be deployed, or accept the default to allow the host to select an availability zone.
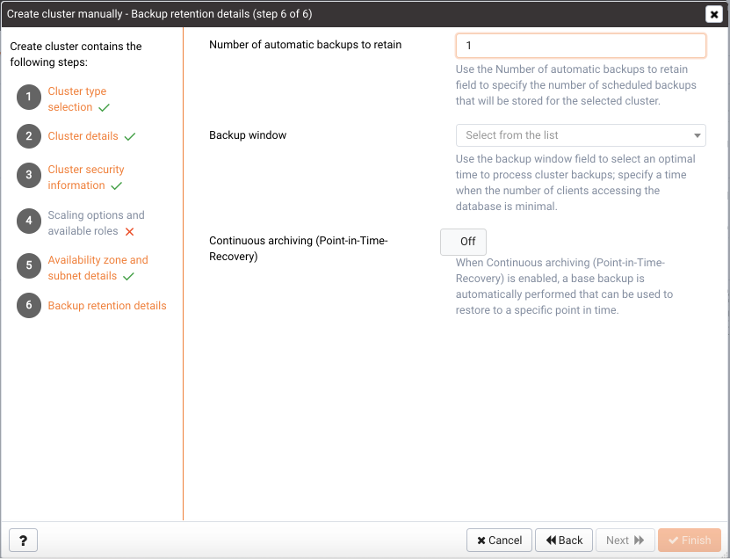
• Use the drop-down listbox in the Subnet field to specify the subnet that will be used by the node listed in the Type column, or accept the default to allow the host to create a new subnet for the node.Use fields on the Backup retention details dialog to specify your backup preferences for the cluster:
• Use the Number of automatic backups to retain field to specify the number of backups that will be stored. When the specified number of backups is reached, the server will delete the oldest backup to make room for a new backup.
• Use the Backup window drop-down listbox to select a time that it is convenient to backup the server (you may wish to schedule backups to occur when the CPU load is the lightest).
• Use the Continuous archiving (Point-in-Time Recovery) slider to enable point-in-time recovery for the cluster. When enabled, a base backup is automatically performed that can to be used to restore to a specific point in time. All subsequent automatic scheduled backups will also support point-in-time recovery. Note that if you deselect this option, the cluster (and subsequent automatic backups) will be re-configured to not include support for point-in-time recovery.Use the Back button to review or modify previous selections, or select Finish to create the defined cluster. Choose Cancel to exit without preserving your selections.
To review a list of existing clusters that reside on a specific cluster host, highlight the Clusters node beneath the cluster name in the PEM client tree control, and navigate to the Properties tab.The Properties tab displays:
• The name of the cluster in the Name column.
• The name of the cluster owner in the Owner column.
•
•
•
•
• The region in which the cluster is deployed in the Region column.
•
2.4.2 Managing a Cluster
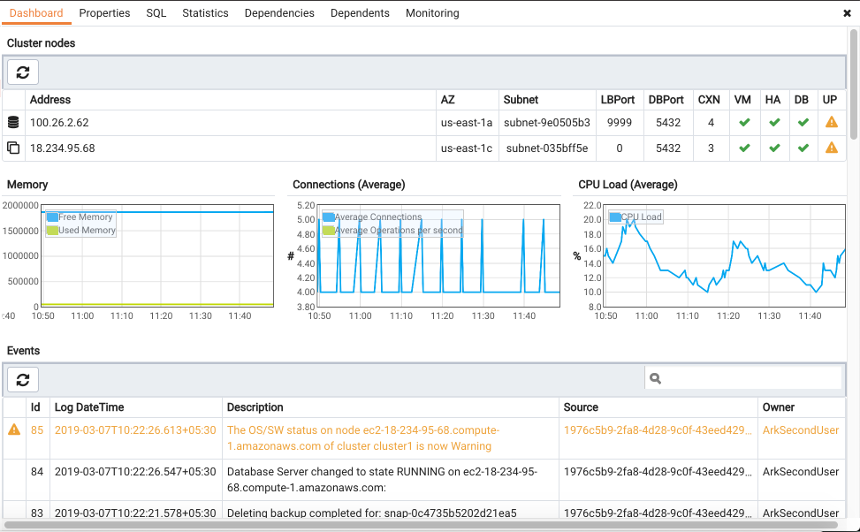
• The Address column displays the IP address of the node.
• The AZ column displays the Availability Zone in which the node resides.
• The Subnet column displays the subnet ID on which the node resides.
• The LBPort column displays the port number to which a client application should connect to utilize load balancing.
• The DBPort column displays the default listener port for the Advanced Server or PostgreSQL server.
• The CXN column displays the current number of connections to the node.
• The VM column displays the state of the virtual machine on which the cluster resides.
• The HA column displays the state of the high-availability cluster.
• The DB column displays the state of the database server.
• The UP column displays the current status of the packages installed on the cluster. Periodically, the cluster manager performs a check to see if the packages are up to date.The Events panel displays events that are logged for the current cluster.
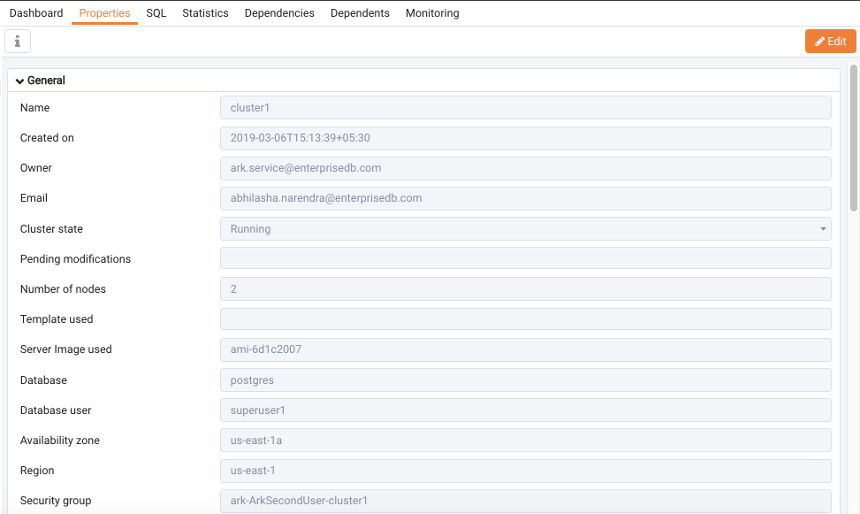
To view information about the cluster configuration, select the cluster name in the PEM Browser tree control and navigate to the Properties tab.Panels on the Properties tab display deployment details for the cluster.
• The General panel displays deployment details such as owner information, creation date, and current cluster state.
• The Storage panel displays information about the storage allocated for the cluster, the amount of storage used, and the amount of storage still available.
• The Network panel displays information about the network addresses and ports in use by the cluster.
• The Maintenance panel displays information about the monitoring and healing policies enforced on the cluster.
• The Auto Scale panel displays information about the scaling policies currently in use by the cluster; if automatic scaling is enabled, the cluster will be scaled up when the thresholds specified in the % of storage size used or # of server connections fields are reached.
• The Backup panel displays the backup schedule and retention policy enforced on the cluster.
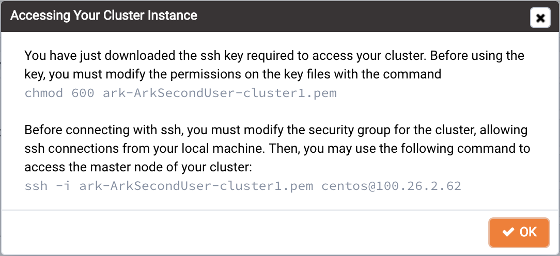
2.4.2.1 Connecting to a Cluster InstanceTo download the cluster's SSH key, select Download SSH Key from the console's context menu. An informational popup will provide information about connecting to the cluster instance:
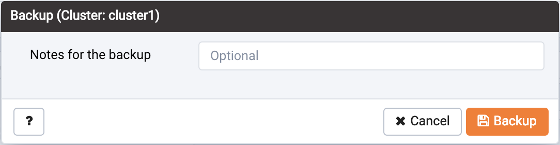
2.4.2.2 Taking a Cluster BackupTo take a backup of the currently selected cluster, select Backup... from the console's context menu or the PEM web interface's Object menu. A popup will open, prompting you to provide a comment so you can identify the backup later should you need to use the backup to restore or clone the cluster:Provide a comment in the Notes for the backup field, and click Backup to start the backup. An informational popup will confirm that the backup process has started.To view a list of cluster backups, select the Backups node in the PEM Browser tree control and navigate to the Properties tab.The Properties tab displays detailed information about completed backups:
• The ID column displays the backup identifier.
• The Cluster column displays the name of the cluster that was backed up.
• The Notes column displays the comment provided when the backup was taken.
• The Engine version column displays the engine version of the cluster.
• The Capacity (in GB) column displays the names of the groups/roles/tenants that have access to the template.
• The Backup type column displays Automatic if the backup is a scheduled backup, and Manual if the backup was started by a user.
• The Start time column displays the time at which the backup was started.
• The End time column displays time at which the backup completed.
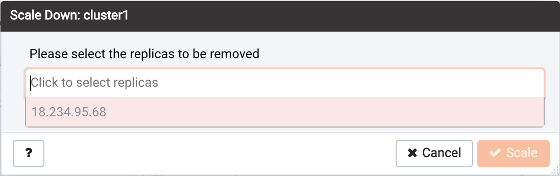
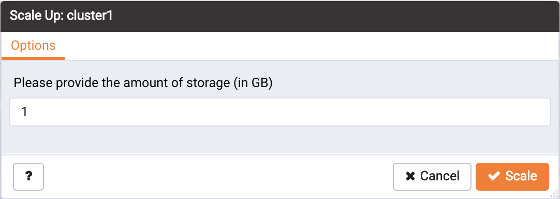
2.4.2.3 Scaling a ClusterYou can use the Scale Up and Scale Down menu options to add replicas or storage to your cluster, or to delete unneeded replica nodes. Access the scaling options on either the cluster's context menu or on the PEM web interface's Object menu.When the Scale Up dialog opens, specify the number of replicas that you would like to add to the cluster. If applicable, select a subnet and an availability zone for each replica, and click Ok.The server will confirm that you wish to add the specified number of replicas; click Yes to continue. An informational popup will confirm when the replica(s) are being added.When the Scale Down dialog opens, click in the field and select a replica address from the list of replicas. To select more than one replica for removal, click in the field again, and select an additional address. When you've finished selecting replicas for removal, click Ok. The server will confirm that you wish to remove the replicas; click OK to continue. An informational popup will confirm when the replica(s) are being removed.When the Scale Up dialog opens, specify the amount of storage (in Gigabytes) that you would like to add to the cluster, and click Ok. The server will confirm that you wish to add the specified storage; click Yes to continue. An informational popup will confirm when the storage is being added.
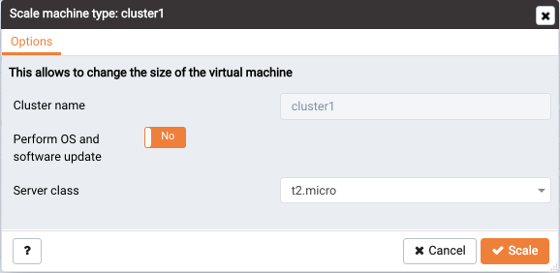
2.4.2.4 Scaling a Machine TypeTo modify the instance type on which a cluster resides, select Scale Machine Type from the console's context menu or from the PEM web interface's Object menu.
•
• Move the Perform OS and software update slider to Yes to perform a software update with the cluster is provisioned; this option can be time consuming.
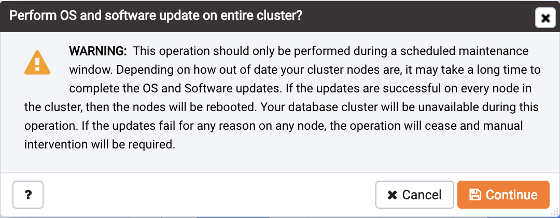
• When you've specified your preferences, click Scale to continue. The server will ask you to confirm your changes; click Continue to start the scaling process. An informational popup confirms when the scaling begins.
2.4.2.5 Upgrading a ClusterYou can use the Upgrade OS/Software option to invoke a yum update command on each node of your cluster, updating any installed packages to the most recent version available through your specified repositories. To perform an upgrade, select Upgrade OS/Software from the console's context menu or from the PEM web interface's Object menu.Before starting an upgrade, PEM will prompt you to confirm that you wish to Continue. Please note that a software update can take some time to complete; we recommend scheduling software updates during a maintenance window. After performing a yum update, the cluster nodes will be rebooted (initiating any kernel updates required).