
EDB Postgres® AI for CloudNativePG™ Cluster Plugin#
EDB Postgres® AI for CloudNativePG™ Cluster provides a plugin for
kubectl to manage a cluster in Kubernetes. The plugin also works
with oc in an OpenShift environment.
Install#
You can install the cnp plugin using a variety of methods.
Note
For air-gapped systems, installation via package managers, using previously downloaded files, may be a good option.
Via the installation script#
curl -sSfL \
  https://github.com/EnterpriseDB/kubectl-cnp/raw/main/install.sh | \
  sudo sh -s -- -b /usr/local/bin
Using the Debian or RedHat packages#
In the releases section of the GitHub repository , you can navigate to any release of interest (pick the same or newer release than your EDB Postgres® AI for CloudNativePG™ Cluster operator), and in it you will find an Assets section. In that section are pre-built packages for a variety of systems. As a result, you can follow standard practices and instructions to install them in your systems.
Debian packages#
For example, let’s install the 1.29.0 release of the plugin, for an
Intel based 64 bit server. First, we download the right .deb file.
wget https://github.com/EnterpriseDB/kubectl-cnp/releases/download/v1.29.0/kubectl-cnp_1.29.0_linux_x86_64.deb \
  --output-document kube-plugin.deb
Then, with superuser privileges, install from the local file using
dpkg :
$ sudo dpkg -i kube-plugin.deb
Selecting previously unselected package cnp.
(Reading database ... 6688 files and directories currently installed.)
Preparing to unpack kube-plugin.deb ...
Unpacking kubectl-cnp (1.29.0) ...
Setting up kubectl-cnp (1.29.0) ...
RPM packages#
As in the example for .rpm packages, let’s install the 1.29.0
release for an Intel 64 bit machine. Note the --output flag to
provide a file name.
curl -L https://github.com/EnterpriseDB/kubectl-cnp/releases/download/v1.29.0/kubectl-cnp_1.29.0_linux_x86_64.rpm \
  --output kube-plugin.rpm
Then, with superuser privileges, install with yum , and you’re ready
to use:
$ sudo yum --disablerepo=* localinstall kube-plugin.rpm
Failed to set locale, defaulting to C.UTF-8
Dependencies resolved.
====================================================================================================
 Package            Architecture         Version                   Repository                  Size
====================================================================================================
Installing:
 cnp                x86_64               1.29.0-1                  @commandline                20 M

Transaction Summary
====================================================================================================
Install  1 Package

Total size: 20 M
Installed size: 78 M
Is this ok [y/N]: y
Supported Architectures#
EDB Postgres® AI for CloudNativePG™ Cluster Plugin is currently built for the following operating system and architectures:
Linux * amd64 * arm 5/6/7 * arm64 * s390x * ppc64le
macOS * amd64 * arm64
Windows * 386 * amd64 * arm 5/6/7 * arm64
Configuring auto-completion#
To configure auto-completion for the plugin, a helper shell script needs
to be installed into your current PATH. Assuming the latter contains
/usr/local/bin , this can be done with the following commands:
cat > kubectl_complete-cnp <<EOF
# !/usr/bin/env sh

#  Call the __complete command passing it all arguments

kubectl cnp __complete "\$@"
EOF

chmod +x kubectl_complete-cnp

#  Important: the following command may require superuser permission

sudo mv kubectl_complete-cnp /usr/local/bin
Use#
Once the plugin is installed and deployed, you can start using it like this:
kubectl cnp <command> <args...>
Note
The plugin automatically detects if the standard output channel is connected to a terminal. In such cases, it may add ANSI colors to the command output. To disable colors, use the --color=never option with the command.
Generation of installation manifests#
The cnp plugin can be used to generate the YAML manifest for the
installation of the operator. This option would typically be used if you
want to override some default configurations such as number of replicas,
installation namespace, namespaces to watch, and so on.
For details and available options, run:
kubectl cnp install generate --help
The main options are:
-n: specifies the namespace in which to install the operator (default:postgresql-operator-system).--control-plane: if set to true, the operator deployment will include a toleration and affinity fornode-role.kubernetes.io/control-plane.--replicas: sets the number of replicas in the deployment.--watch-namespace: specifies a comma-separated list of namespaces to watch (default: all namespaces).--version: defines the minor version of the operator to be installed, such as1.23. If a minor version is specified, the plugin installs the latest patch version of that minor version. If no version is supplied, the plugin installs the latestMAJOR.MINOR.PATCHversion of the operator.
An example of the generate command, which will generate a YAML
manifest that will install the operator, is as follows:
kubectl cnp install generate \
  -n king \
  --version 1.23 \
  --replicas 3 \
  --watch-namespace "albert, bb, freddie" \
  > operator.yaml
The flags in the above command have the following meaning:
-n kinginstall the {{name.abbr}} operator into thekingnamespace--version 1.23install the latest patch version for minor version 1.23--replicas 3install the operator with 3 replicas--watch-namespace "albert, bb, freddie"have the operator watch for changes in thealbert,bbandfreddienamespaces only
Status#
The status command provides an overview of the current status of
your cluster, including:
general information: name of the cluster, PostgreSQL’s system ID, number of instances, current timeline and position in the WAL
backup: point of recoverability, and WAL archiving status as returned by the
pg_stat_archiverview from the primary - or designated primary in the case of a replica clusterstreaming replication: information taken directly from the
pg_stat_replicationview on the primary instanceinstances: information about each Postgres instance, taken directly by each instance manager; in the case of a standby, the
Current LSNfield corresponds to the latest write-ahead log location that has been replayed during recovery (replay LSN).
kubectl cnp status sandbox
Cluster Summary
Name:                default/sandbox
System ID:           7423474350493388827
PostgreSQL Image:    docker.enterprisedb.com/k8s/edb-postgres-extended:18.1-standard-ubi9
Primary instance:    sandbox-1
Primary start time:  2024-10-08 18:31:57 +0000 UTC (uptime 1m14s)
Status:              Cluster in healthy state
Instances:           3
Ready instances:     3
Size:                126M
Current Write LSN:   0/604DE38 (Timeline: 1 - WAL File: 000000010000000000000006)

Continuous Backup status
Not configured

Streaming Replication status
Replication Slots Enabled
Name       Sent LSN   Write LSN  Flush LSN  Replay LSN  Write Lag  Flush Lag  Replay Lag  State      Sync State  Sync Priority  Replication Slot
- ---       --------   ---------  ---------  ----------  ---------  ---------  ----------  -----      ----------  -------------  ----------------
sandbox-2  0/604DE38  0/604DE38  0/604DE38  0/604DE38   00:00:00   00:00:00   00:00:00    streaming  async       0              active
sandbox-3  0/604DE38  0/604DE38  0/604DE38  0/604DE38   00:00:00   00:00:00   00:00:00    streaming  async       0              active

Instances status
Name       Current LSN  Replication role  Status  QoS         Manager Version  Node
- ---       -----------  ----------------  ------  ---         ---------------  ----
sandbox-1  0/604DE38    Primary           OK      BestEffort  1.29.0           k8s-eu-worker
sandbox-2  0/604DE38    Standby (async)   OK      BestEffort  1.29.0           k8s-eu-worker2
sandbox-3  0/604DE38    Standby (async)   OK      BestEffort  1.29.0           k8s-eu-worker
If you require more detailed status information, use the --verbose
option (or -v for short). The level of detail increases each time
the flag is repeated:
kubectl cnp status sandbox --verbose
Cluster Summary
Name:                default/sandbox
System ID:           7423474350493388827
PostgreSQL Image:    docker.enterprisedb.com/k8s/edb-postgres-extended:18.1-standard-ubi8
Primary instance:    sandbox-1
Primary start time:  2024-10-08 18:31:57 +0000 UTC (uptime 2m4s)
Status:              Cluster in healthy state
Instances:           3
Ready instances:     3
Size:                126M
Current Write LSN:   0/6053720 (Timeline: 1 - WAL File: 000000010000000000000006)

Continuous Backup status
Not configured

Physical backups
No running physical backups found

Streaming Replication status
Replication Slots Enabled
Name       Sent LSN   Write LSN  Flush LSN  Replay LSN  Write Lag  Flush Lag  Replay Lag  State      Sync State  Sync Priority  Replication Slot  Slot Restart LSN  Slot WAL Status  Slot Safe WAL Size
- ---       --------   ---------  ---------  ----------  ---------  ---------  ----------  -----      ----------  -------------  ----------------  ----------------  ---------------  ------------------
sandbox-2  0/6053720  0/6053720  0/6053720  0/6053720   00:00:00   00:00:00   00:00:00    streaming  async       0              active            0/6053720         reserved         NULL
sandbox-3  0/6053720  0/6053720  0/6053720  0/6053720   00:00:00   00:00:00   00:00:00    streaming  async       0              active            0/6053720         reserved         NULL

Unmanaged Replication Slot Status
No unmanaged replication slots found

Managed roles status
No roles managed

Tablespaces status
No managed tablespaces

Pod Disruption Budgets status
Name             Role     Expected Pods  Current Healthy  Minimum Desired Healthy  Disruptions Allowed
- ---             ----     -------------  ---------------  -----------------------  -------------------
sandbox          replica  2              2                1                        1
sandbox-primary  primary  1              1                1                        0

Instances status
Name       Current LSN  Replication role  Status  QoS         Manager Version  Node
- ---       -----------  ----------------  ------  ---         ---------------  ----
sandbox-1  0/6053720    Primary           OK      BestEffort  1.29.0           k8s-eu-worker
sandbox-2  0/6053720    Standby (async)   OK      BestEffort  1.29.0           k8s-eu-worker2
sandbox-3  0/6053720    Standby (async)   OK      BestEffort  1.29.0           k8s-eu-worker
With an additional -v (e.g. kubectl cnp status sandbox -v -v ),
you can also view PostgreSQL configuration, HBA settings, and
certificates.
The command also supports output in yaml and json format.
Promote#
The meaning of this command is to promote a pod in the cluster to
primary, so you can start with maintenance work or test a switch-over
situation in your cluster
kubectl cnp promote cluster-example cluster-example-2
Or you can use the instance node number to promote
kubectl cnp promote cluster-example 2
Certificates#
Clusters created using the EDB Postgres® AI for CloudNativePG™ Cluster operator work with a CA to sign a TLS authentication certificate.
To get a certificate, you need to provide a name for the secret to store the credentials, the cluster name, and a user for this certificate
kubectl cnp certificate cluster-cert --cnp-cluster cluster-example --cnp-user appuser
After the secret it’s created, you can get it using kubectl
kubectl get secret cluster-cert
And the content of the same in plain text using the following commands:
kubectl get secret cluster-cert -o json | jq -r .data | map(@base64d) | .[]
Restart#
The kubectl cnp restart command can be used in two cases:
requesting the operator to orchestrate a rollout restart for a certain cluster. This is useful to apply configuration changes to cluster dependent objects, such as ConfigMaps containing custom monitoring queries.
request a single instance restart, either in-place if the instance is the cluster’s primary or deleting and recreating the pod if it is a replica.
#  this command will restart a whole cluster in a rollout fashion

kubectl cnp restart [clusterName]

#  this command will restart a single instance, according to the policy above

kubectl cnp restart [clusterName] [pod]
If the in-place restart is requested but the change cannot be applied without a switchover, the switchover will take precedence over the in-place restart. A common case for this will be a minor upgrade of PostgreSQL image.
Note
If you want ConfigMaps and Secrets to be automatically reloaded by instances, you can add a label with key k8s.enterprisedb.io/reload to it.
Reload#
The kubectl cnp reload command requests the operator to trigger a
reconciliation loop for a certain cluster. This is useful to apply
configuration changes to cluster dependent objects, such as ConfigMaps
containing custom monitoring queries.
The following command will reload all configurations for a given cluster:
kubectl cnp reload [cluster_name]
Maintenance#
The kubectl cnp maintenance command helps to modify one or more
clusters across namespaces and set the maintenance window values, it
will change the following fields:
.spec.nodeMaintenanceWindow.inProgress
.spec.nodeMaintenanceWindow.reusePVC
Accepts as argument set and unset using this to set the
inProgress to true in case set and to false in case of
unset .
By default, reusePVC is always set to false unless the
--reusePVC flag is passed.
The plugin will ask for a confirmation with a list of the cluster to modify and their new values, if this is accepted this action will be applied to all the cluster in the list.
If you want to set in maintenance all the PostgreSQL in your Kubernetes cluster, just need to write the following command:
kubectl cnp maintenance set --all-namespaces
And you’ll have the list of all the cluster to update
The following are the new values for the clusters
Namespace  Cluster Name     Maintenance  reusePVC
- --------  ------------     -----------  --------
default    cluster-example  true         false
default    pg-backup        true         false
test       cluster-example  true         false
Do you want to proceed? [y/n]: y
Report#
The kubectl cnp report command bundles various pieces of information
into a ZIP file. It aims to provide the needed context to debug problems
with clusters in production.
It has two sub-commands: operator and cluster .
report Operator#
The operator sub-command requests the operator to provide
information regarding the operator deployment, configuration and events.
Note
By default, operator logs are not collected, but you can enable operator log collection with the --logs flag
deployment information: the operator Deployment and operator Pod
configuration: the Secrets and ConfigMaps in the operator namespace
events: the Events in the operator namespace
webhook configuration: the mutating and validating webhook configurations
webhook service: the webhook service
logs: logs for the operator Pod (optional, off by default) in JSON-lines format
The command will generate a ZIP file containing various manifest in YAML
format (by default, but settable to JSON with the -o flag). Use the
-f flag to name a result file explicitly. If the -f flag is not
used, a default time-stamped filename is created for the zip file.
Note
The report plugin obeys kubectl conventions, and will look for objects constrained by namespace. The {{name.short}} Operator will generally not be installed in the same namespace as the clusters. E.g. the default installation namespace is postgresql-operator-system
kubectl cnp report operator -n <namespace>
results in
Successfully written report to "report_operator_<TIMESTAMP>.zip" (format: "yaml")
With the -f flag set:
kubectl cnp report operator -n <namespace> -f reportRedacted.zip
Unzipping the file will produce a time-stamped top-level folder to keep the directory tidy:
unzip reportRedacted.zip
will result in:
Archive:  reportRedacted.zip
   creating: report_operator_<TIMESTAMP>/
   creating: report_operator_<TIMESTAMP>/manifests/
  inflating: report_operator_<TIMESTAMP>/manifests/deployment.yaml
  inflating: report_operator_<TIMESTAMP>/manifests/operator-pod.yaml
  inflating: report_operator_<TIMESTAMP>/manifests/events.yaml
  inflating: report_operator_<TIMESTAMP>/manifests/validating-webhook-configuration.yaml
  inflating: report_operator_<TIMESTAMP>/manifests/mutating-webhook-configuration.yaml
  inflating: report_operator_<TIMESTAMP>/manifests/webhook-service.yaml
  inflating: report_operator_<TIMESTAMP>/manifests/postgresql-operator-ca-secret.yaml
  inflating: report_operator_<TIMESTAMP>/manifests/postgresql-operator-webhook-cert.yaml
If you activated the --logs option, you’d see an extra subdirectory:
Archive:  report_operator_<TIMESTAMP>.zip
  <snipped …>
  creating: report_operator_<TIMESTAMP>/operator-logs/
  inflating: report_operator_<TIMESTAMP>/operator-logs/postgresql-operator-controller-manager-66fb98dbc5-pxkmh-logs.jsonl
Note
The plugin will try to get the PREVIOUS operator's logs, which is helpful when investigating restarted operators. In all cases, it will also try to get the CURRENT operator logs. If current and previous logs are available, it will show them both.
====== Begin of Previous Log =====
2023-03-28T12:56:41.251711811Z {"level":"info","ts":"2023-03-28T12:56:41Z","logger":"setup","msg":"Starting EDB Postgres for Kubernetes Operator","version":"1.29.0","build":{"Version":"1.29.0+dev107","Commit":"cc9bab17","Date":"2023-03-28"}}
2023-03-28T12:56:41.251851909Z {"level":"info","ts":"2023-03-28T12:56:41Z","logger":"setup","msg":"Starting pprof HTTP server","addr":"0.0.0.0:6060"}
  <snipped …>

====== End of Previous Log =====
2023-03-28T12:57:09.854306024Z {"level":"info","ts":"2023-03-28T12:57:09Z","logger":"setup","msg":"Starting EDB Postgres for Kubernetes Operator","version":"1.29.0","build":{"Version":"1.29.0+dev107","Commit":"cc9bab17","Date":"2023-03-28"}}
2023-03-28T12:57:09.854363943Z {"level":"info","ts":"2023-03-28T12:57:09Z","logger":"setup","msg":"Starting pprof HTTP server","addr":"0.0.0.0:6060"}
If the operator hasn’t been restarted, you’ll still see the
====== Begin … and ====== End … guards, with no content inside.
You can verify that the confidential information is REDACTED by default:
cd report_operator_<TIMESTAMP>/manifests/
head postgresql-operator-ca-secret.yaml
data:
  ca.crt: ""
  ca.key: ""
metadata:
  creationTimestamp: "2022-03-22T10:42:28Z"
  managedFields:
  - apiVersion: v1
    fieldsType: FieldsV1
    fieldsV1:
With the -S (--stopRedaction ) option activated, secrets are
shown:
kubectl cnp report operator -n <namespace> -f reportNonRedacted.zip -S
You’ll get a reminder that you’re about to view confidential information:
WARNING: secret Redaction is OFF. Use it with caution
Successfully written report to "reportNonRedacted.zip" (format: "yaml")
unzip reportNonRedacted.zip
head postgresql-operator-ca-secret.yaml
data:
  ca.crt: LS0tLS1CRUdJTiBD…
  ca.key: LS0tLS1CRUdJTiBF…
metadata:
  creationTimestamp: "2022-03-22T10:42:28Z"
  managedFields:
  - apiVersion: v1
    fieldsType: FieldsV1
report Cluster#
The cluster sub-command gathers the following:
cluster resources: the cluster information, same as
kubectl get cluster -o yamlcluster pods: pods in the cluster namespace matching the cluster name
cluster jobs: jobs, if any, in the cluster namespace matching the cluster name
events: events in the cluster namespace
pod logs: logs for the cluster Pods (optional, off by default) in JSON-lines format
job logs: logs for the Pods created by jobs (optional, off by default) in JSON-lines format
The cluster sub-command accepts the -f and -o flags, as the
operator does. If the -f flag is not used, a default timestamped
report name will be used. Note that the cluster information does not
contain configuration Secrets / ConfigMaps, so the -S is disabled.
Note
By default, cluster logs are not collected, but you can enable cluster log collection with the --logs flag
Usage:
kubectl cnp report cluster <clusterName> [flags]
Note that, unlike the operator sub-command, for the cluster
sub-command you need to provide the cluster name, and very likely the
namespace, unless the cluster is in the default one.
kubectl cnp report cluster example -f report.zip -n example_namespace
and then:
unzip report.zip
Archive:  report.zip
   creating: report_cluster_example_<TIMESTAMP>/
   creating: report_cluster_example_<TIMESTAMP>/manifests/
  inflating: report_cluster_example_<TIMESTAMP>/manifests/cluster.yaml
  inflating: report_cluster_example_<TIMESTAMP>/manifests/cluster-pods.yaml
  inflating: report_cluster_example_<TIMESTAMP>/manifests/cluster-jobs.yaml
  inflating: report_cluster_example_<TIMESTAMP>/manifests/events.yaml
Remember that you can use the --logs flag to add the pod and job
logs to the ZIP.
kubectl cnp report cluster example -n example_namespace --logs
will result in:
Successfully written report to "report_cluster_example_<TIMESTAMP>.zip" (format: "yaml")
unzip report_cluster_<TIMESTAMP>.zip
Archive:  report_cluster_example_<TIMESTAMP>.zip
   creating: report_cluster_example_<TIMESTAMP>/
   creating: report_cluster_example_<TIMESTAMP>/manifests/
  inflating: report_cluster_example_<TIMESTAMP>/manifests/cluster.yaml
  inflating: report_cluster_example_<TIMESTAMP>/manifests/cluster-pods.yaml
  inflating: report_cluster_example_<TIMESTAMP>/manifests/cluster-jobs.yaml
  inflating: report_cluster_example_<TIMESTAMP>/manifests/events.yaml
   creating: report_cluster_example_<TIMESTAMP>/logs/
  inflating: report_cluster_example_<TIMESTAMP>/logs/cluster-example-full-1.jsonl
   creating: report_cluster_example_<TIMESTAMP>/job-logs/
  inflating: report_cluster_example_<TIMESTAMP>/job-logs/cluster-example-full-1-initdb-qnnvw.jsonl
  inflating: report_cluster_example_<TIMESTAMP>/job-logs/cluster-example-full-2-join-tvj8r.jsonl
OpenShift support#
The report operator directive will detect automatically if the
cluster is running on OpenShift, and will get the Cluster Service
Version and the Install Plan, and add them automatically to the zip
under the openshift sub-folder.
Note
the namespace becomes very important on OpenShift. The default namespace for OpenShift in CNP is "openshift-operators". Many (most) clients will use a different namespace for the CNP operator.
kubectl cnp report operator -n openshift-operators
results in
Successfully written report to "report_operator_<TIMESTAMP>.zip" (format: "yaml")
You can find the OpenShift-related files in the openshift
sub-folder:
unzip report_operator_<TIMESTAMP>.zip
cd report_operator_<TIMESTAMP>/
cd openshift
head clusterserviceversions.yaml
apiVersion: operators.coreos.com/v1alpha1
items:

- apiVersion: operators.coreos.com/v1alpha1
  kind: ClusterServiceVersion
  metadata:
    annotations:
      alm-examples: |-
        [
          {
            "apiVersion": "postgresql.k8s.enterprisedb.io/v1",
Logs#
The kubectl cnp logs command allows to follow the logs of a
collection of pods related to EDB Postgres® AI for CloudNativePG™
Cluster in a single go.
It has at the moment one available sub-command: cluster .
Cluster logs#
The cluster sub-command gathers all the pod logs for a cluster in a
single stream or file. This means that you can get all the pod logs in a
single terminal window, with a single invocation of the command.
As in all the cnp plugin sub-commands, you can get instructions and help
with the -h flag:
kubectl cnp logs cluster -h
The logs command will display logs in JSON-lines format, unless the
--timestamps flag is used, in which case, a human-readable timestamp
will be prepended to each line. In this case, lines will no longer be
valid JSON, and tools such as jq may not work as desired.
If the logs cluster sub-command is given the -f flag (aka
--follow ), it will follow the cluster pod logs, and will also watch
for any new pods created in the cluster after the command has been
invoked. Any new pods found, including pods that have been restarted or
re-created, will also have their pods followed. The logs will be
displayed in the terminal’s standard-out. This command will only exit
when the cluster has no more pods left, or when it is interrupted by the
user.
If logs is called without the -f option, it will read the logs
from all cluster pods until the time of invocation and display them in
the terminal’s standard-out, then exit. The -o or --output flag
can be provided, to specify the name of the file where the logs should
be saved, instead of displaying over standard-out. The --tail flag
can be used to specify how many log lines will be retrieved from each
pod in the cluster. By default, the logs cluster sub-command will
display all the logs from each pod in the cluster. If combined with the
“follow” flag -f , the number of logs specified by --tail will
be retrieved until the current time, and from then the new logs will be
followed.
NOTE: unlike other cnp plugin commands, the -f is used to denote
“follow” rather than specify a file. This keeps with the convention of
kubectl logs , which takes -f to mean the logs should be
followed.
Usage:
kubectl cnp logs cluster <clusterName> [flags]
Using the -f option to follow:
kubectl cnp report cluster cluster-example -f
Using --tail option to display 3 lines from each pod and the -f
option to follow:
kubectl cnp report cluster cluster-example -f --tail 3
{"level":"info","ts":"2023-06-30T13:37:33Z","logger":"postgres","msg":"2023-06-30 13:37:33.142 UTC [26] LOG:  ending log output to stderr","source":"/controller/log/postgres","logging_pod":"cluster-example-3"}
{"level":"info","ts":"2023-06-30T13:37:33Z","logger":"postgres","msg":"2023-06-30 13:37:33.142 UTC [26] HINT:  Future log output will go to log destination \"csvlog\".","source":"/controller/log/postgres","logging_pod":"cluster-example-3"}
…
…
With the -o option omitted, and with --output specified:
$ kubectl cnp logs cluster cluster-example --output my-cluster.log

Successfully written logs to "my-cluster.log"
Pretty#
The pretty sub-command reads a log stream from standard input,
formats it into a human-readable output, and attempts to sort the
entries by timestamp.
It can be used in combination with kubectl cnp logs cluster , as
shown in the following example:
$ kubectl cnp logs cluster cluster-example | kubectl cnp logs pretty
2024-10-15T17:35:00.336 INFO     cluster-example-1 instance-manager Starting EDB Postgres® AI for CloudNativePG™ Cluster Instance Manager
2024-10-15T17:35:00.336 INFO     cluster-example-1 instance-manager Checking for free disk space for WALs before starting PostgreSQL
2024-10-15T17:35:00.347 INFO     cluster-example-1 instance-manager starting tablespace manager
2024-10-15T17:35:00.347 INFO     cluster-example-1 instance-manager starting external server manager
[...]
Alternatively, it can be used in combination with other commands that
produce {{name.abbr}} logs in JSON format, such as stern , or
kubectl logs , as in the following example:
$ kubectl logs cluster-example-1 | kubectl cnp logs pretty
2024-10-15T17:35:00.336 INFO     cluster-example-1 instance-manager Starting EDB Postgres® AI for CloudNativePG™ Cluster Instance Manager
2024-10-15T17:35:00.336 INFO     cluster-example-1 instance-manager Checking for free disk space for WALs before starting PostgreSQL
2024-10-15T17:35:00.347 INFO     cluster-example-1 instance-manager starting tablespace manager
2024-10-15T17:35:00.347 INFO     cluster-example-1 instance-manager starting external server manager
[...]
The pretty sub-command also supports advanced log filtering,
allowing users to display logs for specific pods or loggers, or to
filter logs by severity level. Here’s an example:
$ kubectl cnp logs cluster cluster-example | kubectl cnp logs pretty --pods cluster-example-1 --loggers postgres --log-level info
2024-10-15T17:35:00.509 INFO     cluster-example-1 postgres         2024-10-15 17:35:00.509 UTC [29] LOG:  redirecting log output to logging collector process
2024-10-15T17:35:00.509 INFO     cluster-example-1 postgres         2024-10-15 17:35:00.509 UTC [29] HINT:  Future log output will appear in directory "/controller/log"...
2024-10-15T17:35:00.510 INFO     cluster-example-1 postgres         2024-10-15 17:35:00.509 UTC [29] LOG:  ending log output to stderr
2024-10-15T17:35:00.510 INFO     cluster-example-1 postgres         ending log output to stderr
[...]
The pretty sub-command will try to sort the log stream, to make logs
easier to reason about. In order to achieve this, it gathers the logs
into groups, and within groups it sorts by timestamp. This is the only
way to sort interactively, as pretty may be piped from a command in
“follow” mode. The sub-command will add a group separator line, ---
, at the end of each sorted group. The size of the grouping can be
configured via the --sorting-group-size flag (default: 1000), as
illustrated in the following example:
$ kubectl cnp logs cluster cluster-example | kubectl cnp logs pretty --sorting-group-size=3
2024-10-15T17:35:20.426 INFO     cluster-example-2 instance-manager Starting EDB Postgres® AI for CloudNativePG™ Cluster Instance Manager
2024-10-15T17:35:20.426 INFO     cluster-example-2 instance-manager Checking for free disk space for WALs before starting PostgreSQL
2024-10-15T17:35:20.438 INFO     cluster-example-2 instance-manager starting tablespace manager
- --
2024-10-15T17:35:20.438 INFO     cluster-example-2 instance-manager starting external server manager
2024-10-15T17:35:20.438 INFO     cluster-example-2 instance-manager starting controller-runtime manager
2024-10-15T17:35:20.439 INFO     cluster-example-2 instance-manager Starting EventSource
- --
[...]
To explore all available options, use the -h flag for detailed
explanations of the supported flags and their usage.
Note
You can also increase the verbosity of the log by adding more -v options.
Destroy#
The kubectl cnp destroy command helps remove an instance and all the
associated PVCs from a Kubernetes cluster.
The optional --keep-pvc flag, if specified, allows you to keep the
PVCs, while removing all metadata.ownerReferences that were set by
the instance. Additionally, the k8s.enterprisedb.io/pvcStatus label
on the PVCs will change from ready to detached to signify that
they are no longer in use.
Running again the command without the --keep-pvc flag will remove
the detached PVCs.
Usage:
kubectl cnp destroy [CLUSTER_NAME] [INSTANCE_ID]
The following example removes the cluster-example-2 pod and the
associated PVCs:
kubectl cnp destroy cluster-example 2
Cluster hibernation#
Sometimes you may want to suspend the execution of a EDB Postgres® AI
for CloudNativePG™ Cluster Cluster while retaining its data, then
resume its activity at a later time. We’ve called this feature cluster
hibernation.
Hibernation is only available via the kubectl cnp hibernate [on|off]
commands.
Hibernating a EDB Postgres® AI for CloudNativePG™ Cluster cluster means destroying all the resources generated by the cluster, except the PVCs that belong to the PostgreSQL primary instance.
You can hibernate a cluster with:
kubectl cnp hibernate on <cluster-name>
This will:
shutdown every PostgreSQL instance
detach the PVCs containing the data of the primary instance, and annotate them with the latest database status and the latest cluster configuration
delete the
Clusterresource, including every generated resource - except the aforementioned PVCs
When hibernated, a EDB Postgres® AI for CloudNativePG™ Cluster cluster
is represented by just a group of PVCs, in which the one containing the
PGDATA is annotated with the latest available status, including
content from pg_controldata .
Warning
A cluster having fenced instances cannot be hibernated, as fencing is part of the hibernation procedure too.
In case of error the operator will not be able to revert the procedure. You can still force the operation with:
kubectl cnp hibernate on cluster-example --force
A hibernated cluster can be resumed with:
kubectl cnp hibernate off <cluster-name>
Once the cluster has been hibernated, it’s possible to show the last configuration and the status that PostgreSQL had after it was shut down. That can be done with:
kubectl cnp status <cluster-name>
Benchmarking the database with pgbench#
Pgbench can be run against an existing PostgreSQL cluster with following command:
kubectl cnp pgbench <cluster-name> -- --time 30 --client 1 --jobs 1
Refer to the Benchmarking pgbench section for more details.
Benchmarking the storage with fio#
fio can be run on an existing storage class with following command:
kubectl cnp fio <fio-job-name> -n <namespace>
Refer to the Benchmarking fio section for more details.
Requesting a new physical backup#
The kubectl cnp backup command requests a new physical backup for an
existing Postgres cluster by creating a new Backup resource.
Note
From release 1.21, the backup command accepts a new flag, -m to specify the backup method. To request a backup using volume snapshots, set -m volumeSnapshot
The following example requests an on-demand backup for a given cluster:
kubectl cnp backup [cluster_name]
or, if using volume snapshots:
kubectl cnp backup [cluster_name] -m volumeSnapshot
The created backup will be named after the request time:
$ kubectl cnp backup cluster-example
backup/cluster-example-20230121002300 created
By default, a newly created backup will use the backup target policy
defined in the cluster to choose which instance to run on. However, you
can override this policy with the --backup-target option.
In the case of volume snapshot backups, you can also use the
--online option to request an online/hot backup or an offline/cold
one: additionally, you can also tune online backups by explicitly
setting the --immediate-checkpoint and --wait-for-archive
options.
The Appendix B - Backup on object stores contains more information about the configuration settings.
Launching psql#
The kubectl cnp psql command starts a new PostgreSQL interactive
front-end process (psql) connected to an existing Postgres cluster, as
if you were running it from the actual pod. This means that you will be
using the postgres user.
$ kubectl cnp psql cluster-example

psql (17.0 (Debian 17.0-1.pgdg110+1))
Type "help" for help.

postgres=#
By default, the command will connect to the primary instance. The user
can select to work against a replica by using the --replica option:
$ kubectl cnp psql --replica cluster-example

psql (17.0 (Debian 17.0-1.pgdg110+1))

Type "help" for help.

postgres=# select pg_is_in_recovery();
 pg_is_in_recovery
- ------------------
 t
(1 row)

postgres=# \q
This command will start kubectl exec , and the kubectl
executable must be reachable in your PATH variable to correctly
work.
Note
When connecting to instances running on OpenShift, you must explicitly pass a username to the psql command, because of a
security measure built intoOpenShift :
kubectl cnp psql cluster-example -- -U postgres
Warning
The kubectl cnp snapshot command has been removed. Please use the Requesting a new physical backup to request backups using volume snapshots.
Using pgAdmin4 for evaluation/demonstration purposes only#
pgAdmin stands as the most popular and feature-rich open-source administration and development platform for PostgreSQL. For more information on the project, please refer to the official documentation .
Given that the pgAdmin Development Team maintains official Docker container images, you can install pgAdmin in your environment as a standard Kubernetes deployment.
However, for the purposes of demonstration and evaluation, EDB
Postgres® AI for CloudNativePG™ Cluster offers a suitable solution. The
cnp plugin implements the pgadmin4 command, providing a
straightforward method to connect to a given database Cluster and
navigate its content in a local environment such as kind .
For example, you can install a demo deployment of pgAdmin4 for the
cluster-example cluster as follows:
kubectl cnp pgadmin4 cluster-example
This command will produce:
ConfigMap/cluster-example-pgadmin4 created
Deployment/cluster-example-pgadmin4 created
Service/cluster-example-pgadmin4 created
Secret/cluster-example-pgadmin4 created

[...]
After deploying pgAdmin, forward the port using kubectl and connect through your browser by following the on-screen instructions.
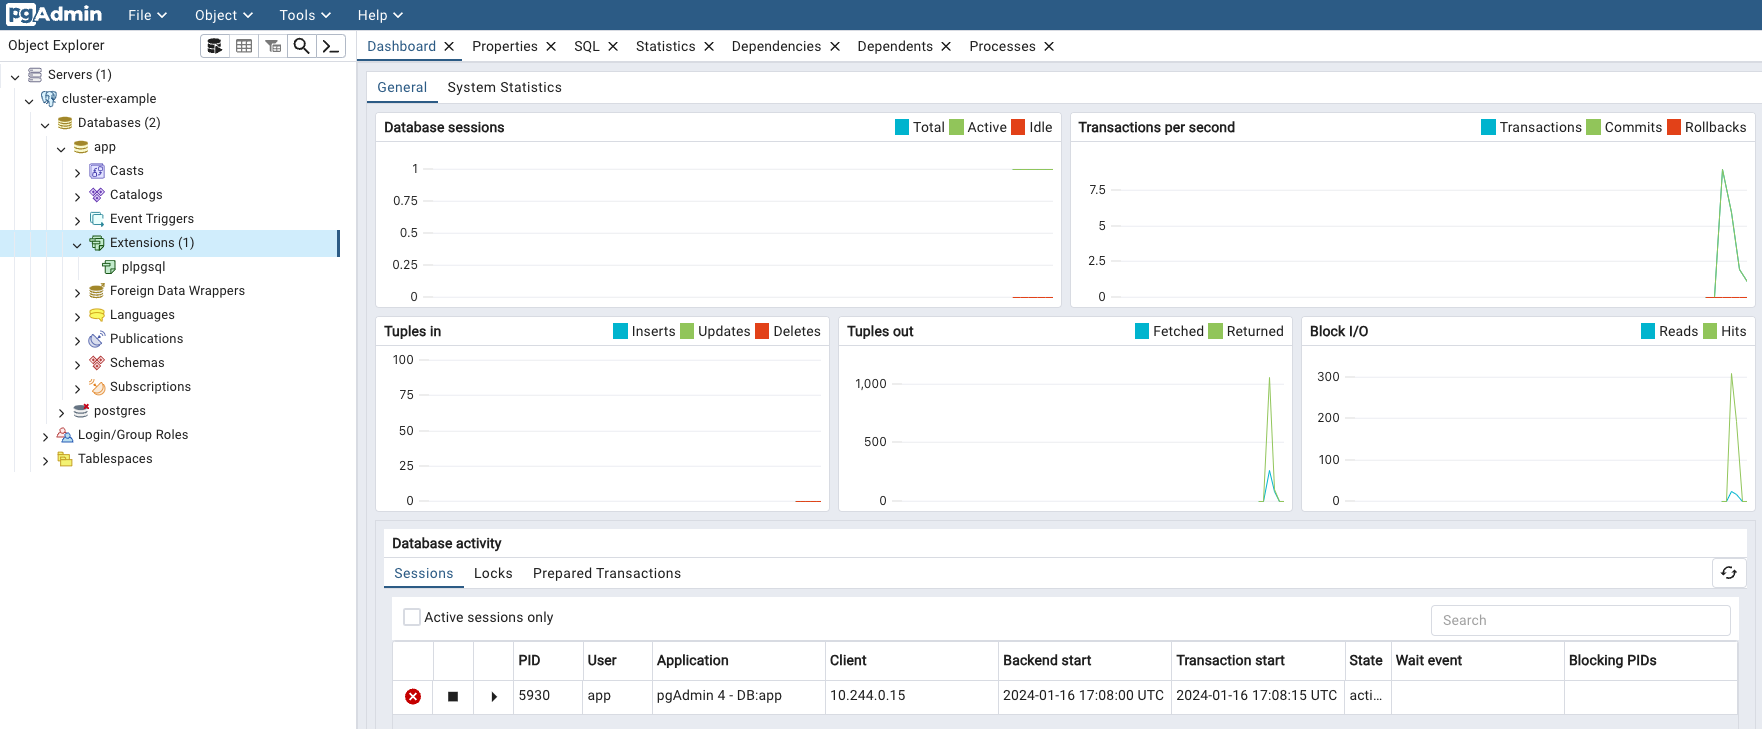
Screenshot of desktop installation of pgAdmin#
As usual, you can use the --dry-run option to generate the YAML
file:
kubectl cnp pgadmin4 --dry-run cluster-example
pgAdmin4 can be installed in either desktop or server mode, with the default being server.
In server mode, authentication is required using a randomly
generated password, and users must manually specify the database to
connect to.
On the other hand, desktop mode initiates a pgAdmin web interface
without requiring authentication. It automatically connects to the
app database as the app user, making it ideal for quick demos,
such as on a local deployment using kind :
kubectl cnp pgadmin4 --mode desktop cluster-example
After concluding your demo, ensure the termination of the pgAdmin deployment by executing:
kubectl cnp pgadmin4 --dry-run cluster-example | kubectl delete -f -
Warning
Never deploy pgAdmin in production using the plugin.
Logical Replication Publications#
The cnp publication command group is designed to streamline the
creation and removal of
PostgreSQL logical replication publications . Be aware that these commands are
primarily intended for assisting in the creation of logical replication
publications, particularly on remote PostgreSQL databases.
Warning
It is crucial to have a solid understanding of both the capabilities and limitations of PostgreSQL's native logical replication system before using these commands. In particular, be mindful of the
Creating a new publication#
To create a logical replication publication, use the
cnp publication create command. The basic structure of this command
is as follows:
kubectl cnp publication create \
  --publication <PUBLICATION_NAME> \
  [--external-cluster <EXTERNAL_CLUSTER>]
  <LOCAL_CLUSTER> [options]
There are two primary use cases:
With
--external-cluster: Use this option to create a publication on an external cluster (i.e. defined in theexternalClustersstanza). The commands will be issued from the<LOCAL_CLUSTER>, but the publication will be for the data in<EXTERNAL_CLUSTER>.Without
--external-cluster: Use this option to create a publication in the<LOCAL_CLUSTER>PostgreSQLCluster(by default, theappdatabase).
Warning
When connecting to an external cluster, ensure that the specified user has sufficient permissions to execute the CREATE PUBLICATION command.
You have several options, similar to the CREATE PUBLICATION
command, to define the group of tables to replicate. Notable options include:
If you specify the
--all-tablesoption, you create a publicationFOR ALL TABLES.Alternatively, you can specify multiple occurrences of:
--table: Add a specific table (with an expression) to the publication.--schema: Include all tables in the specified database schema (available from PostgreSQL 15).
The --dry-run option enables you to preview the SQL commands that
the plugin will execute.
For additional information and detailed instructions, type the following command:
kubectl cnp publication create --help
Example#
Given a source-cluster and a destination-cluster , we would like
to create a publication for the data on source-cluster . The
destination-cluster has an entry in the externalClusters stanza
pointing to source-cluster .
We can run:
kubectl cnp publication create destination-cluster  \
  --external-cluster=source-cluster --all-tables
which will create a publication for all tables on source-cluster ,
running the SQL commands on the destination-cluster .
Or instead, we can run:
kubectl cnp publication create source-cluster \
  --publication=app --all-tables
which will create a publication named app for all the tables in the
source-cluster , running the SQL commands on the source cluster.
Note
There are two sample files that have been provided for illustration and inspiration: logical-source and logical-destination .
Dropping a publication#
The cnp publication drop command seamlessly complements the
create command by offering similar key options, including the
publication name, cluster name, and an optional external cluster. You
can drop a PUBLICATION with the following command structure:
kubectl cnp publication drop \
  --publication <PUBLICATION_NAME> \
  [--external-cluster <EXTERNAL_CLUSTER>]
  <LOCAL_CLUSTER> [options]
To access further details and precise instructions, use the following command:
kubectl cnp publication drop --help
Logical Replication Subscriptions#
The cnp subscription command group is a dedicated set of commands
designed to simplify the creation and removal of
PostgreSQL logical replication subscriptions . These
commands are specifically crafted to aid in the establishment of logical
replication subscriptions, especially when dealing with remote
PostgreSQL databases.
Warning
Before using these commands, it is essential to have a comprehensive understanding of both the capabilities and limitations of PostgreSQL's native logical replication system. In particular, be mindful of the
logical replication restrictions .
In addition to subscription management, we provide a helpful command for synchronizing all sequences from the source cluster. While its applicability may vary, this command can be particularly useful in scenarios involving major upgrades or data import from remote servers.
Creating a new subscription#
To create a logical replication subscription, use the
cnp subscription create command. The basic structure of this command
is as follows:
kubectl cnp subscription create \
  --subscription <SUBSCRIPTION_NAME> \
  --publication <PUBLICATION_NAME> \
  --external-cluster <EXTERNAL_CLUSTER> \
  <LOCAL_CLUSTER> [options]
This command configures a subscription directed towards the specified
publication in the designated external cluster, as defined in the
externalClusters stanza of the <LOCAL_CLUSTER> .
For additional information and detailed instructions, type the following command:
kubectl cnp subscription create --help
Example#
As in the section on publications, we have a source-cluster and a
destination-cluster , and we have already created a publication
called app .
The following command:
kubectl cnp subscription create destination-cluster \
  --external-cluster=source-cluster \
  --publication=app --subscription=app
will create a subscription for app on the destination cluster.
Warning
Prioritize testing subscriptions in a non-production environment to ensure their effectiveness and identify any potential issues before implementing them in a production setting.
Note
There are two sample files that have been provided for illustration and inspiration: logical-source and logical-destination .
Dropping a subscription#
The cnp subscription drop command seamlessly complements the
create command. You can drop a SUBSCRIPTION with the following
command structure:
kubectl cnp subcription drop \
  --subscription <SUBSCRIPTION_NAME> \
  <LOCAL_CLUSTER> [options]
To access further details and precise instructions, use the following command:
kubectl cnp subscription drop --help
Synchronizing sequences#
One notable constraint of PostgreSQL logical replication, implemented through publications and subscriptions, is the lack of sequence synchronization. This becomes particularly relevant when utilizing logical replication for live database migration, especially to a higher version of PostgreSQL. A crucial step in this process involves updating sequences before transitioning applications to the new database (cutover).
To address this limitation, the cnp subscription sync-sequences
command offers a solution. This command establishes a connection with
the source database, retrieves all relevant sequences, and subsequently
updates local sequences with matching identities (based on database
schema and sequence name).
You can use the command as shown below:
kubectl cnp subscription sync-sequences \
  --subscription <SUBSCRIPTION_NAME> \
  <LOCAL_CLUSTER>
For comprehensive details and specific instructions, utilize the following command:
kubectl cnp subscription sync-sequences --help
Example#
As in the previous sections for publication and subscription, we have a
source-cluster and a destination-cluster . The publication and
the subscription, both called app , are already present.
The following command will synchronize the sequences involved in the
app subscription, from the source cluster into the destination
cluster.
kubectl cnp subscription sync-sequences destination-cluster \
  --subscription=app
Warning
Prioritize testing subscriptions in a non-production environment to guarantee their effectiveness and detect any potential issues before deploying them in a production setting.
Integration with K9s#
The cnp plugin can be easily integrated in K9s , a
popular terminal-based UI to interact with Kubernetes clusters.
See k9s/plugins.yml for details.
Permissions required by the plugin#
The plugin requires a set of Kubernetes permissions that depends on the
command to execute. These permissions may affect resources and
sub-resources like Pods, PDBs, PVCs, and enable actions like get ,
delete , patch . The following table contains the full details:
Command |
Resource Permissions |
|---|---|
backup |
clusters: get<br/>backups: create |
certificate |
clusters: get<br/>secrets: get,create |
destroy |
pods: get,delete<br/>jobs: delete,list<br/>PVCs: list,delete,update |
fencing |
clusters: get,patch<br/>pods: get |
fio |
PVCs: create<br/>configmaps: create<br/>deployment: create |
hibernate |
clusters: get,patch,delete<br/>pods: list,get,delete<br/>pods/exec: create<br/>jobs: list<br/>PVCs: get,list,update,patch,delete |
install |
none |
logs |
clusters: get<br/>pods: list<br/>pods/log: get |
maintenance |
clusters: get,patch,list<br/> |
pgadmin4 |
clusters: get<br/>configmaps: create<br/>deployments: create<br/>services: create<br/>secrets: create |
pgbench |
clusters: get<br/>jobs: create<br/> |
promote |
clusters: get<br/>clusters/status: patch<br/>pods: get |
psql |
pods: get,list<br/>pods/exec: create |
publication |
clusters: get<br/>pods: get,list<br/>pods/exec: create |
reload |
clusters: get,patch |
report cluster |
clusters: get<br/>pods: list<br/>pods/log: get<br/>jobs: list<br/>events: list<br/>PVCs: list |
report operator |
configmaps: get<br/>deployments: get<br/>events: list<br/>pods: list<br/>pods/log: get<br/>secrets: get<br/>services: get<br/>mutatingwebhookconfigurations: list[^1]<br/> validatingwebhookconfigurations: list[^1]<br/> If OLM is present on the K8s cluster, also:<br/>clusterserviceversions: list<br/>installplans: list<br/>subscriptions: list |
restart |
clusters: get,patch<br/>pods: get,delete |
status |
clusters: get<br/>pods: list<br/>pods/exec: create<br/>pods/proxy: create<br/>PDBs: list |
subscription |
clusters: get<br/>pods: get,list<br/>pods/exec: create |
version |
none |
[^1]: The permissions are cluster scope ClusterRole resources.
///Footnotes Go Here///
Additionally, assigning the list permission on the clusters will
enable autocompletion for multiple commands.
Role examples#
It is possible to create roles with restricted permissions. The following example creates a role that only has access to the cluster logs:
- --
apiVersion: rbac.authorization.k8s.io/v1
kind: Role
metadata:
  name: cnp-log
rules:
  - verbs:
      - get
    apiGroups:
      - postgresql.k8s.enterprisedb.io
    resources:
      - clusters
  - verbs:
      - list
    apiGroups:
      -
    resources:
      - pods
  - verbs:
      - get
    apiGroups:
      -
    resources:
      - pods/log
The next example shows a role with the minimal permissions required to
get the cluster status using the plugin’s status command:
apiVersion: rbac.authorization.k8s.io/v1
kind: Role
metadata:
  name: cnp-status
rules:
  - verbs:
      - get
    apiGroups:
      - postgresql.k8s.enterprisedb.io
    resources:
      - clusters
  - verbs:
      - list
    apiGroups:
      -
    resources:
      - pods
  - verbs:
      - create
    apiGroups:
      -
    resources:
      - pods/exec
  - verbs:
      - create
    apiGroups:
      -
    resources:
      - pods/proxy
  - verbs:
      - list
    apiGroups:
      - policy
    resources:
      - poddisruptionbudgets