EDB Failover Manager User Guide 4.2
EnterpriseDB
EDB Failover Manager User Guide
EDB Failover Manager
EDB Postgres Failover Manager (EFM) is a high-availability module from EnterpriseDB that enables a Postgres primary node to automatically failover to a Standby node in the event of a software or hardware failure on the primary.
This guide provides information about installing, configuring, and using Failover Manager. For information about the platforms and versions supported by Failover Manager, visit the EnterpriseDB website at:
https://www.enterprisedb.com/services-support/edb-supported-products-and-platforms#efm
This document uses Postgres to mean either the PostgreSQL or EDB Postgres Advanced Server database.
whats_new failover_manager_overview installing_efm configuring_efm using_efm monitoring_efm_cluster using_efm_utility controlling_efm_service controlling_logging notifications supported_scenarios upgrading_existing_cluster troubleshooting configuring_streaming_replication configuring_ssl_authentication conclusion
What’s New
The following changes have been made to EDB Postgres Failover Manager to create version 4.2:
- Support has been added to enable Pgpool EFM integration in a non-sudo mode.
- Failover Manager now provides an option to specify if you do not want to detach the node from the load balancer in case the primary agent fails but the database is still reachable.
- Support has been added to define the priority of standbys applicable for a particular primary node.
- Enhancements have been done to the way standbys are reconfigured so that when archiving is used, standbys will properly follow the new primary.
- A run mode called Eager Failover has been added to the documentation to allow for failovers in situations where previously the old primary would remain active but unmonitored.
- An option to disable the stop-cluster command has been added.
Failover Manager Overview
An EDB Postgres Failover Manager (EFM) cluster is comprised of Failover Manager processes that reside on the following hosts on a network:
- A Primary node - The Primary node is the primary database server that is servicing database clients.
- One or more Standby nodes - A Standby node is a streaming replication server associated with the Primary node.
- A Witness node - The Witness node confirms assertions of either the Primary or a Standby in a failover scenario. A cluster does not need a dedicated witness node if the cluster contains three or more nodes. If you do not have a third cluster member that is a database host, you can add a dedicated Witness node. A cluster may include more than one witness node.
Traditionally, a cluster is a single instance of Postgres managing multiple databases. In this document, the term cluster refers to a Failover Manager cluster. A Failover Manager cluster consists of a Primary agent, one or more Standby agents, and an optional Witness agent that reside on servers in a cloud or on a traditional network and communicate using the JGroups toolkit.
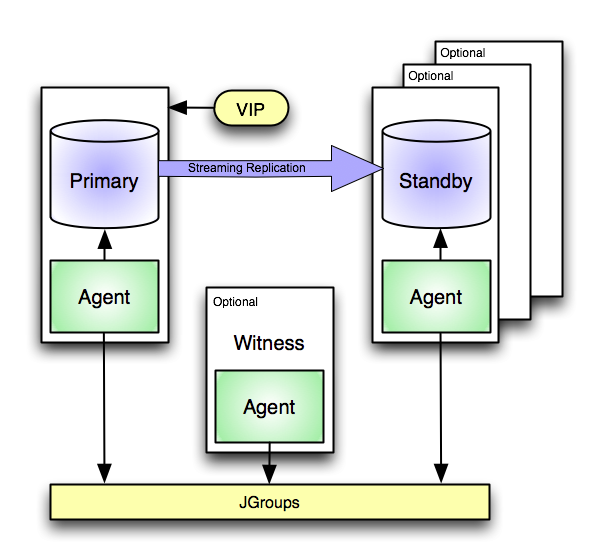
An EFM scenario employing a virtual IP address
When a non-witness agent starts, it connects to the local database and checks the state of the database:
- If the agent cannot reach the database, it will start in idle mode.
- If it finds that the database is in recovery, the agent assumes the role of standby.
- If the database is not in recovery, the agent assumes the role of primary.
In the event of a failover, Failover Manager attempts to ensure that the promoted standby is the most up-to-date standby in the cluster; please note that data loss is possible if the standby node is not in sync with the primary node.
JGroups provides technology that allows Failover Manager to create clusters whose member nodes can communicate with each other and detect node failures.
The figure shown above illustrates a Failover Manager cluster that employs a virtual IP address. You can use a load balancer in place of a virtual IP address if you provide your own script to re-configure the load balancer whenever databases are added or removed. You can also choose to enable native EFM-Pgpool integration for high availability.
prerequisites
Prerequisites
Before configuring a Failover Manager cluster, you must satisfy the prerequisites described below.
Install Java 1.8 (or later)
Before using Failover Manager, you must first install Java (version 1.8 or later). Failover Manager is tested with OpenJDK, and we strongly recommend installing that version of Java. Installation instructions for Java are platform specific.
Provide an SMTP Server
You can receive notifications from Failover Manager as specified by a user-defined notification script, by email, or both.
- If you are using email notifications, an SMTP server must be running on each node of the Failover Manager scenario.
- If you provide a value in the script.notification property, you can leave the user.email field blank; an SMTP server is not required.
If an event occurs, Failover Manager invokes the script (if provided), and can also send a notification email to any email addresses specified in the user.email parameter of the cluster properties file. For more information about using an SMTP server, visit:
https://access.redhat.com/site/documentation
Configure Streaming Replication
Failover Manager requires that PostgreSQL streaming replication be configured between the Primary node and the Standby node or nodes. Failover Manager does not support other types of replication.
On database versions 11 (or prior), unless specified with the -sourcenode option, a recovery.conf file is copied from a random standby node to the stopped primary during switchover. You should ensure that the paths within the recovery.conf file on your standby nodes are consistent before performing a switchover. For more information about the -sourcenode option, please see Promoting a Failover Manager Node.
On database version 12 or later, the primary_conninfo and restore_command properties are copied from a random standby node to the stopped primary during switchover (unless otherwise specified with the -sourcenode option).
Modify the pg_hba.conf File
You must modify the pg_hba.conf file on the Primary and Standby nodes, adding entries that allow communication between the all of the nodes in the cluster. The following example demonstrates entries that might be made to the pg_hba.conf file on the Primary node:
# access for itself
host fmdb efm 127.0.0.1/32 md5
# access for standby
host fmdb efm 192.168.27.1/32 md5
# access for witness
host fmdb efm 192.168.27.34/32 md5
Where:
efm specifies the name of a valid database user.
fmdb specifies the name of a database to which the efm user may connect.
By default, the pg_hba.conf file resides in the data directory, under your Postgres installation. After modifying the pg_hba.conf file, you must reload the configuration file on each node for the changes to take effect. You can use the following command:
# systemctl reload edb-as-x
Where x specifies the Postgres version.
Using Autostart for the Database Servers
If a Primary node reboots, Failover Manager may detect the database is down on the Primary node and promote a Standby node to the role of Primary. If this happens, the Failover Manager agent on the (rebooted) Primary node will not get a chance to write the recovery.conf file; the recovery.conf file prevents the database server from starting. If this happens, the rebooted Primary node will return to the cluster as a second Primary node.
To prevent this, ensure that the Failover Manager agent auto starts before the database server. The agent will start in idle mode, and check to see if there is already a primary in the cluster. If there is a primary node, the agent will verify that a recovery.conf or standby.signal file exists, and the database will not start as a second primary.
Ensure Communication Through Firewalls
If a Linux firewall (i.e. iptables) is enabled on the host of a Failover Manager node, you may need to add rules to the firewall configuration that allow tcp communication between the Failover Manager processes in the cluster. For example:
# iptables -I INPUT -p tcp --dport 7800 -j ACCEPT
/sbin/service iptables save
The command shown above opens the port 7800. Failover Manager will connect via the port that corresponds to the port specified in the cluster properties file.
Ensure that the Database user has Sufficient Privileges
The database user specified by the db.user property in the efm.properties file must have sufficient privileges to invoke the following functions on behalf of Failover Manager:
pg_current_wal_lsn()
pg_last_wal_replay_lsn()
pg_wal_replay_resume()
pg_wal_replay_pause()
If the reconfigure.num.sync or reconfigure.sync.primary property is set to true, then:
For database version 9.6, the
db.userneeds to be a superuser.For database versions higher than version 9.6, the
db.userrequirespg_read_all_statsprivilege and permissions to runpg_reload_conf().
For detailed information about each of these functions, please see the PostgreSQL core documentation.
The user must also have permissions to read the values of configuration variables; a database superuser can use the PostgreSQL GRANT command to provide the permissions needed:
GRANT pg_read_all_settings TO user_name;For more information about pg_read_all_settings, please see the PostgreSQL core documentation.
Installing Failover Manager
To request credentials that allow you to access an EnterpriseDB repository, visit the EDB website at:
https://info.enterprisedb.com/rs/069-ALB-339/images/Repository%20Access%2004-09-2019.pdf
RedHat or CentOS Host
When you install an RPM package that is signed by a source that is not recognized by your system, yum may ask for your permission to import the key to your local server. If prompted, and you are satisfied that the packages come from a trustworthy source, enter y, and press Return to continue.
During the installation, yum may encounter a dependency that it cannot resolve. If it does, it will provide a list of the required dependencies that you must manually resolve.
Failover Manager must be installed by root. During the installation process, the installer will also create a user named efm that has sufficient privileges to invoke scripts that control the Failover Manager service for clusters owned by enterprisedb or postgres.
After receiving your credentials, you must create the EnterpriseDB repository configuration file on each node of the cluster, and then modify the file to enable access. The following steps provide detailed information about accessing the EnterpriseDB repository; the steps must be performed on each node of the cluster.
RHEL or CentOS 7 PPCLE Host
- Use the following command to create a configuration file and install Advance Toolchain:
rpm --import https://public.dhe.ibm.com/software/server/POWER/Linux/toolchain/at/redhat/RHEL7/gpg-pubkey-6976a827-5164221b

cat > /etc/yum.repos.d/advance-toolchain.repo <<EOF
# Begin of configuration file
[advance-toolchain]
name=Advance Toolchain IBM FTP
baseurl=https://public.dhe.ibm.com/software/server/POWER/Linux/toolchain/at/redhat/RHEL7
failovermethod=priority
enabled=1
gpgcheck=1
gpgkey=ftp://public.dhe.ibm.com/software/server/POWER/Linux/toolchain/at/redhat/RHELX/gpg-pubkey-6976a827-5164221b
# End of configuration file
EOF- Install the EDB repository:
yum -y install https://yum.enterprisedb.com/edbrepos/edb-repo-latest.noarch.rpm- Replace ‘USERNAME:PASSWORD’ below with your username and password for the EDB repositories:
sed -i "s@<username>:<password>@USERNAME:PASSWORD@" /etc/yum.repos.d/edb.repo- Install the EPEL repository:
yum -y install https://dl.fedoraproject.org/pub/epel/epel-release-latest-7.noarch.rpm- On RHEL 7 PPCLE, enable the additional repositories to resolve EPEL dependencies:
subscription-manager repos --enable "rhel-*-optional-rpms" --enable "rhel-*-extras-rpms" --enable "rhel-ha-for-rhel-*-server-rpms"- Install the selected package:
yum -y install edb-efm42RHEL or CentOS 7 Host
- To create the repository configuration file, assume superuser privileges, and invoke the following command:
yum -y install https://yum.enterprisedb.com/edbrepos/edb-repo-latest.noarch.rpm- Replace ‘USERNAME:PASSWORD’ below with your username and password for the EDB repositories:
sed -i "s@<username>:<password>@USERNAME:PASSWORD@" /etc/yum.repos.d/edb.repo- Install the EPEL repository:
yum -y install https://dl.fedoraproject.org/pub/epel/epel-release-latest-7.noarch.rpm- On RHEL 7, enable the additional repositories to resolve dependencies:
subscription-manager repos --enable "rhel-*-optional-rpms" --enable "rhel-*-extras-rpms" --enable "rhel-ha-for-rhel-*-server-rpms"- Install the selected package:
yum -y install edb-efm42RHEL or CentOS 8 Host
- To create the repository configuration file, assume superuser privileges, and invoke the following command:
dnf -y install https://yum.enterprisedb.com/edbrepos/edb-repo-latest.noarch.rpm- Replace ‘USERNAME:PASSWORD’ below with your username and password for the EDB repositories:
sed -i "s@<username>:<password>@USERNAME:PASSWORD@" /etc/yum.repos.d/edb.repo- Install the EPEL repository:
- On CentOS 8
dnf -y install epel-release- On RHEL 8
dnf -y install https://dl.fedoraproject.org/pub/epel/epel-release-latest-8.noarch.rpm- Enable the additional repositories to resolve dependencies:
- On CentOS 8
dnf config-manager --set-enabled PowerTools- On RHEL 8
ARCH=$( /bin/arch ) subscription-manager repos --enable "codeready-builder-for-rhel-8-${ARCH}-rpms"- Disable the built-in PostgreSQL module:
dnf -qy module disable postgresql- Install the selected package:
dnf -y install edb-efm42Debian or Ubuntu Host
To install Failover Manager, you must have credentials that allow access to the EnterpriseDB repository. To request credentials for the repository, visit the EnterpriseDB website at:
https://www.enterprisedb.com/user/login
The following steps will walk you through using the EnterpriseDB apt repository to install Failover Manager.
Debian Host
- Assume superuser privileges:
sudo su –- Configure the EnterpriseDB repository by substituting your EnterpriseDB credentials for the username and password placeholders in the following commands:
- On Debian 9
sh -c 'echo "deb https://username:password@apt.enterprisedb.com/$(lsb_release -cs)-edb/ $(lsb_release -cs) main" > /etc/apt/sources.list.d/edb-$(lsb_release -cs).list'- On Debian 10
sh -c 'echo "deb [arch=amd64] https://apt.enterprisedb.com/$(lsb_release -cs)-edb/ $(lsb_release -cs) main" > /etc/apt/sources.list.d/edb-$(lsb_release -cs).list'

sh -c 'echo "machine apt.enterprisedb.com login <username> password <password>" > /etc/apt/auth.conf.d/edb.conf'- Add support to your system for secure APT repositories:
apt-get install apt-transport-https- Add the EDB signing key:
wget -q -O - https://<username>:<password>@apt.enterprisedb.com/edb-deb.gpg.key | apt-key add -- Update the repository meta data:
apt-get update- Install Failover Manager:
apt-get -y install edb-efm42Ububtu Host
- Assume superuser privileges:
sudo su –- Configure the EnterpriseDB repository by substituting your EnterpriseDB credentials for the username and password placeholders in the following commands:
- On Ubuntu 18.04
sh -c 'echo "deb https://username:password@apt.enterprisedb.com/$(lsb_release -cs)-edb/ $(lsb_release -cs) main" > /etc/apt/sources.list.d/edb-$(lsb_release -cs).list'- On Ubuntu 20.4
sh -c 'echo "deb [arch=amd64] https://apt.enterprisedb.com/$(lsb_release -cs)-edb/ $(lsb_release -cs) main" > /etc/apt/sources.list.d/edb-$(lsb_release -cs).list'

sh -c 'echo "machine apt.enterprisedb.com login <username> password <password>" > /etc/apt/auth.conf.d/edb.conf'- Add support to your system for secure APT repositories:
apt-get install apt-transport-https- Add the EDB signing key:
wget -q -O - https://<username>:<password>@apt.enterprisedb.com/edb-deb.gpg.key | apt-key add -- Update the repository meta data:
apt-get update- Install Failover Manager:
apt-get -y install edb-efm42SLES Host
To install Failover Manager, you must have credentials that allow access to the EnterpriseDB repository. To request credentials for the repository, visit the EnterpriseDB website at:
https://www.enterprisedb.com/repository-access-request
You can use the zypper package manager to install a Failover Manager agent on an SLES 12 host. zypper will attempt to satisfy package dependencies as it installs a package, but requires access to specific repositories that are not hosted at EnterpriseDB.
- You must assume superuser privileges and stop any firewalls before installing Failover Manager. Then, use the following commands to add EnterpriseDB repositories to your system:
zypper addrepo https://zypp.enterprisedb.com/suse/edb-sles.repo- The commands create the repository configuration files in the /etc/zypp/repos.d directory. Then, use the following command to refresh the metadata on your SLES host to include the EnterpriseDB repository:
zypper refreshWhen prompted, provide credentials for the repository, and specify a to always trust the provided key, and update the metadata to include the EnterpriseDB repository.
- You must also add SUSEConnect and the SUSE Package Hub extension to the SLES host, and register the host with SUSE, allowing access to SUSE repositories. Use the commands:
zypper install SUSEConnect
SUSEConnect -r <registration_number> -e <user_id>
SUSEConnect -p PackageHub/12.4/x86_64
SUSEConnect -p sle-sdk/12.4/x86_64- Install SUSEConnect to register the host with SUSE, allowing access to SUSE repositories:
zypper addrepo https://download.opensuse.org/repositories/Apache:/Modules/SLE_12_SP4/Apache:Modules.repo- Install OpenJDK (version 1.8) for Java based components:
zypper -n install java-1_8_0-openjdk- Now you can use the zypper utility to install a Failover Manager agent:
zypper -n install edb-efm42Performing post-installation tasks
If you are using Failover Manager to monitor a cluster owned by a user other than enterprisedb or postgres, see Extending Failover Manager Permissions .
After installing on each node of the cluster, you must:
- Modify the cluster properties file on each node.
- Modify the cluster members file on each node.
- If applicable, configure and test virtual IP address settings and any scripts that are identified in the cluster properties file.
- Start the agent on each node of the cluster. For more information about controlling the service, see Section 5.
Installation Locations
components are installed in the following locations:
| Component | Location |
|---|---|
| Executables | /usr/edb/efm-4.2/bin |
| Libraries | /usr/edb/efm-4.2/lib |
| Cluster configuration files | /etc/edb/efm-4.2 |
| Logs | /var/log/efm- 4.2 |
| Lock files | /var/lock/efm-4.2 |
| Log rotation file | /etc/logrotate.d/efm-4.2 |
| sudo configuration file | /etc/sudoers.d/efm-42 |
| Binary to access VIP without sudo | /usr/edb/efm-4.2/bin/secure |
Configuring Failover Manager
Configurable Failover Manager properties are specified in two user-modifiable files:
cluster_properties encrypting_database_password cluster_members extending_efm_permissions using_vip_addresses
The Cluster Properties File
Each node in a Failover Manager cluster has a properties file (by default, named efm.properties) that contains the properties of the individual node on which it resides. The Failover Manager installer creates a file template for the properties file named efm.properties.in in the /etc/edb/efm-4.2 directory.
After completing the Failover Manager installation, you must make a working copy of the template before modifying the file contents:
# cp /etc/edb/efm-4.2/efm.properties.in /etc/edb/efm-4.2/efm.propertiesAfter copying the template file, change the owner of the file to efm:
# chown efm:efm efm.propertiesNote By default, Failover Manager expects the cluster properties file to be named
efm.properties. If you name the properties file something other thanefm.properties, you must modify the service script or unit file to instruct Failover Manager to use a different name.
After creating the cluster properties file, add (or modify) configuration parameter values as required. For detailed information about each property, see Specifying Cluster Properties.
The property files are owned by root. The Failover Manager service script expects to find the files in the /etc/edb/efm-4.2 directory. If you move the property file to another location, you must create a symbolic link that specifies the new location.
Note All user scripts referenced in the properties file will be invoked as the Failover Manager user.
Specifying Cluster Properties
You can use the properties listed in the cluster properties file to specify connection properties and behaviors for your Failover Manager cluster. Modifications to property settings will be applied when Failover Manager starts. If you modify a property value you must restart Failover Manager to apply the changes.
Property values are case-sensitive. Note that while Postgres uses quoted strings in parameter values, Failover Manager does not allow quoted strings in property values. For example, while you might specify an IP address in a Postgres configuration parameter as:
listen_addresses='192.168.2.47'
Failover Manager requires that the value not be enclosed in quotes:
bind.address=192.168.2.54:7800
Use the properties in the efm.properties file to specify connection, administrative, and operational details for Failover Manager.
Legends: In the following table:
A: Required on Primary or Standby nodeW: Required on Witness nodeY: Yes
| Property Name | A | W | Default Value | Comments |
|---|---|---|---|---|
| db.user | Y | Y | Username for the database | |
| db.password.encrypted | Y | Y | Password encrypted using ‘efm encrypt’ | |
| db.port | Y | Y | This value must be same for all the agents | |
| db.database | Y | Y | Database name | |
| db.service.owner | Y | Owner of $PGDATA dir for db.database | ||
| db.service.name | Required if running the database as a service | |||
| db.bin | Y | Directory containing the pg_controldata/pg_ctl commands such as ‘/usr/edb/as12/bin’ | ||
| db.data.dir | Y | Same as the output of query ‘show data_directory;’ | ||
| db.config.dir | Same as the output of query ‘show config_file;’. Should be specified if it is not same as db.data.dir | |||
| jdbc.sslmode | Y | Y | disable | See the note |
| user.email | This value must be same for all the agents; can be left blank if using a notification script | |||
| from.email | efm@localhost | Leave blank to use the default efm@localhost | ||
| notification.level | Y | Y | INFO | See the list of notifications |
| notification.text.prefix | ||||
| script.notification | Required if user.email property is not used; both parameters can be used together | |||
| bind.address | Y | Y | Example: <ip_address>:<port> | |
| external.address | Example: <ip_address/hostname> | |||
| admin.port | Y | Y | 7809 | Modify if the default port is already in use |
| is.witness | Y | Y | See description | |
| local.period | Y | 10 | ||
| local.timeout | Y | 60 | ||
| local.timeout.final | Y | 10 | ||
| remote.timeout | Y | Y | 10 | |
| node.timeout | Y | Y | 50 | This value must be same for all the agents |
| encrypt.agent.messages | Y | Y | false | This value must be same for all the agents |
| enable.stop.cluster | true | This value must be same for all the agents | ||
| stop.isolated.primary | Y | true | This value must be same for all the agents | |
| stop.failed.primary | Y | true | ||
| primary.shutdown.as.failure | Y | Y | false | |
| update.physical.slots.period | Y | 0 | ||
| ping.server.ip | Y | Y | 8.8.8.8 | |
| ping.server.command | Y | Y | /bin/ping -q -c3 -w5 | |
| auto.allow.hosts | Y | Y | false | |
| stable.nodes.file | Y | Y | false | |
| db.reuse.connection.count | Y | 0 | ||
| auto.failover | Y | Y | true | |
| auto.reconfigure | Y | true | This value must be same for all the agents | |
| promotable | Y | true | ||
| use.replay.tiebreaker | Y | Y | true | This value must be same for all the agents |
| standby.restart.delay | 0 | |||
| application.name | Set to replace the application_name portion of the primary_conninfo entry with this property value before starting the original primary database as a standby. | |||
| restore.command | Example: restore.command=scp <db_service_owner>@%h: <archive_path>/%f %p | |||
| reconfigure.num.sync | Y | false | ||
| reconfigure.num.sync.max | ||||
| reconfigure.sync.primary | Y | false | ||
| minimum.standbys | Y | Y | 0 | This value must be same for all the nodes |
| priority.standbys | ||||
| recovery.check.period | Y | 1 | ||
| restart.connection.timeout | 60 | |||
| auto.resume.period | Y | 0 | ||
| virtual.ip | (see virtual.ip.single) | Leave blank if you do not specify a VIP | ||
| virtual.ip.interface | Required if you specify a VIP | |||
| virtual.ip.prefix | Required if you specify a VIP | |||
| virtual.ip.single | Y | Y | Yes | This value must be same for all the nodes |
| check.vip.before.promotion | Y | Y | Yes | |
| pgpool.enable | false | |||
| pcp.user | Required if pgpool.enable is set to true | |||
| pcp.host | Required if pgpool.enable is set to true, this value must be same for all the agents | |||
| pcp.port | Required if pgpool.enable is set to true, this value must be same for all the agents | |||
| pcp.pass.file | Required if pgpool.enable is set to true | |||
| pgpool.bin | Required if pgpool.enable is set to true | |||
| script.load.balancer.attach | Example: script.load.balancer.attach= /<path>/<attach_script> %h %t | |||
| script.load.balancer.detach | Example: script.load.balancer.detach= /<path>/<detach_script> %h %t | |||
| detach.on.agent.failure | true | Set to false if you want to keep a running primary database attached. | ||
| script.fence | Example: script.fence= /<path>/<script_name> %p %f | |||
| script.post.promotion | Example: script.post.promotion= /<path>/<script_name> %f %p | |||
| script.resumed | Example: script.resumed= /<path>/<script_name> | |||
| script.db.failure | Example: script.db.failure= /<path>/<script_name> | |||
| script.primary.isolated | Example: script.primary.isolated= /<path>/<script_name> | |||
| script.remote.pre.promotion | Example: script.remote.pre.promotion= /<path>/<script_name> %p | |||
| script.remote.post.promotion | Example: script.remote.post.promotion= /<path>/<script_name> %p | |||
| script.custom.monitor | Example: script.custom.monitor= /<path>/<script_name> | |||
| custom.monitor.interval | Required if a custom monitoring script is specified | |||
| custom.monitor.timeout | Required if a custom monitoring script is specified | |||
| custom.monitor.safe.mode | Required if a custom monitoring script is specified | |||
| sudo.command | Y | Y | sudo | |
| sudo.user.command | Y | Y | sudo -u %u | |
| lock.dir | If not specified, defaults to ‘/var/lock/efm-<version>’ | |||
| log.dir | If not specified, defaults to ‘/var/log/efm-<version>’ | |||
| syslog.host | localhost | |||
| syslog.port | 514 | |||
| syslog.protocol | ||||
| syslog.facility | UDP | |||
| file.log.enabled | Y | Y | true | |
| syslog.enabled | Y | Y | false | |
| jgroups.loglevel | info | |||
| efm.loglevel | info | |||
| jvm.options | -Xmx128m |
Cluster Properties
Use the following properties to specify connection details for the Failover Manager cluster:
# The value for the password property should be the output from
# 'efm encrypt' -- do not include a cleartext password here. To
# prevent accidental sharing of passwords among clusters, the
# cluster name is incorporated into the encrypted password. If
# you change the cluster name (the name of this file), you must
# encrypt the password again with the new name.
# The db.port property must be the same for all nodes.
db.user=
db.password.encrypted=
db.port=
db.database=
The db.user specified must have sufficient privileges to invoke selected PostgreSQL commands on behalf of Failover Manager. For more information, please see Prerequisites.
For information about encrypting the password for the database user, see Encrypting Your Database Password.
Use the db.service.owner property to specify the name of the operating system user that owns the cluster that is being managed by Failover Manager. This property is not required on a dedicated witness node.
# This property tells EFM which OS user owns the $PGDATA dir for
# the 'db.database'. By default, the owner is either 'postgres'
# for PostgreSQL or 'enterprisedb' for EDB Postgres Advanced
# Server. However, if you have configured your db to run as a
# different user, you will need to copy the /etc/sudoers.d/efm-XX
# conf file to grant the necessary permissions to your db owner.
#
# This username must have write permission to the
# 'db.data.dir' specified below.
db.service.owner=
Specify the name of the database service in the db.service.name property if you use the service or systemctl command when starting or stopping the service.
# Specify the proper service name in order to use service commands
# rather than pg_ctl to start/stop/restart a database. For example, if
# this property is set, then 'service <name> restart' or 'systemctl
# restart <name>'
# (depending on OS version) will be used to restart the database rather
# than pg_ctl.
# This property is required if running the database as a service.
db.service.name=
You should use the same service control mechanism (pg_ctl, service, or systemctl) each time you start or stop the database service. If you use the pg_ctl program to control the service, specify the location of the pg_ctl program in the db.bin property.
# Specify the directory containing the pg_controldata/pg_ctl commands,
# for example:
# /usr/edb/as12/bin. Unless the db.service.name property is used, the
# pg_ctl command is used to start/stop/restart databases as needed
# after a failover or switchover. This property is required.
db.bin=
Use the db.data.dir property to specify the location to which a recovery file will be written on the Primary node of the cluster during promotion. This property is required on primary and standby nodes; it is not required on a dedicated witness node.
# For database version 12 and up, this is the directory where a
# standby.signal file will exist for a standby node. For previous
# versions, this is the location of the db recovery.conf file on
# the node.
# After a failover, the recovery.conf files on remaining standbys are
# changed to point to the new primary db (a copy of the original is made
# first). On a primary node, a recovery.conf file will be written during
# failover and promotion to ensure that the primary node can not be
# restarted as the primary database.
# This corresponds to database environment variable PGDATA and should
# be same as the output of query 'show data_directory;' on respective
# database.
db.data.dir=
Use the db.data.dir property to specify the location to which a recovery file will be written on the Primary node of the cluster during promotion. This property is required on primary and standby nodes; it is not required on a dedicated witness node.
# For database version 12 and up, this is the directory where a
# standby.signal file will exist for a standby node. For previous
# versions, this is the location of the db recovery.conf file on
# the node.
# After a failover, the recovery.conf files on remaining standbys are
# changed to point to the new primary db (a copy of the original is made
# first). On a primary node, a recovery.conf file will be written during
# failover and promotion to ensure that the primary node can not be
# restarted as the primary database.
# This corresponds to database environment variable PGDATA and should
# be same as the output of query 'show data_directory;' on respective
# database.
db.data.dir=
Use the db.config.dir property to specify the location of database configuration files if they are not stored in the same directory as the recovery.conf or standby.signal file. This should be the value specified by the config_file parameter directory of your Advanced Server or PostgreSQL installation. This value will be used as the location of the Postgres data directory when stopping, starting, or restarting the database.
# Specify the location of database configuration files if they are
# not contained in the same location as the recovery.conf or
# standby.signal file. This is most likely the case for Debian
# installations. The location specified will be used as the -D value
# (the location of the data directory for the cluster) when calling
# pg_ctl to start or stop the database. If this property is blank,
# the db.data.dir location specified by the db.data.dir property will
# be used. This corresponds to the output of query 'show config_file;'
# on respective database.
db.config.dir=
For more information about database configuration files, visit the PostgreSQL website.
Use the jdbc.sslmode property to instruct Failover Manager to use SSL connections; by default, SSL is disabled.
# Use the jdbc.sslmode property to enable ssl for EFM
# connections. Setting this property to anything but 'disable'
# will force the agents to use 'ssl=true' for all JDBC database
# connections (to both local and remote databases).
# Valid values are:
#
# disable - Do not use ssl for connections.
# verify-ca - EFM will perform CA verification before allowing
# the certificate.
# require - Verification will not be performed on the server
# certificate.
jdbc.sslmode=disable
Note If you set the value of
jdbc.sslmodetoverify-caand you want to use Java trust store for certificate validation, you need to set the following value:
jdbc.properties=sslfactory=org.postgresql.ssl.DefaultJavaSSLFactory
For information about configuring and using SSL, please see:
and
Use the user.email property to specify an email address (or multiple email addresses) that will receive any notifications sent by Failover Manager.
# Email address(es) for notifications. The value of this
# property must be the same across all agents. Multiple email
# addresses must be separated by space. If using a notification
# script instead, this property can be left blank.
user.email=
The from.email property specifies the value that will be used as the sender’s address on any email notifications from Failover Manager. You can:
- leave
from.emailblank to use the default value (efm@localhost). - specify a custom value for the email address.
- specify a custom email address, using the
%hplaceholder to represent the name of the node host (e.g., example@%h). The placeholder will be replaced with the name of the host as returned by the Linux hostname utility.
For more information about notifications, see Notifications.
# Use the from.email property to specify the from email address that
# will be used for email notifications. Use the %h placeholder to
# represent the name of the node host (e.g. example@%h). The
# placeholder will be replaced with the name of the host as returned
# by the hostname command.
# Leave blank to use the default, efm@localhost.
from.email=
Use the notification.level property to specify the minimum severity level at which Failover Manager will send user notifications or when a notification script is called. For a complete list of notifications, please see Notifications.
# Minimum severity level of notifications that will be sent by
# the agent. The minimum level also applies to the notification
# script (below). Valid values are INFO, WARNING, and SEVERE.
# A list of notifications is grouped by severity in the user's
# guide.
notification.level=INFO
Use the notification.text.prefix property to specify the text to be added to the beginning of every notification.
# Text to add to the beginning of every notification. This could
# be used to help identify what the cluster is used for, the role
# of this node, etc. To use multiple lines, add a backslash \ to
# the end of a line of text. To include a newline use \n.
# Example:
# notification.text.prefix=Development cluster for Example dept.\n\
# Used by Dev and QA \
# See Example group for questions.
notification.text.prefix=
Use the script.notification property to specify the path to a user-supplied script that acts as a notification service; the script will be passed a message subject and a message body. The script will be invoked each time Failover Manager generates a user notification.
# Absolute path to script run for user notifications.
#
# This is an optional user-supplied script that can be used for
# notifications instead of email. This is required if not using
# email notifications. Either/both can be used. The script will
# be passed two parameters: the message subject and the message
# body.
script.notification=
The bind.address property specifies the IP address and port number of the agent on the current node of the Failover Manager cluster.
# This property specifies the ip address and port that jgroups
# will bind to on this node. The value is of the form
# <ip>:<port>.
# Note that the port specified here is used for communicating
# with other nodes, and is not the same as the admin.port below,
# used only to communicate with the local agent to send control
# signals.
# For example, <provide_your_ip_address_here>:7800
bind.address=
Use the external.address property to specify the IP address or hostname that should be used for communication with all other Failover Manager agents in a NAT environment.
# This is the ip address/hostname to be used for communication with all
# other Failover Manager agents. All traffic towards this address
# should be routed by the network to the bind.address of the node.
# The value is in the ip/hostname format only. This address will be
# used in scenarios where nodes are on different networks and broadcast
# an IP address other than the bind.address to the external world.
external.address=
Use the admin.port property to specify a port on which Failover Manager listens for administrative commands.
# This property controls the port binding of the administration
# server which is used for some commands (ie cluster-status). The
# default is 7809; you can modify this value if the port is
# already in use.
admin.port=7809
Set the is.witness property to true to indicate that the current node is a witness node. If is.witness is true, the local agent will not check to see if a local database is running.
# Specifies whether or not this is a witness node. Witness nodes
# do not have local databases running.
is.witness=
The Postgres pg_is_in_recovery() function is a boolean function that reports the recovery state of a database. The function returns true if the database is in recovery, or false if the database is not in recovery. When an agent starts, it connects to the local database and invokes the pg_is_in_recovery() function. If the server responds true, the agent assumes the role of standby; if the server responds false, the agent assumes the role of primary. If there is no local database, the agent will assume an idle state.
Note If
is.witnessistrue, Failover Manager will not check the recovery state.
The following properties specify properties that apply to the local server:
- The
local.periodproperty specifies how many seconds between attempts to contact the database server. - The
local.timeoutproperty specifies how long an agent will wait for a positive response from the local database server. - The
local.timeout.finalproperty specifies how long an agent will wait after the above-mentioned previous checks have failed to contact the database server on the current node. If a response is not received from the database within the number of seconds specified by thelocal.timeout.finalproperty, the database is assumed to have failed.
For example, given the default values of these properties, a check of the local database happens once every 10 seconds. If an attempt to contact the local database does not come back positive within 60 seconds, Failover Manager makes a final attempt to contact the database. If a response is not received within 10 seconds, Failover Manager declares database failure and notifies the administrator listed in the user.email property. These properties are not required on a dedicated witness node.
# These properties apply to the connection(s) EFM uses to monitor
# the local database. Every 'local.period' seconds, a database
# check is made in a background thread. If the main monitoring
# thread does not see that any checks were successful in
# 'local.timeout' seconds, then the main thread makes a final
# check with a timeout value specified by the
# 'local.timeout.final' value. All values are in seconds.
# Whether EFM uses single or multiple connections for database
# checks is controlled by the 'db.reuse.connection.count'
# property.
local.period=10
local.timeout=60
local.timeout.final=10
If necessary, you should modify these values to suit your business model.
Use the remote.timeout property to specify how many seconds an agent waits for a response from a remote database server (i.e., how long a standby agent waits to verify that the primary database is actually down before performing failover). The remote.timeout property value specifies a timeout value for agent-to-agent communication; other timeout properties in the cluster properties file specify values for agent-to-database communication.
# Timeout for a call to check if a remote database is responsive.
# For example, this is how long a standby would wait for a
# DB ping request from itself and the witness to the primary DB
# before performing failover.
remote.timeout=10
Use the node.timeout property to specify the number of seconds that an agent will wait for a response from a node when determining if a node has failed.
# The total amount of time in seconds to wait before determining
# that a node has failed or been disconnected from this node.
#
# The value of this property must be the same across all agents.
node.timeout=50
Use the encrypt.agent.messages property to specify if the messages sent between agents should be encrypted.
# Set to true to encrypt messages that are sent between agents.
# This property must be the same on all agents or else the agents
# will not be able to connect.
encrypt.agent.messages=false
Use the enable.stop.cluster property to enable or disable the stop-cluster command. The command could be a convenience in some environments but could cause issues when unintentionally invoked. In Eager Failover mode, the command would result in stopping Postgres without failover.
# Whether or not the 'efm stop-cluster <cluster name>' command is enabled.
# Set to false to disable the command, in which case all Failover
# Manager agents must be stopped individually. Note that stopping each
# agent separately will change the .nodes files on remaining agents
# unless stable.nodes.file is also true. This property value must
# be the same on all agents if set. The default is true if not set.
enable.stop.cluster=true
Use the stop.isolated.primary property to instruct Failover Manager to shut down the database if a primary agent detects that it is isolated. When true (the default), Failover Manager will stop the database before invoking the script specified in the script.primary.isolated property.
# Shut down the database after a primary agent detects that it has
# been isolated from the majority of the efm cluster. If set to
# true, efm will stop the database before running the
# 'script.primary.isolated' script, if a script is specified.
stop.isolated.primary=true
Use the stop.failed.primary property to instruct Failover Manager to attempt to shut down a primary database if it can not reach the database. If true, Failover Manager will run the script specified in the script.db.failure property after attempting to shut down the database.
# Attempt to shut down a failed primary database after EFM can no
# longer connect to it. This can be used for added safety in the
# case a failover is caused by a failure of the network on the
# primary node.
# If specified, a 'script.db.failure' script is run after this attempt.
stop.failed.primary=true
Use the primary.shutdown.as.failure parameter to indicate that any shutdown of the Failover Manager agent on the primary node should be treated as a failure. If this parameter is set to true and the primary agent stops (for any reason), the cluster will attempt to confirm if the database on the primary node is running:
- If the database is reached, a notification will be sent informing you of the agent status.
- If the database is not reached, a failover will occur.
# Treat a primary agent shutdown as an agent failure. This can be set
# to true to treat a primary agent shutdown as a failure situation.
# Caution should be used when using this feature, as it could
# cause an unwanted promotion in the case of performing primary
# database maintenance.
# Please see the user's guide for more information.
primary.shutdown.as.failure=false
The primary.shutdown.as.failure property is meant to catch user error, rather than failures, such as the accidental shutdown of a primary node. The proper shutdown of a node can appear to the rest of the cluster like a user has stopped the primary Failover Manager agent (for example to perform maintenance on the primary database). If you set the primary.shutdown.as.failure property to true, care must be taken when performing maintenance.
To perform maintenance on the primary database when primary.shutdown.as.failure is true, you should stop the primary agent and wait to receive a notification that the primary agent has failed but the database is still running. Then it is safe to stop the primary database. Alternatively, you can use the stop-cluster command to stop all of the agents without failure checks being performed.
Use the update.physical.slots.period property to define the slot advance frequency for database version 12 and above. When update.physical.slots.period is set to a non-zero value, the primary agent will read the current restart_lsn of the physical replication slots after every update.physical.slots.period seconds, and send this information with its pg_current_wal_lsn and primary_slot_name (If it is set in the postgresql.conf file) to the standbys. If physical slots do not already exist, setting this parameter to a non-zero value will create the slots and then update the restart_lsn parameter for these slots. A non-promotable standby will not create new slots but will update them if they exist.
# Period in seconds between having the primary agent update promotable
# standbys with physical replication slot information so that
# the cluster will continue to use replication slots after a failover.
# Set to zero to turn off.
update.physical.slots.period=0
Use the ping.server.ip property to specify the IP address of a server that Failover Manager can use to confirm that network connectivity is not a problem.
# This is the address of a well-known server that EFM can ping
# in an effort to determine network reachability issues. It
# might be the IP address of a nameserver within your corporate
# firewall or another server that *should* always be reachable
# via a 'ping' command from each of the EFM nodes.
#
# There are many reasons why this node might not be considered
# reachable: firewalls might be blocking the request, ICMP might
# be filtered out, etc.
#
# Do not use the IP address of any node in the EFM cluster
# (primary, standby, or witness) because this ping server is meant
# to provide an additional layer of information should the EFM
# nodes lose sight of each other.
#
# The installation default is Google's DNS server.
ping.server.ip=8.8.8.8
Use the ping.server.command property to specify the command used to test network connectivity.
# This command will be used to test the reachability of certain
# nodes.
#
# Do not include an IP address or hostname on the end of
# this command - it will be added dynamically at runtime with the
# values contained in 'virtual.ip' and 'ping.server.ip'.
#
# Make sure this command returns reasonably quickly - test it
# from a shell command line first to make sure it works properly.
ping.server.command=/bin/ping -q -c3 -w5
Use the auto.allow.hosts property to instruct the server to use the addresses specified in the .nodes file of the first node started to update the allowed host list. Enabling this property (setting auto.allow.hosts to true) can simplify cluster start-up.
# Have the first node started automatically add the addresses
# from its .nodes file to the allowed host list. This will make
# it faster to start the cluster when the initial set of hosts
# is already known.
auto.allow.hosts=false
Use the stable.nodes.file property to instruct the server to not rewrite the nodes file when a node joins or leaves the cluster. This property is most useful in clusters with unchanging IP addresses.
# When set to true, EFM will not rewrite the .nodes file whenever
# new nodes join or leave the cluster. This can help starting a
# cluster in the cases where it is expected for member addresses
# to be mostly static, and combined with 'auto.allow.hosts' makes
# startup easier when learning failover manager.
stable.nodes.file=false
The db.reuse.connection.count property allows the administrator to specify the number of times Failover Manager reuses the same database connection to check the database health. The default value is 0, indicating that Failover Manager will create a fresh connection each time. This property is not required on a dedicated witness node.
# This property controls how many times a database connection is
# reused before creating a new one. If set to zero, a new
# connection will be created every time an agent pings its local
# database.
db.reuse.connection.count=0
The auto.failover property enables automatic failover. By default, auto.failover is set to true.
# Whether or not failover will happen automatically when the primary
# fails. Set to false if you want to receive the failover notifications
# but not have EFM actually perform the failover steps.
# The value of this property must be the same across all agents.
auto.failover=true
Use the auto.reconfigure property to instruct Failover Manager to enable or disable automatic reconfiguration of remaining Standby servers after the primary standby is promoted to Primary. Set the property to true to enable automatic reconfiguration (the default) or false to disable automatic reconfiguration. This property is not required on a dedicated witness node. If you are using Advanced Server or PostgreSQL version 11 or earlier, the recovery.conf file will be backed up during the reconfiguration process.
# After a standby is promoted, Failover Manager will attempt to
# update the remaining standbys to use the new primary. For database
# versions before 12, Failover Manager will back up recovery.conf.
# Then it will change the host parameter of the primary_conninfo entry
# in recovery.conf or postgresql.auto.conf, and restart the database.
# The restart command is contained in either the efm_db_functions or
# efm_root_functions file; default when not running db as an os
# service is: "pg_ctl restart -m fast -w -t <timeout> -D <directory>"
# where the timeout is the local.timeout property value and the
# directory is specified by db.data.dir. To turn off
# automatic reconfiguration, set this property to false.
auto.reconfigure=true
Note
primary_conninfois a space-delimited list of keyword=value pairs.
Use the promotable property to indicate that a node should not be promoted. The promotable property is ignored when a primary agent is started. This simplifies switching back to the original primary after a switchover or failover. To override the setting, use the efm set-priority command at runtime; for more information about the efm set-priority command, see Using the efm Utility.
# A standby with this set to false will not be added to the
# failover priority list, and so will not be available for
# promotion. The property will be used whenever an agent starts
# as a standby or resumes as a standby after being idle. After
# startup/resume, the node can still be added or removed from the
# priority list with the 'efm set-priority' command. This
# property is required for all non-witness nodes.
promotable=true
If the same amount of data has been written to more than one standby node, and a failover occurs, the use.replay.tiebreaker value will determine how Failover Manager selects a replacement primary. Set the use.replay.tiebreaker property to true to instruct Failover Manager to failover to the node that will come out of recovery faster, as determined by the log sequence number. To ignore the log sequence number and promote a node based on user preference, set use.replay.tiebreaker to false.
# Use replay LSN value for tiebreaker when choosing a standby to
# promote before using failover priority. Set this property to true to
# consider replay location as more important than failover priority
# (as seen in cluster-status command) when choosing the "most ahead"
# standby to promote.
use.replay.tiebreaker=true
Use the standby.restart.delay property to specify the time in seconds that the standby should wait before it gets reconfigured (stopped/started) to follow the new primary after a promotion.
# Time in seconds for this standby to delay restarting to follow the
# primary after a promotion. This can be used to have standbys restart
# at different times to increase availability. Caution should be used
# when using this feature, as a delayed standby will not be following
# the new primary and care must be taken that the new primary retains
# enough WAL for the standby to follow it.
# Please see the user's guide for more information.
standby.restart.delay=0
You can use the application.name property to provide the name of an application that will be copied to the primary_conninfo parameter before restarting an old primary node as a standby.
# During a switchover, recovery settings are copied from a standby
# to the original primary. If the application.name property is set,
# Failover Manager will replace the application_name portion of the
# primary_conninfo entry with this property value before starting
# the original primary database as a standby. If this property is
# not set, Failover Manager will remove the parameter value
# from primary_conninfo.
application.name=
Note You should set the
application.nameproperty on the primary and any promotable standby; in the event of a failover/switchover, the primary node could potentially become a standby node again.
Use the restore.command property to instruct Failover Manager to update the restore_command when a new primary is promoted. %h represents the address of the new primary; Failover Manager will replace %h with the address of the new primary. %f and %p are placeholders used by the server. If the property is left blank, Failover Manager will not update the restore_command values on the standbys after a promotion.
See the PostgreSQL documentation for more information about using a restore_command.
# If the restore_command on a standby restores directly from the
# primary node, use this property to have Failover Manager change
# the command when a new primary is promoted.
#
# Use the %h placeholder to represent the address of the new primary.
# During promotion it will be replaced with the address of the new
# primary.
#
# If not specified, failover manager will not change the
# restore_command value, if any, on standby nodes.
#
# Example:
# restore.command=scp <db service owner>@%h:/var/lib/edb/as12/data/archive/%f %p
restore.command=
The database parameter synchronous_standby_names on the primary node specifies the names and count of the synchronous standby servers that will confirm receipt of data, to ensure that the primary nodes can accept write transactions. When reconfigure.num.sync property is set to true, Failover Manager will reduce the number of synchronous standby servers and reload the configuration of the primary node to reflect the current value.
# Reduce num_sync when the number of synchronous standbys drops below
# the value required by the primary database. If set to true, Failover
# Manager will reduce the number of standbys needed in the primary's
# synchronous_standby_names property and reload the primary
# configuration. Failover Manager will not reduce the number below 1,
# taking the primary out of synchronous replication, unless the
# reconfigure.sync.primary property is also set to true.
# To raise num_sync, see the reconfigure.num.sync.max property below.
reconfigure.num.sync=false
Use the reconfigure.num.sync.max property to specify the maximum number to which num-sync can be raised when a standby is added to the cluster.
# If reconfigure.num.sync is set to true and this property is set,
# Failover Manager will check if num_sync can be raised when a standby
# is added to the cluster.
# Failover Manager will not raise the value above the maximum set here.
# If the primary database has been taken out of synchronous mode
# completely (see the reconfigure.sync.primary property), then Failover
# Manager will not reconfigure the primary database if standbys are
# added to the cluster.
reconfigure.num.sync.max=
Set the reconfigure.sync.primary property to true to take the primary database out of synchronous replication mode if the number of standby nodes drops below the level required. Set reconfigure.sync.primary to false to send a notification if the standby count drops, but not interrupt synchronous replication.
# Take the primary database out of synchronous replication mode when
# needed. If set to true, Failover Manager will clear the
# synchronous_standby_names configuration parameter on the primary
# if the number of synchronous standbys drops below the required
# level for the primary to accept writes.
# If set to false, Failover Manager will detect the situation but
# will only send a notification if the standby count drops below the
# required level.
#
# CAUTION: TAKING THE PRIMARY DATABASE OUT OF SYNCHRONOUS MODE MEANS
# THERE MAY ONLY BE ONE COPY OF DATA. DO NOT MAKE THIS CHANGE UNLESS
# YOU ARE SURE THIS IS OK.
reconfigure.sync.primary=false
Use the minimum.standbys property to specify the minimum number of standby nodes that will be retained on a cluster; if the standby count drops to the specified minimum, a replica node will not be promoted in the event of a failure of the primary node.
# Instead of setting specific standbys as being unavailable for
# promotion, this property can be used to set a minimum number
# of standbys that will not be promoted. Set to one, for
# example, promotion will not happen if it will drop the number
# of standbys below this value. This property must be the same on
# each node.
minimum.standbys=0
Use the priority.standbys property to specify the priority of standbys after this node is promoted.
# Space-separated list of standby addresses that are high priority for
# promotion when this node is the primary. If set, when this node is
# promoted, addresses in this list will be added to the front of the
# standby priority list. If this list contains addresses that are not
# standbys at the time of promotion, they will not be added.
priority.standbys=
Use the recovery.check.period property to specify the number of seconds that Failover Manager will wait before checks to see if a database is out of recovery.
# Time in seconds between checks to see if a promoting database
# is out of recovery.
recovery.check.period=1
Use the restart.connection.timeout property to specify the number of seconds that Failover Manager will attempt to connect to a newly reconfigured primary or standby node while the database on that node prepares to accept connections.
# Time in seconds to keep trying to connect to a database after a
# start or restart command returns successfully but the database
# is not ready to accept connections yet (a rare occurance). This
# applies to standby databases that are restarted when being
# reconfigured for a new primary, and to primary databases that
# are stopped and started as standbys during a switchover.
# This retry mechanism is unrelated to the auto.resume.period
# parameter.
restart.connection.timeout=60
Use the auto.resume.period property to specify the number of seconds (after a monitored database fails and an agent has assumed an idle state, or when starting in IDLE mode) during which an agent will attempt to resume monitoring that database.
# Period in seconds for IDLE agents to try to resume monitoring
# after a database failure or when starting in IDLE mode. Set to
# 0 for agents to not try to resume (in which case the
# 'efm resume <cluster>' command is used after bringing a
# database back up).
auto.resume.period=0
Failover Manager provides support for clusters that use a virtual IP. If your cluster uses a virtual IP, provide the host name or IP address in the virtual.ip property; specify the corresponding prefix in the virtual.ip.prefix property. If virtual.ip is left blank, virtual IP support is disabled.
Use the virtual.ip.interface property to provide the network interface used by the VIP.
The specified virtual IP address is assigned only to the primary node of the cluster. If you specify virtual.ip.single=true, the same VIP address will be used on the new primary in the event of a failover. Specify a value of false to provide a unique IP address for each node of the cluster.
For information about using a virtual IP address, see Using Failover Manager with Virtual IP Addresses.
# These properties specify the IP and prefix length that will be
# remapped during failover. If you do not use a VIP as part of
# your failover solution, leave the virtual.ip property blank to
# disable Failover Manager support for VIP processing (assigning,
# releasing, testing reachability, etc).
#
# If you specify a VIP, the interface and prefix are required.
#
# If you specify a host name, it will be resolved to an IP address
# when acquiring or releasing the VIP. If the host name resolves
# to more than one IP address, there is no way to predict which
# address Failover Manager will use.
#
# By default, the virtual.ip and virtual.ip.prefix values must be
# the same across all agents. If you set virtual.ip.single to
# false, you can specify unique values for virtual.ip and
# virtual.ip.prefix on each node.
#
# If you are using an IPv4 address, the virtual.ip.interface value
# should not contain a secondary virtual ip id (do not include
# ":1", etc).
virtual.ip=
virtual.ip.interface=
virtual.ip.prefix=
virtual.ip.single=true
Note If a primary agent is started and the node does not currently have the VIP, the EFM agent will acquire it. Stopping a primary agent does not drop the VIP from the node.
Set the check.vip.before.promotion property to false to indicate that Failover Manager will not check to see if a VIP is in use before assigning it to a a new primary in the event of a failure. Note that this could result in multiple nodes broadcasting on the same VIP address; unless the primary node is isolated or can be shut down via another process, you should set this property to true.
# Whether to check if the VIP (when used) is still in use before
# promoting after a primary failure. Turning this off may allow
# the new primary to have the VIP even though another node is also
# broadcasting it. This should only be used in environments where
# it is known that the failed primary node will be isolated or
# shut down through other means.
check.vip.before.promotion=true
Use the pgpool.enable property to specify if you want to enable the Failover Manager and Pgpool integration for high availability. If you want to enable Pgpool integration in a non-sudo mode (running as the DB owner), the PCPPASS file must be owned by the DB owner operating system user and file permissions should be set to 600.
# A boolean property to enable Failover Manager managed Pgpool HA.
# If enabled, Failover Manager would natively update the joining
# and leaving status of database nodes to active pgpool instance.
# Failover manager expects properly configured and running pgpool
# instances on required nodes. It does not manage setup and
# configuration of pgpool on any node.
#
# By default the property is disabled.
pgpool.enable=false
Use the following parameters to specify the values that should be used for Pgpool integration.
# Configurations required for pgpool integration.
# 'pcp.user' - User that would be invoking PCP commands
# 'pcp.host' - Virtual IP that would be used by pgpool. Same as
# pgpool parameter 'delegate_IP'
# 'pcp.port' - The port on which pgpool listens for pcp commands.
# 'pcp.pass.file' - Absolute path of PCPPASSFILE.
# 'pgpool.bin' - Absolute path of pgpool bin directory

# These properties are required if 'pgpool.enable' is set to true.
pcp.user=
pcp.host=
pcp.port=
pcp.pass.file=
pgpool.bin=
Use the following properties to provide paths to scripts that reconfigure your load balancer in the event of a switchover or primary failure scenario. The scripts will also be invoked in the event of a standby failure. If you are using these properties, they should be provided on every node of the cluster (primary, standby, and witness) to ensure that if a database node fails, another node will call the detach script with the failed node’s address.
You do not need to set the below properties if you are using Pgpool as Load Balancer solution and have set the Pgpool integration properties.
Provide a script name after the script.load.balancer.attach property to identify a script that will be invoked when a node should be attached to the load balancer. Use the script.load.balancer.detach property to specify the name of a script that will be invoked when a node should be detached from the load balancer. Include the %h placeholder to represent the IP address of the node that is being attached or removed from the cluster. Include the %t placeholder to instruct Failover Manager to include an p (for a primary node) or an s (for a standby node) in the string.
# Absolute path to load balancer scripts
# The attach script is called when a node should be attached to
# the load balancer, for example after a promotion. The detach
# script is called when a node should be removed, for example
# when a database has failed or is about to be stopped. Use %h to
# represent the IP/hostname of the node that is being
# attached/detached. Use %t to represent the type of node being
# attached or detached: the letter m will be passed in for primary nodes
#and the letter s for standby nodes.
#
# Example:
# script.load.balancer.attach=/somepath/attachscript %h %t
script.load.balancer.attach=
script.load.balancer.detach=
Use the detach.on.agent.failure property to indicate if you do not want to detach a node from the load balancer in a scenario where the primary agent fails but the database is still reachable. The default value is true.
# If set to true, Failover Manager will detach the node from load
# balancer if the primary agent fails but the database is still
# reachable. In most scenarios this is NOT the desired situation. In
# scenarios where the detach script should run with a failed primary
# agent, even when the primary database is still healthy this parameter
# should be set to true. If no value specified it defaults to true (for
# backwards compatibility).
# This is not applicable for standbys.
detach.on.agent.failure=
script.fence specifies the path to an optional user-supplied script that will be invoked during the promotion of a standby node to primary node.
# absolute path to fencing script run during promotion
#
# This is an optional user-supplied script that will be run
# during failover on the standby database node. If left blank,
# no action will be taken. If specified, EFM will execute this
# script before promoting the standby.
#
# Parameters can be passed into this script for the failed primary
# and new primary node addresses. Use %p for new primary and %f
# for failed primary. On a node that has just been promoted, %p
# should be the same as the node's efm binding address.
#
# Example:
# script.fence=/somepath/myscript %p %f
#
# NOTE: FAILOVER WILL NOT OCCUR IF THIS SCRIPT RETURNS A NON-ZERO EXIT
# CODE.
script.fence=
Use the script.post.promotion property to specify the path to an optional user-supplied script that will be invoked after a standby node has been promoted to primary.
# Absolute path to fencing script run after promotion
#
# This is an optional user-supplied script that will be run after
# failover on the standby node after it has been promoted and
# is no longer in recovery. The exit code from this script has
# no effect on failover manager, but will be included in a
# notification sent after the script executes.
#
# Parameters can be passed into this script for the failed primary
# and new primary node addresses. Use %p for new primary and %f
# for failed primary. On a node that has just been promoted, %p
# should be the same as the node's efm binding address.
#
# Example:
# script.post.promotion=/somepath/myscript %f %p
script.post.promotion=
Use the script.resumed property to specify an optional path to a user-supplied script that will be invoked when an agent resumes monitoring of a database.
# Absolute path to resume script
#
# This script is run before an IDLE agent resumes
# monitoring its local database.
script.resumed=
Use the script.db.failure property to specify the complete path to an optional user-supplied script that Failover Manager will invoke if an agent detects that the database that it monitors has failed.
# Absolute path to script run after database failure
# This is an optional user-supplied script that will be run after
# an agent detects that its local database has failed.
script.db.failure=
Use the script.primary.isolated property to specify the complete path to an optional user-supplied script that Failover Manager will invoke if the agent monitoring the primary database detects that the primary is isolated from the majority of the Failover Manager cluster. This script is called immediately after the VIP is released (if a VIP is in use).
# Absolute path to script run on isolated primary
# This is an optional user-supplied script that will be run after
# a primary agent detects that it has been isolated from the
# majority of the efm cluster.
script.primary.isolated=
Use the script.remote.pre.promotion property to specify the path and name of a script that will be invoked on any agent nodes not involved in the promotion when a node is about to promote its database to primary.
Include the %p placeholder to identify the address of the new primary node.
# Absolute path to script invoked on non-promoting agent nodes
# before a promotion.
#
# This optional user-supplied script will be invoked on other
# agents when a node is about to promote its database. The exit
# code from this script has no effect on Failover Manager, but
# will be included in a notification sent after the script
# executes.
#
# Pass a parameter (%p) with the script to identify the new
# primary node address.
#
# Example:
# script.remote.pre.promotion=/path_name/script_name %p
script.remote.pre.promotion=
Use the script.remote.post.promotion property to specify the path and name of a script that will be invoked on any non-primary nodes after a promotion occurs.
Include the %p placeholder to identify the address of the new primary node.
# Absolute path to script invoked on non-primary agent nodes
# after a promotion.
#
# This optional user-supplied script will be invoked on nodes
# (except the new primary) after a promotion occurs. The exit code
# from this script has no effect on Failover Manager, but will be
# included in a notification sent after the script executes.
#
# Pass a parameter (%p) with the script to identify the new
# primary node address.
#
# Example:
# script.remote.post.promotion=/path_name/script_name %p
script.remote.post.promotion=
Use the script.custom.monitor property to provide the name and location of an optional script that will be invoked on regular intervals (specified in seconds by the custom.monitor.interval property).
Use custom.monitor.timeout to specify the maximum time that the script will be allowed to run; if script execution does not complete within the time specified, Failover Manager will send a notification.
Set custom.monitor.safe.mode to true to instruct Failover Manager to report non-zero exit codes from the script, but not promote a standby as a result of an exit code.
# Absolute path to a custom monitoring script.
#
# Use script.custom.monitor to specify the location and name of
# an optional user-supplied script that will be invoked
# periodically to perform custom monitoring tasks. A non-zero
# exit value means that a check has failed; this will be treated
# as a database failure. On a primary node, script failure will
# cause a promotion. On a standby node script failure will
# generate a notification and the agent will become IDLE.
#
# The custom.monitor.\* properties are required if a custom
# monitoring script is specified:
#
# custom.monitor.interval is the time in seconds between executions
# of the script.
#
# custom.monitor.timeout is a timeout value in seconds for how
# long the script will be allowed to run. If script execution
# exceeds the specified time, the task will be stopped and a
# notification sent. Subsequent runs will continue.
#
# If custom.monitor.safe.mode is set to true, non-zero exit codes
# from the script will be reported but will not cause a promotion
# or be treated as a database failure. This allows testing of the
# script without affecting EFM.
#
script.custom.monitor=
custom.monitor.interval=
custom.monitor.timeout=
custom.monitor.safe.mode=
Use the sudo.command property to specify a command that will be invoked by Failover Manager when performing tasks that require extended permissions. Use this option to include command options that might be specific to your system authentication.
Use the sudo.user.command property to specify a command that will be invoked by Failover Manager when executing commands that will be performed by the database owner.
# Command to use in place of 'sudo' if desired when efm runs
# the efm_db_functions or efm_root_functions, or efm_address
# scripts.
# Sudo is used in the following ways by efm:
#
# sudo /usr/edb/efm-<version>/bin/efm_address <arguments>
# sudo /usr/edb/efm-<version>/bin/efm_root_functions <arguments>
# sudo -u <db service owner> /usr/edb/efm-<version>/bin/efm_db_functions <arguments>
#
# 'sudo' in the first two examples will be replaced by the value
# of the sudo.command property. 'sudo -u <db service owner>' will
# be replaced by the value of the sudo.user.command property.
# The '%u' field will be replaced with the db owner.
sudo.command=sudo
sudo.user.command=sudo -u %u
Use the lock.dir property to specify an alternate location for the Failover Manager lock file; the file prevents Failover Manager from starting multiple (potentially orphaned) agents for a single cluster on the node.
# Specify the directory of lock file on the node. Failover
# Manager creates a file named <cluster>.lock at this location to
# avoid starting multiple agents for same cluster. If the path
# does not exist, Failover Manager will attempt to create it. If
# not specified defaults to '/var/lock/efm-<version>'
lock.dir=
Use the log.dir property to specify the location to which agent log files will be written; Failover Manager will attempt to create the directory if the directory does not exist.
# Specify the directory of agent logs on the node. If the path
# does not exist, Failover Manager will attempt to create it. If
# not specified defaults to '/var/log/efm-<version>'. (To store
# Failover Manager startup logs in a custom location, modify the
# path in the service script to point to an existing, writable
# directory.)
# If using a custom log directory, you must configure
# logrotate separately. Use 'man logrotate' for more information.
log.dir=
After enabling the UDP or TCP protocol on a Failover Manager host, you can enable logging to syslog. Use the syslog.protocol parameter to specify the protocol type (UDP or TCP) and the syslog.port parameter to specify the listener port of the syslog host. The syslog.facility value may be used as an identifier for the process that created the entry; the value must be between LOCAL0 and LOCAL7.
# Syslog information. The syslog service must be listening on
# the port for the given protocol, which can be UDP or TCP.
# The facilities supported are LOCAL0 through LOCAL7.
syslog.host=localhost
syslog.port=514
syslog.protocol=UDP
syslog.facility=LOCAL1
Use the file.log.enabled and syslog.enabled properties to specify the type of logging that you wish to implement. Set file.log.enabled to true to enable logging to a file; enable the UDP protocol or TCP protocol and set syslog.enabled to true to enable logging to syslog. You can enable logging to both a file and syslog.
# Which logging is enabled.
file.log.enabled=true
syslog.enabled=false
For more information about configuring syslog logging, see Enabling syslog Log File Entries.
Use the jgroups.loglevel and efm.loglevel parameters to specify the level of detail logged by Failover Manager. The default value is INFO. For more information about logging, see Controlling Logging.
# Logging levels for JGroups and EFM.
# Valid values are: TRACE, DEBUG, INFO, WARN, ERROR
# Default value: INFO
# It is not necessary to increase these values unless debugging a
# specific issue. If nodes are not discovering each other at
# startup, increasing the jgroups level to DEBUG will show
# information about the TCP connection attempts that may help
# diagnose the connection failures.
jgroups.loglevel=INFO
efm.loglevel=INFO
Use the jvm.options property to pass JVM-related configuration information. The default setting specifies the amount of memory that the Failover Manager agent will be allowed to use.
# Extra information that will be passed to the JVM when starting
# the agent.
jvm.options=-Xmx128m
encrypting_database_password
Encrypting Your Database Password
Failover Manager requires you to encrypt your database password before including it in the cluster properties file. Use the efm utility (located in the /usr/edb/efm-4.2/bin directory) to encrypt the password. When encrypting a password, you can either pass the password on the command line when you invoke the utility, or use the EFMPASS environment variable.
To encrypt a password, use the command:
# efm encrypt <cluster_name> [ --from-env ]Where <cluster_name> specifies the name of the Failover Manager cluster.
If you include the --from-env option, you must export the value you wish to encrypt before invoking the encryption utility. For example:
export EFMPASS=passwordIf you do not include the --from-env option, Failover Manager will prompt you to enter the database password twice before generating an encrypted password for you to place in your cluster property file. When the utility shares the encrypted password, copy and paste the encrypted password into the cluster property files.
Note Many Java vendors ship their version of Java with full-strength encryption included, but not enabled due to export restrictions. If you encounter an error that refers to an illegal key size when attempting to encrypt the database password, you should download and enable a Java Cryptography Extension (JCE) that provides an unlimited policy for your platform.
The following example demonstrates using the encrypt utility to encrypt a password for the acctg cluster:
# efm encrypt acctg
This utility will generate an encrypted password for you to place in
 your EFM cluster property file:
/etc/edb/efm-4.2/acctg.properties
Please enter the password and hit enter:
Please enter the password again to confirm:
The encrypted password is: 516b36fb8031da17cfbc010f7d09359c
Please paste this into your acctg.properties file
db.password.encrypted=516b36fb8031da17cfbc010f7d09359c
Note The utility will notify you if a properties file does not exist.
After receiving your encrypted password, paste the password into the properties file and start the Failover Manager service. If there is a problem with the encrypted password, the Failover Manager service will not start:
[witness@localhost ~]# systemctl start edb-efm-4.2
Job for edb-efm-4.2.service failed because the control process exited with error code. See "systemctl status edb-efm-4.2.service" and "journalctl -xe" for details.
If you receive this message when starting the Failover Manager service, please see the startup log (located in /var/log/efm-4.2/startup-efm.log) for more information.
If you are using RHEL/CentOS 7.x or RHEL/CentOS 8.x, startup information is also available with the following command:
systemctl status edb-efm-4.2To prevent a cluster from inadvertently connecting to the database of another cluster, the cluster name is incorporated into the encrypted password. If you modify the cluster name, you will need to re-encrypt the database password and update the cluster properties file.
Using the EFMPASS Environment Variable
The following example demonstrates using the –from-env environment variable when encrypting a password. Before invoking the efm encrypt command, set the value of EFMPASS to the password (1safepassword):
# export EFMPASS=1safepasswordThen, invoke efm encrypt, specifying the --from-env option:
# efm encrypt acctg --from-env
# 7ceecd8965fa7a5c330eaa9e43696f83
The encrypted password (7ceecd8965fa7a5c330eaa9e43696f83) is returned as a text value; when using a script, you can check the exit code of the command to confirm that the command succeeded. A successful execution returns 0.
The Cluster Members File
Each node in a Failover Manager cluster has a cluster members file (by default, named efm.nodes) that contains a list of the current Failover Manager cluster members. When an agent starts, it uses the file to locate other cluster members. The Failover Manager installer creates a file template for the cluster members file named efm.nodes.in in the /etc/edb/efm-4.2 directory.
After completing the Failover Manager installation, you must make a working copy of the template:
cp /etc/edb/efm-4.2/efm.nodes.in /etc/edb/efm-4.2/efm.nodesAfter copying the template file, change the owner of the file to efm:
chown efm:efm efm.nodesBy default, Failover Manager expects the cluster members file to be named efm.nodes. If you name the cluster members file something other than efm.nodes, you must modify the Failover Manager service script to instruct Failover Manager to use the new name.
The cluster members file on the first node started can be empty; this node will become the Membership Coordinator. On each subsequent node, the cluster member file must contain the address and port number of the Membership Coordinator. Each entry in the cluster members file must be listed in an address:port format, with multiple entries separated by white space.
The agents will update the contents of the efm.nodes file to match the current members of the cluster. As agents join or leave the cluster, the efm.nodes files on other agents are updated to reflect the current cluster membership. If you invoke the efm stop-cluster command, Failover Manager does not modify the file.
If the Membership Coordinator leaves the cluster, another node will assume the role. You can use the efm cluster-status command to find the address of the Membership Coordinator. If a node joins or leaves a cluster while an agent is down, before starting that agent you must manually ensure that the file includes at least the current Membership Coordinator’s address and port.
If you know the addresses and ports of the nodes that will be joining the cluster, you can include the addresses in the cluster members file at any time. At startup, any addresses that do not identify cluster members will be ignored unless the auto.allow.hosts property (in the cluster properties file) is set to true.
If the stable.nodes.file property (located in the cluster properties file) is set to true, the agent will not update the .nodes file when cluster members join or leave the cluster; this behavior is most useful when the IP addresses of cluster members do not change often.
Extending Failover Manager Permissions
During the Failover Manager installation, the installer creates a user named efm. efm does not have sufficient privileges to perform management functions that are normally limited to the database owner or operating system superuser.
- When performing management functions requiring database superuser privileges,
efminvokes theefm_db_functionsscript. - When performing management functions requiring operating system superuser privileges,
efminvokes theefm_root_functionsscript. - When assigning or releasing a virtual IP address,
efminvokes theefm_addressscript. - When enabling Pgpool integration,
efminvokes theefm_pgpool_functionsscript.
The efm_db_functions or efm_root_functions scripts perform management functions on behalf of the efm user.
The sudoers file contains entries that allow the user efm to control the Failover Manager service for clusters owned by postgres or enterprisedb. You can modify a copy of the sudoers file to grant permission to manage Postgres clusters owned by other users to efm.
The efm-42 file is located in /etc/sudoers.d, and contains the following entries:
# Copyright EnterpriseDB Corporation, 2014-2020. All Rights Reserved.
#
# Do not edit this file. Changes to the file may be overwritten
# during an upgrade.
#
# This file assumes you are running your efm cluster as user 'efm'.  If not,
# then you will need to copy this file.

# Allow user 'efm' to sudo efm_db_functions as either 'postgres' or 'enterprisedb'.
# If you run your db service under a non-default account, you will need to copy
# this file to grant the proper permissions and specify the account in your efm
# cluster properties file by changing the 'db.service.owner' property.
efm    ALL=(postgres)      NOPASSWD:   /usr/edb/efm-4.2/bin/efm_db_functions
efm    ALL=(enterprisedb)  NOPASSWD:   /usr/edb/efm-4.2/bin/efm_db_functions

# Allow user 'efm' to sudo efm_root_functions as 'root' to write/delete the PID file,
# validate the db.service.owner property, etc.
efm    ALL=(ALL)           NOPASSWD:   /usr/edb/efm-4.2/bin/efm_root_functions

# Allow user 'efm' to sudo efm_address as root for VIP tasks.
efm    ALL=(ALL)           NOPASSWD:   /usr/edb/efm-4.2/bin/efm_address

# Allow user 'efm' to sudo efm_pgpool_functions as root for pgpool tasks.
efm    ALL=(ALL)           NOPASSWD:   /usr/edb/efm-4.2/bin/efm_pgpool_functions

# relax tty requirement for user 'efm'
Defaults:efm !requiretty
If you are using Failover Manager to monitor clusters that are owned by users other than postgres or enterprisedb, make a copy of the efm-42 file, and modify the content to allow the user to access the efm_functions script to manage their clusters.
If an agent cannot start because of permission problems, make sure the default /etc/sudoers file contains the following line at the end of the file:
## Read drop-in files from /etc/sudoers.d (the # here does not # mean a comment)

#includedir /etc/sudoers.d
Running Failover Manager without sudo
By default, Failover Manager uses sudo to securely manage access to system functionality. If you choose to configure Failover Manager to run without sudo access, Note that root access is still required to:
- install the Failover Manager RPM.
- perform Failover Manager setup tasks.
To run Failover Manager without sudo, you must select a database process owner that will have privileges to perform management functions on behalf of Failover Manager. The user could be the default database superuser (for example, enterprisedb or postgres) or another privileged user. After selecting the user:
- Use the following command to add the user to the
efmgroup:
usermod -a -G efm enterprisedbThis should allow the user to write to /var/run/efm-4.2 and /var/lock/efm-4.2.
If you are reusing a cluster name, remove any previously created log files; the new user will not be able to write to log files created by the default (or other) owner.
Copy the cluster properties template file and the nodes template file:
su - enterprisedb

cp /etc/edb/efm-4.2/efm.properties.in <directory/cluster_name>.properties

cp /etc/edb/efm-4.2/efm.nodes.in <directory>/<cluster_name>.nodes
Then, modify the cluster properties file, providing the name of the user in the db.service.owner property. You must also ensure that the db.service.name property is blank; without sudo, you cannot run services without root access.
After modifying the configuration, the new user can control Failover Manager with the following command:
/usr/edb/efm-4.2/bin/runefm.sh start|stop <directory/cluster_name>.propertiesWhere <directory/cluster_name.properties> specifies the full path of the cluster properties file. Note that the user must ensure that the full path to the properties file must be provided whenever the non-default user is controlling agents or using the efm script.
To allow the new user to manage Failover Manager as a service, you must provide a custom script or unit file.
Failover Manager uses a binary named manage-vip that resides in /usr/edb/efm-4.2/bin/secure/ to perform VIP management operations without sudo privileges. This script uses setuid to acquire with the privileges needed to manage virtual IP addresses.
- This directory is only accessible to root and users in the
efmgroup. - The binary is only executable by root and the
efmgroup.
For security reasons, we recommend against modifying the access privileges of the /usr/edb/efm-4.2/bin/secure/ directory or the manage-vip script.
For more information about using Failover Manager without sudo, visit:
https://www.enterprisedb.com/blog/running-edb-postgres-failover-manager-without-sudo
Using Failover Manager with Virtual IP Addresses
Failover Manager uses the efm_address script to assign or release a virtual IP address.
Note Virtual IP addresses are not supported by many cloud providers. In those environments, another mechanism should be used (such as an Elastic IP Address on AWS), which can be changed when needed by a fencing or post-promotion script.
By default, the script resides in:
/usr/edb/efm-4.2/bin/efm_address
Failover Manager uses the following command variations to assign or release an IPv4 or IPv6 IP address.
To assign a virtual IPv4 IP address:
# efm_address add4 <interface_name> <IPv4_addr>/<prefix>To assign a virtual IPv6 IP address:
# efm_address add6 <interface_name> <IPv6_addr>/<prefix>To release a virtual address:
# efm_address del <interface_name> <IP_address/prefix>Where:
<interface_name> matches the name specified in the virtual.ip.interface property in the cluster properties file.
<IPv4_addr> or <IPv6_addr> matches the value specified in the virtual.ip property in the cluster properties file.
prefix matches the value specified in the virtual.ip.prefix property in the cluster properties file.
For more information about properties that describe a virtual IP address, see The Cluster Properties File.
You must invoke the efm_address script as the root user. The efm user is created during the installation, and is granted privileges in the sudoers file to run the efm_address script. For more information about the sudoers file, see Extending Failover Manager Permissions.
Note If a VIP address (or any address other than the
bind.address) is assigned to a node, the operating system can choose the source address used when contacting the database. Be sure that you modify thepg_hba.conffile on all monitored databases to allow contact from all addresses within your replication scenario.
Testing the VIP
When using a virtual IP (VIP) address with Failover Manager, it is important to test the VIP functionality manually before starting Failover manager. This will catch any network-related issues before they cause a problem during an actual failover. While testing the VIP, ensure that Failover Manager is not running.
The following steps test the actions that Failover Manager will take. The example uses the following property values:
virtual.ip=172.24.38.239
virtual.ip.interface=eth0
virtual.ip.prefix=24
ping.server.command=/bin/ping -q -c3 -w5
Note The
virtual.ip.prefixspecifies the number of significant bits in the virtual Ip address.
When instructed to ping the VIP from a node, use the command defined by the ping.server.command property.
- Ping the VIP from all nodes to confirm that the address is not already in use:
# /bin/ping -q -c3 -w5 172.24.38.239
PING 172.24.38.239 (172.24.38.239) 56(84) bytes of data.
--- 172.24.38.239 ping statistics ---
4 packets transmitted, 0 received, +3 errors, 100% packet loss,
 time 3000ms
You should see 100% packet loss.
- Run the
efm_address add4command on the Primary node to assign the VIP and then confirm with ip address:
# efm_address add4 eth0 172.24.38.239/24
# ip address
<output truncated>
eth0 Link encap:Ethernet HWaddr 36:AA:A4:F4:1C:40
inet addr:172.24.38.239 Bcast:172.24.38.255
...- Ping the VIP from the other nodes to verify that they can reach the VIP:
# /bin/ping -q -c3 -w5 172.24.38.239
PING 172.24.38.239 (172.24.38.239) 56(84) bytes of data.
--- 172.24.38.239 ping statistics ---
3 packets transmitted, 3 received, 0% packet loss, time 1999ms
rtt min/avg/max/mdev = 0.023/0.025/0.029/0.006 ms
You should see no packet loss.
- Use the
efm_address delcommand to release the address on the primary node and confirm the node has been released with ip address:
# efm_address del eth0 172.24.38.239/24
# ip address
eth0 Link encap:Ethernet HWaddr 22:00:0A:89:02:8E
inet addr:10.137.2.142 Bcast:10.137.2.191
...
The output from this step should not show an eth0 interface
- Repeat step 3, this time verifying that the Standby and Witness do not see the VIP in use:
# /bin/ping -q -c3 -w5 172.24.38.239
PING 172.24.38.239 (172.24.38.239) 56(84) bytes of data.
--- 172.24.38.239 ping statistics ---
4 packets transmitted, 0 received, +3 errors, 100% packet loss,
 time 3000ms
You should see 100% packet loss. Repeat this step on all nodes.
- Repeat step 2 on all Standby nodes to assign the VIP to every node. You can ping the VIP from any node to verify that it is in use.
# efm_address add4 eth0 172.24.38.239/24
# ip address
<output truncated>
eth0 Link encap:Ethernet HWaddr 36:AA:A4:F4:1C:40
inet addr:172.24.38.239 Bcast:172.24.38.255
...
After the test steps above, release the VIP from any non-Primary node before attempting to start Failover Manager.
Note The network interface used for the VIP does not have to be the same interface used for the Failover Manager agent’s
bind.addressvalue. The primary agent will drop the VIP as needed during a failover, and Failover Manager will verify that the VIP is no longer available before promoting a standby. A failure of the bind address network will lead to primary isolation and failover.
If the VIP uses a different interface, you may encounter a timing condition where the rest of the cluster checks for a reachable VIP before the primary agent has dropped it. In this case, EFM will retry the VIP check for the number of seconds specified in the node.timeout property to help ensure that a failover happens as expected.
Configuring for Eager Failover
In default run mode, if a primary Failover Manager process fails, there is no failover protection until the agent is restarted. To avoid such a case, you can set up the primary node through systemd to cause a failover when the primary agent exits, which is called Eager Failover. You can set up Eager Failover by performing the following steps (the example uses Advanced Server version 12 and EFM version 4.2):
Enabling Eager Failover
- Since the database server stops as soon as the Failover Manager agent stops or fails, you must set the following property for all the agents before starting Failover Manager:
primary.shutdown.as.failure=trueIf you do not set this property before starting Failover Manager, shutting down an EFM agent will shut down the database without failover.
- With Eager Failover enabled, using the
efm stop-clustercommand will stop all of the efm agents and shut down the primary database. Since the agents are not running, there is no failover. To avoid such a scenario, the command can be disabled with theenable.stop.clusterproperty.
enable.stop.cluster=falseEnsure that the database server and the local Failover Manager agent are running.
As root, create
/etc/systemd/system/edb-as-12.servicefile and include:
.include /lib/systemd/system/edb-as-12.service
[Unit]
BindsTo=edb-efm-4.2.service- Run the following command to reload the configuration files:
systemctl daemon-reloadWith the above-mentioned changes, when the Failover Manager agent is stopped or is killed, the rest of the cluster will treat this situation as a failure and attempt a failover.
Disabling Eager Failover
- If you want to stop Failover Manager without stopping the database, comment out the following line in
/etc/systemd/system/edb-as-12.service:
BindsTo=edb-efm-4.2.service- Run the following command to reload the configuration files:
systemctl daemon-reloadUpgrading EFM in Eager Failover Mode
To upgrade Failover Manager without stopping Postgres, the Eager Failover mode should be temporarily disabled. Perform the following steps:
Important Notes
Since systemd command is not used to manage the database while running EFM with a non-sudo setup, Eager Failover is only supported in sudo mode and not supported in a non-sudo mode.
Eager failover is not suitable for situations where a VIP would not be released by the old primary.
Eager Failover is suitable in the following situations:
With the
EDB Postgres High AvailabilitysetupIn a setup using client connection failover with jdbc or libpq (target-session-attrs)
When custom scripting triggered by
script.fencewould fence the old primary server (STONITH). Some examples would be to shut down the VM with VMWare vCenter integration, openstack integration, or lights-out management.When custom scripting triggered by
script.fencewould use ssh to deactivate the VIP.Note: Setting
check.vip.before.promotion=falseis required to allow the new primary to attach the VIP before the old primary has released it.
Care must be taken when using
primary.shutdown.as.failure=true. See the description of primary.shutdown.as.failure property for information on how to safely bring down the database if needed.With every failover, a primary ends up being a failed primary, which does not automatically recover as an operational standby. Therefore, the cluster should contain multiple promotable standbys, and the total number of standbys should be at least two more than the value specified for the
minimum.standbysproperty. This is a general recommendation, but it becomes more pressing when using Eager Failover.If the database server is stopped, restarting the database will also start Failover Manager.
Notes:
- If there is a problem starting EFM, such as a bad property value, the database server will start and shut down again without displaying any warning that it is not running.
- If the Failover Manager process was previously killed, the lock file will still exist and the agent can not be restarted automatically.
- If there are problems starting the database server or the Failover Manager agent, check the EFM startup log for information.
As a result of running the
stop-clustercommand, EFM will be stopped on all the nodes. In Eager Failover mode, thestop-clustercommand would also stop Postgres without a failover. Setenable.stop.cluster=falseto make sure thestop-clustercommand can not unintentionally be invoked.
Using Failover Manager
Failover Manager offers support for monitoring and failover of clusters with one or more Standby servers. You can add or remove nodes from the cluster as your demand for resources grows or shrinks.
If a Primary node reboots, Failover Manager may detect the database is down on the Primary node and promote a Standby node to the role of Primary. If this happens, the Failover Manager agent on the (rebooted) Primary node will attempt to write a recovery.conf file to make sure Postgres does not start as a secondary primary. Therefore, the Failover Manager agent must be started before starting the database server. The agent will start in idle mode, and check to see if there is already a primary in the cluster. If there is a primary node, the agent will verify that a recovery.conf or standby.signal file exists, or create recovery.conf if needed to prevent the database from starting as a second primary.
Managing a Failover Manager Cluster
Once configured, a Failover Manager cluster requires no regular maintenance. The following sections provide information about performing the management tasks that may occasionally be required by a Failover Manager Cluster.
By default, some of the efm commands must be invoked by efm or an OS superuser; an administrator can selectively permit users to invoke these commands by adding the user to the efm group. The commands are:
- efm allow-node
- efm disallow-node
- efm promote
- efm resume
- efm set-priority
- efm stop-cluster
- efm upgrade-conf
Starting the Failover Manager Cluster
You can start the nodes of a Failover Manager cluster in any order.
To start the Failover Manager cluster on RHEL/CentOS 7.x or RHEL/CentOS 8.x, assume superuser privileges, and invoke the command:
systemctl start edb-efm-4.2If the cluster properties file for the node specifies that is.witness is true, the node will start as a Witness node.
If the node is not a dedicated Witness node, Failover Manager will connect to the local database and invoke the pg_is_in_recovery() function. If the server responds false, the agent assumes the node is a Primary node, and assigns a virtual IP address to the node (if applicable). If the server responds true, the Failover Manager agent assumes that the node is a Standby server. If the server does not respond, the agent will start in an idle state.
After joining the cluster, the Failover Manager agent checks the supplied database credentials to ensure that it can connect to all of the databases within the cluster. If the agent cannot connect, the agent will shut down.
If a new primary or standby node joins a cluster, all of the existing nodes will also confirm that they can connect to the database on the new node.
Note If you are running
/var/lockor/var/runontmpfs(Temporary File System), make sure that the systemd service file for Failover Manager has a dependency onsystemd-tmpfiles-setup.service.
Adding Nodes to a Cluster
You can add a node to a Failover Manager cluster at any time. When you add a node to a cluster, you must modify the cluster to allow the new node, and then tell the new node how to find the cluster. The following steps detail adding a node to a cluster:
- Unless
auto.allow.hostsis set totrue, use theefm allow-nodecommand, to add the address of the new node to the Failover Manager allowed node host list. When invoking the command, specify the cluster name and the address of the new node:
efm allow-node <cluster_name> <address>For more information about using the efm allow-node command or controlling a Failover Manager service, see Using the EFM Utility.
Install a Failover Manager agent and configure the cluster properties file on the new node. For more information about modifying the properties file, see The Cluster Properties File.
Configure the cluster members file on the new node, adding an entry for the Membership Coordinator. For more information about modifying the cluster members file, see The Cluster Members File.
Assume superuser privileges on the new node, and start the Failover Manager agent. To start the Failover Manager cluster on RHEL/CentOS 7.x or RHEL/CentOS 8.x, invoke the command:
systemctl start edb-efm-4.2When the new node joins the cluster, Failover Manager will send a notification to the administrator email provided in the user.email property, and/or will invoke the specified notification script.
Note To be a useful Standby for the current node, the node must be a standby in the PostgreSQL Streaming Replication scenario.
Changing the Priority of a Standby
If your Failover Manager cluster includes more than one Standby server, you can use the efm set-priority command to influence the promotion priority of a Standby node. Invoke the command on any existing member of the Failover Manager cluster, and specify a priority value after the IP address of the member.
For example, the following command instructs Failover Manager that the acctg cluster member that is monitoring 10.0.1.9 is the primary Standby (1):
efm set-priority acctg 10.0.1.9 1You can set the priority of a standby to 0 to make the standby non-promotable. Setting the priority of a standby to a value greater than 0 overrides a property value of promotable=false.
For example, if the properties file on node 10.0.1.10 includes a setting of promotable=false and you use efm set-priority to set the promotion priority of 10.0.1.10 to be the standby used in the event of a failover, the value designated by the efm set-priority command will override the value in the property file:
efm set-priority acctg 10.0.1.10 1In the event of a failover, Failover Manager will first retrieve information from Postgres streaming replication to confirm which Standby node has the most recent data, and promote the node with the least chance of data loss. If two Standby nodes contain equally up-to-date data, the node with a higher user-specified priority value will be promoted to Primary unless use.replay.tiebreaker is set to false . To check the priority value of your Standby nodes, use the command:
efm cluster-status <cluster_name>Note
The promotion priority for nodes will change when a new primary is promoted.
If the efm set-priority command has been used to change whether or not a standby is promotable, this may be reset to the value in the standby’s properties file through promotion or cluster splits and rejoins.
Promoting a Failover Manager Node
You can invoke efm promote on any node of a Failover Manager cluster to start a manual promotion of a Standby database to Primary database.
Manual promotion should only be performed during a maintenance window for your database cluster. If you do not have an up-to-date Standby database available, you will be prompted before continuing. To start a manual promotion, assume the identity of efm or the OS superuser, and invoke the command:
efm promote <cluster_name> [-switchover] [-sourcenode <address>] [-quiet] [-noscripts]`Where:
<cluster_name> is the name of the Failover Manager cluster.
Include the –switchover option to reconfigure the original Primary as a Standby. If you include the –switchover keyword, the cluster must include a primary node and at least one standby, and the nodes must be in sync.
Include the –sourcenode keyword to specify the node from which the recovery settings will be copied to the primary.
Include the -quiet keyword to suppress notifications during switchover.
Include the -noscripts keyword to prevent instruct Failover Manager to not invoke fencing and post-promotion scripts.
During switchover:
- For server versions 11 and prior, the
recovery.conffile is copied from an existing standby to the primary node. For server version 12 and later, theprimary_conninfoandrestore_commandparameters are copied and stored in memory. - The primary database is stopped.
- If you are using a VIP, the address is released from the primary node.
- A standby is promoted to replace the primary node, and acquires the VIP.
- The address of the new primary node is added to the
recovery.conffile or theprimary_conninfodetails are stored in memory. - If the
application.nameproperty is set for this node, the application_name property will be added to therecovery.conffile or theprimary_conninfoinformation will be stored in memory. - If you are using server version 12 or later, the recovery settings that have been stored in memory are written to the
postgresql.auto.conffile. Astandby.signalfile is created. - The old primary is started; the agent will resume monitoring it as a standby.
During a promotion, the Primary agent releases the virtual IP address. If it is not a switchover, a recovery.conf file is created in the directory specified by the db.data.dir property. The recovery.conf file is used to prevent the old primary database from starting until the file is removed, preventing the node from starting as a second primary in the cluster. If the promotion is part of a switchover, recovery settings are handled as described above.
The Primary agent remains running, and assumes a status of Idle.
The Standby agent confirms that the virtual IP address is no longer in use before pinging a well- known address to ensure that the agent is not isolated from the network. The Standby agent runs the fencing script and promotes the Standby database to Primary. The Standby agent then assigns the virtual IP address to the Standby node, and runs the post-promotion script (if applicable).
Note that this command instructs the service to ignore the value specified in the auto.failover parameter in the cluster properties file.
To return a node to the role of primary, place the node first in the promotion list:
efm set-priority <cluster_name> <address> <priority>Then, perform a manual promotion:
efm promote <cluster_name> ‑switchoverFor more information about the efm utility, see Using the EFM Utility.
Stopping a Failover Manager Agent
When you stop an agent, Failover Manager will remove the node’s address from the cluster members list on all of the running nodes of the cluster, but will not remove the address from the Failover Manager Allowed node host list.
To stop the Failover Manager agent on RHEL/CentOS 7.x or RHEL/CentOS 8.x, assume superuser privileges, and invoke the command:
systemctl stop edb-efm-4.2Until you invoke the efm disallow-node command (removing the node’s address of the node from the Allowed node host list), you can use the service edb-efm-4.2 start command to restart the node at a later date without first running the efm allow-node command again.
Note that stopping an agent does not signal the cluster that the agent has failed unless the primary.shutdown.as.failure property is set to true.
Stopping a Failover Manager Cluster
To stop a Failover Manager cluster, connect to any node of a Failover Manager cluster, assume the identity of efm or the OS superuser, and invoke the command:
efm stop-cluster <cluster_name>The command will cause all Failover Manager agents to exit. Terminating the Failover Manager agents completely disables all failover functionality.
Note When you invoke the
efm stop-clustercommand, all authorized node information is lost from the Allowed node host list.
Removing a Node from a Cluster
The efm disallow-node command removes the IP address of a node from the Failover Manager Allowed Node host list. Assume the identity of efm or the OS superuser on any existing node (that is currently part of the running cluster), and invoke the efm disallow-node command, specifying the cluster name and the IP address of the node:
efm disallow-node <cluster_name> <address>The efm disallow-node command will not stop a running agent; the service will continue to run on the node until you stop the agent. If the agent or cluster is subsequently stopped, the node will not be allowed to rejoin the cluster, and will be removed from the failover priority list (and will be ineligible for promotion).
After invoking the efm disallow-node command, you must use the efm allow-node command to add the node to the cluster again.
Running Multiple Agents on a Single Node
You can monitor multiple database clusters that reside on the same host by running multiple Primary or Standby agents on that Failover Manager node. You may also run multiple Witness agents on a single node. To configure Failover Manager to monitor more than one database cluster, while ensuring that Failover Manager agents from different clusters do not interfere with each other, you must:
- Create a cluster properties file for each member of each cluster that defines a unique set of properties and the role of the node within the cluster.
- Create a cluster members file for each member of each cluster that lists the members of the cluster.
- Customize the unit file (on a RHEL/CentOS 7.x or RHEL/CentOS 8.x system) for each cluster to specify the names of the cluster properties and the cluster members files.
- Start the services for each cluster.
The examples that follow uses two database clusters (acctg and sales) running on the same node:
- Data for
acctgresides in/opt/pgdata1; its server is monitoring port5444. - Data for
salesresides in/opt/pgdata2; its server is monitoring port5445.
To run a Failover Manager agent for both of these database clusters, use the efm.properties.in template to create two properties files. Each cluster properties file must have a unique name. For this example, we create acctg.properties and sales.properties to match the acctg and sales database clusters.
The following parameters must be unique in each cluster properties file:
admin.port
bind.address
db.port
db.data.dir
virtual.ip (if used)
virtual.ip.interface (if used)
Within each cluster properties file, the db.port parameter should specify a unique value for each cluster, while the db.user and db.database parameter may have the same value or a unique value. For example, the acctg.properties file may specify:
db.user=efm_user
db.password.encrypted=7c801b32a05c0c5cb2ad4ffbda5e8f9a
db.port=5444
db.database=acctg_db
While the sales.properties file may specify:
db.user=efm_user
db.password.encrypted=e003fea651a8b4a80fb248a22b36f334
db.port=5445
db.database=sales_db
Some parameters require special attention when setting up more than one Failover Manager cluster agent on the same node. If multiple agents reside on the same node, each port must be unique. Any two ports will work, but it may be easier to keep the information clear if using ports that are not too close to each other.
When creating the cluster properties file for each cluster, the db.data.dir parameters must also specify values that are unique for each respective database cluster.
The following parameters are used when assigning the virtual IP address to a node. If your Failover Manager cluster does not use a virtual IP address, leave these parameters blank.
virtual.ip
virtual.ip.interface
virtual.ip.prefix
This parameter value is determined by the virtual IP addresses being used and may or may not be the same for both acctg.properties and sales.properties.
After creating the acctg.properties and sales.properties files, create a service script or unit file for each cluster that points to the respective property files; this step is platform specific. If you are using RHEL/CentOS 7.x or RHEL/CentOS 8.x, see RHEL/CentOS 7.x or RHEL/CentOS 8.x.
Note If you are using a unit file, you must manually update the file to reflect the new service name when you upgrade Failover Manager.
RHEL/CentOS 7.x or RHEL/CentOS 8.x
If you are using RHEL/CentOS 7.x or RHEL/CentOS 8.x, you should copy the edb-efm-4.2 unit file to new file with a name that is unique for each cluster. For example, if you have two clusters (named acctg and sales), the unit file names might be:
/usr/lib/systemd/system/efm-acctg.service

/usr/lib/systemd/system/efm-sales.service
Then, edit the CLUSTER variable within each unit file, changing the specified cluster name from efm to the new cluster name. For example, for a cluster named acctg, the value would specify:
Environment=CLUSTER=acctgYou must also update the value of the PIDfile parameter to specify the new cluster name. For example:
PIDFile=/var/run/efm-4.2/acctg.pidAfter copying the service scripts, use the following commands to enable the services:
# systemctl enable efm-acctg.service

# systemctl enable efm-sales.service
Then, use the new service scripts to start the agents. For example, you can start the acctg agent with the command:
# systemctl start efm-acctg`For information about customizing a unit file, please visit:
https://docs.fedoraproject.org/en-US/quick-docs/understanding-and-administering-systemd/index.html
Monitoring a Failover Manager Cluster
You can use either the Failover Manager efm cluster-status command or the PEM Client graphical interface to check the current status of a monitored node of a Failover Manager cluster.
Reviewing the Cluster Status Report
The efm cluster-status cluster properties file command returns a report that contains information about the status of the Failover Manager cluster. To invoke the command, enter:
# efm cluster-status <cluster_name>The following status report is for a cluster named edb that has three nodes running:
Agent Type  Address               Agent   DB        VIP
-----------------------------------------------------------------------
Standby     172.19.10.2            UP     UP        192.168.225.190
Standby     172.19.12.163          UP     UP        192.168.225.190
Primary     172.19.14.9            UP     UP        192.168.225.190*


Allowed node host list:
172.19.14.9 172.19.12.163 172.19.10.2


Membership coordinator: 172.19.14.9


Standby priority host list:
172.19.12.163 172.19.10.2

Promote Status:

DB Type  Address         WAL Received LSN   WAL Replayed LSN   Info
--------------------------------------------------------------------
Primary  172.19.14.9                        0/4000638
Standby  172.19.12.163   0/4000638          0/4000638
Standby  172.19.10.2     0/4000638          0/4000638


Standby database(s) in sync with primary. It is safe to promote.
The cluster status section provides an overview of the status of the agents that reside on each node of the cluster:
Agent Type  Address             Agent   DB        VIP
-----------------------------------------------------------------------
Standby     172.19.10.2          UP     UP        192.168.225.190
Standby     172.19.12.163        UP     UP        192.168.225.190
Primary     172.19.14.9          UP     UP        192.168.225.190*
The asterisk (*) after the VIP address indicates that the address is available for connections. If a VIP address is not followed by an asterisk, the address has been associated with the node (in the properties file), but the address is not currently in use.
Failover Manager agents provide the information displayed in the Cluster Status section.
The Allowed node host list and Standby priority host list provide an easy way to tell which nodes are allowed to join the cluster, and the promotion order of the nodes. The IP address of the Membership coordinator is also displayed in the report:
Allowed node host list:
172.19.14.9 172.19.12.163 172.19.10.2
Membership coordinator: 172.19.14.9
Standby priority host list:
172.19.12.163 172.19.10.2
The Promote Status section of the report is the result of a direct query from the node on which you are invoking the cluster-status command to each database in the cluster; the query also returns the transaction log location of each database. Because the queries to each database return at different points in time, the LSNs may not match even if streaming replication is working normally for the cluster.
Promote Status:

DB Type  Address         WAL Received LSN   WAL Replayed LSN   Info
-------------------------------------------------------------------
Primary   172.19.14.9                       0/4000638
Standby  172.19.12.163   0/4000638          0/4000638
Standby  172.19.10.2     0/4000638          0/4000638
If a database is down (or if the database has been restarted, but the resume command has not yet been invoked), the state of the agent that resides on that host will be Idle. If an agent is idle, the cluster status report will include a summary of the condition of the idle node. For example:
Agent Type Address Agent DB VIP
-----------------------------------------------------
Idle 172.19.18.105 UP UP 172.19.13.105
Exit Codes
The cluster status process returns an exit code that is based on the state of the cluster:
An exit code of
0indicates that all agents are running, and the databases on the Primary and Standby nodes are running and in sync.A non-zero exit code indicates that there is a problem. The following problems can trigger a non-zero exit code:
A database is down or unknown (or has an idle agent).
Failover Manager cannot decrypt the provided database password.
There is a problem contacting the databases to get WAL locations.
There is no Primary agent.
There are no Standby agents.
One or more Standby nodes are not in sync with the Primary.
Monitoring Streaming Replication with Postgres Enterprise Manager
If you use Postgres Enterprise Manager (PEM) to monitor your servers, you can configure the Streaming Replication Analysis dashboard (part of the PEM graphical interface) to display the state of a Primary or Standby node that is part of a Streaming Replication scenario.
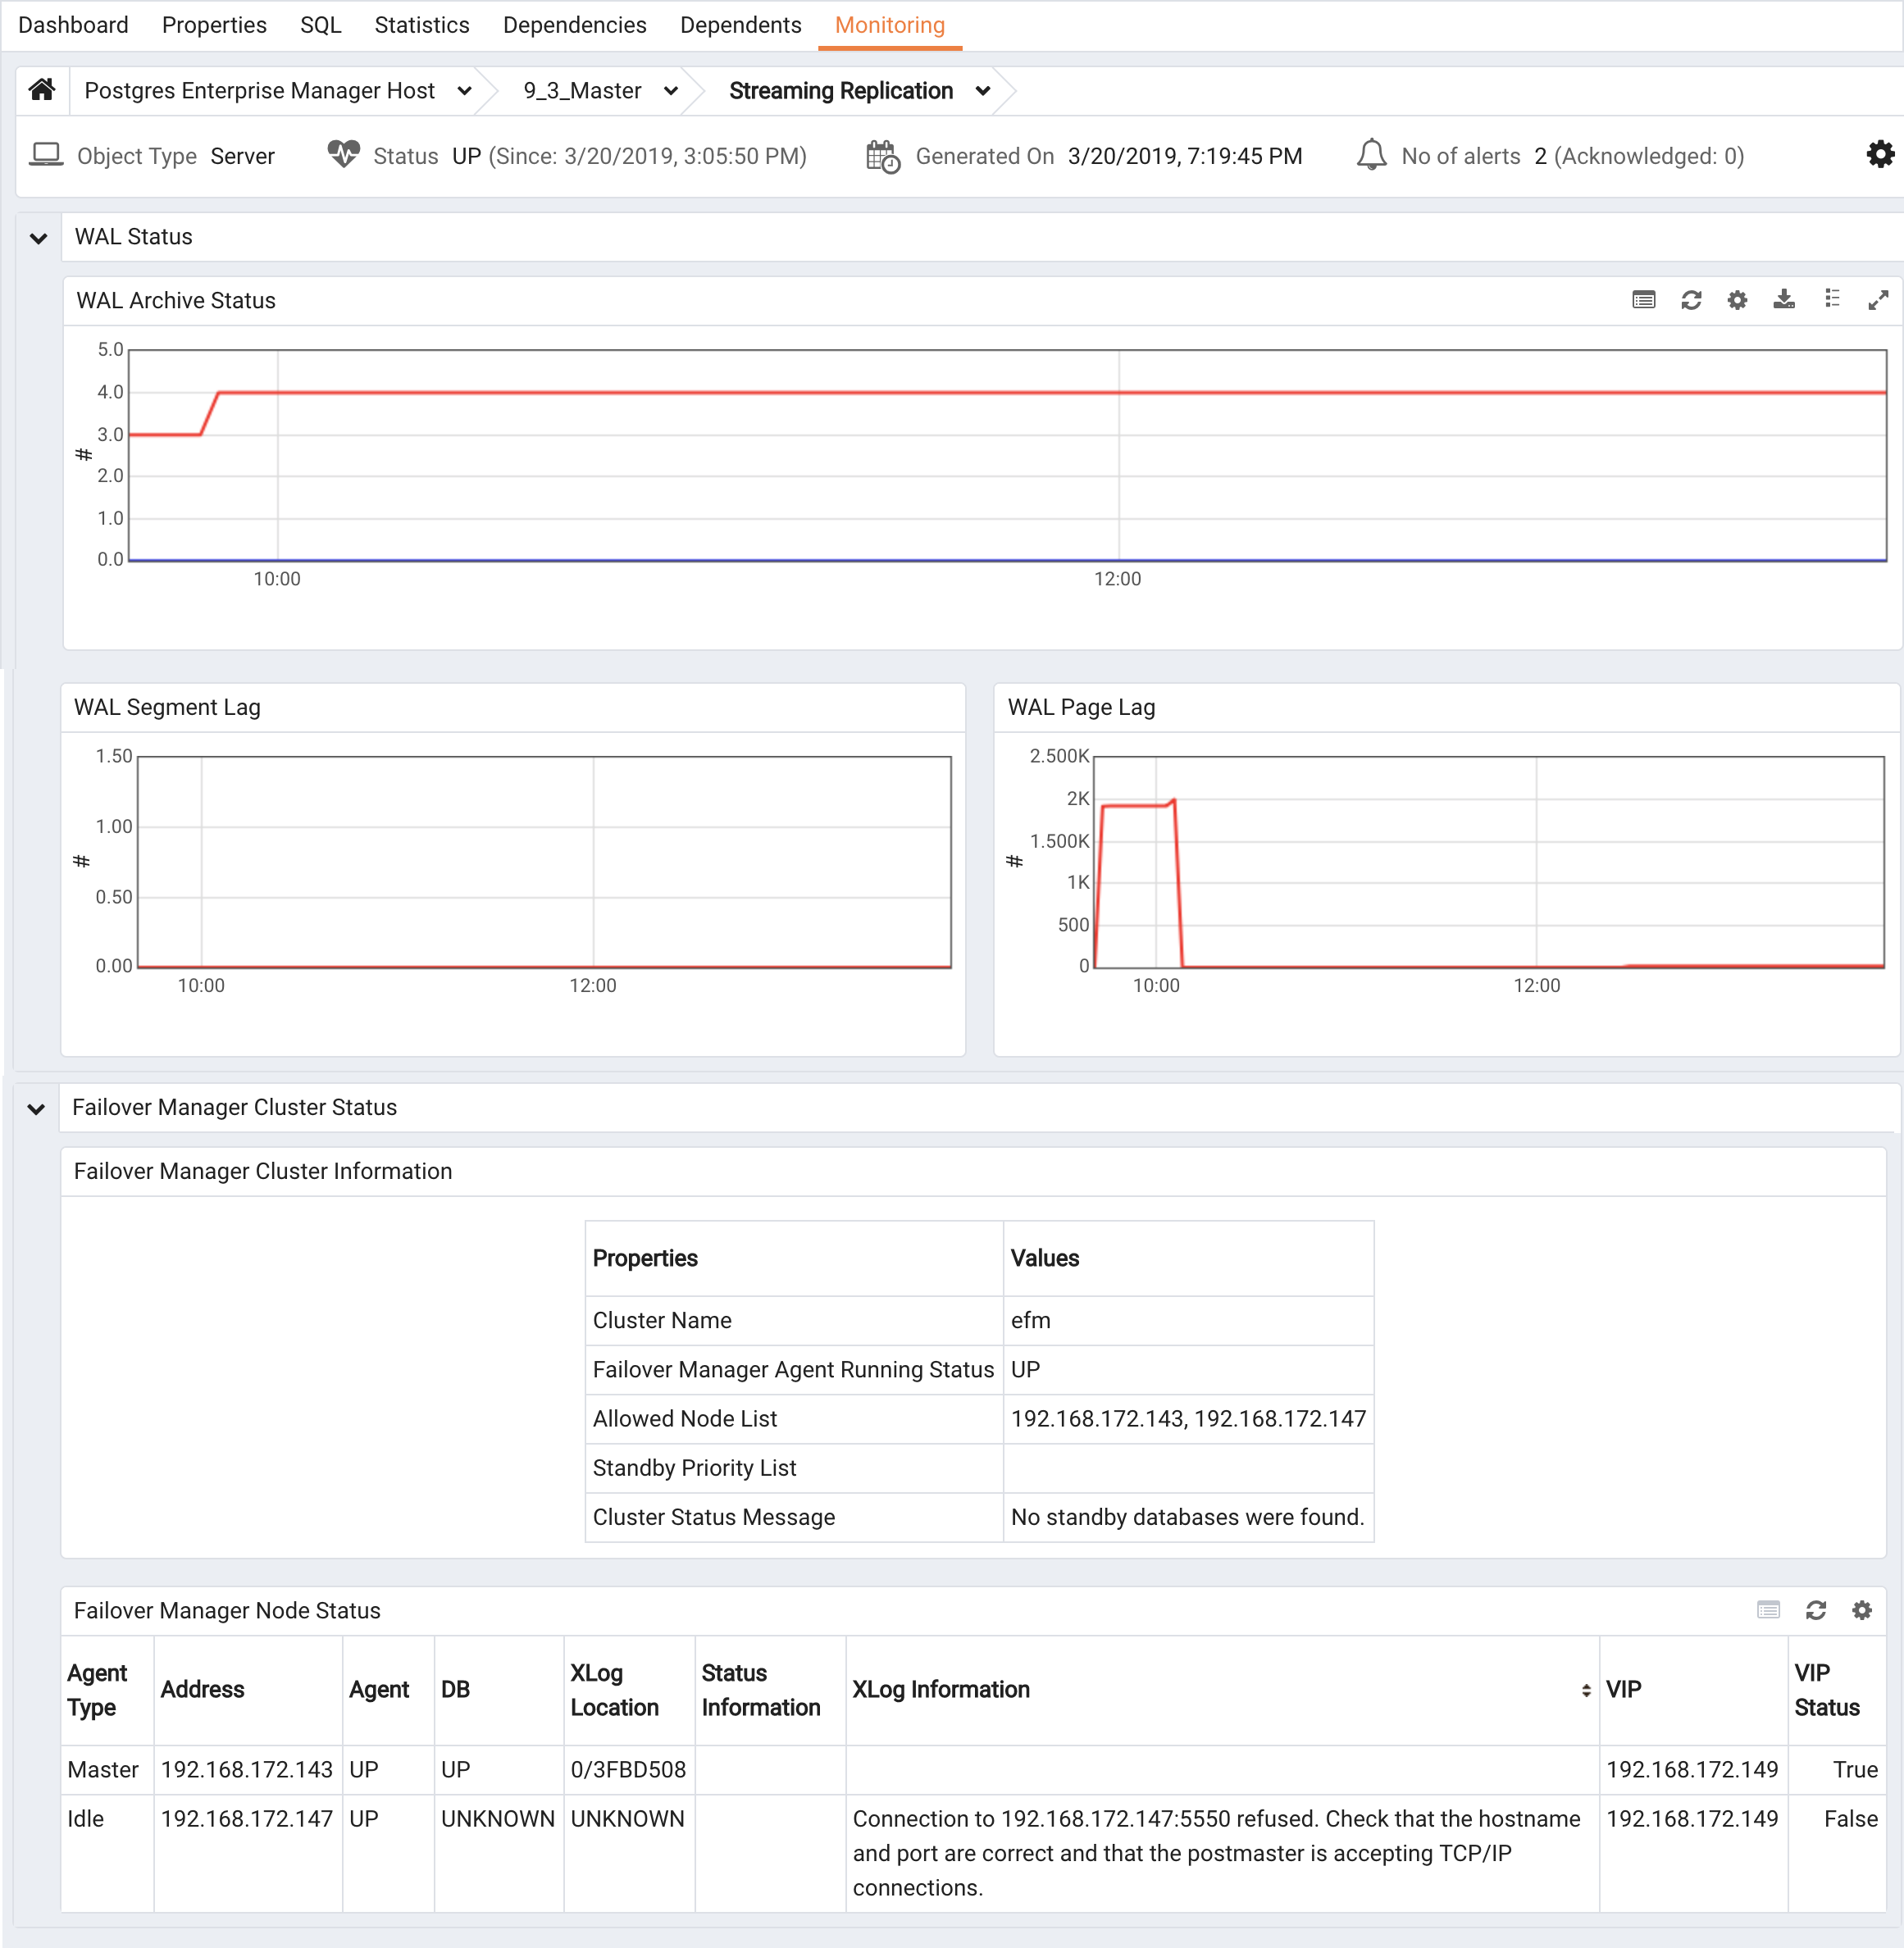
The Streaming Replication Analysis Dashboard displays statistical information about activity for any monitored server on which streaming replication is enabled. The dashboard header identifies the status of the monitored server (either Replication Primary or Replication Slave), and displays the date and time that the server was last started, the date and time that the page was last updated, and a current count of triggered alerts for the server.
When reviewing the dashboard for a Replication Slave (a Standby node), a label at the bottom of the dashboard confirms the status of the server.
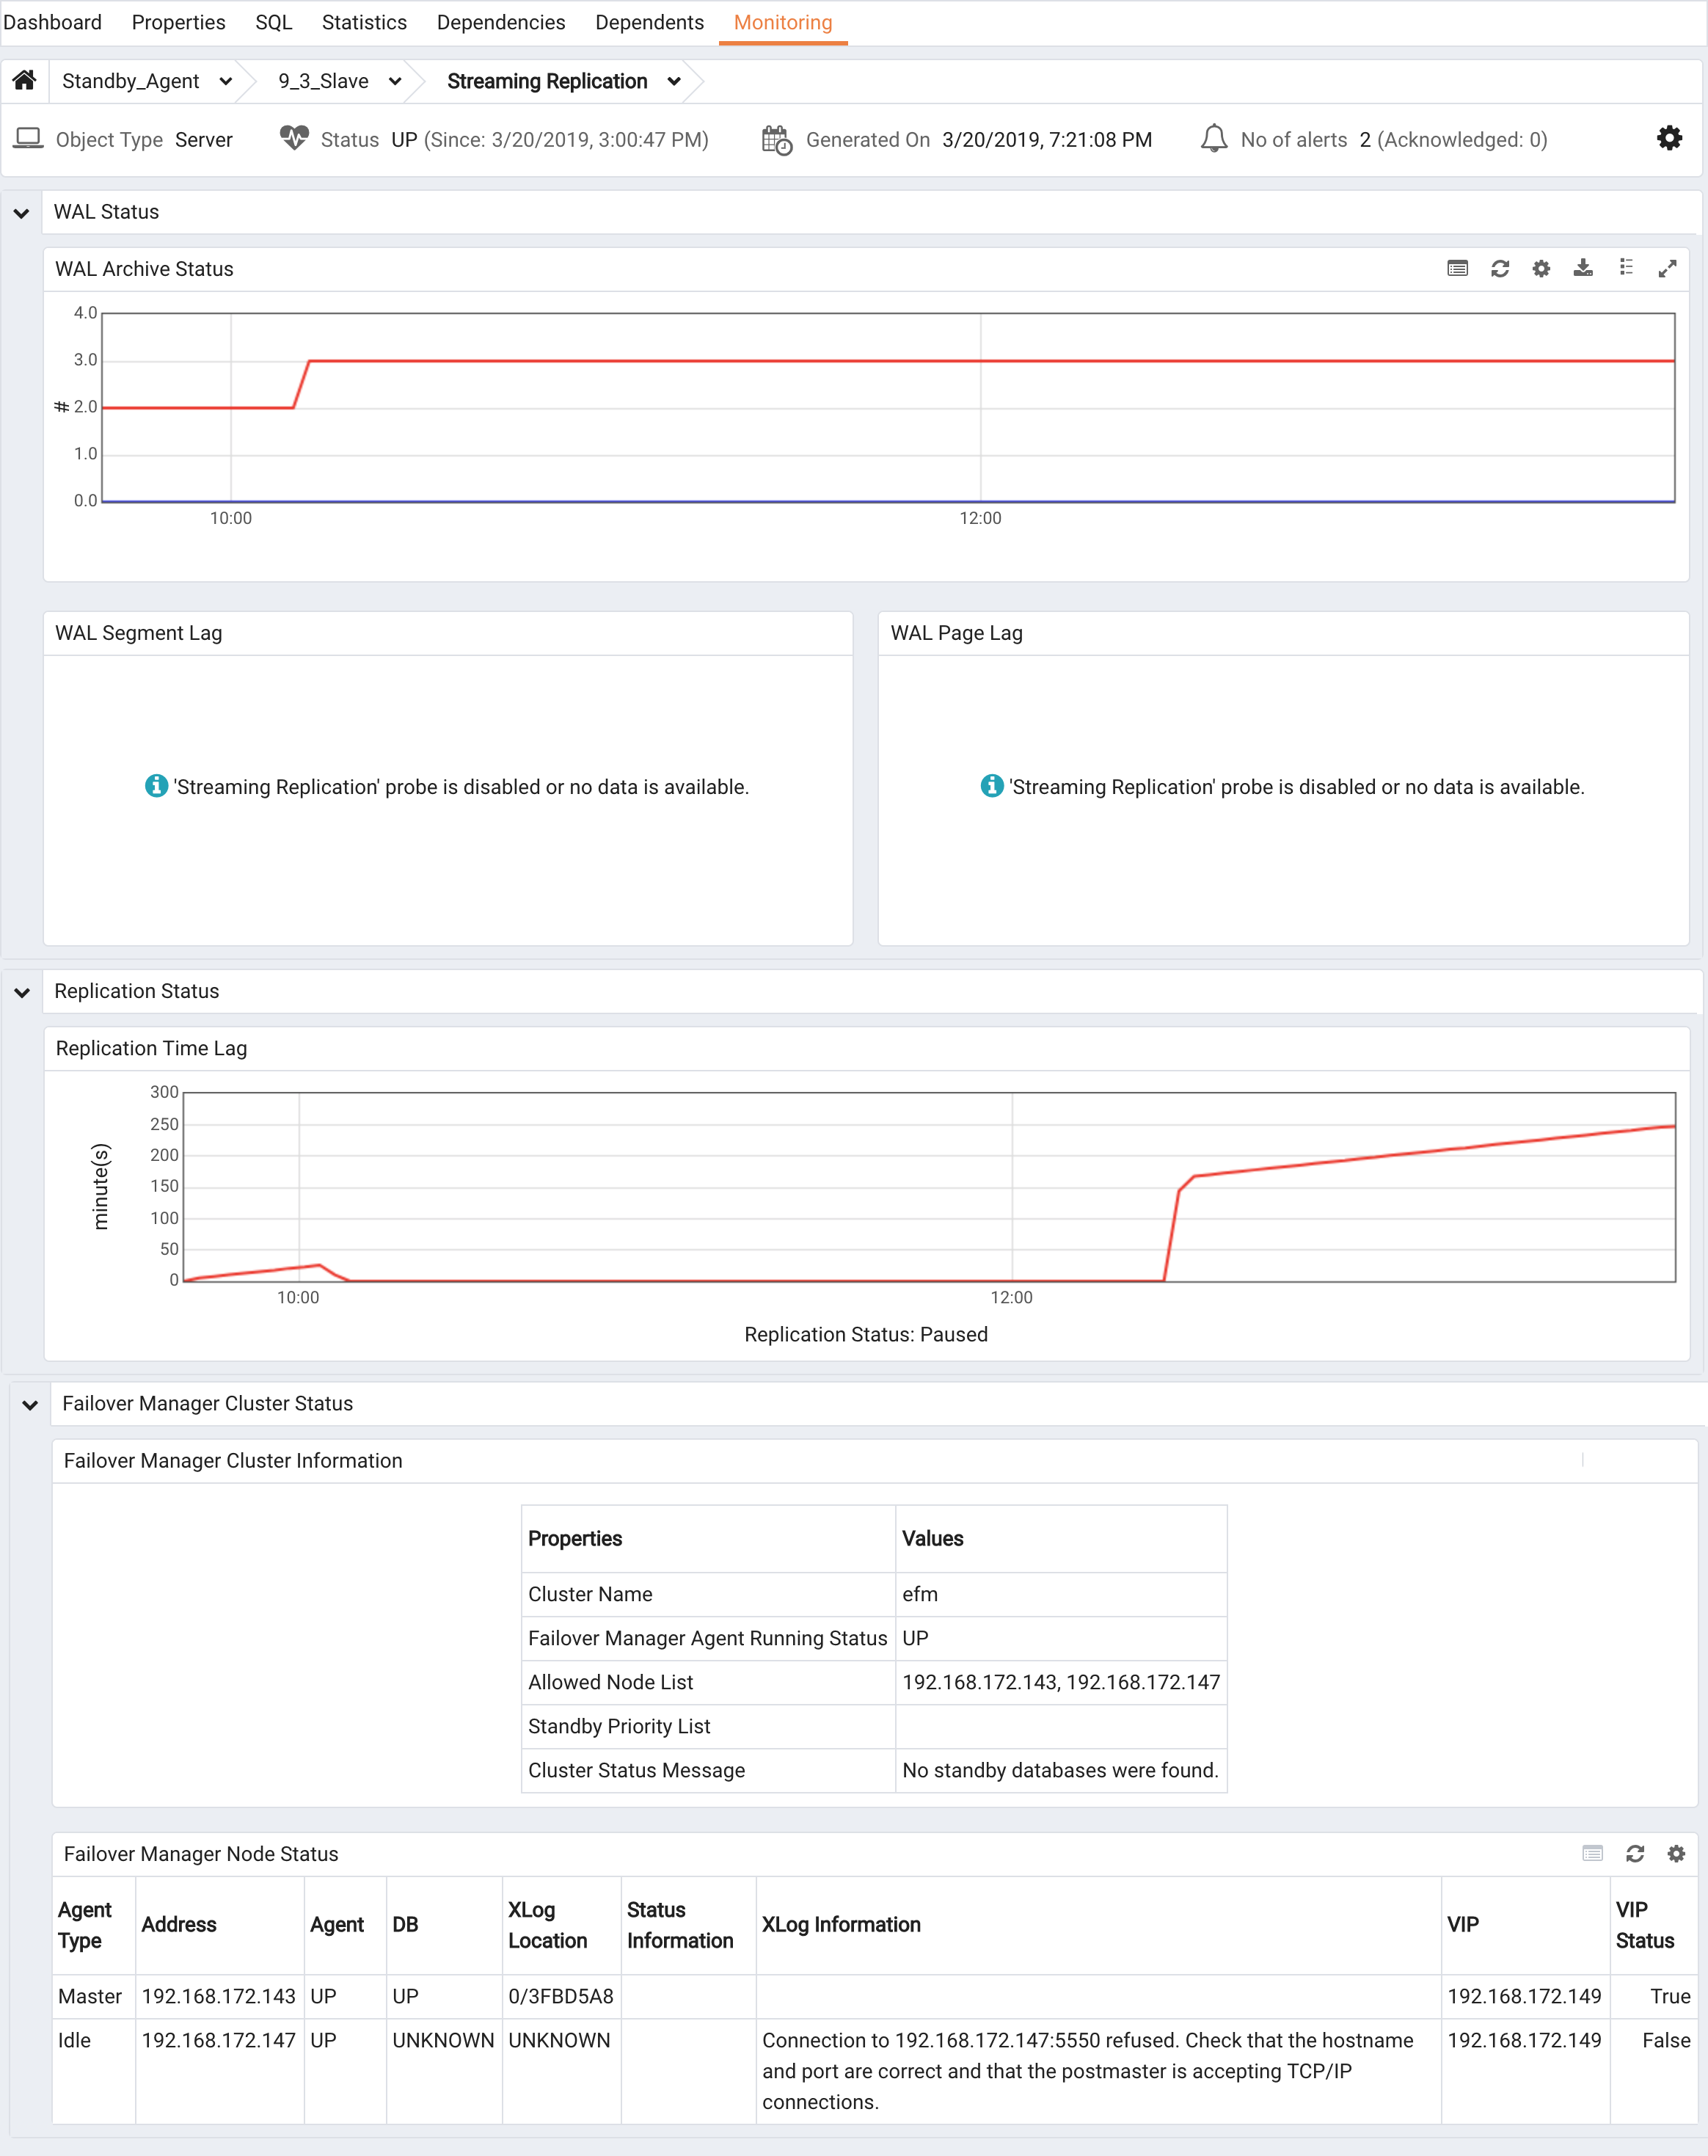
By default, the PEM replication probes that provide information for the Streaming Replication Analysis dashboard are disabled.
To view the Streaming Replication Analysis dashboard for the Primary node of a replication scenario, you must enable the following probes:
- Streaming Replication
- WAL Archive Status
To view the Streaming Replication Analysis dashboard for the Standby node of a replication scenario, you must enable the following probes:
- Streaming Replication Lag Time
For more information about PEM, please visit the EnterpriseDB website at:
http://www.enterprisedb.com/products-services-training/products/postgres-enterprise-manager
Using the efm Utility
Failover Manager provides the efm utility to assist with cluster management. The RPM installer adds the utility to the /usr/edb/efm-42/bin directory when you install Failover Manager.
efm allow-node
efm allow-node <cluster_name>Invoke the efm allow-node command to allow the specified node to join the cluster. When invoking the command, provide the name of the cluster and the IP address of the joining node.
This command must be invoked by efm, a member of the efm group, or root.
efm disallow-node
efm disallow-node <cluster_name> <address>Invoke the efm disallow-node command to remove the specified node from the allowed hosts list, and prevent the node from joining a cluster. Provide the name of the cluster and the address of the node when calling the efm disallow-node command. This command must be invoked by efm, a member of the efm group, or root.
efm cluster-status
efm cluster-status <cluster_name>Invoke the efm cluster-status command to display the status of a Failover Manager cluster. For more information about the status report, see Monitoring a Failover Manager Cluster.
efm cluster-status-json
efm cluster-status-json <cluster_name>Invoke the efm cluster-status-json command to display the status of a Failover Manager cluster in json format. While the format of the displayed information is different than the display generated by the efm cluster-status command, the information source is the same.
The following example is generated by querying the status of a healthy cluster with three nodes:
{
    "nodes": {
        "172.16.144.176": {
            "type": "Witness",
            "agent": "UP",
            "db": "N\/A",
            "vip": "",
            "vip_active": false
        },
        "172.16.144.177": {
            "type": "Primary",
            "agent": "UP",
            "db": "UP",
            "vip": "",
            "vip_active  :   false"
            "xlogReceive :   0/14001478"
            "xlog    :   0/14001478"
            "xloginfo    :"
        },
        "172.16.144.180": {
            "type": "Standby",
            "agent": "UP",
            "db": "UP",
            "vip": "",
            "vip_active  :   false"
            "xlogReceive :   0/14001478"
            "xlog    :   0/14001478"
            "xloginfo    :"
        }
    },
    "allowednodes": [
        "172.16.144.177",
        "172.16.144.160",
        "172.16.144.180",
        "172.16.144.176"
    ],
    "membershipcoordinator": "172.16.144.177",
    "failoverpriority": [
        "172.16.144.180"
    ],
    "minimumstandbys": 0,
    "missingnodes": [],
    "messages": []
}
efm encrypt
efm encrypt <cluster_name> [--from-env]Invoke the efm encrypt command to encrypt the database password before include the password in the cluster properties file. Include the --from-env option to instruct Failover Manager to use the value specified in the EFMPASS environment variable, and execute without user input. For more information, see Encrypting Your Database Password.
efm promote
efm promote cluster_name [-switchover [-sourcenode <address>][-quiet][-noscripts]The efm promote command instructs Failover Manager to perform a manual failover of standby to primary.
Manual promotion should only be attempted if the status command reports that the cluster includes a Standby node that is up-to-date with the Primary. If there is no up-to-date Standby, Failover Manager will prompt you before continuing.
Include the –switchover clause to promote a standby node, and reconfigure a primary node as a standby node. Include the -sourcenode keyword, and specify a node address to indicate the node whose recovery settings will be copied to the old primary node (making it a standby). Include the -quiet keyword to suppress notifications during the switchover process. Include the -noscripts keyword to instruct Failover Manager to not invoke fencing or post-promotion scripts.
This command must be invoked by efm, a member of the efm group, or root.
Note This command instructs the service to ignore the value specified in the
auto.failoverparameter in the cluster properties file.
efm resume
efm resume <cluster_name>Invoke the efm resume command to resume monitoring a previously stopped database. This command must be invoked by efm, a member of the efm group, or root.
efm set-priority
efm set-priority <cluster_name> <address> <priority>Invoke the efm set-priority command to assign a failover priority to a standby node. The value specifies the order in which the node will be used in the event of a failover. This command must be invoked by efm, a member of the efm group, or root.
Use the priority option to specify the place for the node in the priority list. For example, specify a value of 1 to indicate that the node is the primary standby, and will be the first node promoted in the event of a failover. A priority value of 0 instructs Failover Manager to not promote the standby.
efm stop-cluster
efm stop-cluster <cluster_name>Invoke the efm stop-cluster command to stop Failover Manager on all nodes. This command instructs Failover Manager to connect to each node on the cluster and instruct the existing members to shut down. The command has no effect on running databases, but when the command completes, there is no failover protection in place.
Note When you invoke the
efm stop-clustercommand, all authorized node information is removed from the Allowed node host list.
This command must be invoked by efm, a member of the efm group, or root.
efm upgrade-conf
efm upgrade-conf <cluster_name> [-source <directory>]Invoke the efm upgrade-conf command to copy the configuration files from an existing Failover Manager installation, and add parameters required by a Failover Manager installation. Provide the name of the previous cluster when invoking the utility. This command must be invoked with root privileges.
If you are upgrading from a Failover Manager configuration that does not use sudo, include the -source flag and specify the name of the directory in which the configuration files reside when invoking upgrade-conf.
efm node-status-json
efm node-status-json <cluster_name>Invoke the efm node-status-json command to display the status of a local node in json format. A successful execution of this command returns 0 as its exit code. In case of a database failure or an agent status becoming IDLE, the command returns 1 as exit code.
The following is an example output of the efm node-status-json command:
{
  "type":"Standby",
  "address":"172.16.144.130",
  "agent":"UP",
  "db":"UP",
  "vip":"",
  "vip_active":"false"
 }
efm –help
efm --helpInvoke the efm --help command to display online help for the Failover Manager utility commands.
Controlling the Failover Manager Service
Each node in a Failover Manager cluster hosts a Failover Manager agent that is controlled by a service script. By default, the service script expects to find:
- A configuration file named
efm.propertiesthat contains the properties used by the Failover Manager service. Each node of a replication scenario must contain a properties file that provides information about the node. - A cluster members file named
efm.nodesthat contains a list of the cluster members. Each node of a replication scenario must contain a cluster members list.
Note that if you are running multiple clusters on a single node you will need to manually create configuration files with cluster-specific names and modify the service script for the corresponding clusters.
The commands that control the Failover Manager service are platform-specific.
Using the systemctl Utility on RHEL/CentOS 7.x and RHEL/CentOS 8.x
On RHEL/CentOS 7.x and RHEL/CentOS 8.x, Failover Manager runs as a Linux service named (by default) edb-efm-4.2.service that is located in /usr/lib/systemd/system. Each database cluster monitored by Failover Manager will run a copy of the service on each node of the replication cluster.
Use the following systemctl commands to control a Failover Manager agent that resides on a RHEL/CentOS 7.x and RHEL/CentOS 8.x host:
systemctl start edb-efm-4.2The start command starts the Failover Manager agent on the current node. The local Failover Manager agent monitors the local database and communicates with Failover Manager on the other nodes. You can start the nodes in a Failover Manager cluster in any order. This command must be invoked by root.
systemctl stop edb-efm-4.2Stop the Failover Manager on the current node. This command must be invoked by root.
systemctl status edb-efm-4.2The status command returns the status of the Failover Manager agent on which it is invoked. You can invoke the status command on any node to instruct Failover Manager to return status and server startup information.
[root@ONE ~]}> systemctl status edb-efm-4.2
  edb-efm-4.2.service - EnterpriseDB Failover Manager 4.2
   Loaded: loaded (/usr/lib/systemd/system/edb-efm-4.2.service; disabled; vendor preset: disabled)
   Active: active (running) since Wed 2013-02-14 14:02:16 EST; 4s ago
  Process: 58125 ExecStart=/bin/bash -c /usr/edb/edb-efm-4.2/bin/runefm.sh start ${CLUSTER} (code=exited, status=0/SUCCESS)
 Main PID: 58180 (java)
   CGroup: /system.slice/edb-efm-4.2.service
           └─58180 /usr/lib/jvm/java-1.8.0-openjdk-1.8.0.161-0.b14.el7_4.x86_64/jre/bin/java -cp /usr/edb/edb-efm-4.2/lib/EFM-4.2.0.jar -Xmx128m...
Controlling Logging
Failover Manager writes and stores one log file per agent and one startup log per agent in /var/log/<cluster_name>-4.2 (where <cluster_name> specifies the name of the cluster).
You can control the level of detail written to the agent log by modifying the jgroups.loglevel and efm.loglevel parameters in the cluster properties file:
# Logging levels for JGroups and EFM.
# Valid values are: TRACE, DEBUG, INFO, WARN, ERROR
# Default value: INFO
# It is not necessary to increase these values unless debugging a
# specific issue. If nodes are not discovering each other at
# startup, increasing the jgroups level to DEBUG will show
# information about the TCP connection attempts that may help
# diagnose the connection failures.
jgroups.loglevel=INFO
efm.loglevel=INFO
The logging facilities use the Java logging library and logging levels. The log levels (in order from most logging output to least) are:
TRACEDEBUGINFOWARNERROR
For example, if you set the efm.loglevel parameter to WARN, Failover Manager will only log messages at the WARN level and above (WARN and ERROR).
By default, Failover Manager log files are rotated daily, compressed, and stored for a week. You can modify the file rotation schedule by changing settings in the log rotation file (/etc/logrotate.d/efm-4.2). For more information about modifying the log rotation schedule, consult the logrotate man page:
$ man logrotate
Enabling syslog Log File Entries
Failover Manager supports syslog logging. To implement syslog logging, you must configure syslog to allow UDP or TCP connections.
To allow a connection to syslog, edit the /etc/rsyslog.conf file and uncomment the protocol you wish to use. You must also ensure that the UDPServerRun or TCPServerRun entry associated with the protocol includes the port number to which log entries will be sent. For example, the following configuration file entries enable UDP connections to port 514:
# Provides UDP syslog reception
$ModLoad imudp
$UDPServerRun 514
The following configuration file entries enable TCP connections to port 514:
# Provides TCP syslog reception
$ModLoad imtcp
$InputTCPServerRun 514
After modifying the syslog configuration file, restart the rsyslog service to enable the connections:
systemctl restart rsyslog.service
After modifying the rsyslog.conf file on the Failover Manager host, you must modify the Failover Manager properties to enable logging. Use your choice of editor to modify the properties file (/etc/edb/efm-4.2/efm.properties.in) specifying the type of logging that you wish to implement:
# Which logging is enabled.
file.log.enabled=true
syslog.enabled=false
You must also specify syslog details for your system. Use the syslog.protocol parameter to specify the protocol type (UDP or TCP) and the syslog.port parameter to specify the listener port of the syslog host. The syslog.facility value may be used as an identifier for the process that created the entry; the value must be between LOCAL0 and LOCAL7.
# Syslog information. The syslog service must be listening # on the
 port for the given protocol, which can be UDP or
# TCP. The facilities supported are LOCAL0 through LOCAL7.
# syslog.host=localhost
syslog.port=514
syslog.protocol=UDP
syslog.facility=LOCAL1
For more information about syslog, please see the syslog man page:
syslog man
Notifications
Failover Manager will send e-mail notifications and/or invoke a notification script when a notable event occurs that affects the cluster. If you have configured Failover Manager to send an email notification, you must have an SMTP server running on port 25 on each node of the cluster. Use the following parameters to configure notification behavior for Failover Manager:
user.email
script.notification
from.email
For more information about editing the configuration properties, see Specifying Cluster Properties.
The body of the notification contains details about the event that triggered the notification, and about the current state of the cluster. For example:
EFM node: 10.0.1.11
Cluster name: acctg
Database name: postgres
VIP: ip_address (Active|Inactive)
Database health is not being monitored.
The VIP field displays the IP address and state of the virtual IP if implemented for the node.
Failover Manager assigns a severity level to each notification. The following levels indicate increasing levels of attention required:
INFOindicates an informational message about the agent and does not require any manual intervention (for example, Failover Manager has started or stopped). See List of INFO level notificationsWARNINGindicates that an event has happened that requires the administrator to check on the system (for example, failover has occurred). See List of WARNING level notificationsSEVEREindicates that a serious event has happened and requires the immediate attention of the administrator (for example, failover was attempted, but was unable to complete). See List of SEVERE level notifications
The severity level designates the urgency of the notification. A notification with a severity level of SEVERE requires user attention immediately, while a notification with a severity level of INFO will call your attention to operational information about your cluster that does not require user action. Notification severity levels are not related to logging levels; all notifications are sent regardless of the log level detail specified in the configuration file.
You can use the notification.level property to specify the minimum severity level that will trigger a notification.
Note In addition to sending notices to the administrative email address, all notifications are recorded in the agent log file (
/var/log/efm-4.2/<*cluster name*>.log).
The conditions listed in the table below will trigger an INFO level notification:
| Subject | Description |
|---|---|
| Executed fencing script | Executed fencing script script_name Results: script_results |
| Executed post-promotion script | Executed post-promotion script script_name Results: script_results |
| Executed remote pre-promotion script | Executed remote pre-promotion script script_name Results: script_results |
| Executed remote post-promotion script | Executed remote post-promotion script script_name Results: script_results |
| Executed post-database failure script | Executed post-database failure script script_name Results: script_results |
| Executed primary isolation script | Executed primary isolation script script_name Results: script_results |
| Witness agent running on node_address for cluster cluster_name | Witness agent is running. |
| Primary agent running on node_address for cluster cluster_name | Primary agent is running and database health is being monitored. |
| Standby agent running on node_address for cluster cluster_name | Standby agent is running and database health is being monitored. |
| Idle agent running on node node_address for cluster cluster_name | Idle agent is running. After starting the local database, the agent can be resumed. |
| Assigning VIP to node node_address | Assigning VIP VIP_address to node node_address Results: script_results |
| Releasing VIP from node node_address | Releasing VIP VIP_address from node node_address Results: script_results |
| Starting auto resume check for cluster cluster_name | The agent on this node will check every auto.resume.period seconds to see if it can resume monitoring the failed database. The cluster should be checked during this time and the agent stopped if the database will not be started again. See the agent log for more details. |
| Executed agent resumed script | Executed agent resumed script script_name Results: script_results |
| WAL logs backed up during promotion | When reconfiguring this standby to follow the new primary, the pg_xlog or pg_wal contents were backed up in the pgdata directory. This backup should be removed when convenient to free up disk space. |
The conditions listed in the table below will trigger a WARNING level notification:
| Subject | Description |
|---|---|
| Witness agent exited on node_address for cluster cluster_name | Witness agent has exited. |
| Primary agent exited on node_address for cluster cluster_name | Database health is not being monitored. |
| Cluster cluster_name notified that primary agent has left | Failover is disabled for the cluster until the primary agent is restarted. |
| Standby agent exited on node_address for cluster cluster_name | Database health is not being monitored. |
| Agent exited during promotion on node_address for cluster cluster name | Database health is not being monitored. |
| Agent exited on node_address for cluster cluster name | The agent has exited. This is generated by an agent in the Idle state. |
| Agent exited for cluster cluster name | The agent has exited. This notification is usually generated during startup when an agent exits before startup has completed. |
| Virtual IP address assigned to non-primary node | The virtual IP address appears to be assigned to a non-primary node. To avoid any conflicts, Failover Manager will release the VIP. You should confirm that the VIP is assigned to your primary node and manually reassign the address if it is not. |
| Virtual IP address not assigned to primary node. | The virtual IP address appears to not be assigned to a primary node. EDB Postgres Failover Manager will attempt to reacquire the VIP. |
| No standby agent in cluster for cluster cluster name | The standbys on cluster_name have left the cluster. |
| Standby agent failed for cluster cluster name | A standby agent on cluster_name has left the cluster, but the coordinator has detected that the standby database is still running. |
| Standby database failed for cluster cluster name | A standby agent has signaled that its database has failed. The other nodes also cannot reach the standby database. |
| Standby agent cannot reach database for cluster cluster name | A standby agent has signaled database failure, but the other nodes have detected that the standby database is still running. |
| Cluster cluster name has dropped below three nodes | At least three nodes are required for full failover protection. Please add witness or agent node to the cluster. |
| Subset of cluster cluster name disconnected from primary | This node is no longer connected to the majority of the cluster cluster name. Because this node is part of a subset of the cluster, failover will not be attempted. Current nodes that are visible are: node_address. |
| Promotion has started on cluster cluster name. | The promotion of a standby has started on cluster cluster_name. |
| Witness failure for cluster cluster_name | Witness running at node_address has left the cluster. |
| Idle agent failure for cluster cluster_name. | Idle agent running at node_address has left the cluster. |
| One or more nodes isolated from network for cluster cluster_name | This node appears to be isolated from the network. Other members seen in the cluster are: node_name |
| Node no longer isolated from network for cluster cluster_name. | This node is no longer isolated from the network. |
| Failover Manager tried to promote, but primary DB is still running | Failover Manager has started promotion steps, but detected that the primary DB is still running on address. This usually indicates that the primary EFM agent has exited. Failover has NOT occurred. There is no failover protection until the primary agent is restarted. |
| Primary agent missing for cluster cluster_name | The primary agent has previously left the cluster. Until a primary agent joins the cluster, there is no failover protection. |
| Standby agent started to promote, but primary has rejoined. | The standby EFM agent started to promote itself, but found that a primary agent has rejoined the cluster. Failover has NOT occurred. |
| Standby agent tried to promote, but could not verify primary DB | The standby EFM agent tried to promote itself, but could not detect whether or not the primary DB is still running on node_address. Failover has NOT occurred. |
| Standby agent tried to promote, but VIP appears to still be assigned | The standby EFM agent tried to promote itself, but could not because the virtual IP address (VIP_address) appears to still be assigned to another node. Promoting under these circumstances could cause data corruption. Failover has NOT occurred. |
| Standby agent tried to promote, but appears to be orphaned | The standby EFM agent tried to promote itself, but could not because the well-known server (server_address) could not be reached. This usually indicates a network issue that has separated the standby agent from the other agents. Failover has NOT occurred. |
| Potential manual failover required on cluster cluster_name. | A potential failover situation was detected for cluster cluster_name. Automatic failover has been disabled for this cluster, so manual intervention is required. |
| Failover has completed on cluster cluster_name | Failover has completed on cluster cluster_name. |
| Lock file for cluster cluster_name has been removed | The lock file for cluster cluster_name has been removed from: path_name on node node_address. This lock prevents multiple agents from monitoring the same cluster on the same node. Please restore this file to prevent accidentally starting another agent for cluster. |
| A recovery file for cluster cluster_name has been found on primary node | A recovery file for cluster cluster_name has been found at: path_name on primary node node_address. This may be problematic should you attempt to restart the DB on this node. |
| recovery_target_timeline is not set to latest in recovery settings | The recovery_target_timeline parameter is not set to latest in the recovery settings. The standby server will not be able to follow a timeline change that occurs when a new primary is promoted. |
| Promotion has not occurred for cluster cluster_name | A promotion was attempted but there is already a node being promoted: ip_address. |
| Standby will not be reconfigured after failover in cluster cluster_name | The ‘auto.reconfigure’ property has been set to false for this node, so it will not be reconfigured to follow the new primary node after a promotion. |
| Could not resume replay for standby standby_id. | Could not resume replay for standby. Manual intervention may be required. Error: error_message. |
| Possible problem with database timeout values | Your remote.timeout value (value) is higher than your local.timeout value (value). If the local database takes too long to respond, the local agent could assume that the database has failed though other agents can connect. While this will not cause a failover, it could force the local agent to stop monitoring, leaving you without failover protection. |
| No standbys available for promotion in cluster cluster_name | The current number of standby nodes in the cluster has dropped to the minimum number: number. There cannot be a failover unless another standby node(s) is added or made promotable. |
| No promotable standby for cluster cluster_name | The current failover priority list in the cluster is empty. You have removed the only promotable standby for the cluster cluster_name. There cannot be a failover unless another promotable standby node(s) is added or made promotable by adding to failover priority list. |
| Synchronous replication has been reconfigured for cluster cluster_name | The number of synchronous standby nodes in the cluster has dropped below number. The synchronous standby names on primary has been reconfigured to: new synchronous_standby_names value. |
| Synchronous replication has been reconfigured for cluster cluster_name | The synchronous_standby_names on primary has been reconfigured to new_synchronous_standby_names |
| Synchronous replication has been disabled for cluster cluster_name. | The number of synchronous standby nodes in the cluster has dropped below count. The primary has been taken out of synchronous replication mode. |
| Could not reload database configuration. | Could not reload database configuration. Manual intervention is required. Error: error_message. |
| Custom monitor timeout for cluster cluster_name | The following custom monitoring script has timed out: script_name |
| Custom monitor ‘safe mode’ failure for cluster cluster_name | The following custom monitor script has failed, but is being run in “safe mode”: script_name. Output: script_results |
| primary.shutdown.as.failure set to true for primary node | The primary.shutdown.as.failure property has been set to true for this cluster. Stopping the primary agent without stopping the entire cluster will be treated by the rest of the cluster as an immediate primary agent failure. If maintenance is required on the primary database, shut down the primary agent and wait for a notification from the remaining nodes that failover will not happen. |
| Primary_or_Standby cannot ping local database for cluster cluster_name | The Primary_or_Standby agent can no longer reach the local database running at node_address. Other nodes are able to access the database remotely, so the agent will become IDLE and attempt to resume monitoring the database. |
| Standby cannot resume monitoring local database for cluster cluster_name | The standby agent can no longer reach the local database running at node_address. Other nodes are able to access the database remotely. The standby agent will remain IDLE until the resume command is run to resume monitoring the database. |
| Primary agent left the cluster and node detached from load balancer | The standby agent can no longer reach the local database running at node_address. Other nodes are able to access the database remotely. The standby agent will remain IDLE until the resume command is run to resume monitoring the database. |
| Standby database in cluster cluster_name not stopped before primary is promoted | The standby.restart.delay property is set for this agent, so it will not be reconfigured to follow the new primary until num_seconds seconds after promotion has completed. In some cases it may not be able to follow the new primary without manual intervention. |
The conditions listed in the table below will trigger a SEVERE notification:
| Subject | Description |
|---|---|
| Standby database restarted but EFM cannot connect | The start or restart command for the database ran successfully but the database is not accepting connections. EFM will keep trying to connect for up to restart.connection.timeout seconds. |
| Unable to connect to DB on node_address | The maximum connections limit has been reached. |
| Unable to connect to DB on node_address | Invalid password for db.user=user_name. |
| Unable to connect to DB on node_address | Invalid authorization specification. |
| Primary cannot resume monitoring local database for cluster cluster_name | The primary agent can no longer reach the local database running at node_address. Other nodes are able to access the database remotely, so the primary will not release the VIP and/or create a recovery.conf file. The primary agent will remain IDLE until the resume command is run to resume monitoring the database. |
| Fencing script error | Fencing script script_name failed to execute successfully. Exit Value: exit_code Results: script_results Failover has NOT occurred. |
| Post-promotion script failed | Post-promotion script script_name failed to execute successfully. Exit Value: exit_code Results: script_results |
| Remote post-promotion script failed | Remote post-promotion script script_name failed to execute successfully Exit Value: exit_code Results: script_resultsNode: node_address |
| Remote pre-promotion script failed | Remote pre-promotion script script_name failed to execute successfully Exit Value: exit_code Results: script_resultsNode: node_address |
| Post-database failure script error | Post-database failure script script_name failed to execute successfully. Exit Value: exit_code Results: script_results |
| Agent resumed script error | Agent resumed script script_name failed to execute successfully. Results: script_results |
| Primary isolation script failed | Primary isolation script script_name failed to execute successfully. Exit Value: exit_code Results: script_results |
| Could not promote standby | The promote command failed on node. Could not promote standby. Error details: error_details |
| Error creating recovery.conf file on node_address for cluster cluster_name | There was an error creating the recovery.conf file on primary node node_address during promotion. Promotion has continued, but requires manual intervention to ensure that the old primary node can not be restarted. Error details: message_details |
| An unexpected error has occurred for cluster cluster_name | An unexpected error has occurred on this node. Please check the agent log for more information. Error: error_details |
| Primary database being fenced off for cluster cluster_name | The primary database has been isolated from the majority of the cluster. The cluster is telling the primary agent at ip_address to fence off the primary database to prevent two primaries when the rest of the failover manager cluster promotes a standby. |
| Isolated primary database shutdown. | The isolated primary database has been shutdown by failover manager. |
| Primary database being fenced off for cluster cluster_name | The primary database has been isolated from the majority of the cluster. Before the primary could finish detecting isolation, a standby was promoted and has rejoined this node in the cluster. This node is isolating itself to avoid more than one primary database. |
| Could not assign VIP to node node_address | Failover manager could not assign the VIP address for some reason. |
| primary_or_standby database failure for cluster cluster_name | The database has failed on the specified node. |
| Agent is timing out for cluster cluster_name | This agent has timed out trying to reach the local database. After the timeout, the agent could successfully ping the database and has resumed monitoring. However, the node should be checked to make sure it is performing normally to prevent a possible database or agent failure. |
| Resume timed out for cluster cluster_name | This agent could not resume monitoring after reconfiguring and restarting the local database. See agent log for details. |
| Internal state mismatch for cluster cluster_name | The failover manager cluster’s internal state did not match the actual state of the cluster members. This is rare and can be caused by a timing issue of nodes joining the cluster and/or changing their state. The problem should be resolved, but you should check the cluster status as well to verify. Details of the mismatch can be found in the agent log file. |
| Failover has not occurred | An agent has detected that the primary database is no longer available in cluster cluster_name, but there are no standby nodes available for failover. |
| Failover has not occurred | An agent has detected that the primary database is no longer available in cluster cluster_name, but there are not enough standby nodes available for failover. |
| Database in wrong state on node_address | The standby agent has detected that the local database is no longer in recovery. The agent will now become IDLE. Manual intervention is required. |
| Database in wrong state on node_address | The primary agent has detected that the local database is in recovery. The agent will now become IDLE. Manual intervention is required. |
| Database connection failure for cluster cluster_name | This node is unable to connect to the database running on: node_addressUntil this is fixed, failover may not work properly because this node will not be able to check if the database is running or not. |
| Standby custom monitor failure for cluster cluster_name | The following custom monitor script has failed on a standby node. The agent will stop monitoring the local database. Script location: script_name Script output: script_results |
| Primary custom monitor failure for cluster cluster_name | The following custom monitor script has failed on a primary node. EFM will attempt to promote a standby. Script location: script_name Script output: script_results |
| Loopback address set for ping.server.ip | Loopback address is set for ping.server.ip property. This setting can interfere with the network isolation detection and hence it should be changed. |
| Load balancer attach script error | Load balancer attach script script_name failed to execute successfully. Exit Value: exit_code Results: script_results |
| Load balancer detach script error | Load balancer detach script script_name failed to execute successfully. Exit Value: exit_code Results: script_results |
| Pgpool attach node error | Failover Manager failed to attach pgpool node. Exit Value: exit_code. Results: script_results |
| Pgpool detach node error | Failover Manager failed to detach pgpool node. Exit Value: exit_code. Results: script_results |
| Not enough synchronous standbys available in cluster cluster_name | The number of synchronous standby nodes in the cluster has dropped to count. All write queries on the primary will be blocked until enough synchronous standby nodes are added. |
Supported Failover and Failure Scenarios
Failover Manager monitors a cluster for failures that may or may not result in failover.
Failover Manager supports a very specific and limited set of failover scenarios. Failover can occur:
- if the Primary database crashes or is shutdown.
- if the node hosting the Primary database crashes or becomes unreachable.
Failover Manager makes every attempt to verify the accuracy of these conditions. If agents cannot confirm that the Primary database or node has failed, Failover Manager will not perform any failover actions on the cluster.
Failover Manager also supports a no auto-failover mode for situations where you want Failover Manager to monitor and detect failover conditions, but not perform an automatic failover to a Standby. In this mode, a notification is sent to the administrator when failover conditions are met. To disable automatic failover, modify the cluster properties file, setting the auto.failover parameter to false.
Failover Manager will alert an administrator to situations that require administrator intervention, but that do not merit promoting a Standby database to Primary.
Primary Database is Down
If the agent running on the Primary database node detects a failure of the Primary database, Failover Manager begins the process of confirming the failure.
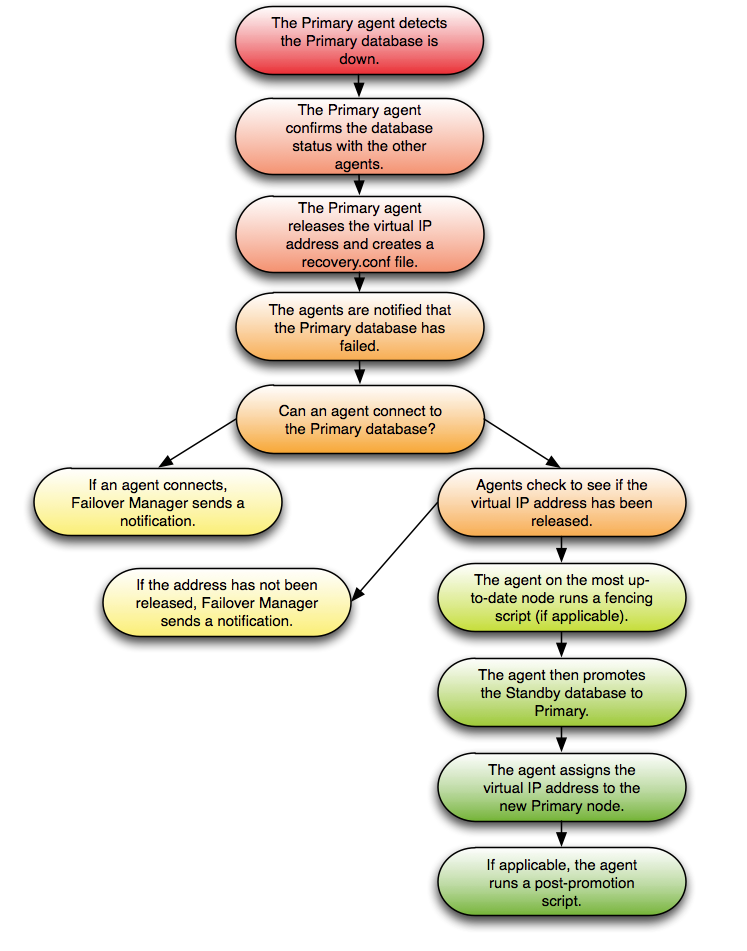
If the agent on the Primary node detects that the Primary database has failed, all agents attempt to connect directly to the Primary database. If an agent can connect to the database, Failover Manager sends a notification about the state of the Primary node. If no agent can connect, the Primary agent declares database failure and releases the VIP (if applicable).
If no agent can reach the virtual IP address or the database server, Failover Manager starts the failover process. The Standby agent on the most up-to-date node runs a fencing script (if applicable), promotes the Standby database to Primary database, and assigns the virtual IP address to the Standby node. Any additional Standby nodes are configured to replicate from the new primary unless auto.reconfigure is set to false. If applicable, the agent runs a post-promotion script.
Returning the Node to the Cluster
To recover from this scenario without restarting the entire cluster, you should:
- Restart the database on the original Primary node as a Standby database.
- Invoke the
efm resumecommand on the original Primary node.
Returning the Node to the Role of Primary
After returning the node to the cluster as a Standby, you can easily return the node to the role of Primary:
- If the cluster has more than one Standby node, use the
efm set-prioritycommand to set the node’s failover priority to 1. - Invoke the efm promote -switchover command to promote the node to its original role of Primary node.
Standby Database is Down
If a Standby agent detects a failure of its database, the agent notifies the other agents; the other agents confirm the state of the database.
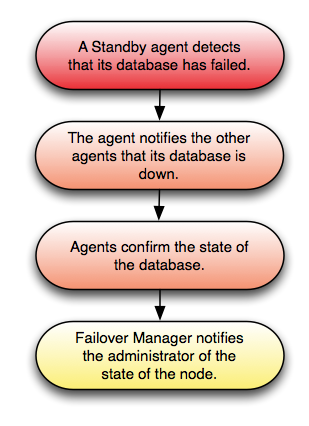
After returning the Standby database to a healthy state, invoke the efm resume command to return the Standby to the cluster.
Primary Agent Exits or Node Fails
If the Failover Manager Primary agent crashes or the node fails, a Standby agent will detect the failure and (if appropriate) initiate a failover.
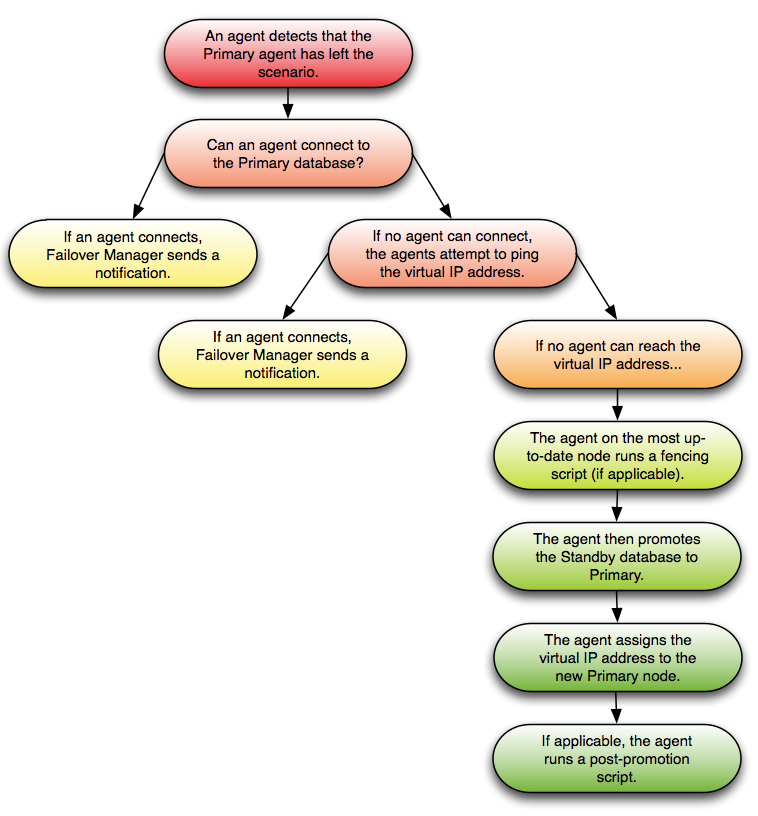
If an agent detects that the Primary agent has left, all agents attempt to connect directly to the Primary database. If any agent can connect to the database, an agent sends a notification about the failure of the Primary agent. If no agent can connect, the agents attempt to ping the virtual IP address (if applicable) to determine if it has been released.
If no agent can reach the virtual IP address or the database server, Failover Manager starts the failover process. The Standby agent on the most up-to-date node runs a fencing script (if applicable), promotes the Standby database to Primary database, and assigns the virtual IP address to the Standby node; if applicable, the agent runs a post-promotion script. Any additional Standby nodes are configured to replicate from the new primary unless auto.reconfigure is set to false.
If this scenario has occurred because the primary has been isolated from network, the Primary agent will detect the isolation and release the virtual IP address and create the recovery.conf file. Failover Manager will perform the previously listed steps on the remaining nodes of the cluster.
To recover from this scenario without restarting the entire cluster, you should:
- Restart the original Primary node.
- Bring the original Primary database up as a Standby node.
- Start the service on the original Primary node.
Please note that stopping an agent does not signal the cluster that the agent has failed.
If a primary Failover Manager process fails, there is no failover protection until the agent is restarted. To avoid such a case, you can set up the primary node through systemd to cause a failover when the primary agent exits. For more information, see the section Configuring for Eager Failover.
Standby Agent Exits or Node Fails
If a Standby agent exits or a Standby node fails, the other agents will detect that it is no longer connected to the cluster.
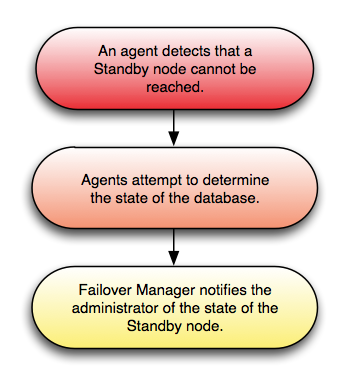
When the failure is detected, the agents attempt to contact the database that resides on the node; if the agents confirm that there is a problem, Failover Manager sends the appropriate notification to the administrator.
If there is only one Primary and one Standby remaining, there is no failover protection in the case of a Primary node failure. In the case of a Primary database failure, the Primary and Standby agents can agree that the database failed and proceed with failover.
Dedicated Witness Agent Exits / Node Fails
The following scenario details the actions taken if a dedicated Witness (a node that is not hosting a database) fails.
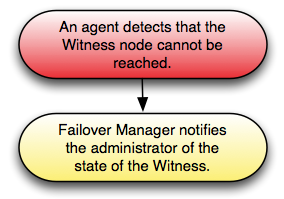
When an agent detects that the Witness node cannot be reached, Failover Manager notifies the administrator of the state of the Witness.
Note If the witness fails and the cluster only has two nodes, then there is no failover protection because the standby node has no way to know if the primary failed or was disconnected. In a two node cluster, if the primary database fails but the nodes are still connected, failover will still occur since the standby can confirm the condition of the primary database.
Nodes Become Isolated from the Cluster
The following scenario details the actions taken if one or more nodes (a minority of the cluster) become isolated from the majority of the cluster.
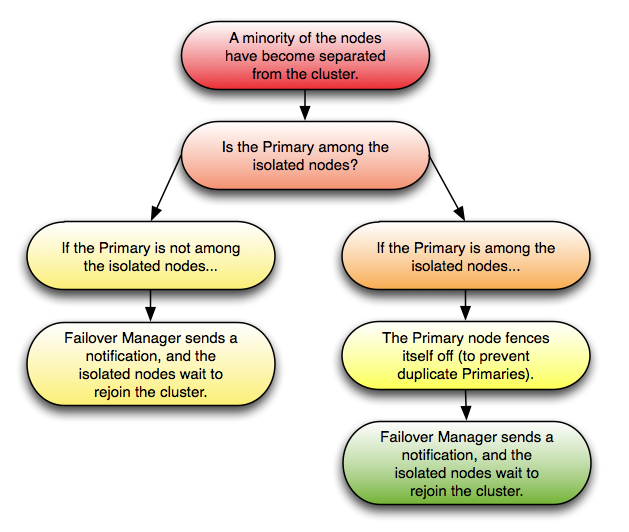
If one or more nodes (but less than half of the cluster) become isolated from the rest of the cluster, the remaining cluster behaves as if the nodes have failed. The agents attempt to discern if the Primary node is among the isolated nodes; it is, the Primary fences itself off from the cluster, while a Standby node (from within the cluster majority) is promoted to replace it. Other Standby nodes are configured to replicate from the new primary unless auto.reconfigure is set to false.
Failover Manager then notifies an administrator, and the isolated nodes rejoin the cluster when they are able. When the nodes rejoin the cluster, the failover priority may change.
Upgrading an Existing Cluster
Failover Manager provides a utility to assist you when upgrading a Failover Manager cluster. To upgrade an existing cluster, you must:
Install Failover Manager 4.2 on each node of the cluster. For detailed information about installing Failover Manager, see Installing Failover Manager.
After installing Failover Manager, invoke the
efm upgrade-confutility to create the.propertiesand.nodesfiles for Failover Manager 4.2. The Failover Manager installer installs the upgrade utility (efm upgrade-conf) to the/usr/edb/efm-4.2/bin directory. To invoke the utility, assume root privileges, and invoke the command:
efm upgrade-conf <cluster_name>The efm upgrade-conf utility locates the .properties and .nodes files of pre-existing clusters and copies the parameter values to a new configuration file for use by Failover Manager. The utility saves the updated copy of the configuration files in the /etc/edb/efm-4.2 directory.
- Modify the
.propertiesand.nodesfiles for EFM 4.2, specifying any new preferences. Use your choice of editor to modify any additional properties in the properties file (located in the/etc/edb/efm-4.2directory) before starting the service for that node. For detailed information about property settings, see The Cluster Properties File.
Note
db.binis a required property. When modifying the properties file, ensure that thedb.binproperty specifies the location of the Postgresbindirectory.
If you are using Eager Failover, you must disable it before stopping the EFM cluster. For more information, see Disabling Eager Failover.
Use a version-specific command to stop the old Failover Manager cluster; for example, you can use the following command to stop a version 4.1 cluster:
/usr/efm-4.1/bin/efm stop-cluster efm- Start the new Failover manager service (
edb-efm-4.2) on each node of the cluster.
The following example demonstrates invoking the upgrade utility to create the .properties and .nodes files for a Failover Manager installation:
[root@k8s-worker ~]# /usr/edb/efm-4.2/bin/efm upgrade-conf efm
Checking directory /etc/edb/efm-4.1
Processing efm.properties file

The following properties were added in addition to those in previous installed version:
priority.standbys
detach.on.agent.failure

Checking directory /etc/edb/efm-4.1
Processing efm.nodes file

Upgrade of files is finished. The owner and group for properties and nodes files have been set as 'efm'.
[root@k8s-worker ~]#
If you are using a Failover Manager configuration without sudo, include the -source flag and specify the name of the directory in which the configuration files reside when invoking upgrade-conf. If the directory is not the configuration default directory, the upgraded files will be created in the directory from which the upgrade-conf command was invoked.
Please note: If you are using a unit file, you must manually update the file to reflect the new Failover Manager service name when you perform an upgrade.
Uninstalling Failover Manager
After upgrading to Failover Manager 4.2, you can use your native package manager to remove previous installations of Failover Manager. For example, use the following command to remove Failover Manager 4.1 and any unneeded dependencies:
- On RHEL or CentOS 7.x:
yum remove edb-efm41- On RHEL or CentOS 8.x:
dnf remove edb-efm41- On Debian or Ubuntu:
apt-get remove edb-efm41- On SLES:
zypper remove edb-efm41Performing a Database Update (Minor Version)
This section describes how to perform a quick minor database version upgrade. You can use the steps that follow to upgrade from one minor version to another (for example, from 10.1.5 to version 10.2.7), or to apply a patch release for a version.
You should first update the database server on each Standby node of the Failover Manager cluster. Then, perform a switchover, promoting a Standby node to the role of Primary within the Failover Manager cluster. Then, perform a database update on the old primary node.
On each node of the cluster you must perform the following steps to update the database server:
- Stop the Failover Manager agent.
- Stop the database server.
- Update the database server.
- Start the database service.
- Start the Failover Manager agent.
For detailed information about controlling the Advanced Server service, or upgrading your version of Advanced Server, please see the EDB Postgres Advanced Server Guide, available at:
https://www.enterprisedb.com/docs
When your updates are complete, you can use the efm set-priority command to add the old primary to the front of the standby list (if needed), and then switchover to return the cluster to its original state.
Troubleshooting
Authorization file not found. Is the local agent running?
If you invoke an EFM cluster management command and EFM is not running on the node, the efm command will display an error:
Authorization file not found. Is the local agent running?Not authorized to run this command. User ‘<os user>’ is not a member of the `efm` group.
You must have special privileges to invoke some of the efm commands documented in Using the efm Utility. If these commands are invoked by a user who isn’t authorized to run them, the efm command will display an error:
Not authorized to run this command. User '<os user>' is not a member of the `efm` group.Notification; Unexpected error message
If you receive a notification message about an unexpected error message, check the Failover Manager log file for an OutOfMemory message. Failover Manager runs with the default memory value set by this property:
# Extra information that will be passed to the JVM when starting the agent.
jvm.options=-Xmx128m
If you are running with less than 128 megabytes allocated, you should increase the value and restart the Failover Manager agent.
Confirming the OpenJDK version
Failover Manager is tested with OpenJDK; we strongly recommend using OpenJDK. You can use the following command to check the type of your Java installation:
# java -version
openjdk version "1.8.0_191"
OpenJDK Runtime Environment (build 1.8.0_191-b12)
OpenJDK 64-Bit Server VM (build 25.191-b12, mixed mode)
Configuring Streaming Replication
Configuring a replication scenario can be complex; for detailed information about configuration options, please see the PostgreSQL core documentation, available at:
https://www.postgresql.org/docs/current/static/warm-standby.html#streaming-replication
You may want to use a .pgpass file to enable md5 authentication for the replication user – this may or may not be the safest authentication method for your environment. For more information about the supported authentication options, please see the PostgreSQL core documentation at:
https://www.postgresql.org/docs/current/static/client-authentication.html
Note From Version 3.10 onwards, EFM uses
pg_ctlutility for standby promotion. You do not need to set thetrigger_fileorpromote_trigger_fileparameter for promotion of a standby server.
Limited Support for Cascading Replication
While Failover Manager does not provide full support for cascading replication, it does provide limited support for simple failover in a cascading replication scenario. Cascading replication allows a Standby node to stream to another Standby node, reducing the number of connections (and processing overhead) to the primary node.
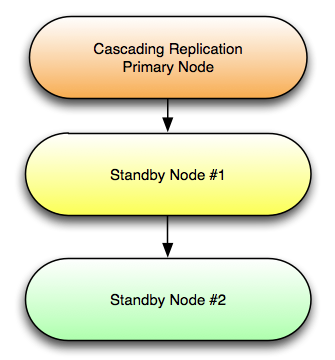
For detailed information about configuring cascading replication, please see the PostgreSQL documentation at:
https://www.postgresql.org/docs/current/static/warm-standby.html#cascading-replication
To use Failover Manager in a cascading replication scenario, you should modify the cluster properties file, setting the following property values on Standby Node #2:
promotable=false
auto.reconfigure=false
In the event of a Failover, Standby Node #1 will be promoted to the role of Primary node. Should failover occur, Standby Node #2 will continue to act as a read-only replica for the new Primary node until you take actions to manually reconfigure the replication scenario to contain 3 nodes.
In the event of a failure of Standby Node #1, you will not have failover protection, but you will receive an email notifying you of the failure of the node.
Note Performing a switchover and switch back to the original primary may not preserve the cascading replication scenario.
Configuring SSL Authentication on a Failover Manager Cluster
The following steps enable SSL authentication for Failover Manager. Note that all connecting clients will be required to use SSL authentication when connecting to any database server within the cluster; you will be required to modify the connection methods currently used by existing clients.
To enable SSL on a Failover Manager cluster, you must:
Place a
server.crtandserver.keyfile in thedatadirectory (under your Advanced Server installation). You can purchase a certificate signed by an authority, or create your own self-signed certificate. For information about creating a self-signed certificate, see the PostgreSQL core documentation at:https://www.postgresql.org/docs/10/static/ssl-tcp.html#ssl-certificate-creation
Modify the
postgresql.conffile on each database within the Failover Manager cluster, enabling SSL:
ssl=onAfter modifying the postgresql.conf file, you must restart the server.
- Modify the
pg_hba.conffile on each node of the Failover Manager cluster, adding the following line to the beginning of the file:
hostnossl all all all rejectThe line instructs the server to reject any connections that are not using SSL authentication; this enforces SSL authentication for any connecting clients. For information about modifying the pg_hba.conf file, see the PostgreSQL core documentation at:
https://www.postgresql.org/docs/10/static/auth-pg-hba-conf.html
- After placing the server.crt and server.key file in the data directory, convert the certificate to a form that Java understands; you can use the command:
openssl x509 -in server.crt -out server.crt.der -outform derFor more information, visit:
https://jdbc.postgresql.org/documentation/94/ssl-client.html
- Then, add the certificate to the Java trusted certificates file:
keytool -keystore $JAVA_HOME/lib/security/cacerts -alias <alias_name> -import -file server.crt.derWhere
$JAVA_HOMEis the home directory of your Java installation.<alias_name> can be any string, but must be unique for each certificate.
You can use the
keytoolcommand to review a list of the available certificates or retrieve information about a specific certificate. For more information about using the keytool command, enter:man keytool
The certificate from each database server must be imported into the trusted certificates file of each agent. Note that the location of the cacerts file may vary on each system. For more information, visit:
https://jdbc.postgresql.org/documentation/94/ssl-client.html
- Modify the efm.properties file on each node within the cluster, setting the
jdbc.sslmodeproperty.