High Availability & Scalability Guide 4.2
EnterpriseDB
High Availability & Scalability Guide
Since high-availability and read scalability are not part of the core feature set of EDB Postgres Advanced Server, Advanced Server relies on external tools to provide this functionality. This document focuses on the functionality provided by EDB Failover Manager and Pgpool-II, and discusses the implications of a high-availability architecture formed around these tools.
introduction architecture components_ha_pgpool appendix_a appendix_b conclusion
Architecture Overview
This guide explains how to configure Failover Manager and Pgpool best to leverage the benefits that they provide for Advanced Server. Using the reference architecture described in the Architecture section, you can learn how to achieve high availability by implementing an automatic failover mechanism (with Failover Manager) while scaling the system for larger workloads and an increased number of concurrent clients with read-intensive or mixed workloads to achieve horizontal scaling/read-scalability (with Pgpool).
The architecture described in this document has been developed and tested for EFM 4.2, EDB pgPool 4.2, and Advanced Server 13.
Documentation for Advanced Server and Failover Manager are available from EnterpriseDB at:
https://www.enterprisedb.com/docs/
Documentation for pgPool-II can be found at:
http://www.pgpool.net/docs/latest/en/html
Failover Manager Overview
Failover Manager is a high-availability module that monitors the health of a Postgres streaming replication cluster and verifies failures quickly. When a database failure occurs, Failover Manager can automatically promote a streaming replication Standby node into a writable Primary node to ensure continued performance and protect against data loss with minimal service interruption.
Basic EFM Architecture Terminology
A Failover Manager cluster is comprised of EFM processes that reside on the following hosts on a network:
- A Primary node is the Primary database server that is servicing database clients.
- One or more Standby nodes are streaming replication servers associated with the Primary node.
- The Witness node confirms assertions of either the Primary or a Standby in a failover scenario. If, during a failure situation, the Primary finds itself in a partition with half or more of the nodes, it will stay Primary. As such, EFM supports running in a cluster with an even number of agents.
Pgpool-II Overview
Pgpool-II (Pgpool) is an open-source application that provides connection pooling and load balancing for horizontal scalability of SELECT queries on multiple Standbys in EPAS and community Postgres clusters. For every backend, a backend_weight parameter can set the ratio of read traffic to be directed to the backend node. To prevent read traffic on the Primary node, the backend_weight parameter can be set to 0. In such cases, data modification language (DML) queries (i.e., INSERT, UPDATE, and DELETE) will still be sent to the Primary node, while read queries are load-balanced to the Standbys, providing scalability with mixed and read-intensive workloads.
EnterpriseDB supports the following Pgpool functionality:
- Load balancing
- Connection pooling
- High availability
- Connection limits
PCP Overview
Pgpool provides an interface called PCP for administrators that performs management operations such as retrieving the status of Pgpool or terminating Pgpool processes remotely. PCP commands are UNIX commands that manipulate Pgpool via the network.
Pgpool Watchdog
watchdog is an optional sub process of Pgpool that provides a high availability feature. Features added by watchdog include:
- Health checking of the pgpool service
- Mutual monitoring of other watchdog processes
- Changing leader/Standby state if certain faults are detected
- Automatic virtual IP address assigning synchronous to server switching
- Automatic registration of a server as a Standby during recovery
More information about the Pgpool watchdog component can be found at:
http://www.pgpool.net/docs/latest/en/html/tutorial-watchdog.html
Architecture
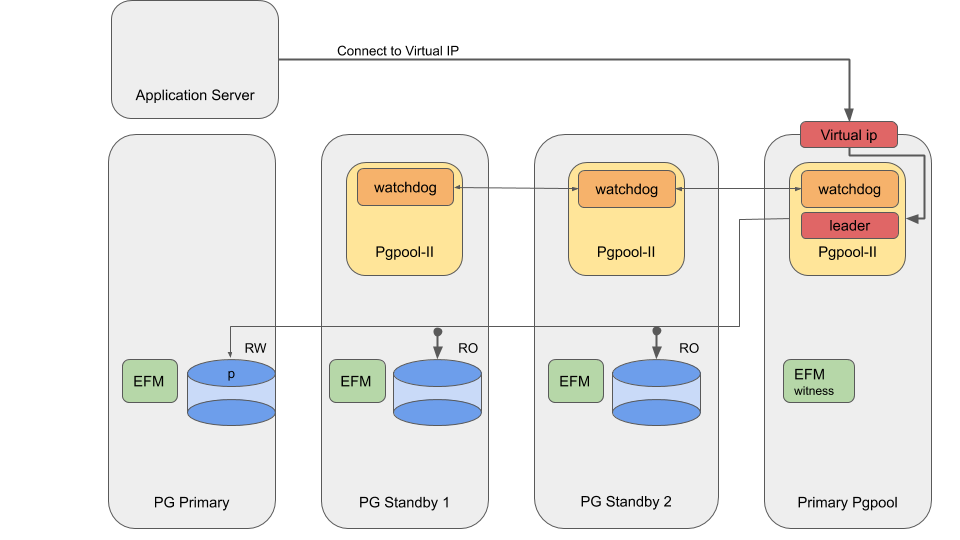
The sample architecture diagram shows four nodes as described in the table below:
| Systems | Components |
|---|---|
| Primary Pgpool/EFM witness node | The Primary Pgpool node will only run Pgpool, and EFM witness, as such leaving as much resources available to Pgpool as possible. During normal runmode (no Pgpool Failovers), the Primary Pgpool node has attached the Virtual IP address, and all applications connect through the Virtual IP address to Pgpool. Pgpool will forward all write traffic to the Primary Database node, and will balance all read across all Standby nodes.On the Primary Pgpool node, the EFM witness process ensures that a minimum quota of three EFM agents remains available even if one of the database nodes fails. Some examples are when a node is already unavailable due to maintenance, or failure, and another failure occurs. |
| Primary Database node | The Primary Database node will only run Postgres (Primary)and EFM, leaving all resources to Postgres. Read/Write traffic (i.e., INSERT, UPDATE, DELETE) is forwarded to this node by the Primary Pgpool node. |
| Standby nodes | The Standby nodes are running Postgres (Standby), EFM and an inactive Pgpool process. In case of a Primary database failure, EFM will promote Postgres on one of these Standby nodes to handle read-write traffic. In case of a Primary Pgpool failure, the Pgpool watchdog will activate Pgpool on one of the Standby nodes which will attach the VIP, and handle the forwarding of the application connections to the Database nodes. Note that in a double failure situation (both the Primary Pgpool node and the Primary Database node are in failure), both of these Primary processes might end up on the same node. |
This architecture:
- Achieves high availability by providing two Standbys that can be promoted in case of a Primary Postgres node failure.
- Achieves high availability by providing at least three Pgpool processes in a watchdog configuration.
- Increases performance with mixed and read-intensive workloads by introducing increased read scalability with more than one Standby for load balancing.
- Reduces load on the Primary database node by redirecting read-only traffic with the Primary pgpool node.
- Prevents resource contention between Pgpool and Postgres on the Primary Database node. By not running Pgpool on the Primary database node, the Primary Postgres process can utilize as much resources as possible.
- Prevents resource contention between pgpool and Postgres on the Primary Pgpool node. By not running Standby databases on the Primary Pgpool node, Pgpool can utilize as many resources as possible.
- Optionally, synchronous replication can be set up to achieve near-zero data loss in a failure event.
Note The architecture also allows us to completely separate 3 virtual machines running Postgres from 3 virtual machines running Pgpool. This kind of setup requires 2 extra virtual machines, but it is a better choice if you want to prevent resource contention between Pgpool and Postgres in Failover scenarios. In this setup, the architecture can run without an extra 7th node running the EFM Witness Process. To increase failure resolution efm witness agents could be deployed on the Pgpool servers.
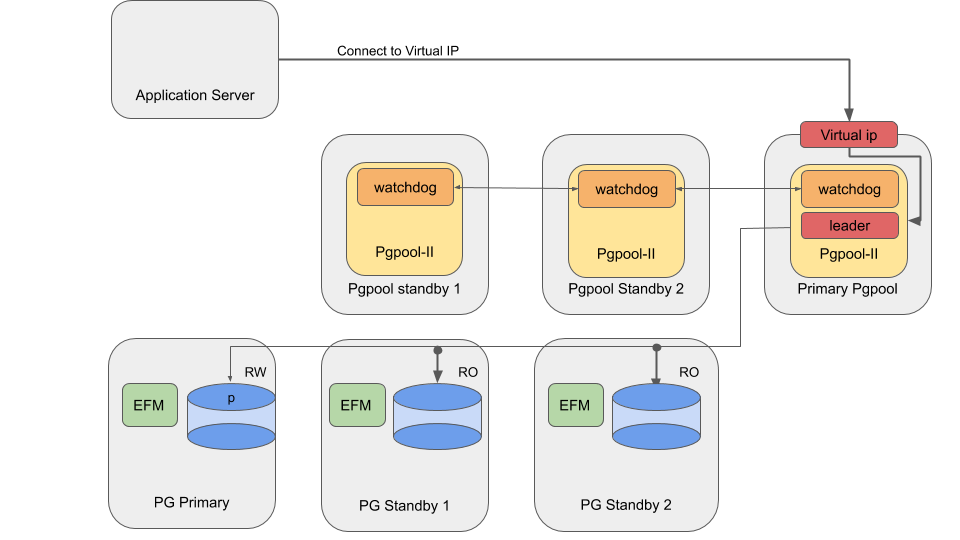
Implementing High Availability with Pgpool
Failover Manager monitors the health of Postgres nodes; in the event of a database failure, Failover Manager performs an automatic failover to a Standby node. Note that Pgpool does not monitor the health of backend nodes and will not perform failover to any Standby nodes.
Configuring Failover Manager
Failover Manager provides functionality that will remove failed database nodes from Pgpool load balancing; it can also re-attach nodes to Pgpool when returned to the Failover Manager cluster. To configure EFM for high availability using Pgpool, you must set the following properties in the cluster properties file:
pgpool.enable = true/false
pcp.user = User that would be invoking PCP commands
pcp.host = Virtual IP that would be used by pgpool. Same as pgpool parameter 'delegate_IP’
pcp.port = The port on which pgpool listens for pcp commands
pcp.pass.file = Absolute path of PCPPASSFILE
pgpool.bin = Absolute path of pgpool bin directory
Configuring Pgpool
The section lists the configuration of some important parameters in the pgpool.conf file to integrate the Pgpool-II with EFM.
Backend node setting
There are three PostgreSQL backend nodes, one Primary and two Standby nodes. Configure using backend_* configuration parameters in pgpool.conf, and use the equal backend weights for all nodes. This will make the read queries to be distributed equally among all nodes.
backend_hostname0 = ‘server1_IP'
backend_port0 = 5444
backend_weight0 = 1
backend_flag0 = 'DISALLOW_TO_FAILOVER'

backend_hostname1 = ‘server2_IP'
backend_port1 = 5444
backend_weight1 = 1
backend_flag1 = 'DISALLOW_TO_FAILOVER'

backend_hostname2 = ‘server3_IP'
backend_port2 = 5444
backend_weight2 = 1
backend_flag2 = 'DISALLOW_TO_FAILOVER'
Enable Load-balancing and streaming replication mode
Set the following configuration parameter in the pgpool.conf file to enable load balancing and streaming replication mode
master_slave_mode = on
master_slave_sub_mode = 'stream'
load_balance_mode = on
Disable health-checking and failover
Health-checking and failover must be handled by EFM and hence, these must be disabled on Pgpool-II side. To disable the health-check and failover on pgpool-II side, assign the following values:
health_check_period = 0
fail_over_on_backend_error = off
failover_if_affected_tuples_mismatch = off
failover_command = ‘’
failback_command = ‘’
Ensure the following while setting up the values in the pgpool.conf file:
- Keep the value of wd_priority in pgpool.conf different on each node. The node with the highest value gets the highest priority.
- The properties backend_hostname0 , backend_hostname1, backend_hostname2 and so on are shared properties (in EFM terms) and should hold the same value for all the nodes in pgpool.conf file.
- Update the correct interface value in if_ * and arping cmd props in the pgpool.conf file.
- Add the properties heartbeat_destination0, heartbeat_destination1, heartbeat_destination2 etc. as per the number of nodes in pgpool.conf file on every node. Here heartbeat_destination0 should be the ip/hostname of the local node.
Setting up PCP
Script uses the PCP interface, So we need to set up the PCP and .PCPPASS file to allow PCP connections without password prompt.
setup PCP: http://www.pgpool.net/docs/latest/en/html/configuring-pcp-conf.html
setup PCPPASS: https://www.pgpool.net/docs/latest/en/html/pcp-commands.html
Note that the load-balancing is turned on to ensure read scalability by distributing read traffic across the standby nodes
The health checking and error-triggered backend failover have been turned off, as Failover Manager will be responsible for performing health checks and triggering failover. It is not advisable for Pgpool to perform health checking in this case, so as not to create a conflict with Failover Manager, or prematurely perform failover.
Finally, search_primary_node_timeout has been set to a low value to ensure prompt recovery of Pgpool services upon an Failover Manager-triggered failover.
Virtual IP Addresses
Both Pgpool-II and Failover Manager provide functionality to employ a virtual IP for seamless failover. While both provide this capability, the pgpool-II leader is the process that receives the Application connections through the Virtual IP. As in this design, such Virtual IP management is performed by the Pgpool-II watchdog system. EFM VIP has no beneficial effect in this design and it must be disabled.
Note that in a failure situation of the active instance of Pgpool (The Primary Pgpool Server in our sample architecture), the next available Standby Pgpool instance (according to watchdog priority) will be activated and takes charge as the leader Pgpool instance.
Configuring Pgpool-II Watchdog
Watchdog provides the high availability of Pgpool-II nodes. This section lists the configuration required for watchdog on each Pgpool-II node.
Common watchdog configurations on all Pgpool nodes
The following configuration parameters enable and configure the watchdog. The interval and retry values can be adjusted depending upon the requirements and testing results.
use_watchdog = on # enable watchdog
wd_port = 9000 # watchdog port, can be changed
delegate_IP = ‘Virtual IP address’
wd_lifecheck_method = 'heartbeat'
wd_interval = 10 # we can lower this value for quick detection
wd_life_point = 3
# virtual IP control
ifconfig_path = '/sbin' # ifconfig command path
if_up_cmd = 'ifconfig eth0:0 inet $_IP_$ netmask 255.255.255.0'
                                     # startup delegate IP command
if_down_cmd = 'ifconfig eth0:0 down' # shutdown delegate IP command
arping_path = '/usr/sbin'            # arping command path
Note Replace the value of eth0 with the network interface on your system. See Chapter 5 for tuning the number of connections, and pooling configuration.
Watchdog configurations on server 2
other_pgpool_hostname0 = 'server 3 IP/hostname'
other_pgpool_port0 = 9999
other_wd_port0 = 9000
other_pgpool_hostname1 = 'server 4 IP/hostname'
other_pgpool_port1 = 9999
other_wd_port1 = 9000
wd_priority = 1
Watchdog configurations on server 3
other_pgpool_hostname0 = 'server 2 IP/hostname'
other_pgpool_port0 = 9999
other_wd_port0 = 9000
other_pgpool_hostname1 = 'server 4 IP/hostname'
other_pgpool_port1 = 9999
other_wd_port1 = 9000
wd_priority = 3
Watchdog configurations on server 4
other_pgpool_hostname0 = 'server 2 IP/hostname'
other_pgpool_port0 = 9999
other_wd_port0 = 9000
other_pgpool_hostname1 = 'server 3 IP/hostname'
other_pgpool_port1 = 9999
other_wd_port1 = 9000
wd_priority = 5 # use high watchdog priority on server 4
EFM Pgpool Integration Using Azure Network Load Balancer
This section describes a specific use case for EFM Pgpool integration, where the database, EFM, and Pgpool are installed on CentOS 8 Virtual Machines in Azure. For this specific use case, Azure Load Balancer (LNB) has been used to distribute the traffic amongst all the active Pgpool Instances instead of directing the traffic using Pgpool VIP.
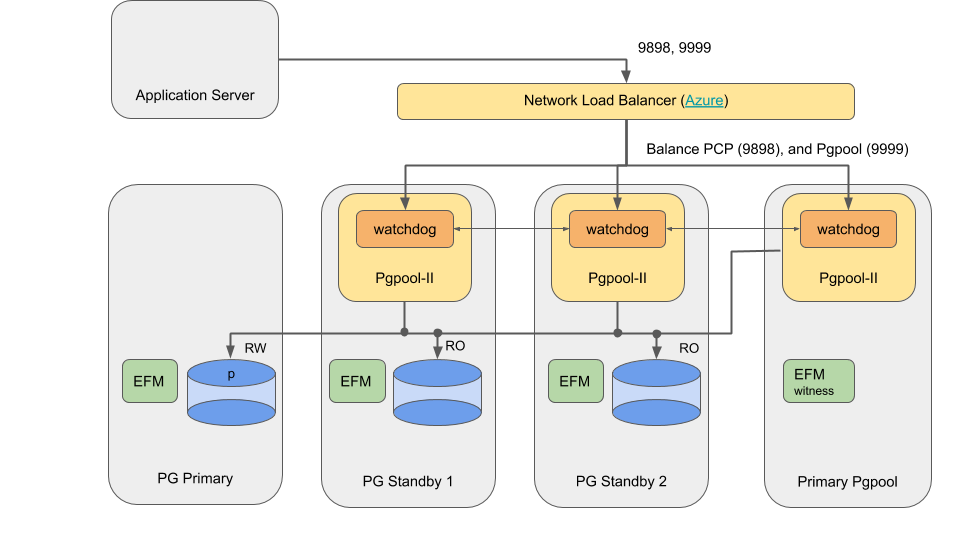
Step 1 (Installation):
Install and configure Advanced Server database, EFM, and Pgpool on Azure Virtual Machines as following:
| Systems | Components |
|---|---|
| Primary | Primary node running Advanced Server 13 and Failover Manager 4.2 |
| Standby 1 | Standby node running Advanced Server 13, Failover Manager 4.2, and Pgpool 4.2. |
| Standby 2 | Standby node running Advanced Server 13, Failover Manager 4.2, and Pgpool 4.2. |
| Witness | Witness node running Failover Manager 4.2 and Pgpool 4.2. |
Step 2 (Pgpool configuration):
Configure Pgpool as per the steps given in chapter 3 (except for delegate_ip, which should be left empty in this architecture).
Step 3 (Azure Load Balancer configuration):
You need to do the following configuration for using Azure NLB:
Networking: You need to ensure the following settings for Network Load Balancer and for each of the virtual machines: Assign Public IP as well as private IP to the NLB, and only private IP to the virtual machines. The application server should connect to the NLB over public IP and NLB in turn should connect to the virtual machines over private IPs.
In the current scenario, following are the IP addresses assigned to each component:
- Public IP of NLB : 40.76.240.33 (pcp.host)
- Private IP of Primarydb : 172.16.1.3 (note that this is not part of the backend pool of the Load Balancer)
- Private IP of Standby 1 : 172.16.1.4
- Private IP of Standby 2 : 172.16.1.5
- Private IP of witness node: 172.16.1.6
Ensure that the ports required to run the database, EFM, and Pgpool are open for communication. Following is the list of default ports for each of these component (you can customize the ports for your environment):
- Database: 5444
- EFM: 7800 (bind.address)
- Pgpool: 9000, 9694, 9898, 9999
Backend pool: Create a Backend pool consisting of all the 3 virtual machines running Pgpool instances. Use the private IPs of the virtual machines to create the Backend pool.
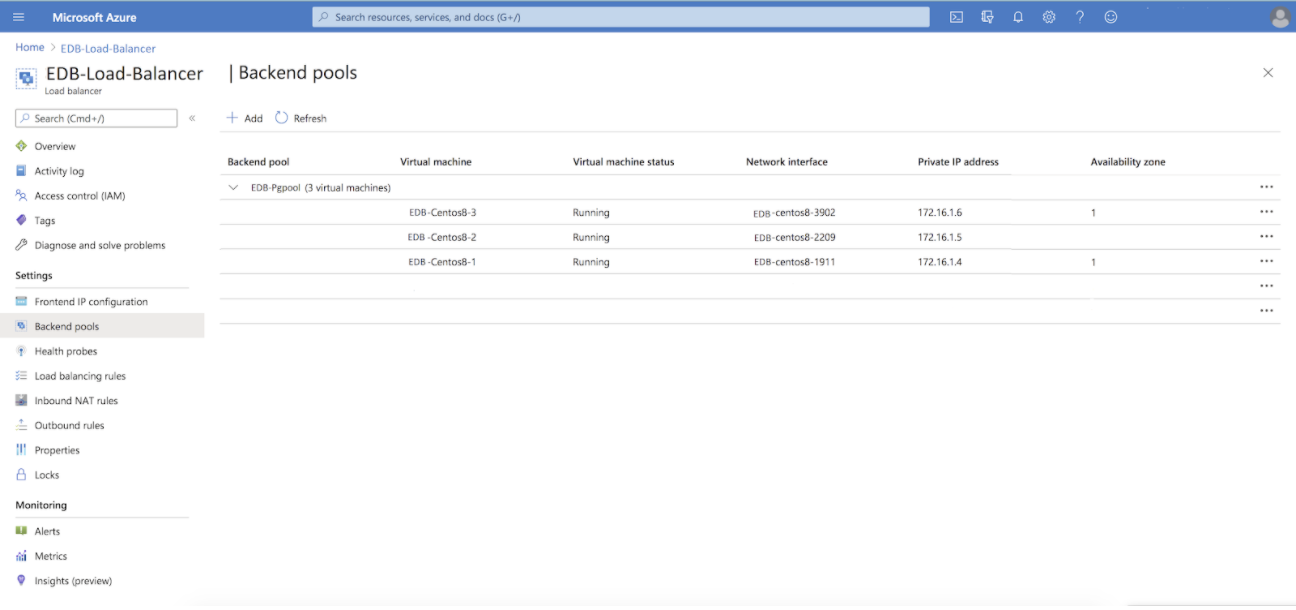
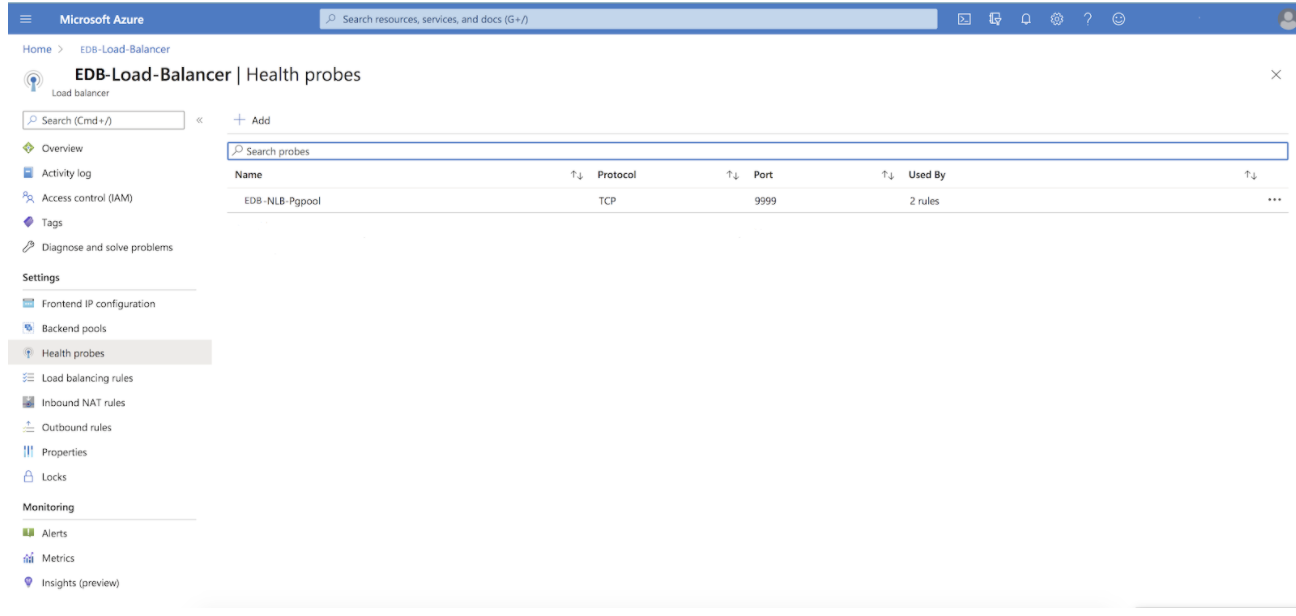
Health Probe: Add a health probe to check if the Pgpool instance is available on the virtual machines. The health probe periodically pings the virtual machines of the Backend pool on port 9999. If it does not receive any response from any of the virtual machines, it assumes that the Pgpool instance is not available and hence stops sending traffic towards that particular machine.
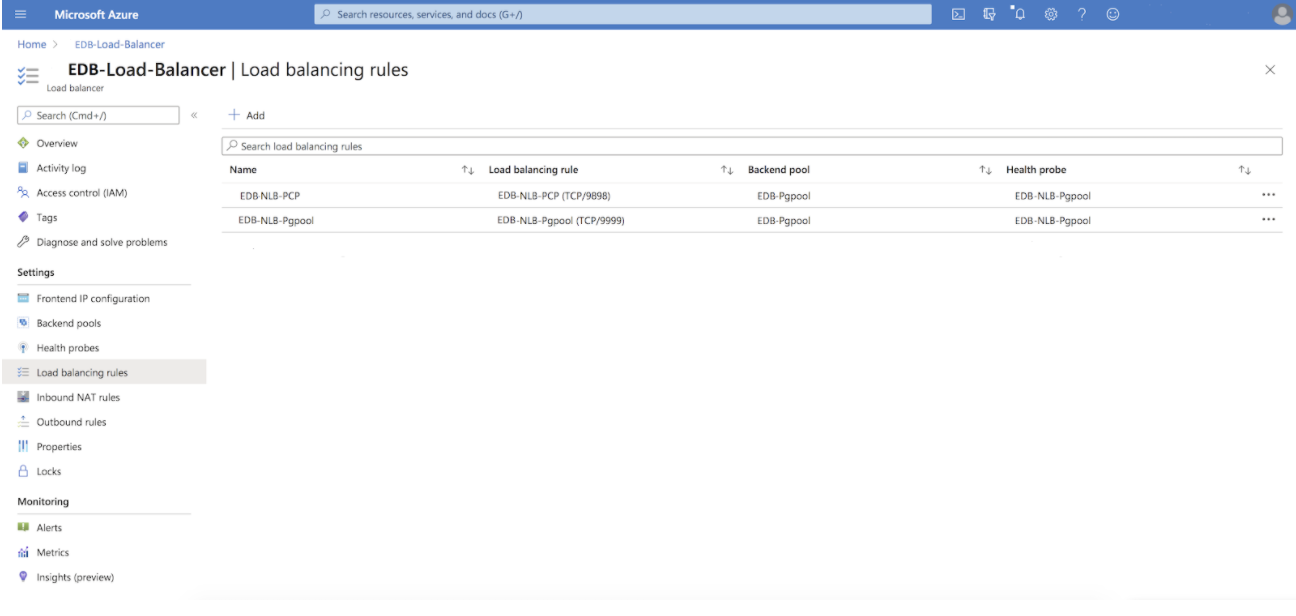
Load balancing rules: Add two Load balancing rules - one each for port 9898 and port 9999. These rules should ensure that the network traffic coming towards that particular port gets distributed evenly among all the virtual machines present in the Backend pool.
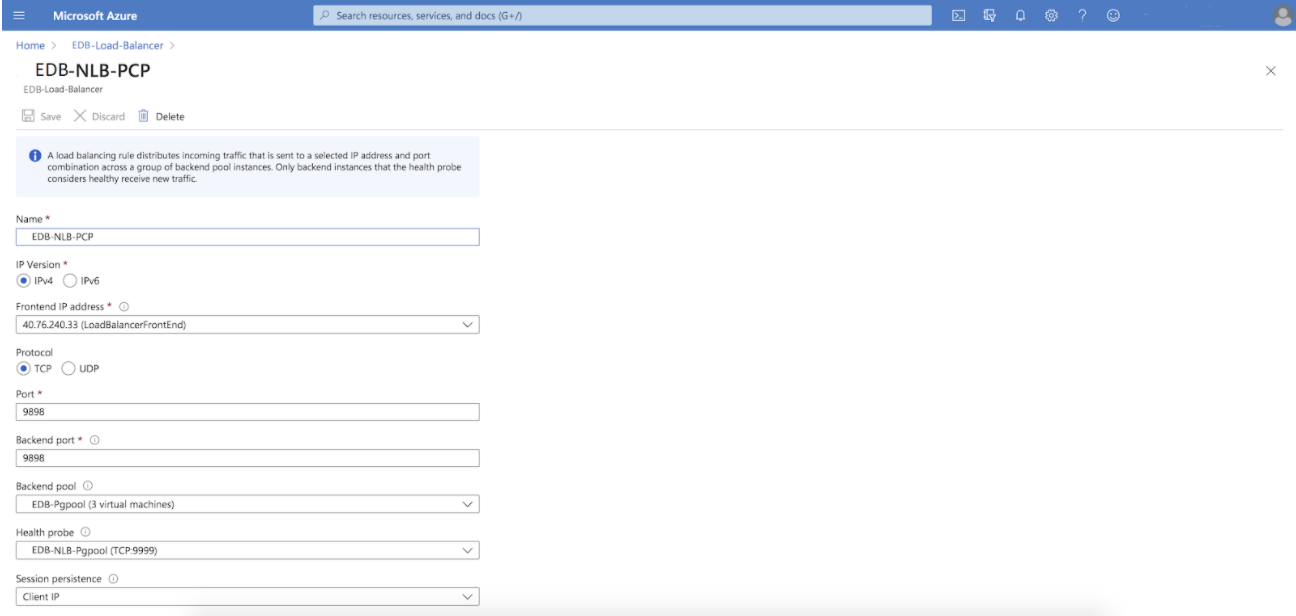
- Rule created for port 9999 (i.e. PCP port)
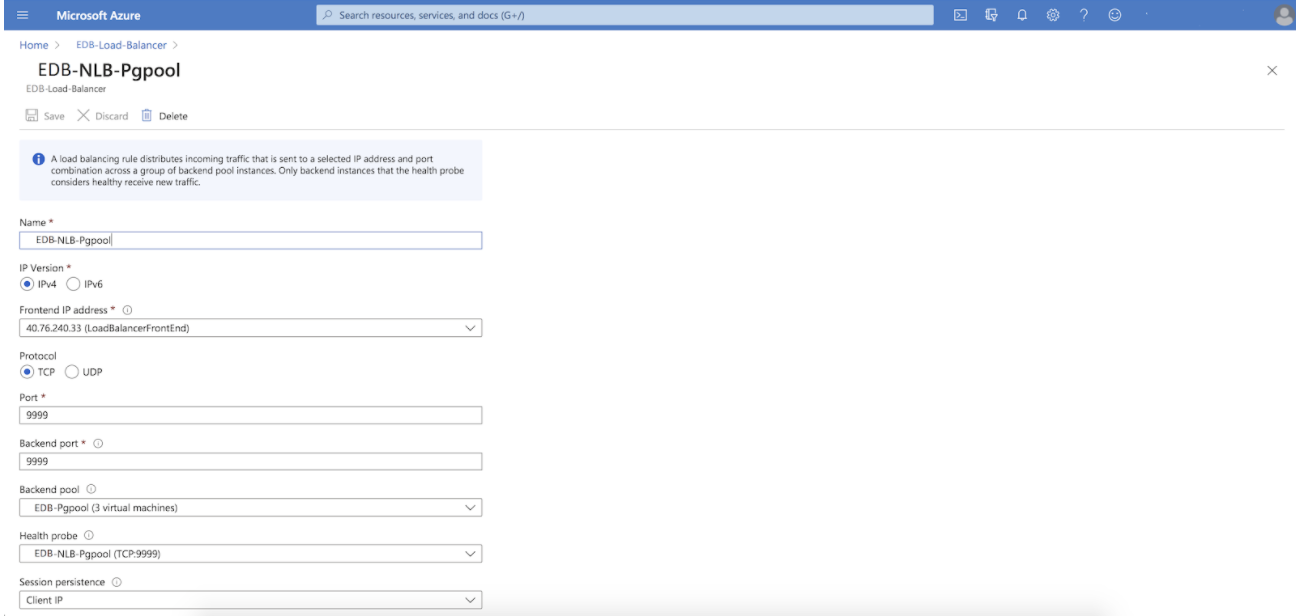
- Rule created for port 9999 (i.e. Pgpool port)
After configuration of the above-mentioned setup, you can connect to Postgres on the IP address of the Network Load Balancer on port 9999. If a failure occurs on the Primary database server, EFM will promote a new Primary and then reconfigure Pgpool to redistribute traffic. If any one of the Pgpool processes is not available to accept traffic anymore, the Network Load Balancer will redistribute all the traffic to the remaining two Pgpool processes. Make sure that listen_backlog_multiplier is tuned to compensate for the higher number of connections in case of failover.
Configuration for Number of Connections and Pooling
Pgpool has some configuration to tune the pooling and connection processing. Depending on this configuration, also the Postgres configuration for max_connections should be set to make sure all connections can be accepted as required. Furthermore, note that the Cloud Architecture works with active/active instances, which requires to spread num_init_children over all Pgpool instances (divide the normally used value by the number of active instances). The below text describes the effect of changing the configuration, and advises values for both the on-premise and the Cloud architecture.
max_pool: Generally, it is advised to set max_pool to 1. Alternatively, for applications with a lot of reconnects, max_pool can be set to the number of distinct combinations of users, databases and connection options for the application connections. All but one connection in the pool would be stale connections, which consumes a connection slot from Postgres, without adding to performance. It is therefore advised not to configure max_pool beyond 4 to preserve a healthy ratio between active and stale connections. As an example, for an application which constantly reconnects and uses 2 distinct users both connecting to their own database, set it to 2. If both users would be able to connect to both databases set it to 4. Note that increasing max_pool requires to tune down num_init_children in Pgpool, or tune up max_connections in Postgres.
num_init_children: It is advised to set num_init_children to the number of connections that could be running active in parallel, but the value should be divided by the number of active Pgpool-II instances (one with the on-premise architecture, and all instances for the cloud architecture). As an example: In an architecture with 3 Pgpool instances, to allow the application to have 100 active connections in parallel, set num_init_children to 100 for the on-premise architecture, and set num_init_children to 33 for the cloud architecture. Note that increasing num_init_children generally requires to tune up max_connections in Postgres.
listen_backlog_multiplier: Can be set to multiply the number of open connections (as perceived by the application) with the number of active connections (num_init_children). As an example, when the application might open 500 connections of which 100 should be active in parallel, with the on-premise architecture, num_init_children should be set to 100, and listen_backlog_multiplier should be set to 4. This setup can process 100 connections active in parallel, and another 400 (listen_backlog_multiplier*num_init_children) connections will be queued before connections will be blocked. The application would perceive a total of 500 open connections, and Postgres would process the load of 100 connections maximum at all times. Note that increasing listen_backlog_multiplier only causes the application to perceive more connections, but will not increase the number of parallel active connections (which is determined by num_init_children).
max_connections: It is advised to set max_connections in Postgres higher than [number of active pgpool instances]*[max_pool]*[num_init_children] + [superuser_reserved_connections] (Postgres). As an example: in the on-premise setup with 3 instances active/passive, max_pool set to 2, num_init_children set to 100, and superuser_reserved_connections (Postgres) set to 5, Postgres max_connections should be set equal or higher then [1*2*100+5] which is 205 connections or higher. A similar setup in the cloud setup would run with 3 active instances, max_pool set to 2, num_init_children set to 33, and superuser_reserved_connections (Postgres) set to 5, in which case Postgres max_connections should be set equal or higher than [3*2*33+5] which is 203 or higher. Note that configuring below the advised setting can cause issues opening new connections, and in a combination with max_pool can cause unexpected behaviour (low or no active connections but still connection issues due to stale pooled connections using connection slots from Postgres. For more information on the relation between num_init_children, max_pool and max_connections, see this background information.