Migration Portal 3.1
EnterpriseDB
EDB Postgres Migration Portal
Migration Portal is a web-based service for migrating Oracle database schemas to the EDB Postgres platform. The Migration Portal assesses and analyzes Oracle database schemas and converts types, tables, sequences, constraints, triggers, views, stored procedures, packages, database links (dblinks), materialized views, and indexes, producing DDLs compatible with EDB Postgres Advanced Server.
The user-friendly portal interface simplifies the assessment and migration process. Log in to the portal and start with the migration process.
The Migration Portal guide provides a high-level description of the steps involved in the migration process. The guide also includes solutions to common migration problems and details of unsupported features and their potential workarounds.
EnterpriseDB has helped companies migrate their existing database systems to Postgres for years. For more information, visit the EnterpriseDB website at: https://www.edbpostgres.com/
whats_new supported_platforms mp_using_portal mp_migrating_database mp_advanced_data_migration
What’s New
The following enhancements are added to the Migration Portal for the release 3.1.0:
Asynchronous/Parallel assessment
You can now create multiple projects and run the assessments in parallel, getting notified once the assessment completes. Also, use multiple browser tabs to work on projects simultaneously.
Restructured schema assessment report for enhanced readability along with consolidated information about the incompatible function/package
Refined object search and filter experience along with other UI enhancements
Starting this release, Migration Portal detects function/procedure names from the packages which are not supported in EPAS, for example,
'Incompatible function/package found : UTL_FILE.GET_RAW', giving a better understanding of error and the migration efforts required.
Updated Repair Handler
Repair handlers convert Oracle syntax to Postgres-compatible syntax so that you don’t have to do it manually.
ERH-2055 - UNSUPPORTED_USING_INDEX_CLAUSE
Updated the repair handler such that it does not remove GLOBAL indexes from the table definition
ERH-1012 - INSERT_STATEMENT_ALIAS
Modified the repair handler as it was not firing for scenarios where INSERT statements contained the SELECT statement
ERH-2090 - CONVERT_FUNCTION
Enhanced the performance for large DDLs
ERH-2027 - SESSION_GLOBAL_SEQUENCE
Enhanced the accuracy so that it functions correctly for edge case DDLs
ERH-2079 - GLOBAL_PARTITIONED_INDEX
Removed this so that Global Partitioned Indexes will not be removed
Knowledge Base
Knowledge base entries provide workarounds or solutions for the objects that fail during an assessment. You can view and apply the knowledge base solutions to reassess the fail objects.
New Knowledge Base entries
Following are the new knowledge base entries added:
Workaround for Oracle SQLERRM function
The
SQLERRM()function returns the error message associated with the most recently raised error exception. You may use Advanced Server supportedSQLCODEandSQLERRMvariables in the exception block to get similar results.Workaround for Oracle SQLCODE function
In PL/SQL blocks, the
SQLCODEcan be used for getting numeric code of exception, in Advanced Server you can create custom function which can return numeric value of error.Value assignment with %type operator for TYPE definition inside package
This syntax is supported starting with Advanced Server v12, hence we recommend upgrading to Advanced Server v12 or above to resolve this error.
Global Indexes
Global Indexes map one index to multiple partitioned tables. There can be multiple workarounds, for example, aligning partitioning keys across all referencing and referenced tables.
Workaround for NESTED Table
In Advanced Server,
ARRAYcan be used to achieve the same kind of functionality.Method Overloading
In Oracle, users can overload the method inside the package by changing the name of the arguments. In Advanced Server, users should change the argument type to overload a method.
Supported Platforms
The Migration Portal supports assessment and migration from Oracle 11g and 12c to EDB Postgres Advanced Server 10, 11, 12, or 13. Migration Portal is supported on the following browsers and operating systems:
Supported Browsers
For the best user experience, we recommend using the Google Chrome browser. Migration Portal is also supported on the following browsers:
| Browser | Supported Version |
|---|---|
| Apple Safari on Macintosh OS | 11 and above |
| Google Chrome | 68 and above |
| Microsoft Edge | 42 and above |
| Mozilla Firefox | 60 and above |
Supported Operating Systems
| Operating Systems | Supported Version |
|---|---|
| Macintosh | OS X Sierra |
| Windows | 10 |
| Linux | CentOS 7 |
Using Migration Portal
Migration Portal allows you to easily migrate your database schema from Oracle to EDB Postgres Advanced Server. You can upload schemas for assessment and get immediate feedback and suggestions. The portal allows you to download assessed DDLs for all objects and create your EDB Postgres database on-premises or in the cloud.
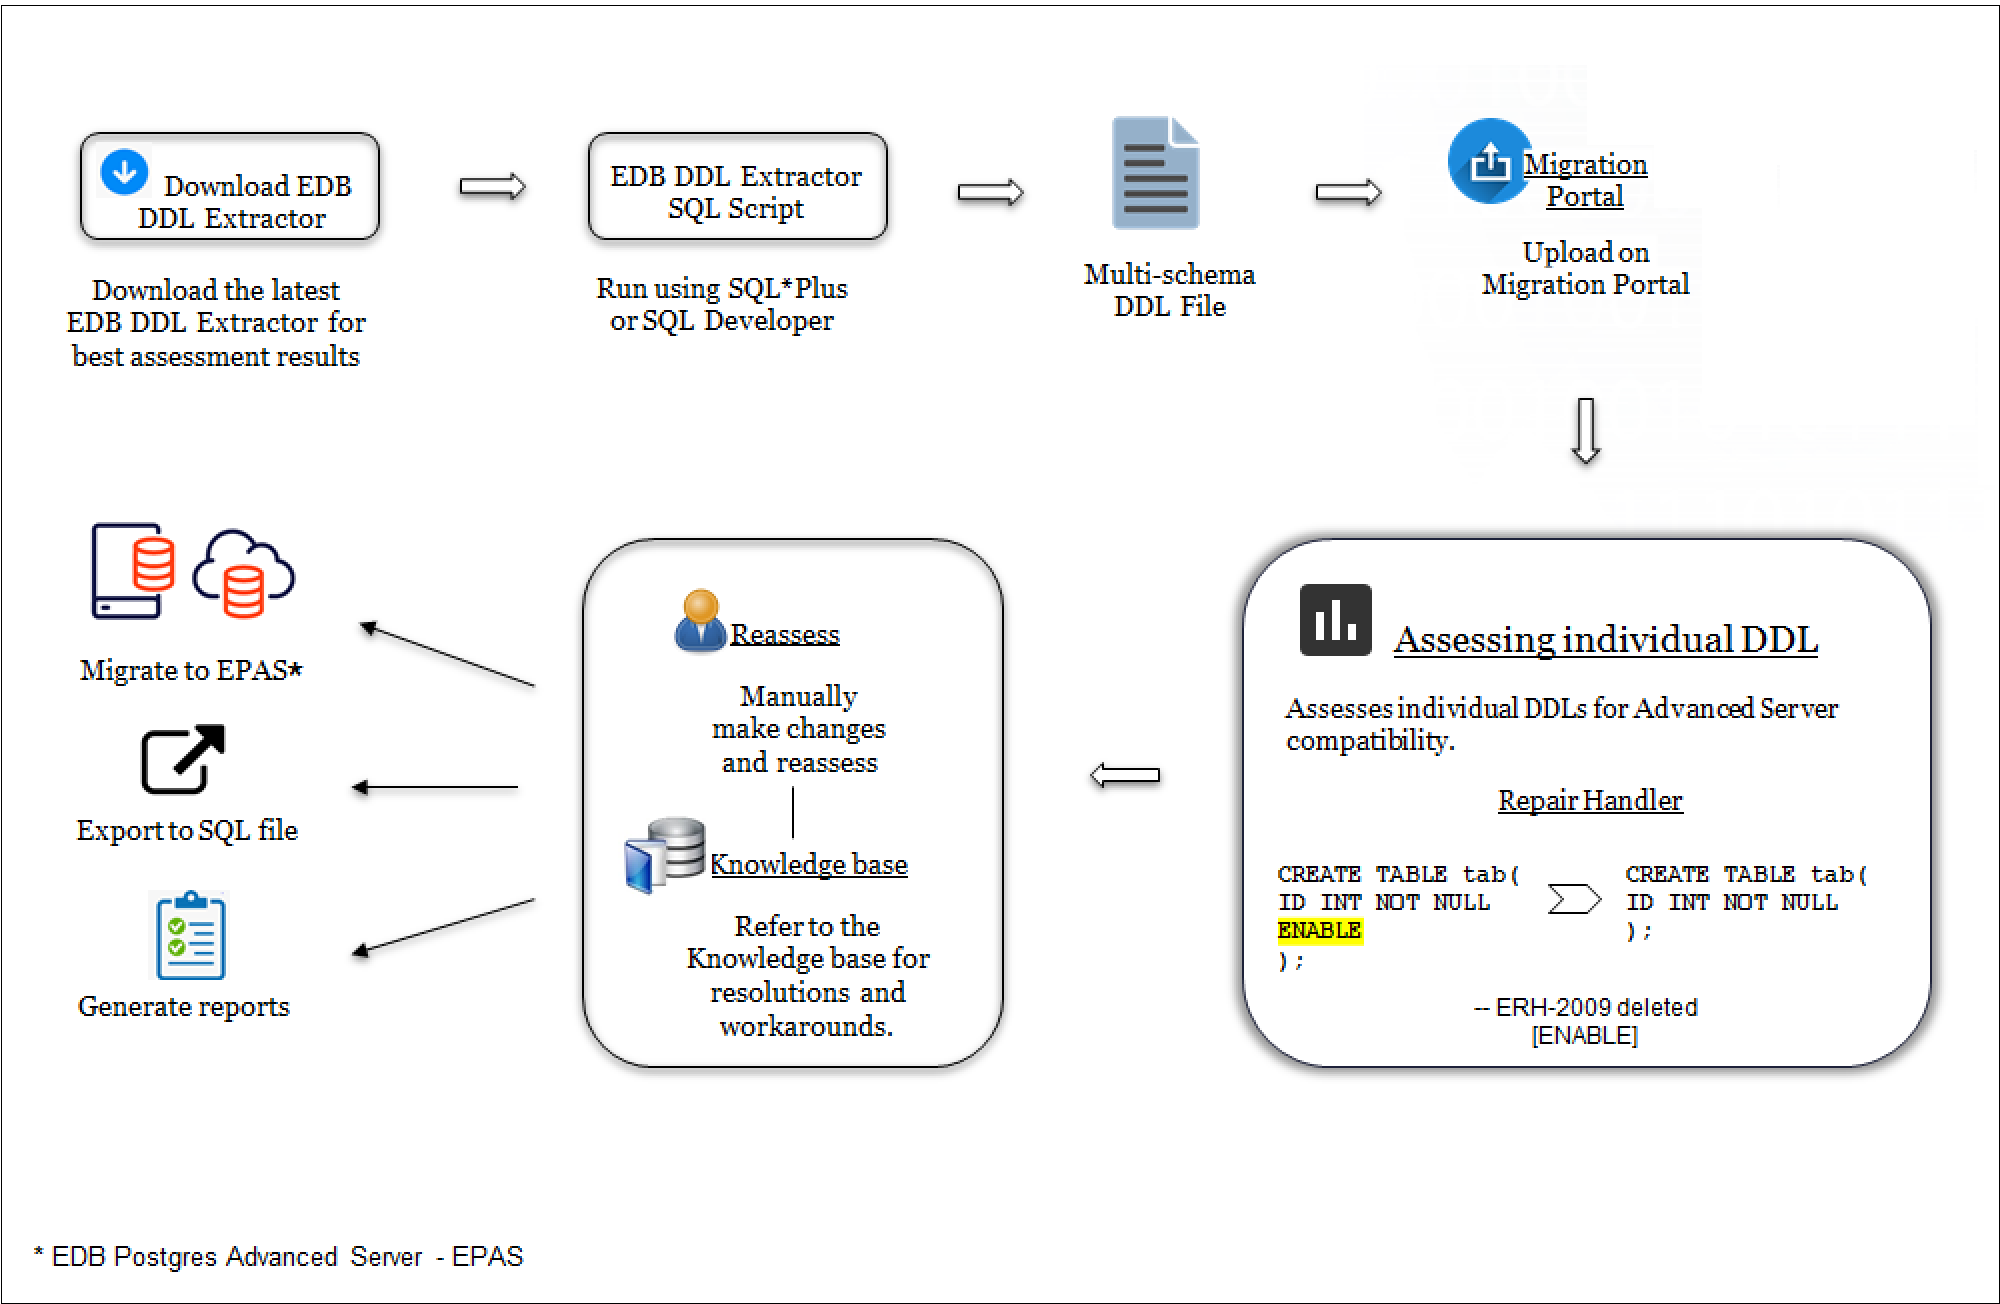
Figure 2-1: The assessment and migration process
Note Migration Portal currently does not have team collaboration features. We recommend collaborative meetings, screen sharing, and using the downloadable assessment report to share results.
To access the Migration Portal:
Open a browser and navigate to https://www.edbpostgres.com/.
On the EnterpriseDB home page, click
Products>Migration Portal.
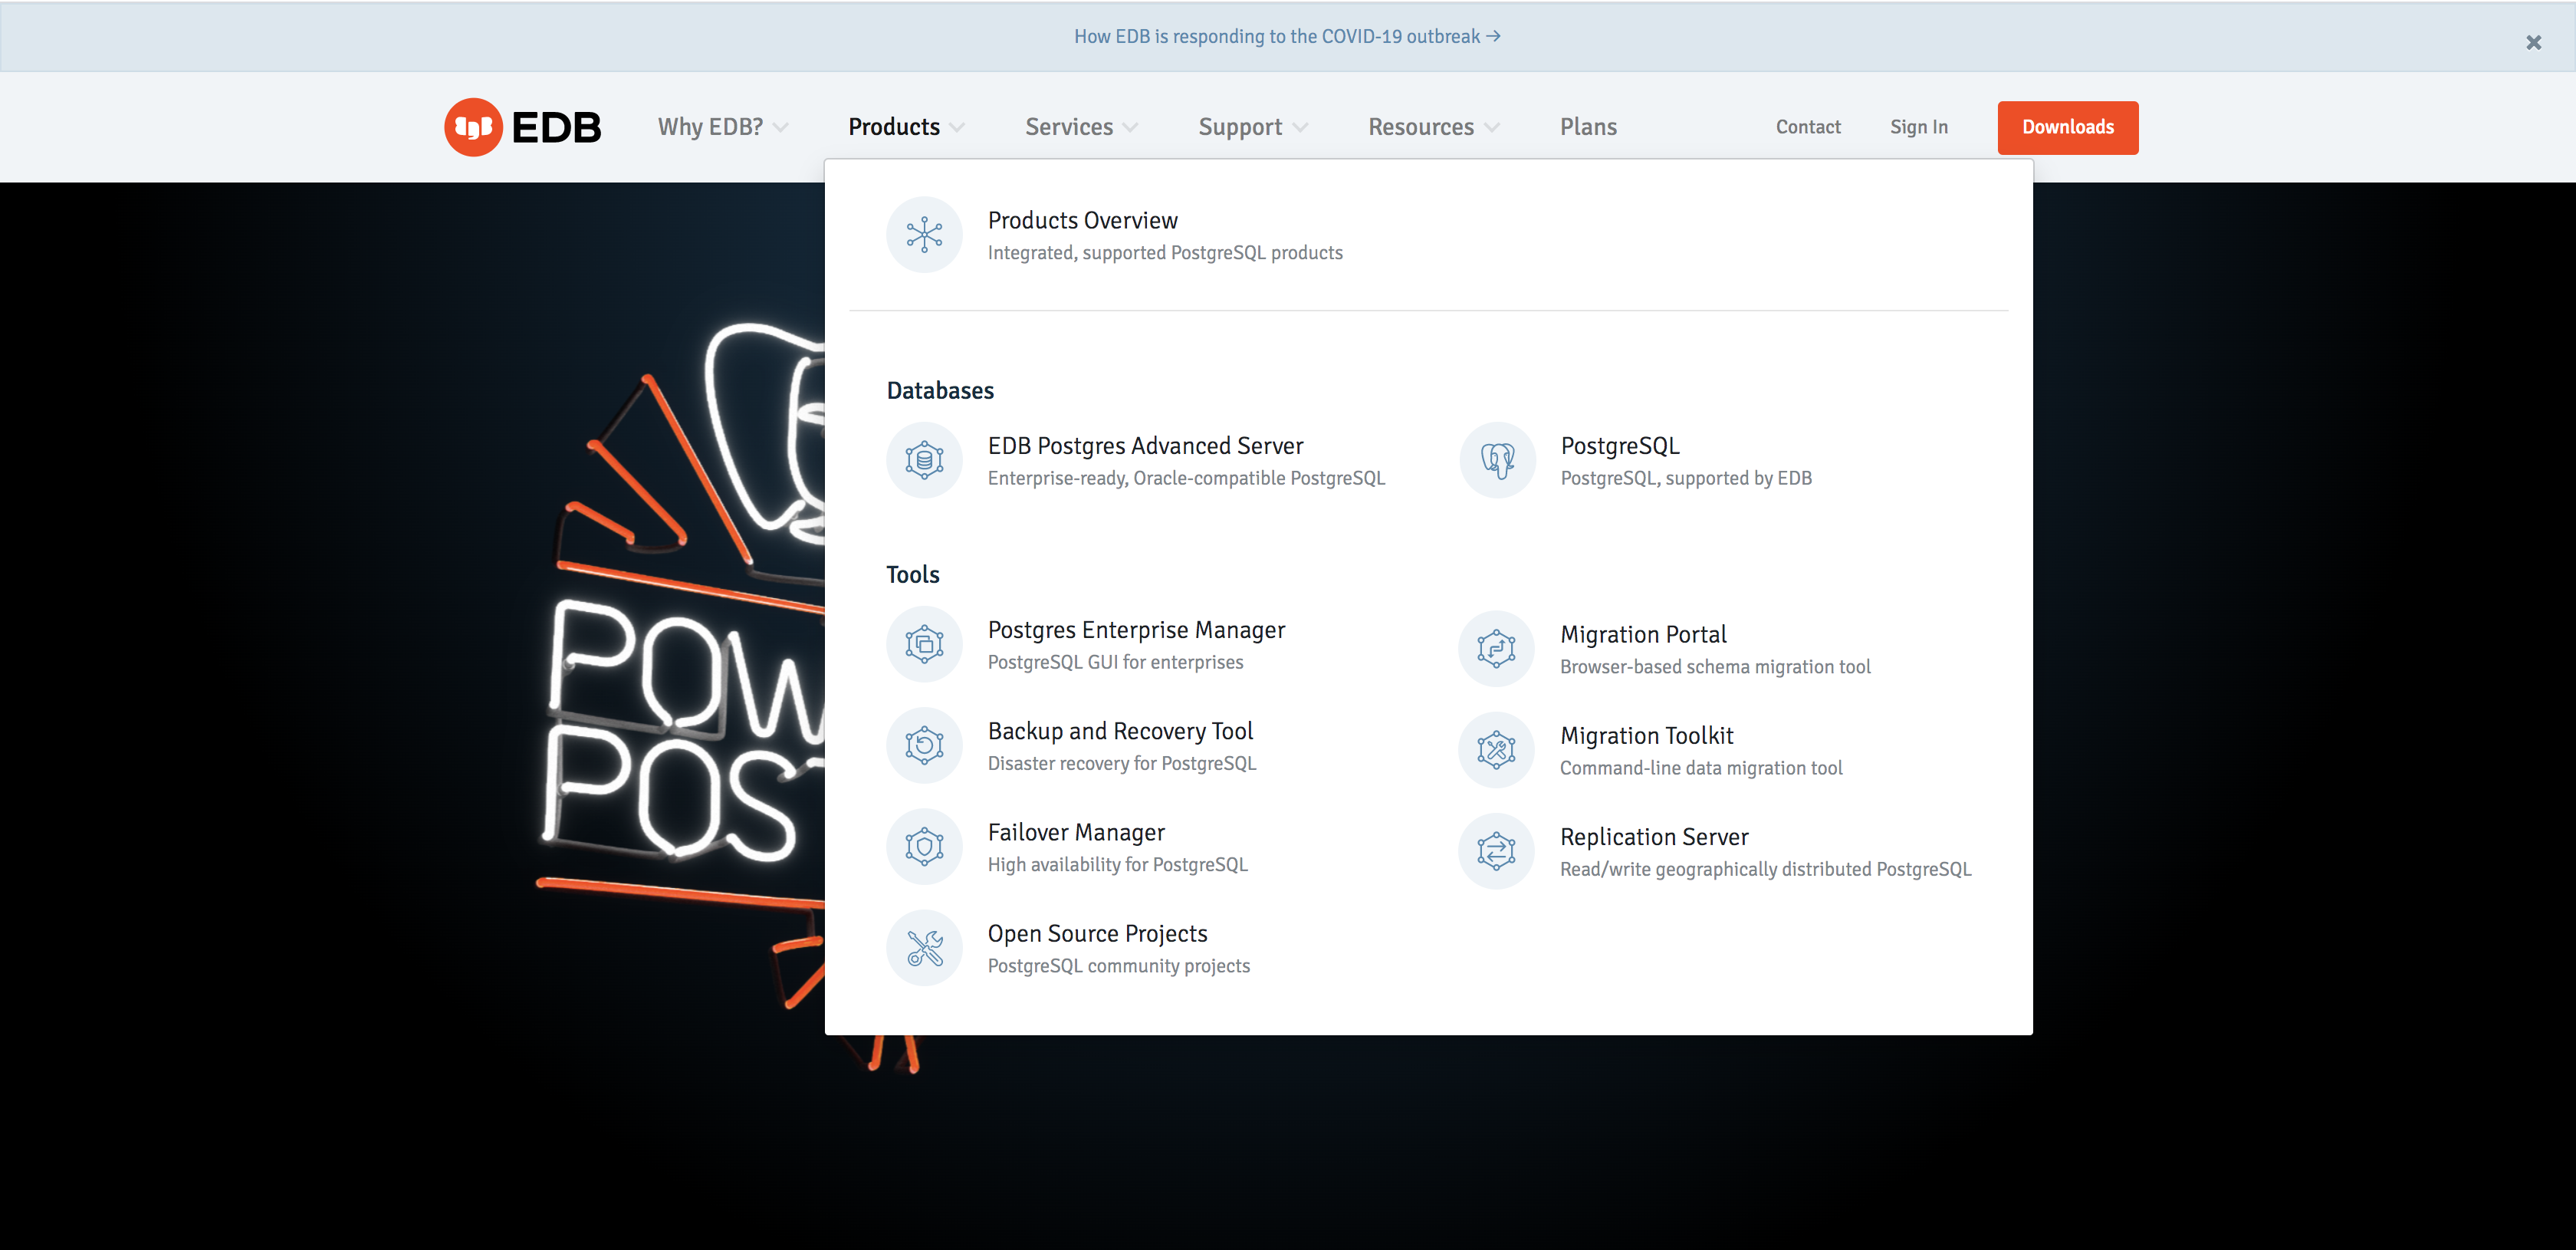
Figure 2-2: The assessment and migration process
Click
Open Migration Portal.Log in using your credentials.
mp_overview_home mp_overview_project mp_overview_wiki
Overview of the Migration Portal Home Page
The Migration Portal home page provides quick access to migration tools.
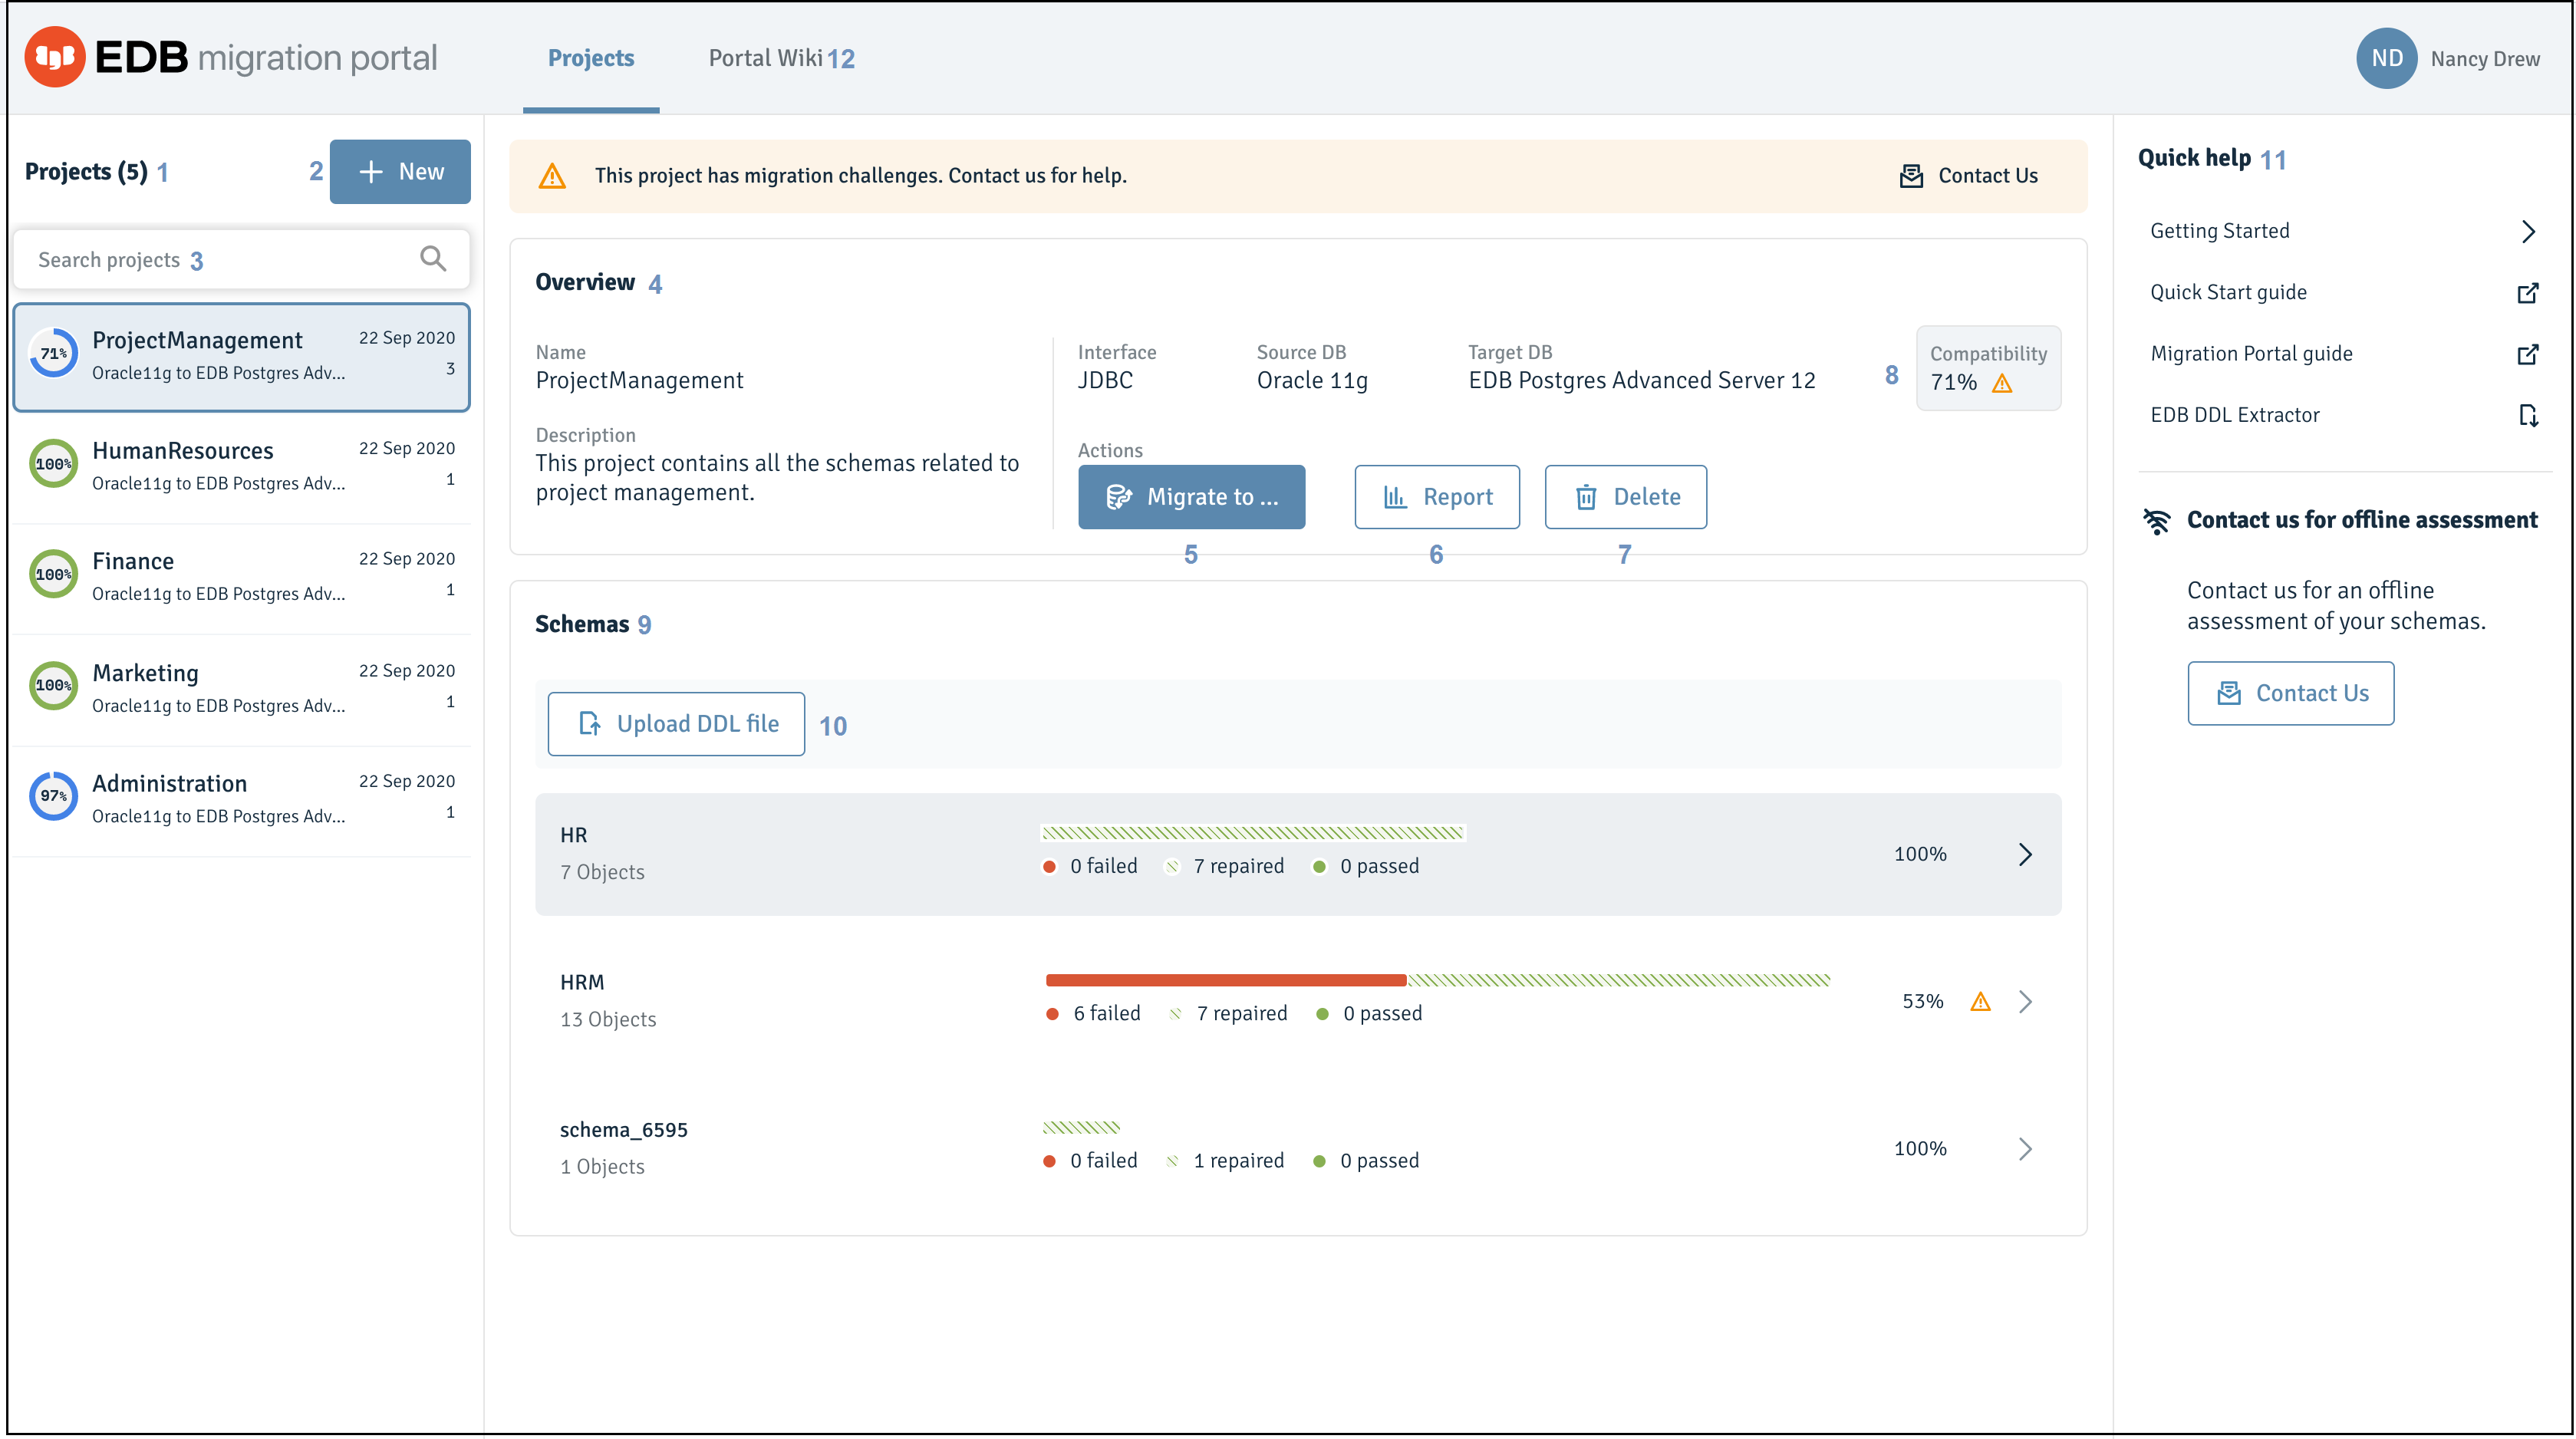
Figure 2-3: The Migration Portal home
The Migration Portal home page allows access to the following Migration Portal features:
Projects: The
Projectspanel displays a list of assessed projects.Create project: Click
+ New(the button located to the right of theProjectslabel) to create a new project.
Note Uploading large DDL files might freeze or crash the browser (depending on the browser and the system resources in use). In this scenario, try running Migration Portal in a different browser or extracting fewer schemas and uploading that file on Migration Portal.
Search projects: Use the
Searchbox to search for projects.Overview: The
Overviewpanel provides details about the selected project and displays the compatibility percentage after schema assessment.Migrate to: Use the
Migrate tobutton to either download an EDB Postgres Advanced Server compatible.sqlfile or migrate a schema to an EDB Postgres Advanced Server on-premise or on the cloud. For more information, see Schema Migration.Report: Use the
Reportbutton to view and download the schema assessment report.Delete: Use the
Deletebutton to delete a selected project.Warning sign: A warning message is displayed if a project or a schema is less than 70% compatible or any DDL doesn’t succeed after multiple attempts.
Upload DDL file: Use the
Upload new schemabutton to upload a new or additional DDL file.Schemas: The
Schemaspanel displays the assessment result from an uploaded DDL file.Quick help: The
Quick helppanel contains quick handles to a few required resources.Portal Wiki: The
Portal Wikihas links to product information and different help guides.
Overview of the Migration Portal Projects Page
The Migration Portal Projects page provides detailed information about your migration.
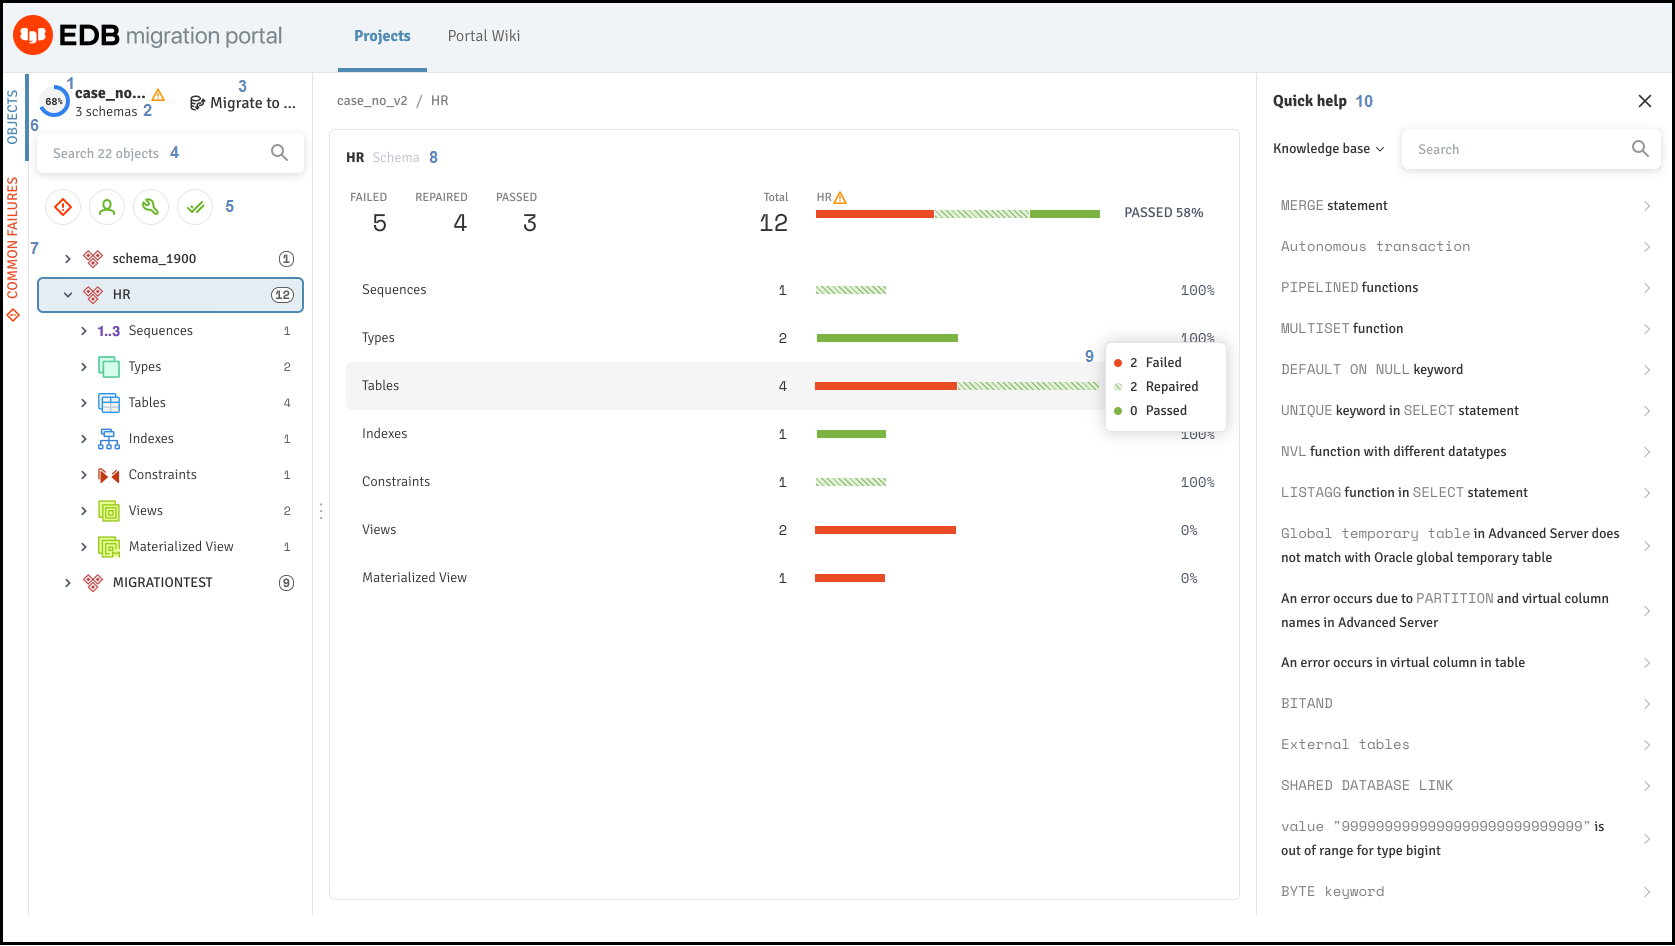
Figure 2-4: The Migration Portal Projects Page overview
Use the following resources to gather information about your migration projects:
Compatible: The
Compatiblegauge displays the color on the basis of the compatibility percentage of the assessed schema.Schema Count: Displays the number of schemas in a project.
Migrate to: Use the
Migrate toto migrate the schema to an EDB Postgres Advanced Server on-prmise or on cloud.Search objects: Use the
Searchbox to search for objects.Filters: You can filter the system repaired and manual repaired objects from the left panel of the Projects page.In addition, you can select one or more filter combinations to refine the information.
Objects: Displays the objects for the selected schemas.
Common Failures: Displays the reason for the failed objects for the selected schemas.
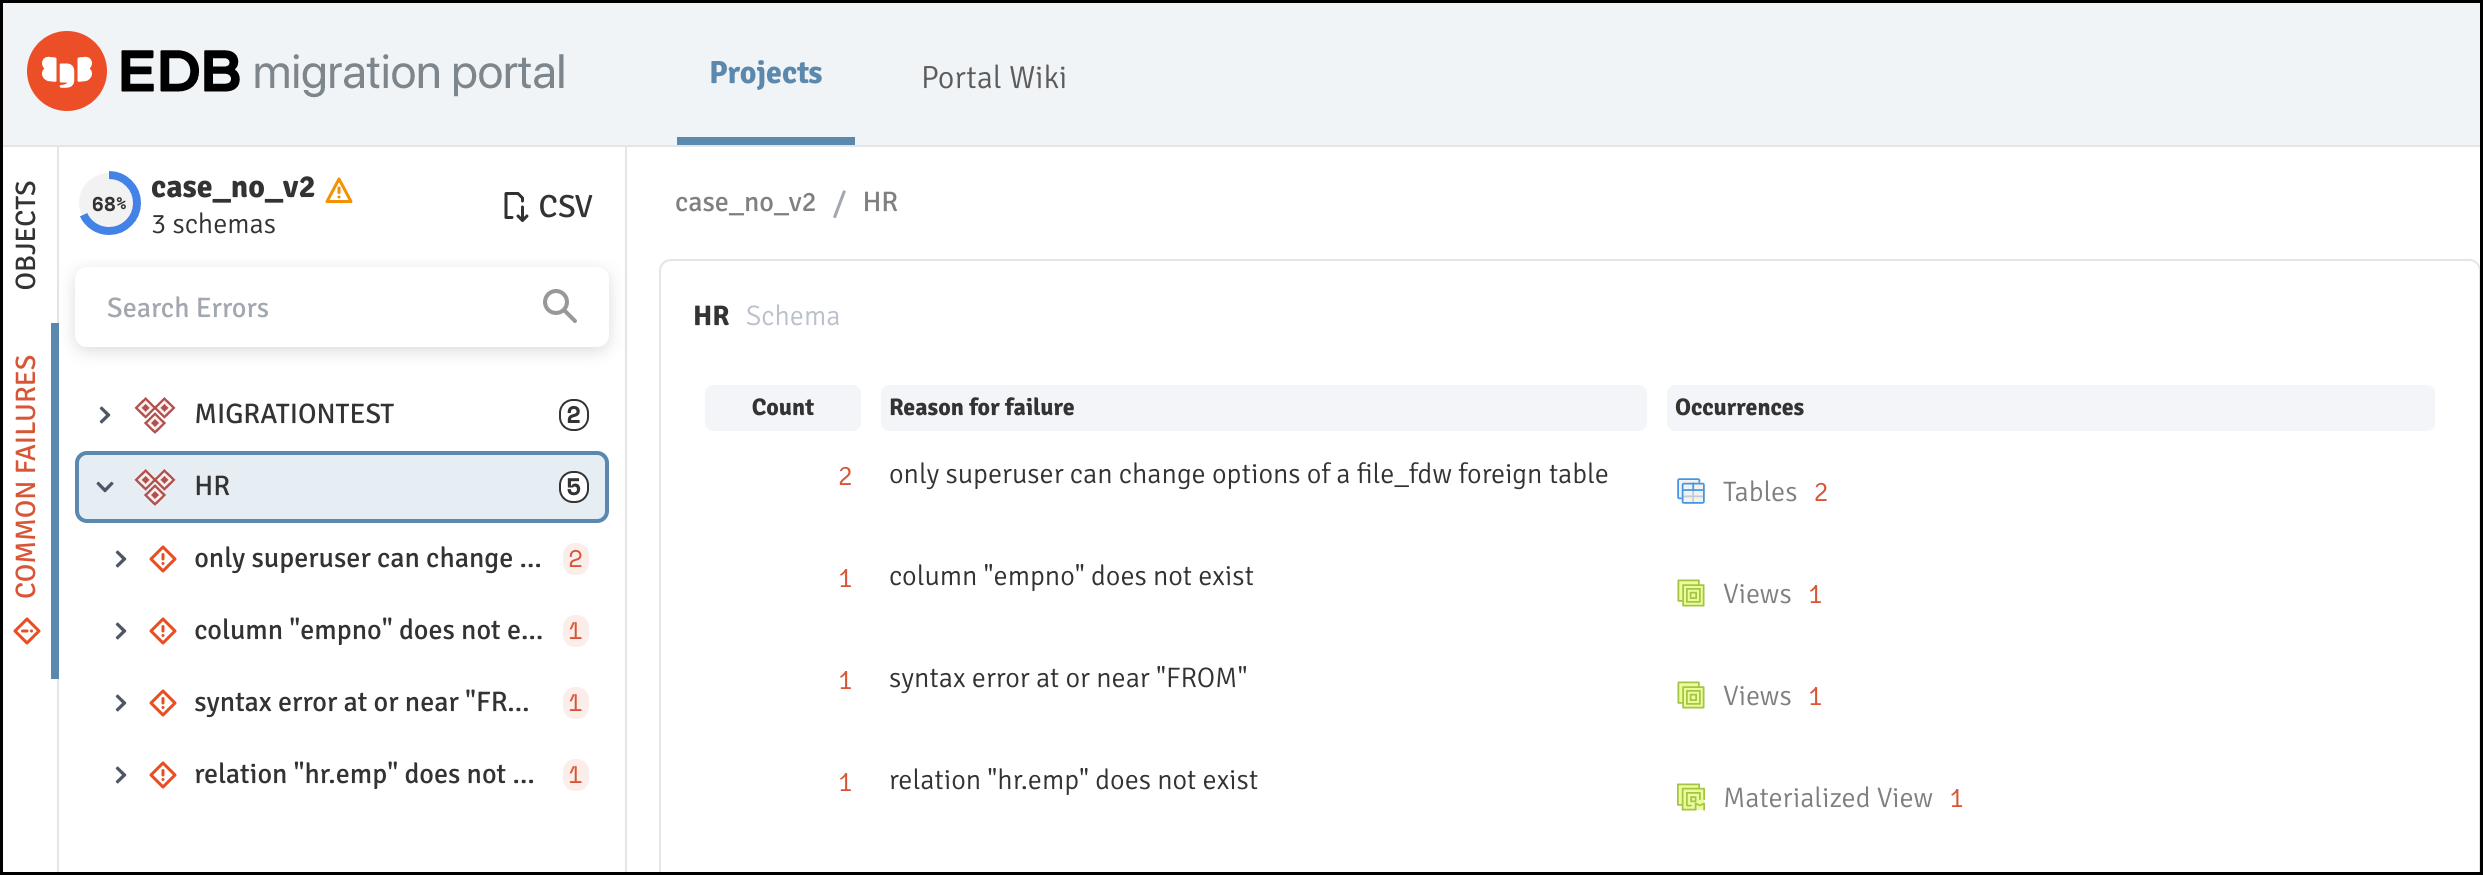
Figure 2-5: Common Failures tab
Note You can download a
CSVfile for the common failures for the project.
Schema: The
Schemapanel displays the result of the assessment.Tooltip: Hover over a result set to display a tooltip with the number of passed, failed, and repaired objects.
Quick help: The
Quick helppanel displays links to Knowledge base articles and repair handler documentation.Search: Use the
Searchbox to search theKnowledge baseentries or repair handler documentation for specific information.
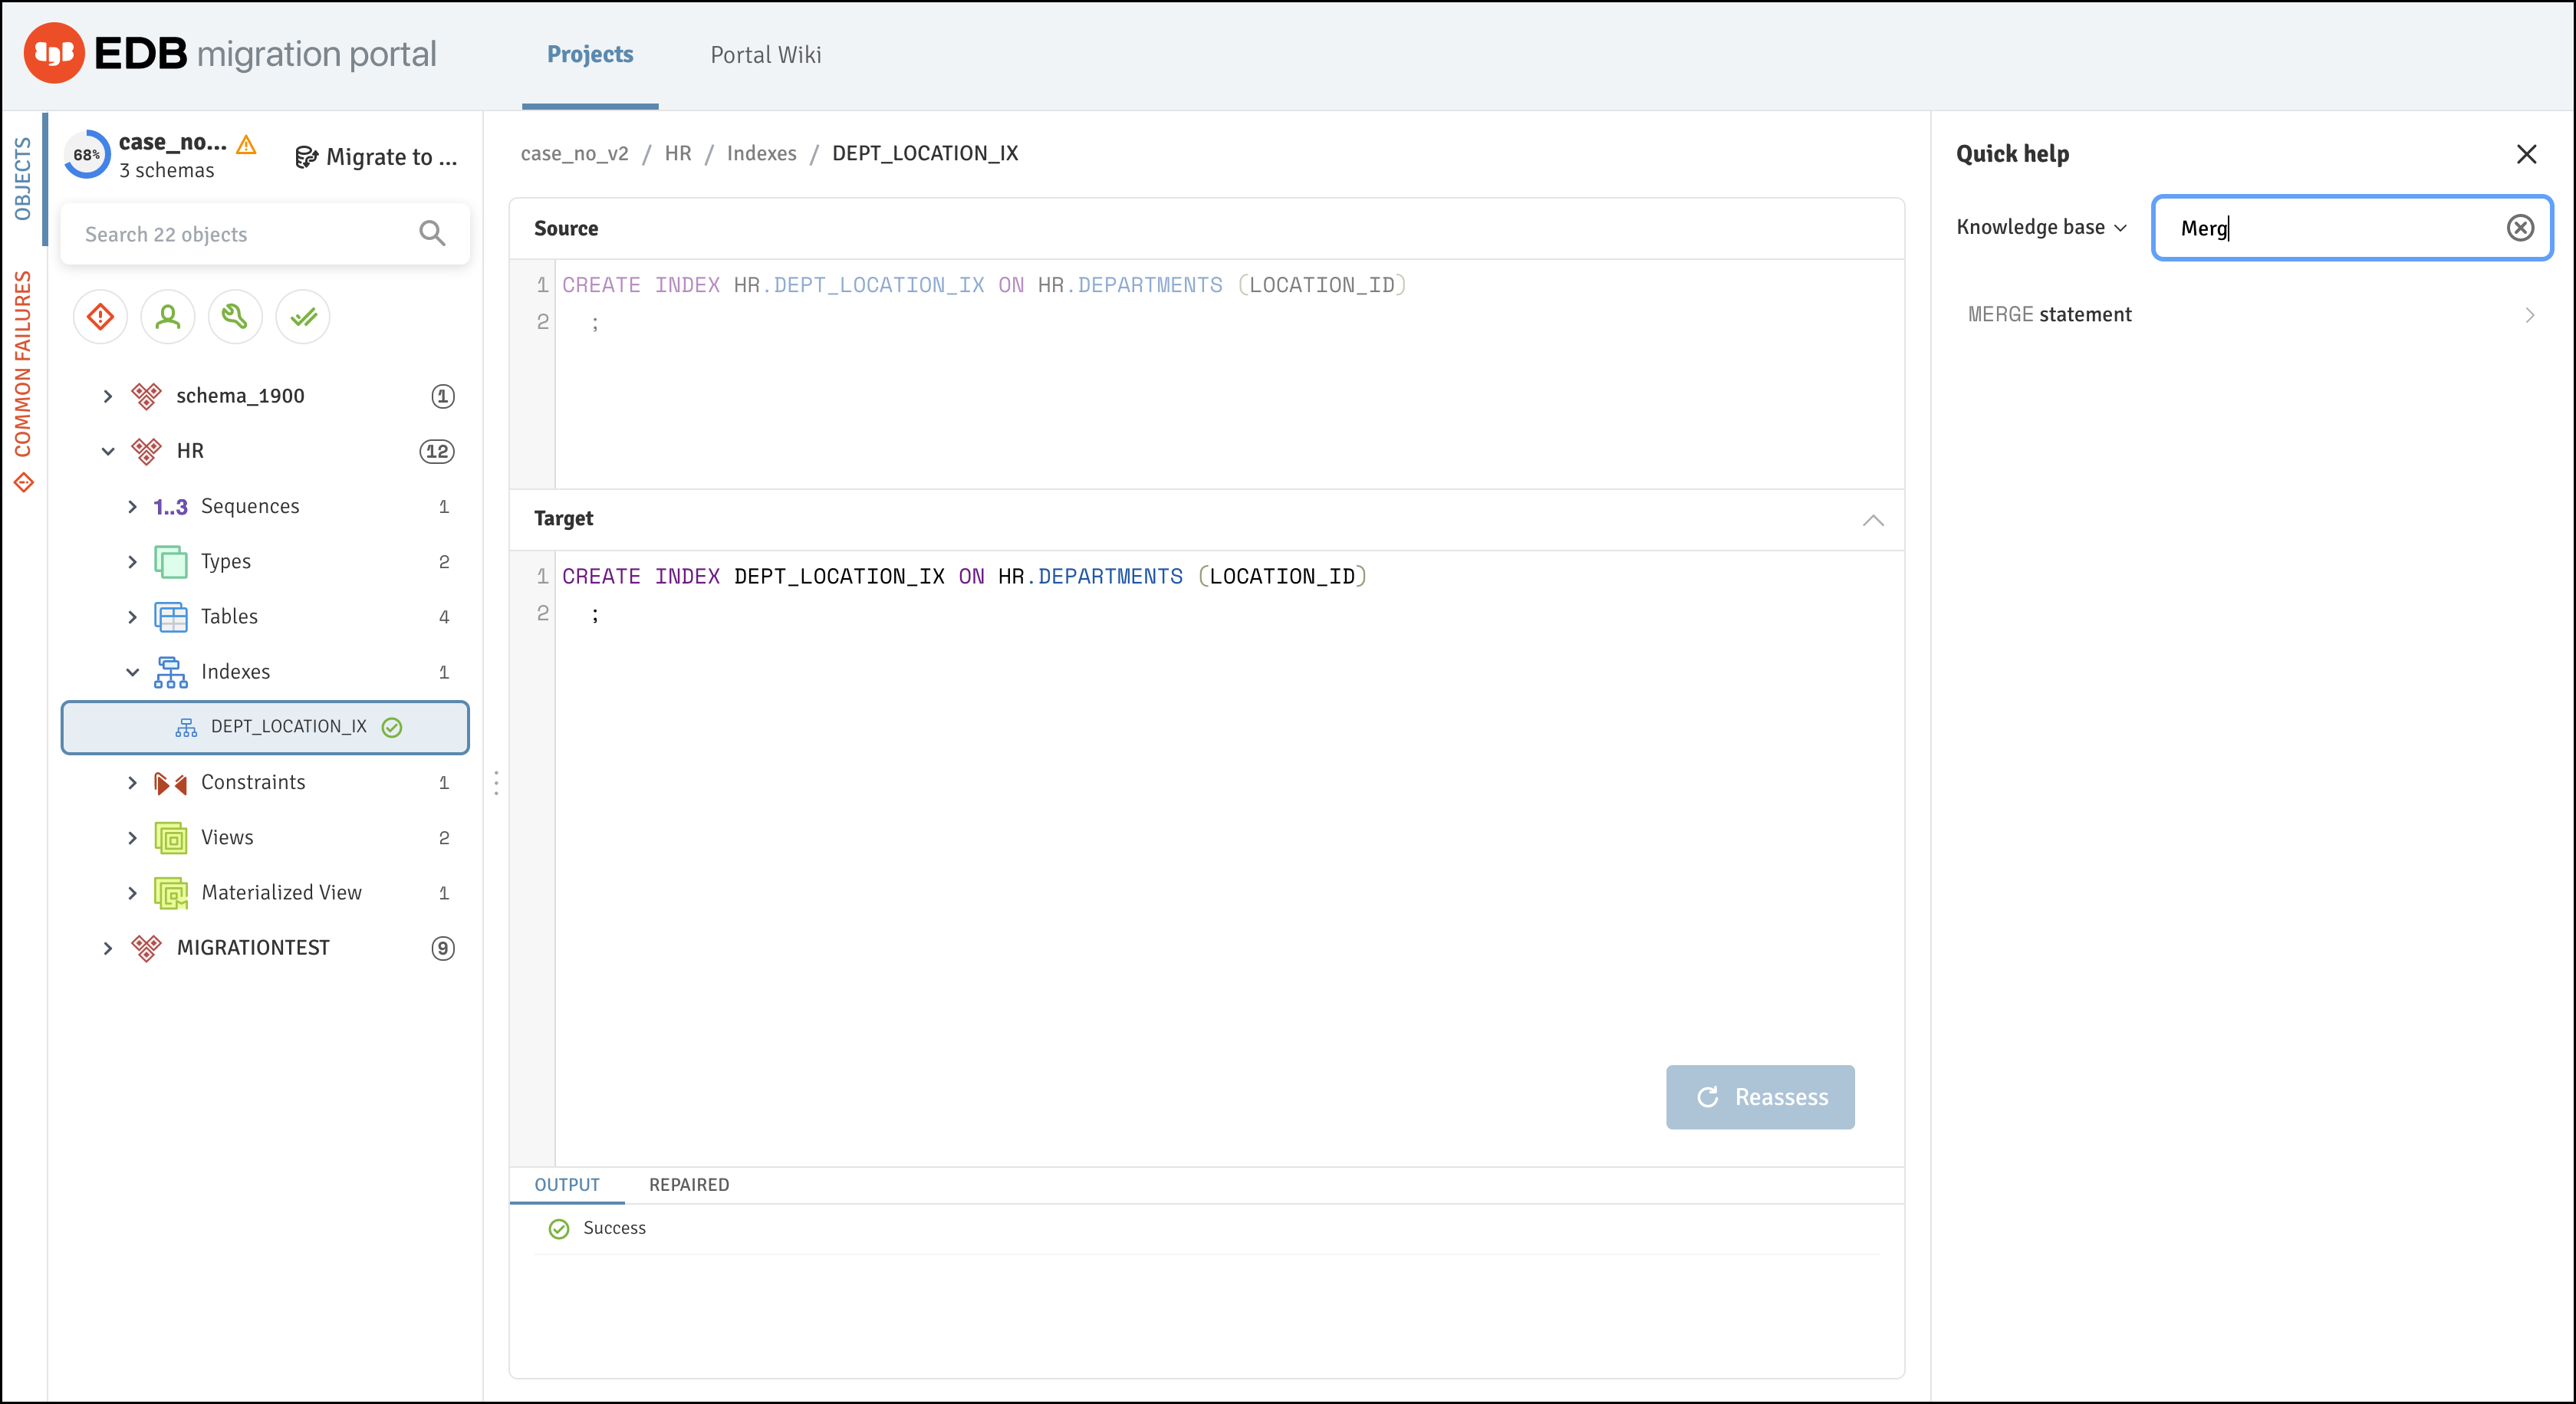
Figure 2-6: Searching the Knowledge Base entry
Overview of the Migration Portal Wiki Page
The Portal Wiki page provides quick access to information:
- What’s New information
- Quick Start guide
- Migrating Schema
- Migrating Data
- DDL Extractor guide
- Knowledge Base
- Repair handlers
- Migration Portal User’s Guide
- FAQs
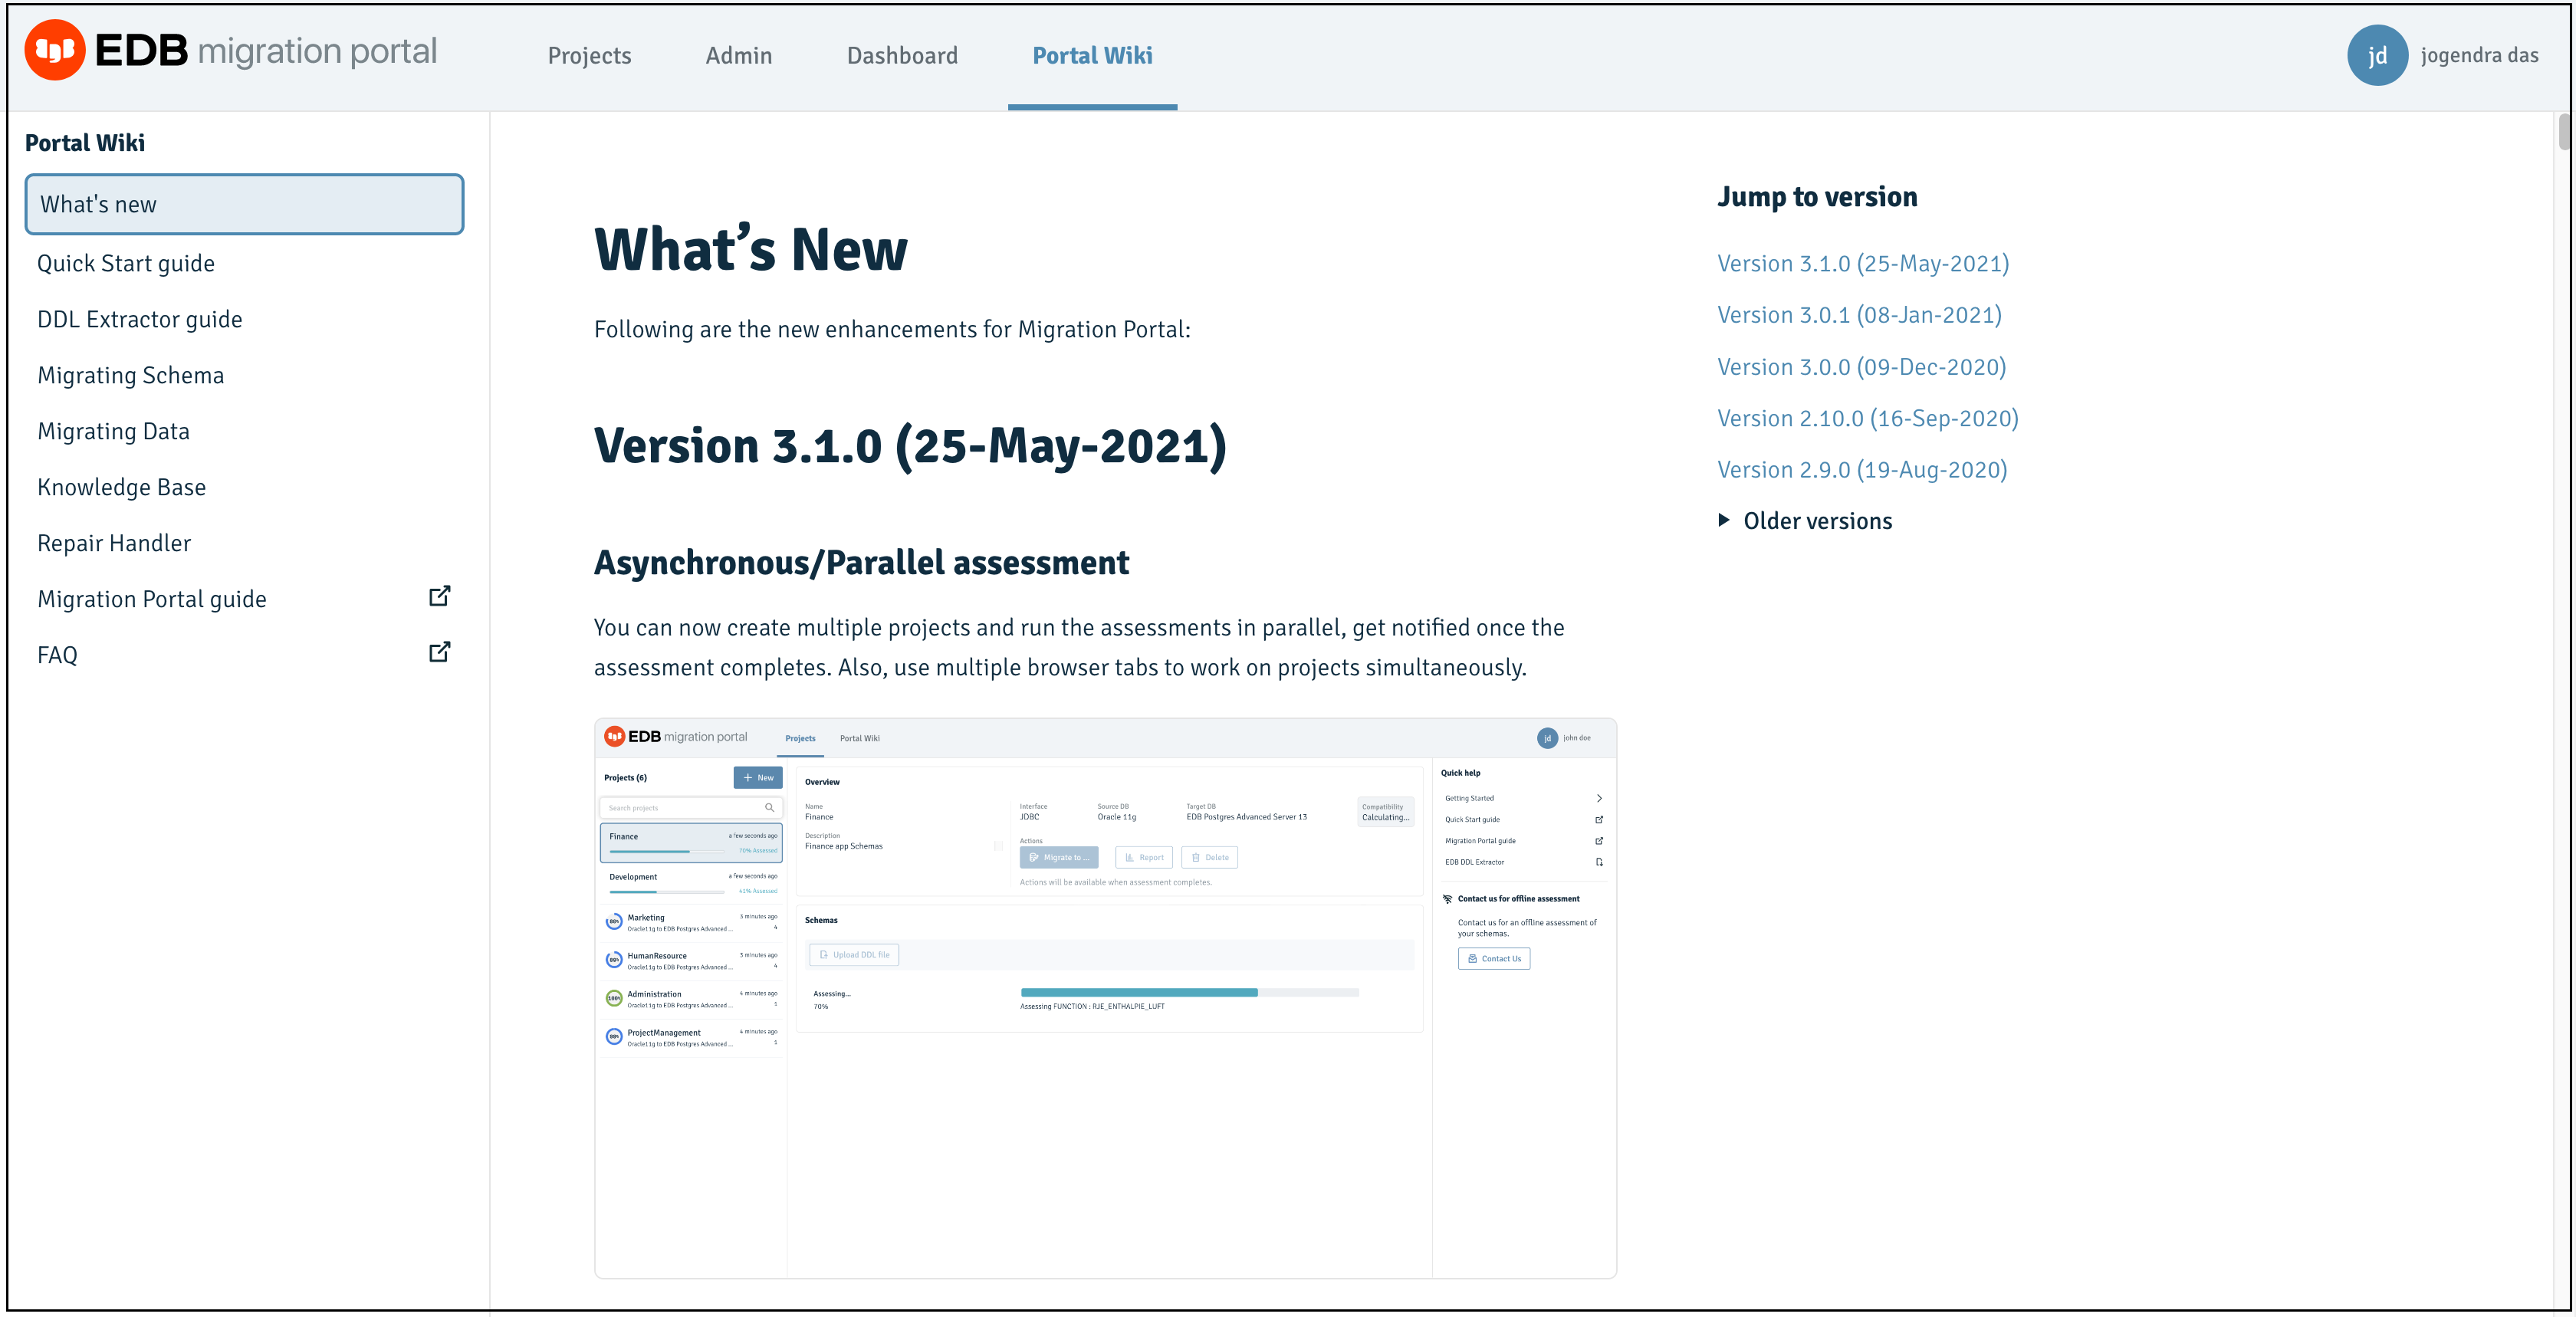
Figure 2-7: The Migration Portal Wiki page
Migrating a Database
To migrate a database, you must complete the following steps:
- Perform a Schema Extraction.
- Perform a Schema Assessment.
- Perform a Schema Migration.
- Perform a Data Migration.
The following sections provide detailed information about each step in the migration process.
mp_schema_extraction mp_schema_assessment mp_schema_migration mp_data_migration
Performing a Schema Extraction
Prerequisites
Before extracting a schema, you must download the latest EDB DDL Extractor script from the Migration Portal Projects page or from the link provided in the DDL Extractor guide in the Portal Wiki. The script can be run in SQL Developer or SQL*Plus. It uses Oracle’s DBMS_METADATA built-in package to extract DDLs for different objects under schemas (specified while running the script). The EDB DDL extractor creates the DDL file uploaded to the portal and analyzed for EDB Postgres compatibility.
Note You must have
CONNECTandSELECT_CATALOG_ROLEroles andCREATE TABLEprivilege.
For SQL*Plus
Connect to SQL*Plus and run the command:
SQL>@edb_ddl_extractor.sqlProvide the schema name and the path or directory in which the extractor will store the extracted DDL. When extracting multiple schemas, use a comma (
‘,’) as a delimiter.
Note If you want to extract all the user schemas from the current database, do not mention any schema names while extracting. However, it is recommended to mention the schema names that you would like to extract.
If you want to extract dependent objects from other schemas, enter
yesorno.For example, on Linux:
Enter a comma separated list of schemas to be extracted (Default all schemas): HR, SCOTT, FINANCE

Location for output file (Default current location) : /home/oracle/extracted_ddls/

WARNING:

Given schema(s) list may contain objects which are dependent on objects from other schema(s), not mentioned in the list.` `Assessment may fail for such objects. It is suggested to extract all dependent objects together.

Extract dependent object from other schemas?(yes/no) (Default no / Ignored for all schemas option): yes
On Windows:
Enter comma separated list of schemas to be extracted (Default all schemas): HR, SCOTT, FINANCE

Location for output file (Default current location) : c:\Users\Example\Desktop\

WARNING:

Given schema(s) list may contain objects which are dependent on objects from other schema(s), not mentioned in the list.` `Assessment may fail for such objects. It is suggested to extract all dependent objects together.

Extract dependent object from other schemas?(yes/no) (Default no / Ignored for all schemas option): yes
For SQL Developer
- Connect to the SQL server and run the following command:
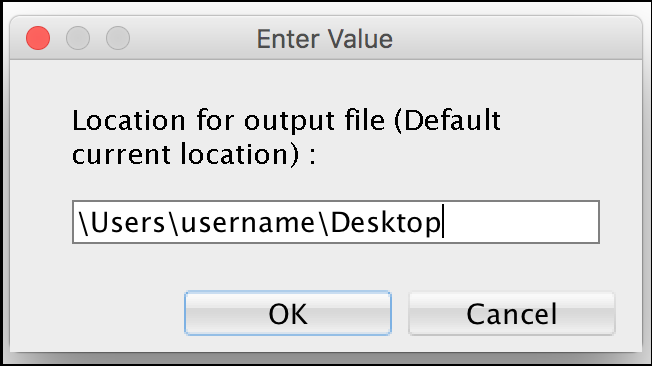
Figure 3-1: Enter the path for Linux or Windows
- Enter a comma-separated list of schemas:
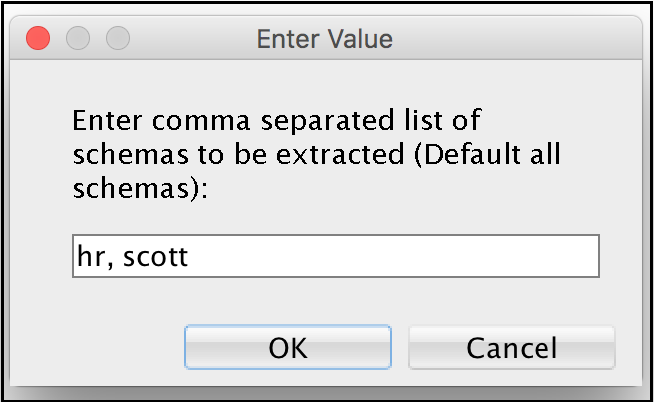
Figure 3-2: Provide a list of schemas
- Enter the path for the output file:
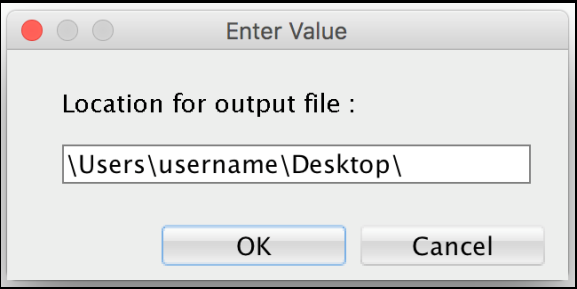
Figure 3-3: Specify the output file path
- Enter (yes/no) to extract dependant objects:
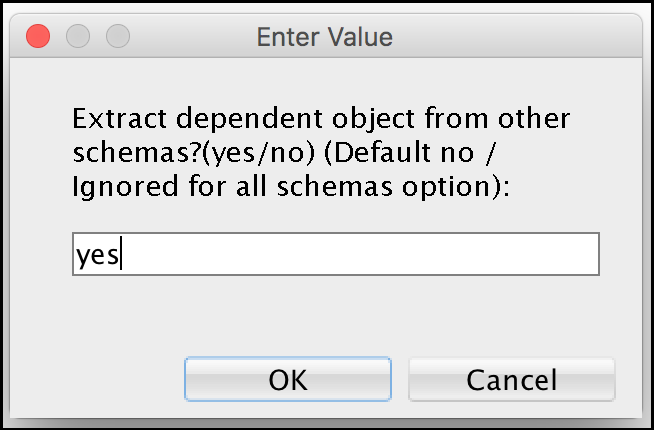
Figure 3-4: Extracting dependent objects
Note You can also enter single schema name in both SQL*Plus and SQL Developer.
The script then iterates through the object types in the source database and once the task is completed, the .SQL output is stored at the entered location, i.e., c:\Users\Example\Desktop\.
Additional Notes
- The EDB DDL Extractor script does not extract objects restored using
Flashbackand still have names likeBIN$b54+4XlEYwPgUAB/AQBWwA==$0. If you want to extract these objects, you must change the name of the objects and re-run the extraction process. - DDL Extractor extracts
nologgingtables as normal tables. Once these tables are migrated to EDB Postgres Advanced Server, WAL log files will be created. - DDL Extractor creates Global Temporary tables to store the schema names and their dependency information. These tables are dropped at the end of successful extraction.
- DDL Extractor script does not extract schemas whose name starts with
PG_because PostgreSQL does not support it. If you want to extract these schemas, you must change name of schema before extraction.
Supported Object Types
The Migration Portal supports the migration of the following object types:
- Synonyms
- DB Links
- Types and Type Body
- Sequences
- Tables
- Constraints
- Indexes (Except LOB indexes and indexes on materialized views)
- Views
- Materialized Views
- Triggers
- Functions
- Procedures
- Packages
Note COMMENTS on Columns, Tables, and Materialized Views are also supported.
Unsupported Object Types
- Editions
- Operators
- Schedulers
- LOB indexes and Indexes on Materialized Views
- XML Schemas
- Profiles
- Role and Object Grants
- Tablespaces
- Directories
- Users
- RLS Policy
- Queues
Oracle System Schemas
EDB DDL Extractor script will ignore the following system schemas while extracting from Oracle:
| ANONYMOUS | APEX_PUBLIC_USER | APEX_030200 |
| APEX_040000 | APEX_040000 | APPQOSSYS |
| AUDSYS | BI | CTXSYS |
| DMSYS | DBSNMP | DIP |
| DVF | DVSYS | EXFSYS |
| FLOWS_FILES | FLOWS_020100 | GSMADMIN_INTERNAL |
| GSMCATUSER | GSMUSER | IX |
| LBACSYS | MDDATA | MDSYS |
| MGMT_VIEW | OE | OJVMSYS |
| OLAPSYS | ORDPLUGINS | ORDSYS |
| ORDDATA | OUTLN | ORACLE_OCM |
| OWBSYS | OWBYSS_AUDIT | PM |
| RMAN | SH | SI_INFORMTN_SCHEMA |
| SPATIAL_CSW_ADMIN_USR | SPATIAL_WFS_ADMIN_USR | SYS |
| SYSBACKUP | SYSDG | SYSKM |
| SYSTEM SYSMAN | TSMSYS WKPROXY | WKSYS |
| WK_TEST XS$NULL | WMSYS | XDB |
Performing a Schema Assessment
To assess an Oracle database schema for compatibility with EDB Postgres Advanced Server, you must:
Navigate to the Migration Portal.
Enter your EDB credentials.
Click
Newto create a new project.
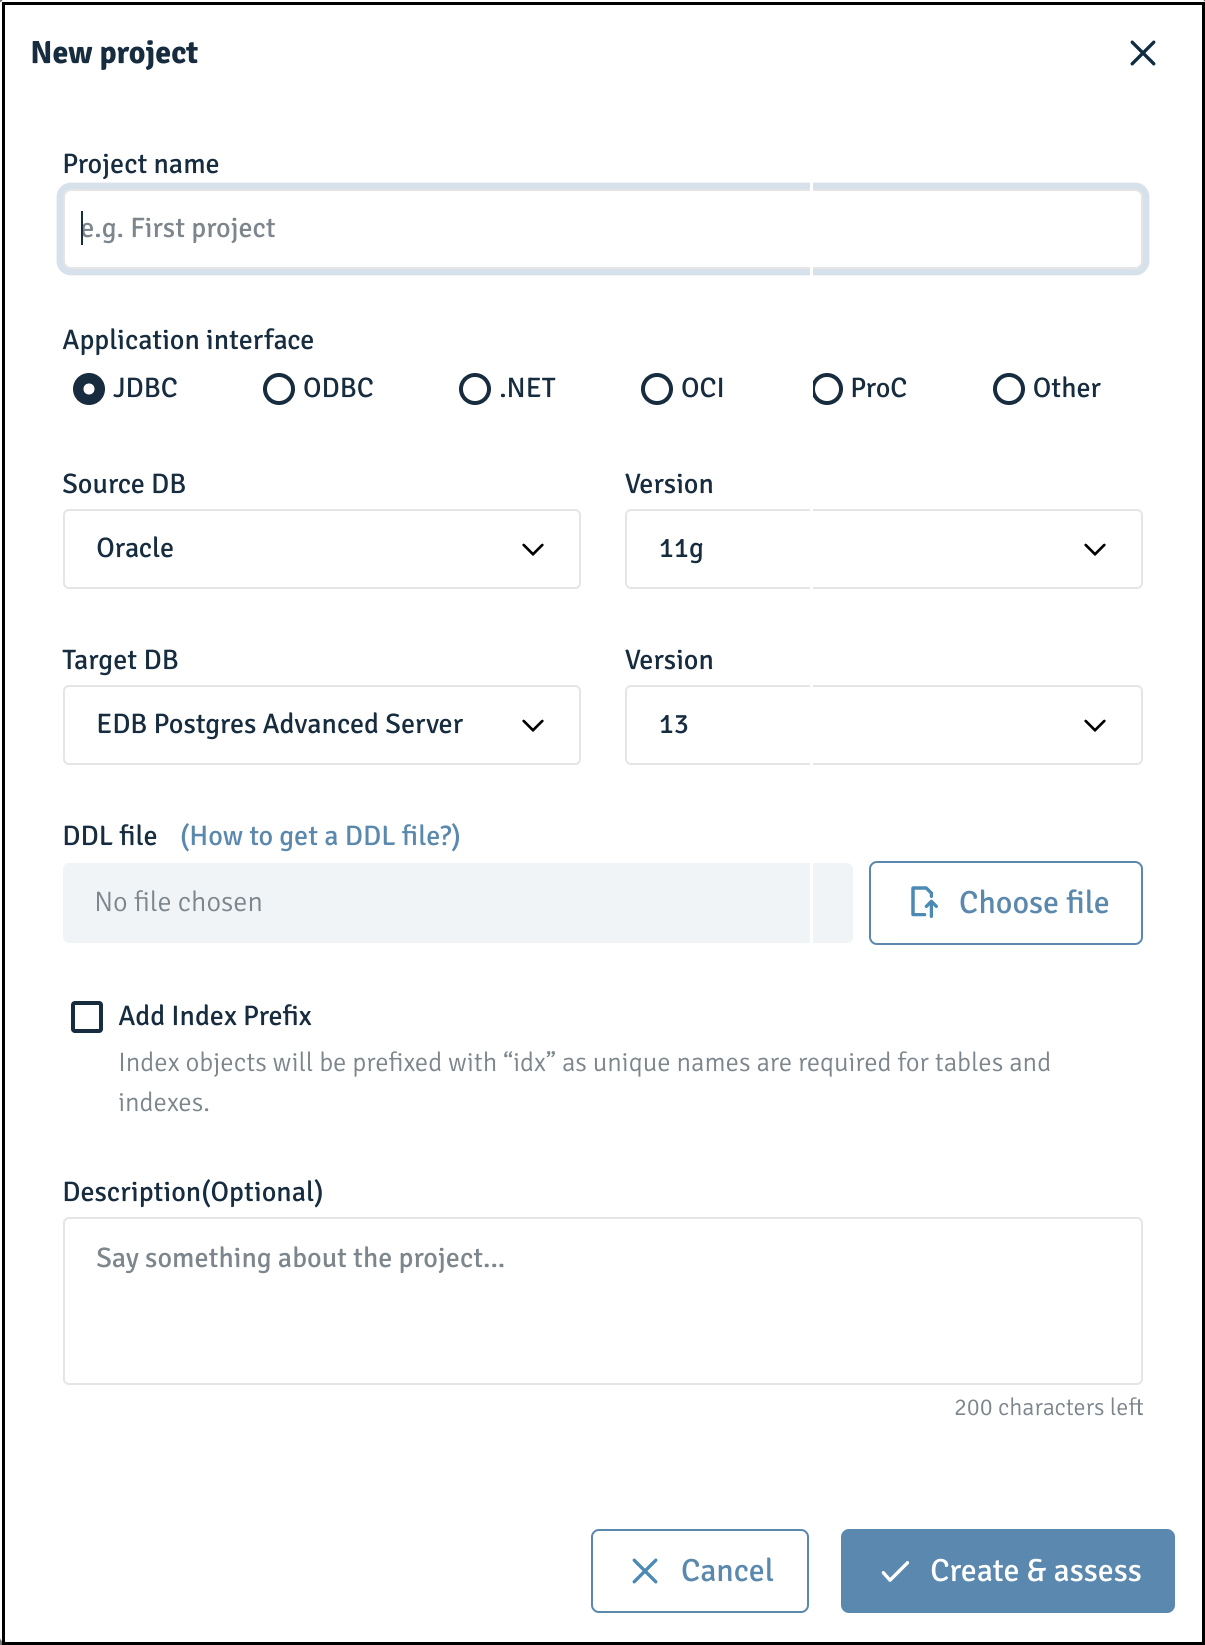
Figure 3-5: The Migration Portal New project dialog box
On the
New projectdialog box, enter the project name in theProject namefield.Specify project details:
- Select the radio button next to the
Application interface. - Select a
Source DBandVersionfor the source. - Select the
Target DBandVersionfor the target.
- Select the radio button next to the
Click
Choose fileto upload the .SQL file generated by the latest EDB DDL Extractor for Oracle Database.
Note - You should not modify the .SQL file. - Only the .SQL file generated by the latest EDB DDL Extractor can be uploaded.
For more information, refer to the Schema Extraction section.
Check the box next to
Add Index Prefixto specify an index prefix (idx) when creating a project to ensure better assessment results, as EDB Postgres Advanced Server does not support the same name for tables and indexes.Click
Create & assessto create a new project and to assess the schemas.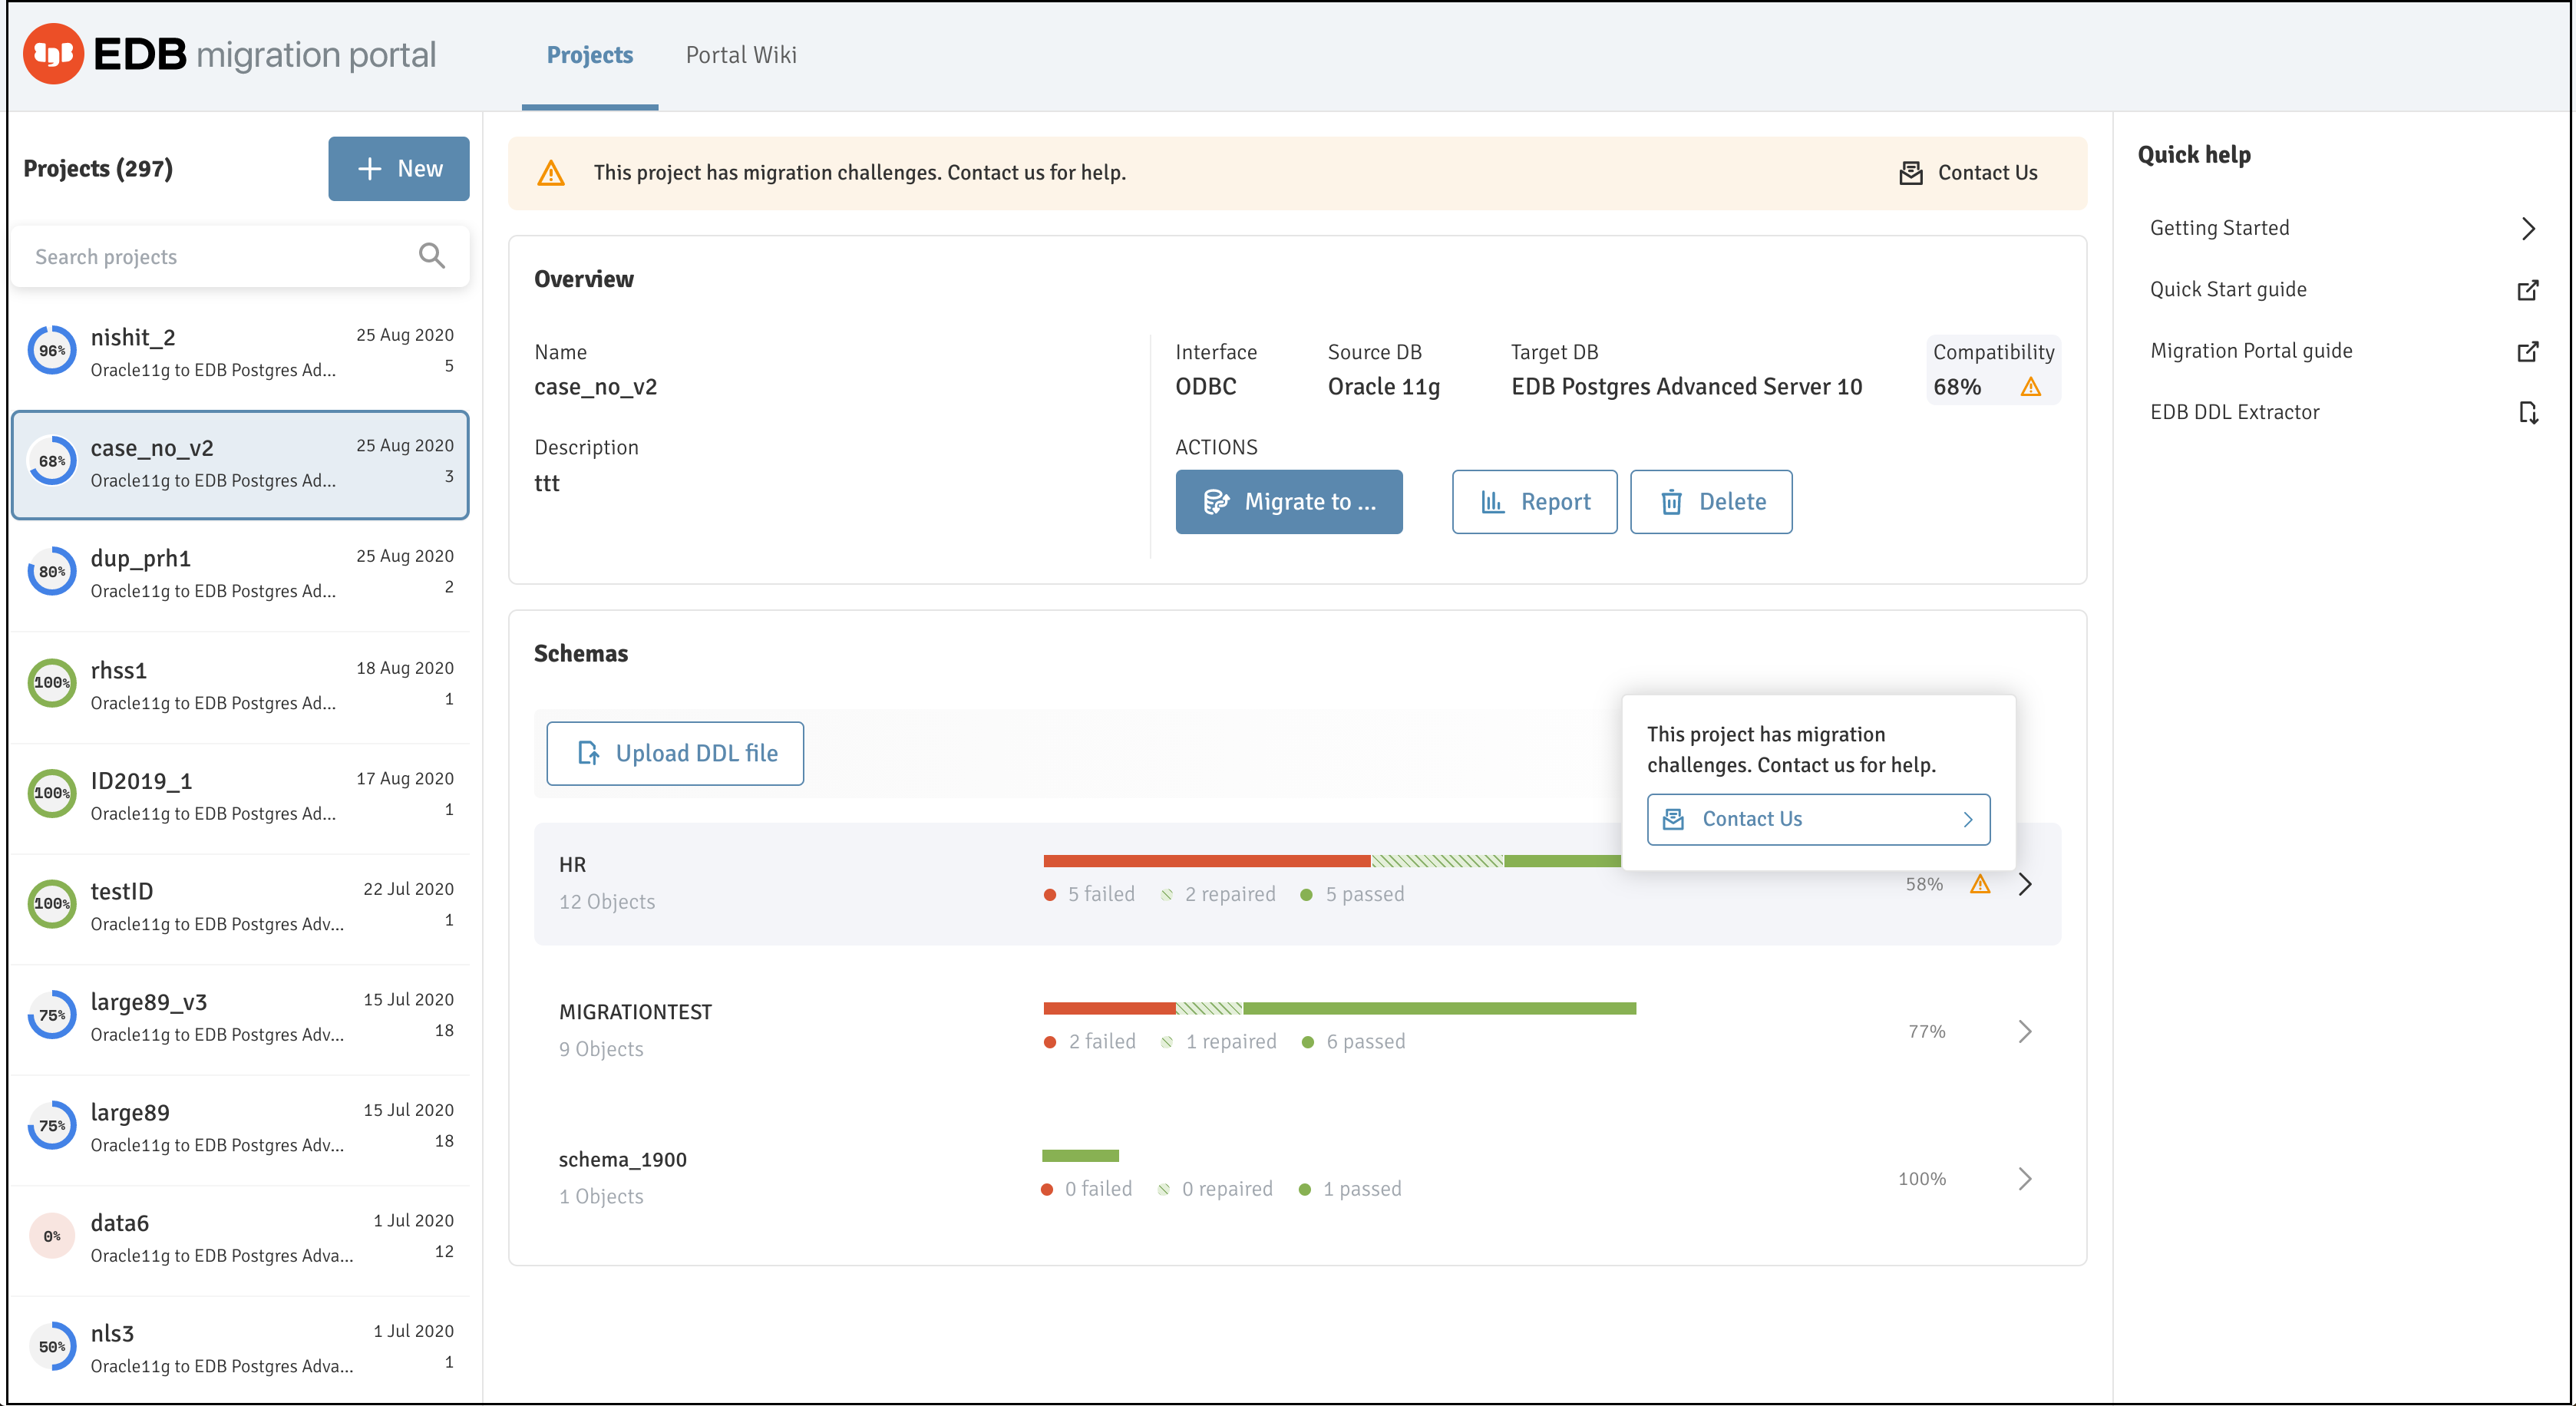
Figure 3-6: The Schema analysis result
The analysis tool will review every construct and execute repair actions to improve compatibility with EDB Postgres Advanced Server and flag any remaining errors that require manual intervention.
Verify the DDL objects (e.g., TABLES) that do not show a 100% success ratio.
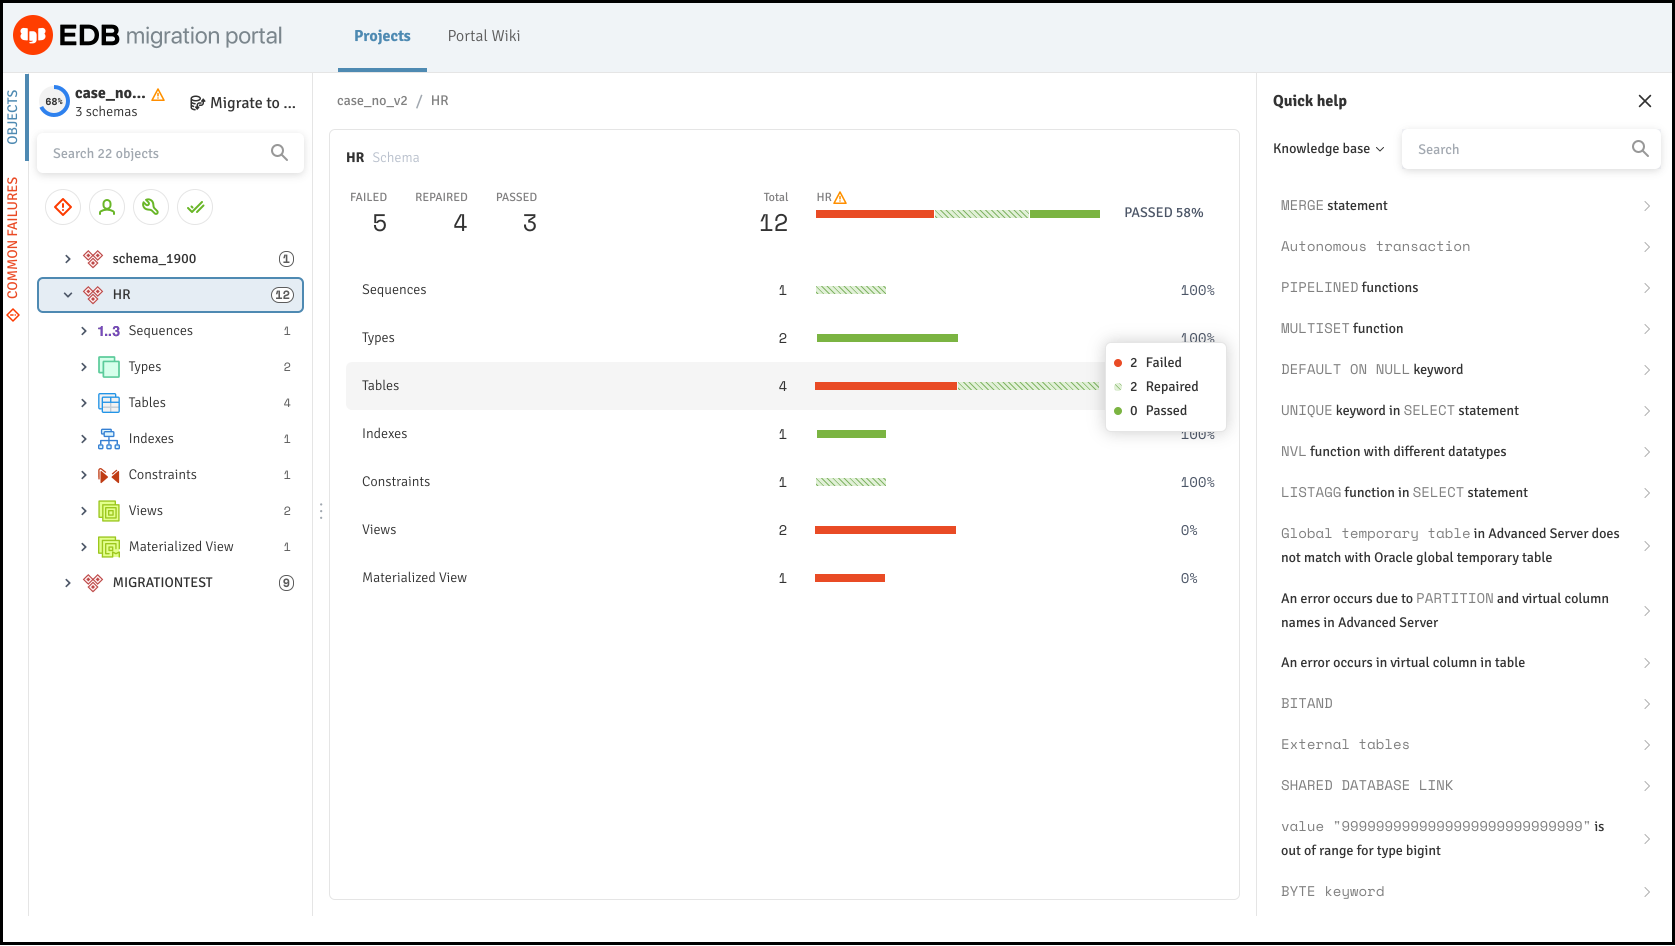
Figure 3-7: Verifying the DDL objects
- Click the objects that are not compatible with EDB Postgres Advanced Server and view the details. At the bottom of the middle panel, you can view repair action details.
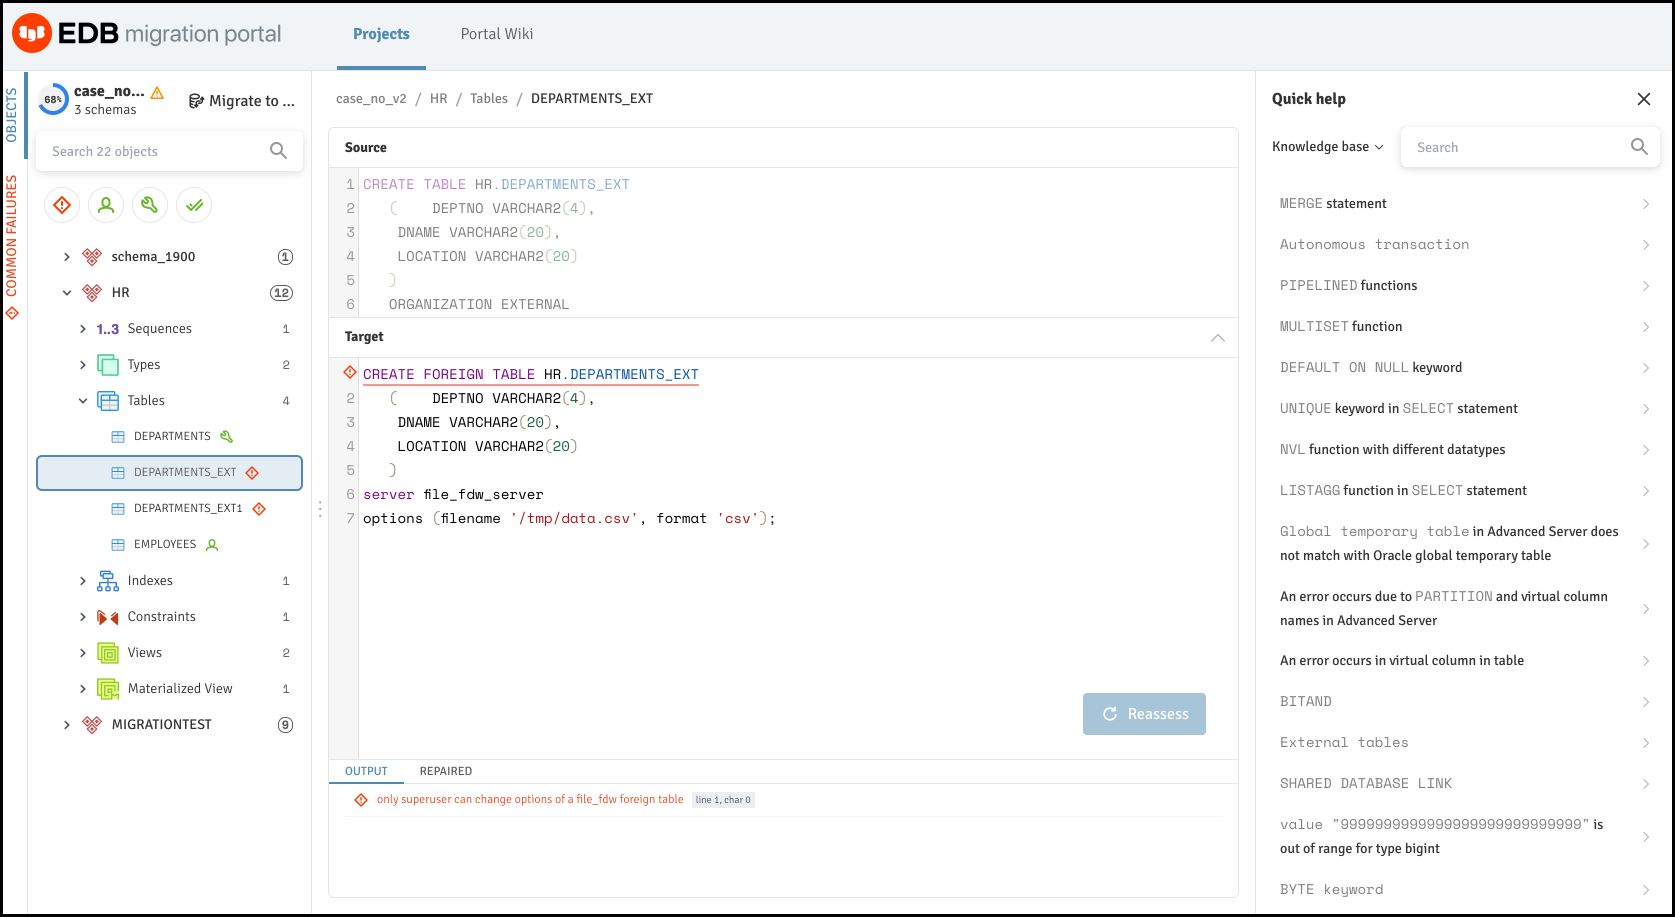
Figure 3-8: Incompatible objects are identified
- Refer to the Knowledge Base information in the right panel to locate the possible workarounds for the objects that are not immediately compatible with EDB Postgres Advanced Server. You can also view the Knowledge Base information on the Portal Wiki page.
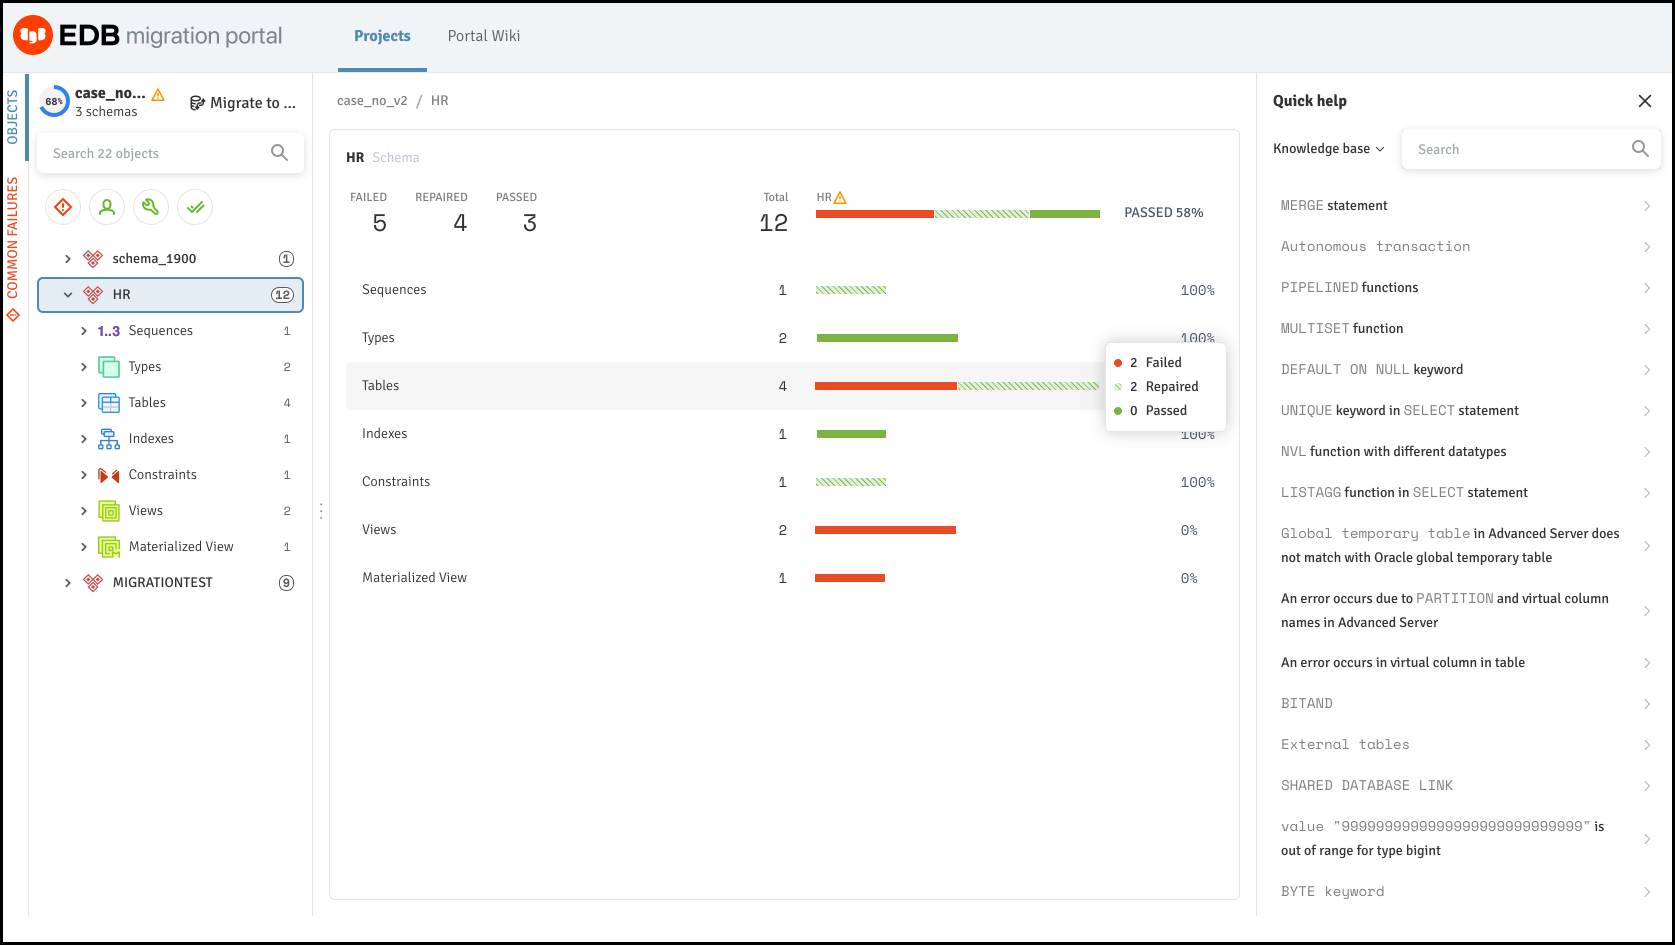
Figure 3-9: Assessment result with errors
On the
Knowledge Basetab, you can enter the error message for the incompatible objects with EDB Postgres Advanced Server and clickSearch.The object detail panel displays the workaround or the resolution for the failed object. You can manually make the changes on the
Assessmenttab for that object and clickReassess.
Note If any failed object passes while reassessing, the dependent objects for that object are also reassessed.
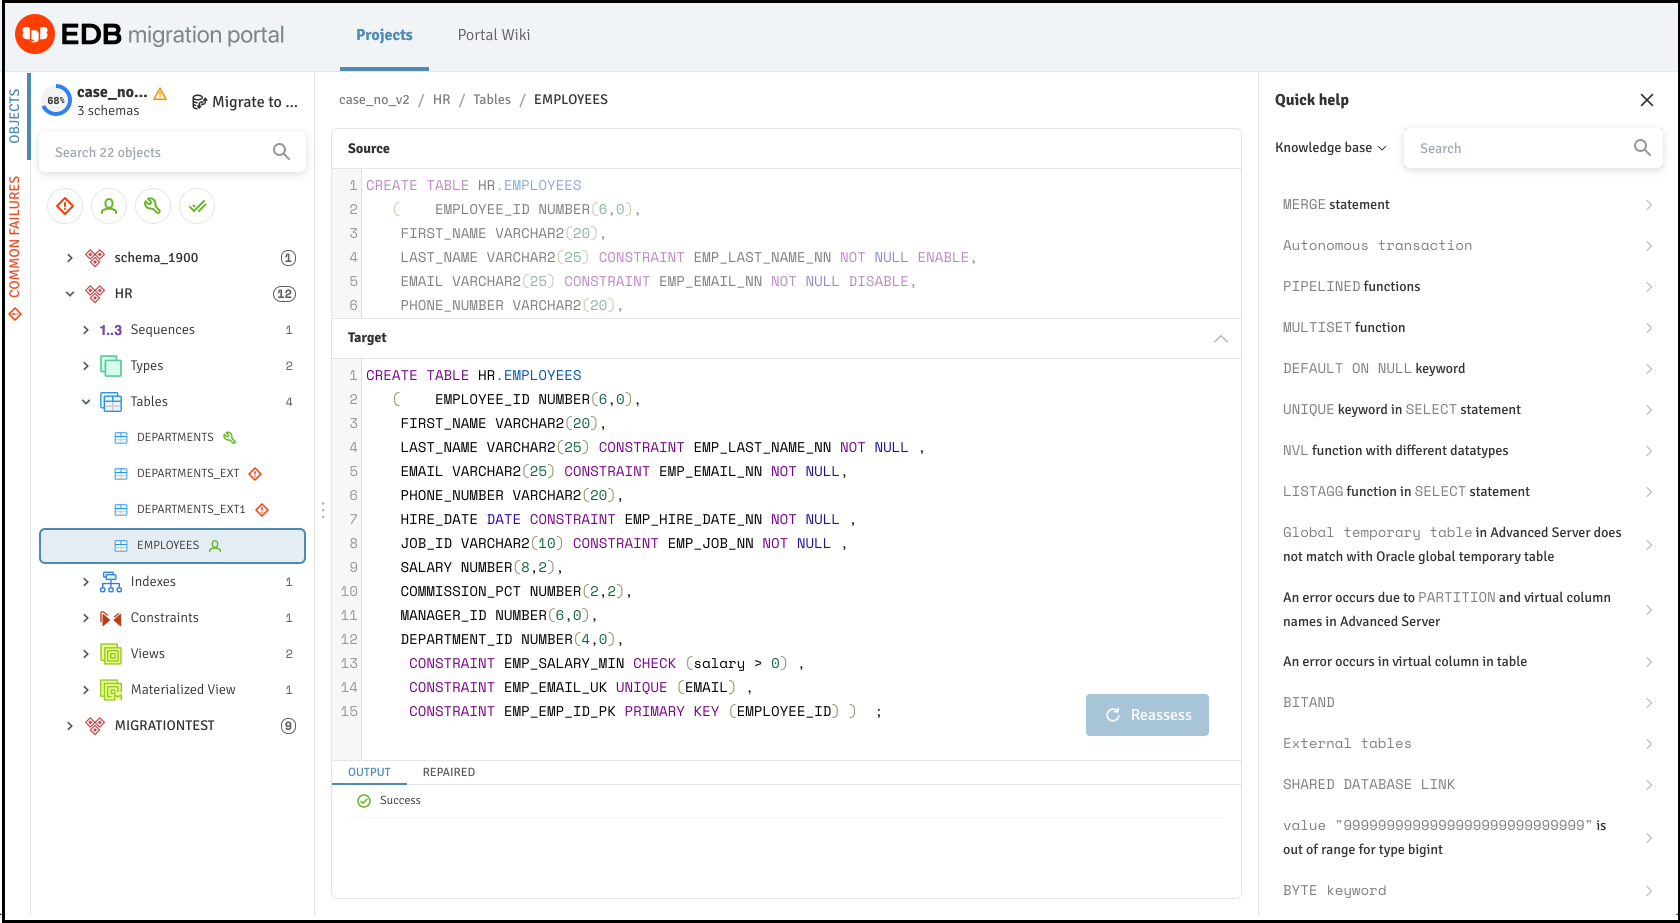
Figure 3-10: Workaround or resolution for incompatible objects
Similarly, you can make all incompatible objects compatible.
Note If the information or workaround for incompatible objects is not available in the Knowledge Base, please contact the support team for assistance.
When you have finished working with the DDL, you can either download the modified EDB compatible DDL as a .sql file or migrate the schemas see, Schema Migration.
Generating an Assessment Report
Migration Portal’s report functionality provides a high-level assessment summary of the schemas assessed for your project. In addition, the report provides details about the failed objects and the cause of failure.
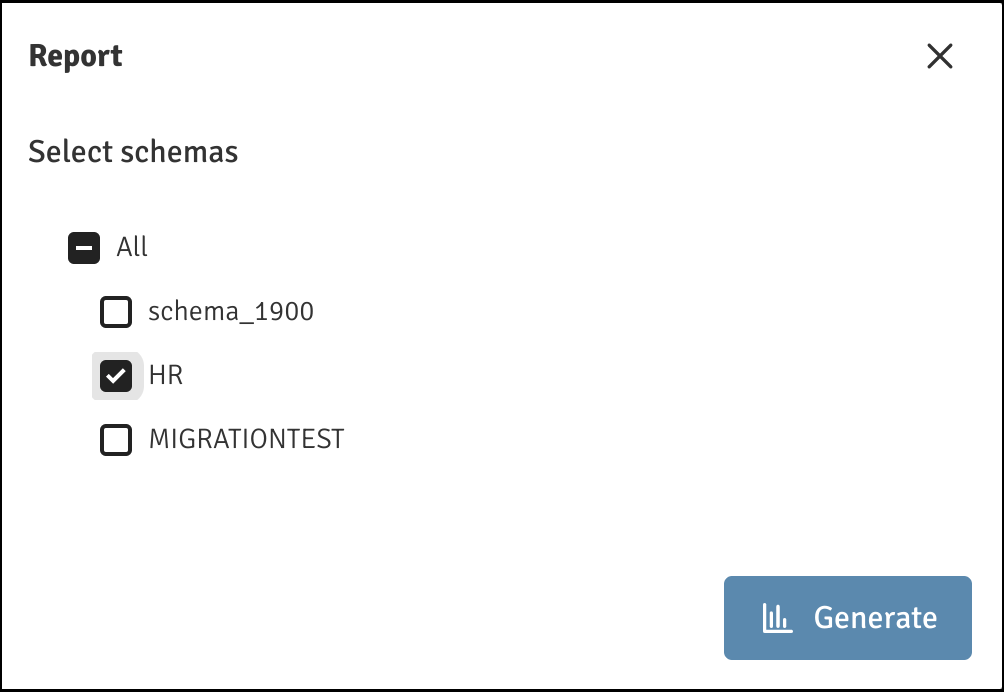
Figure 3-11: Select schemas for reports
To generate a report:
Click the
Reportbutton to access the schema selection dialog.Select the schemas that you wish to include in the report.
Click
Generateto generate the onscreen report.
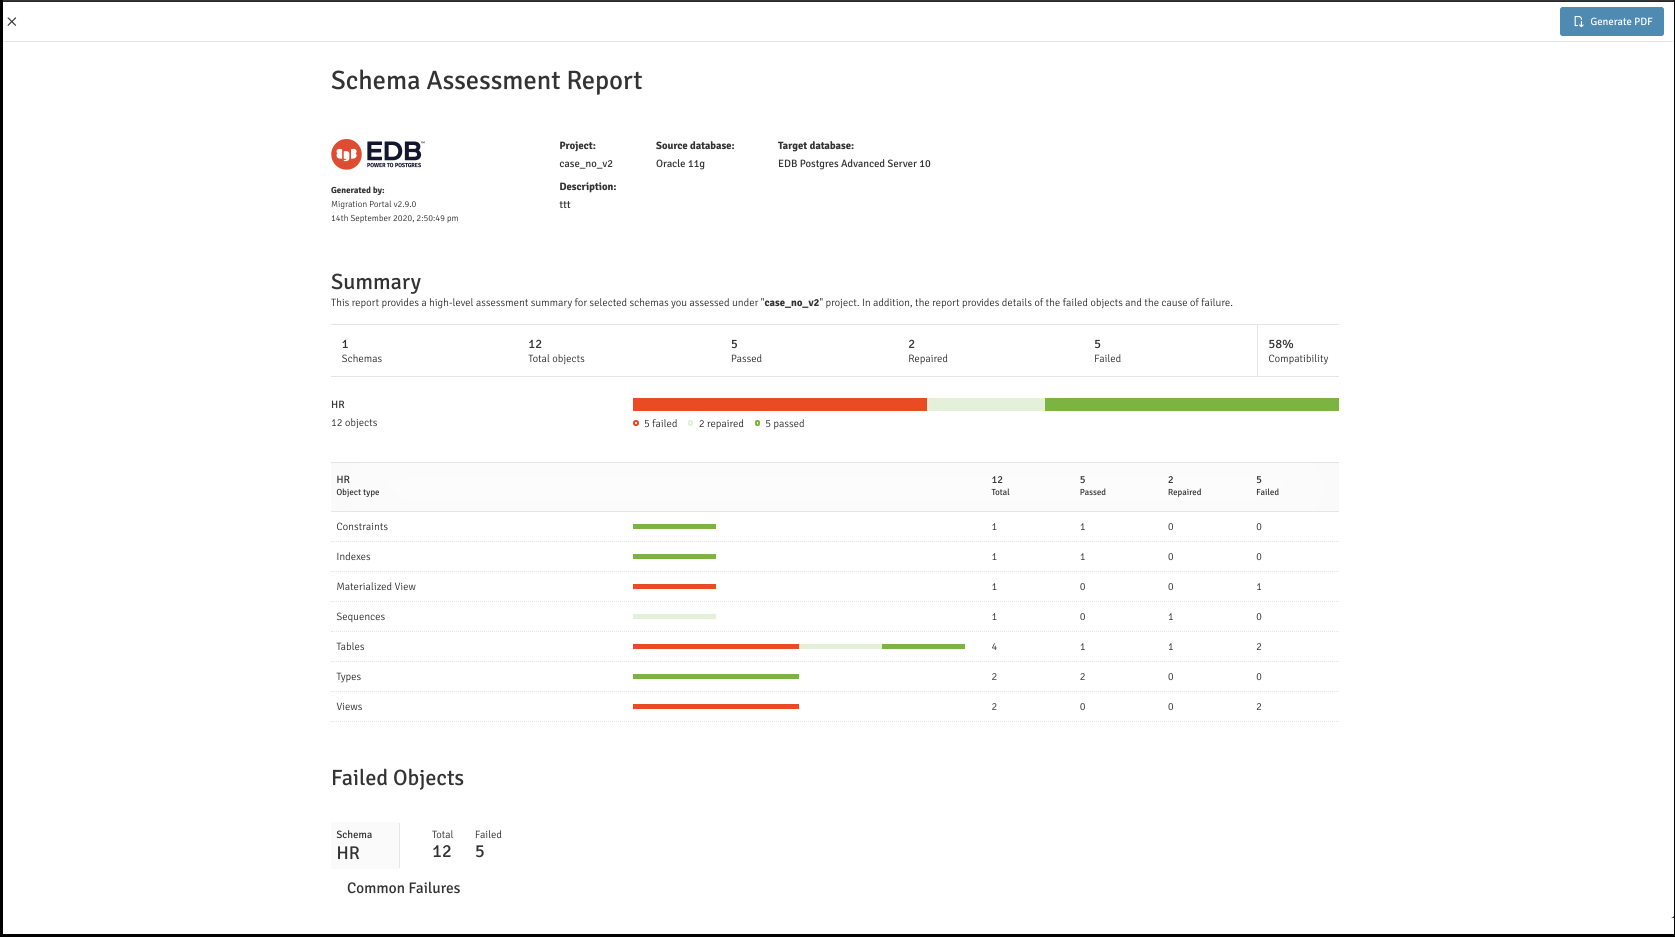
Figure 3-12: The Schema Assessment Report
You can optionally select Generate PDF to save the report in .pdf format. You can also view the count of distinct repair handlers applied to the DDLs under the selected schemas.
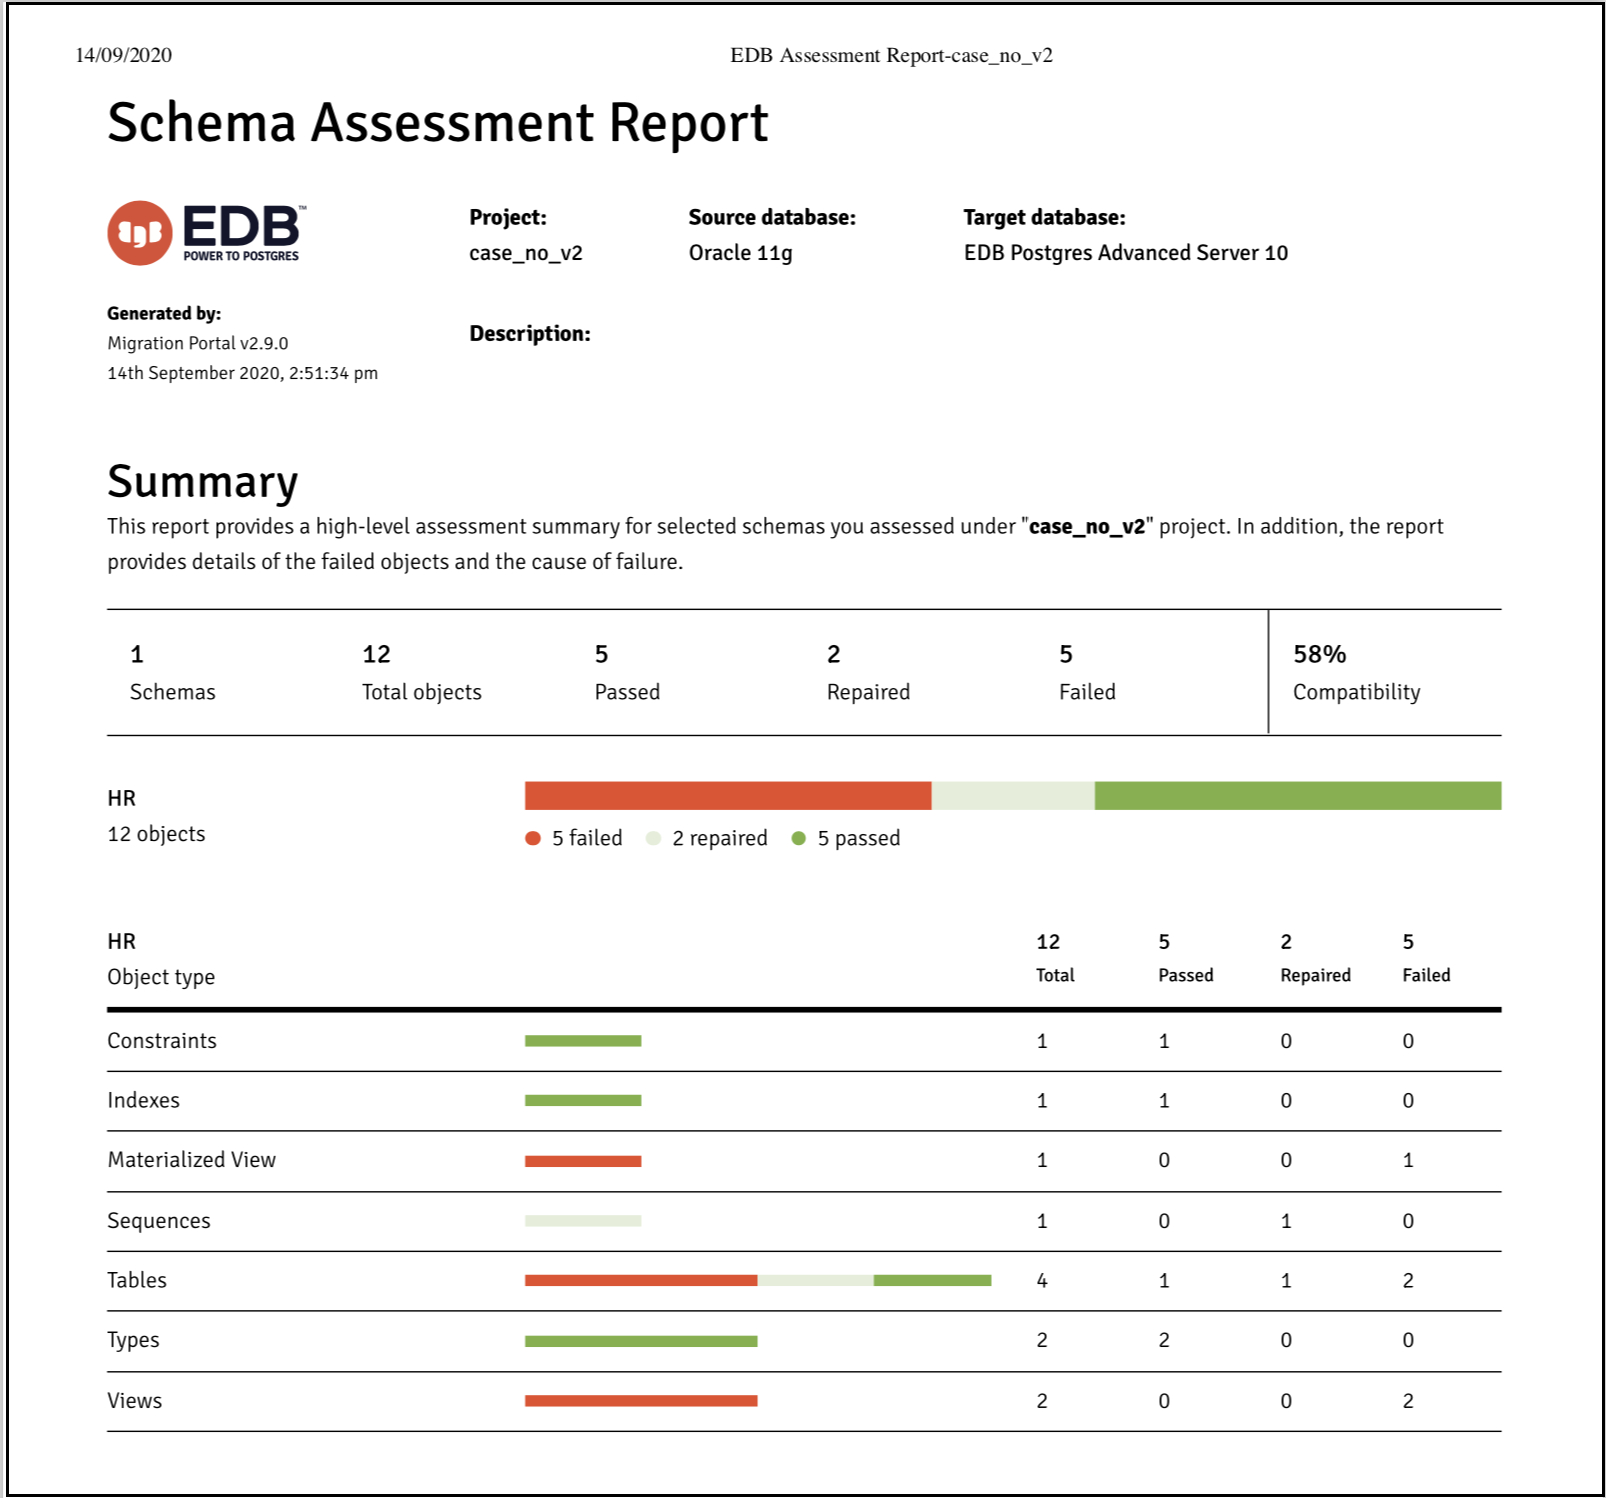
Figure 3-13: The saved pdf report
Schema Migration
After resolving errors in your schemas, you can use the schemas with a client application such as pgAdmin, ToadEdge, or the PSQL client, or migrate the schema to an EDB Postgres Advanced Server.
Note
For more information about using Toad Edge with EDB Postgres Advanced Server, see Toad Edge for Postgres.
You can choose one of the following options for migrating schemas; migrate to an:
- Existing on-premises EDB Postgres Advanced Server
- New on-premises EDB Postgres Advanced Server
- EDB Postgres Advanced Server on Cloud
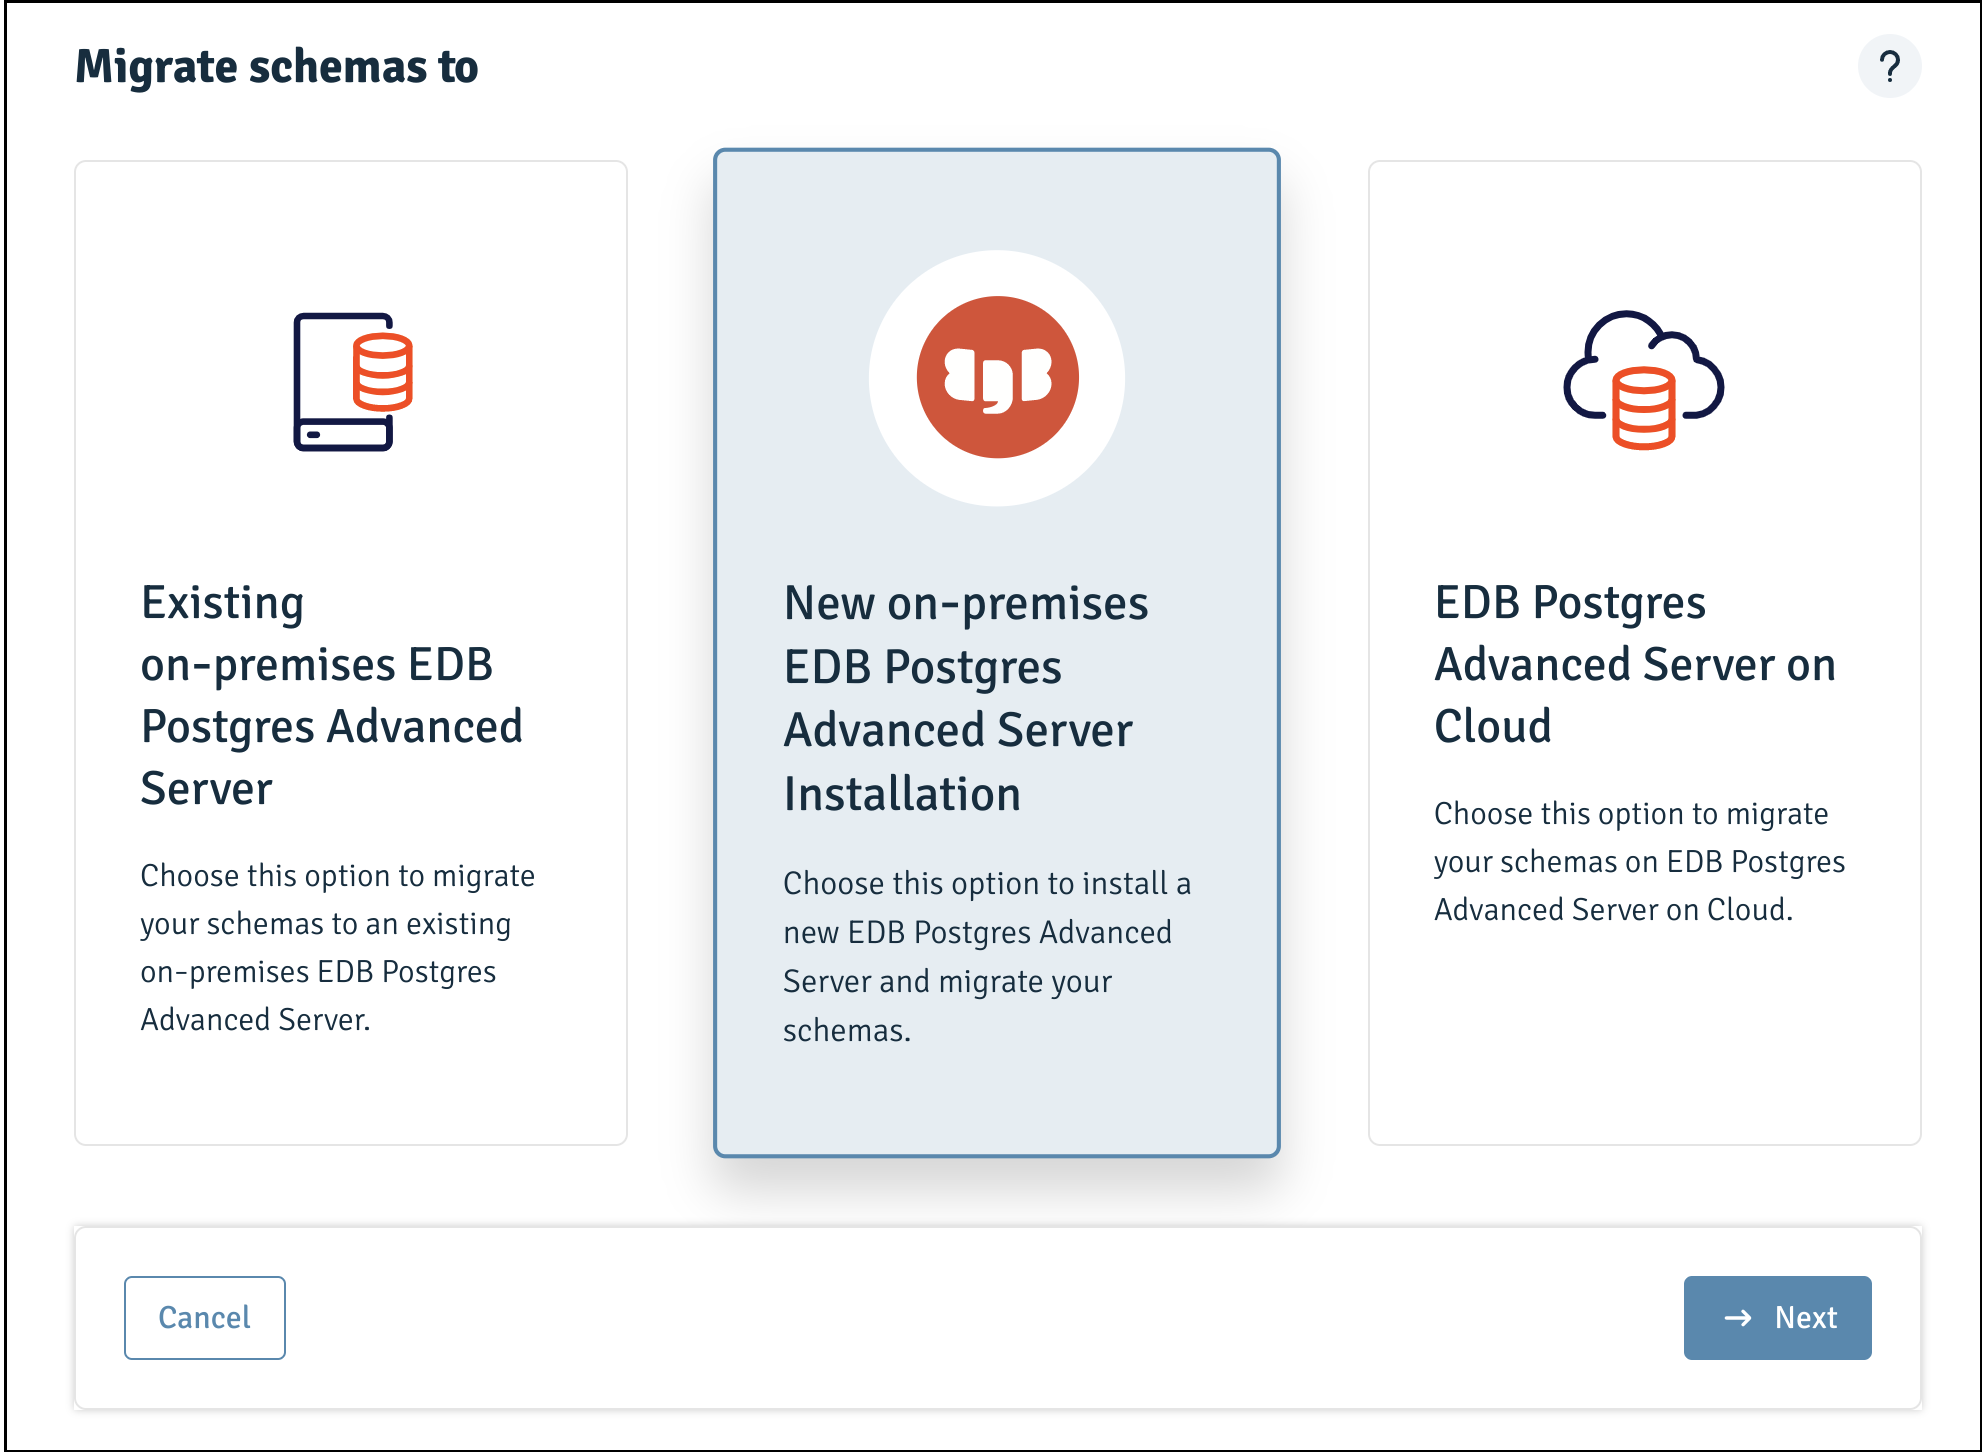
Figure 3-14: Schema migration home page
Migrating to an Existing On-Premises EDB Postgres Advanced Server Host
You can migrate schemas to an existing on-premises EDB Postgres Advanced Server on Windows or Linux platforms.
Migrating Schemas on Windows
- Select the
Existing on-premises EDB Postgres Postgres Advanced Serveroption:
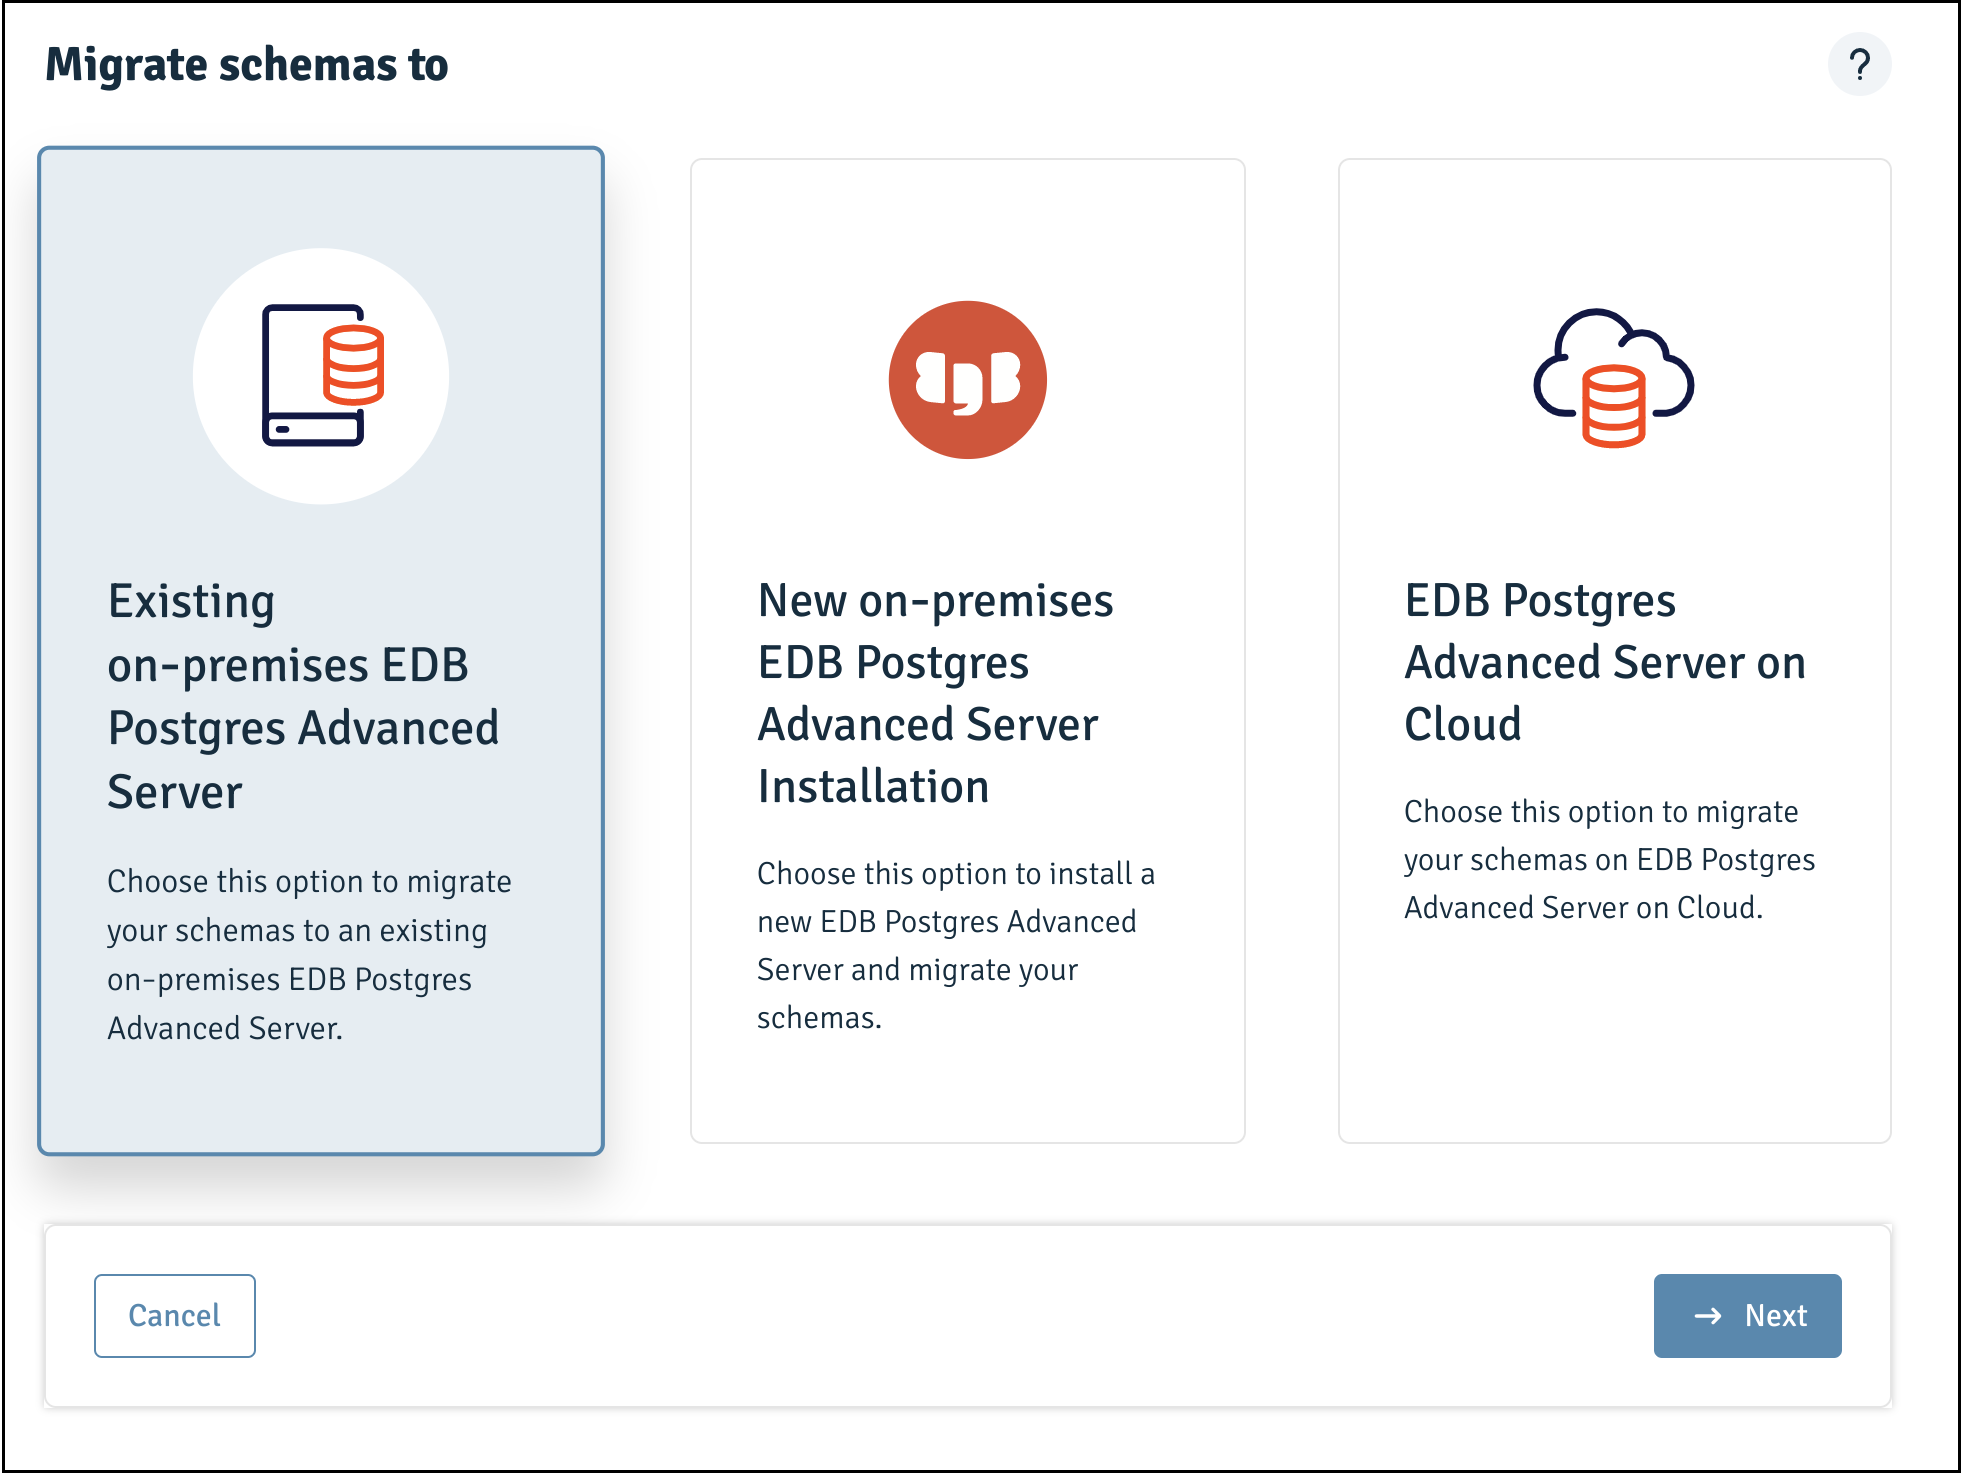
Figure 3-15: Existing on-premises EDB Postgres Advanced Server home page
- Select one or more schemas to migrate to EDB Postgres Advanced Server:
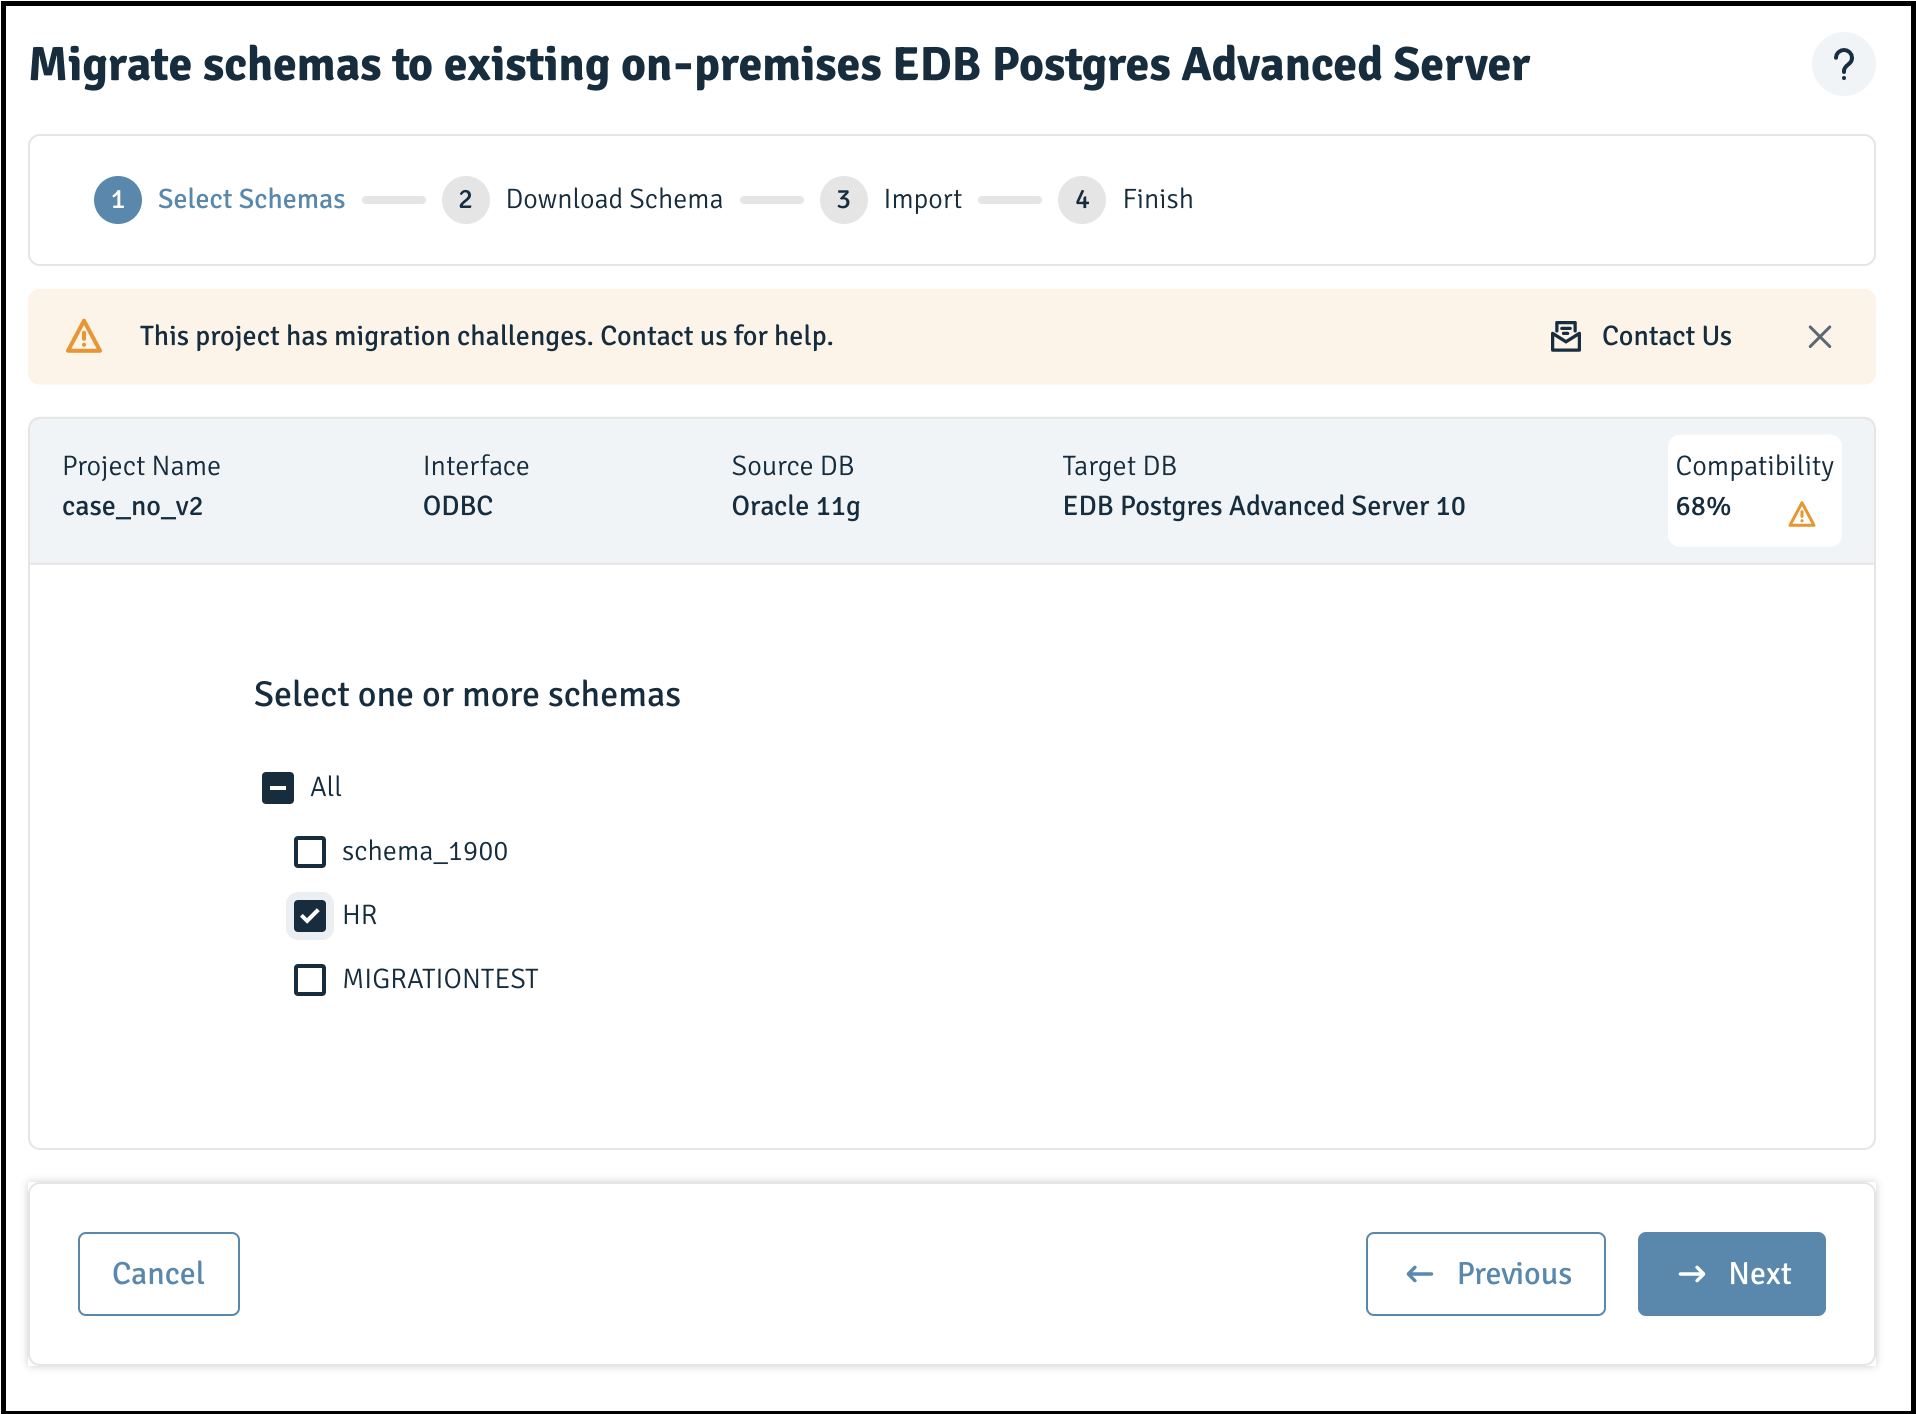
Figure 3-16: Selecting schemas for migration
Note If your schemas are not 100% compatible, a banner will be displayed as shown; complete the
Contact Usform for any assistance required.
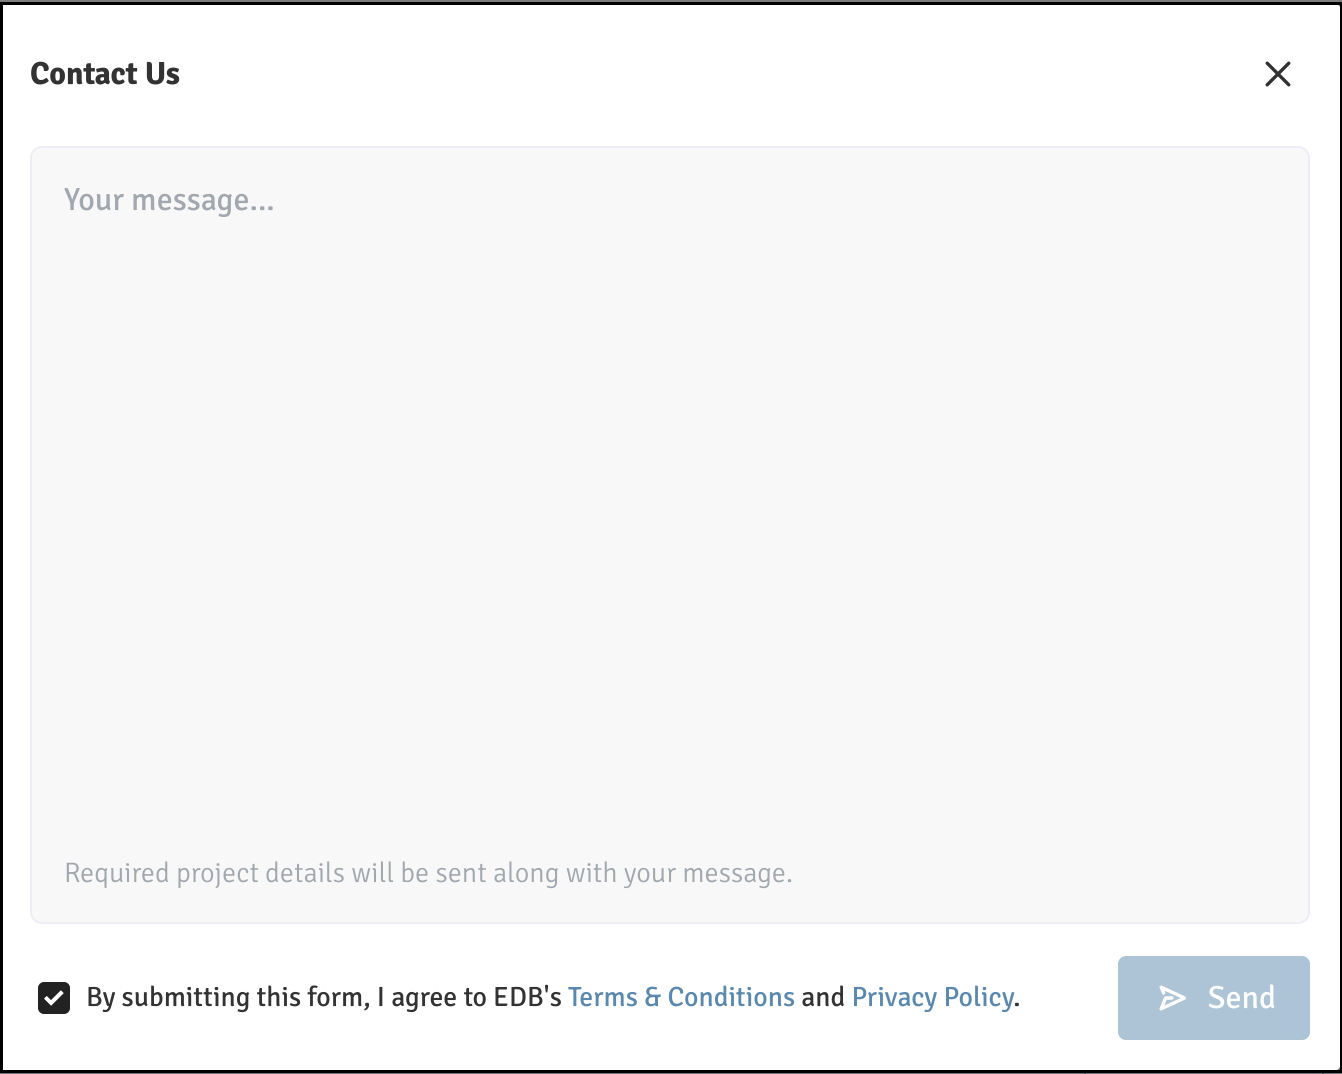
Figure 3-17: The Contact Us form
- Download the assessed schemas:
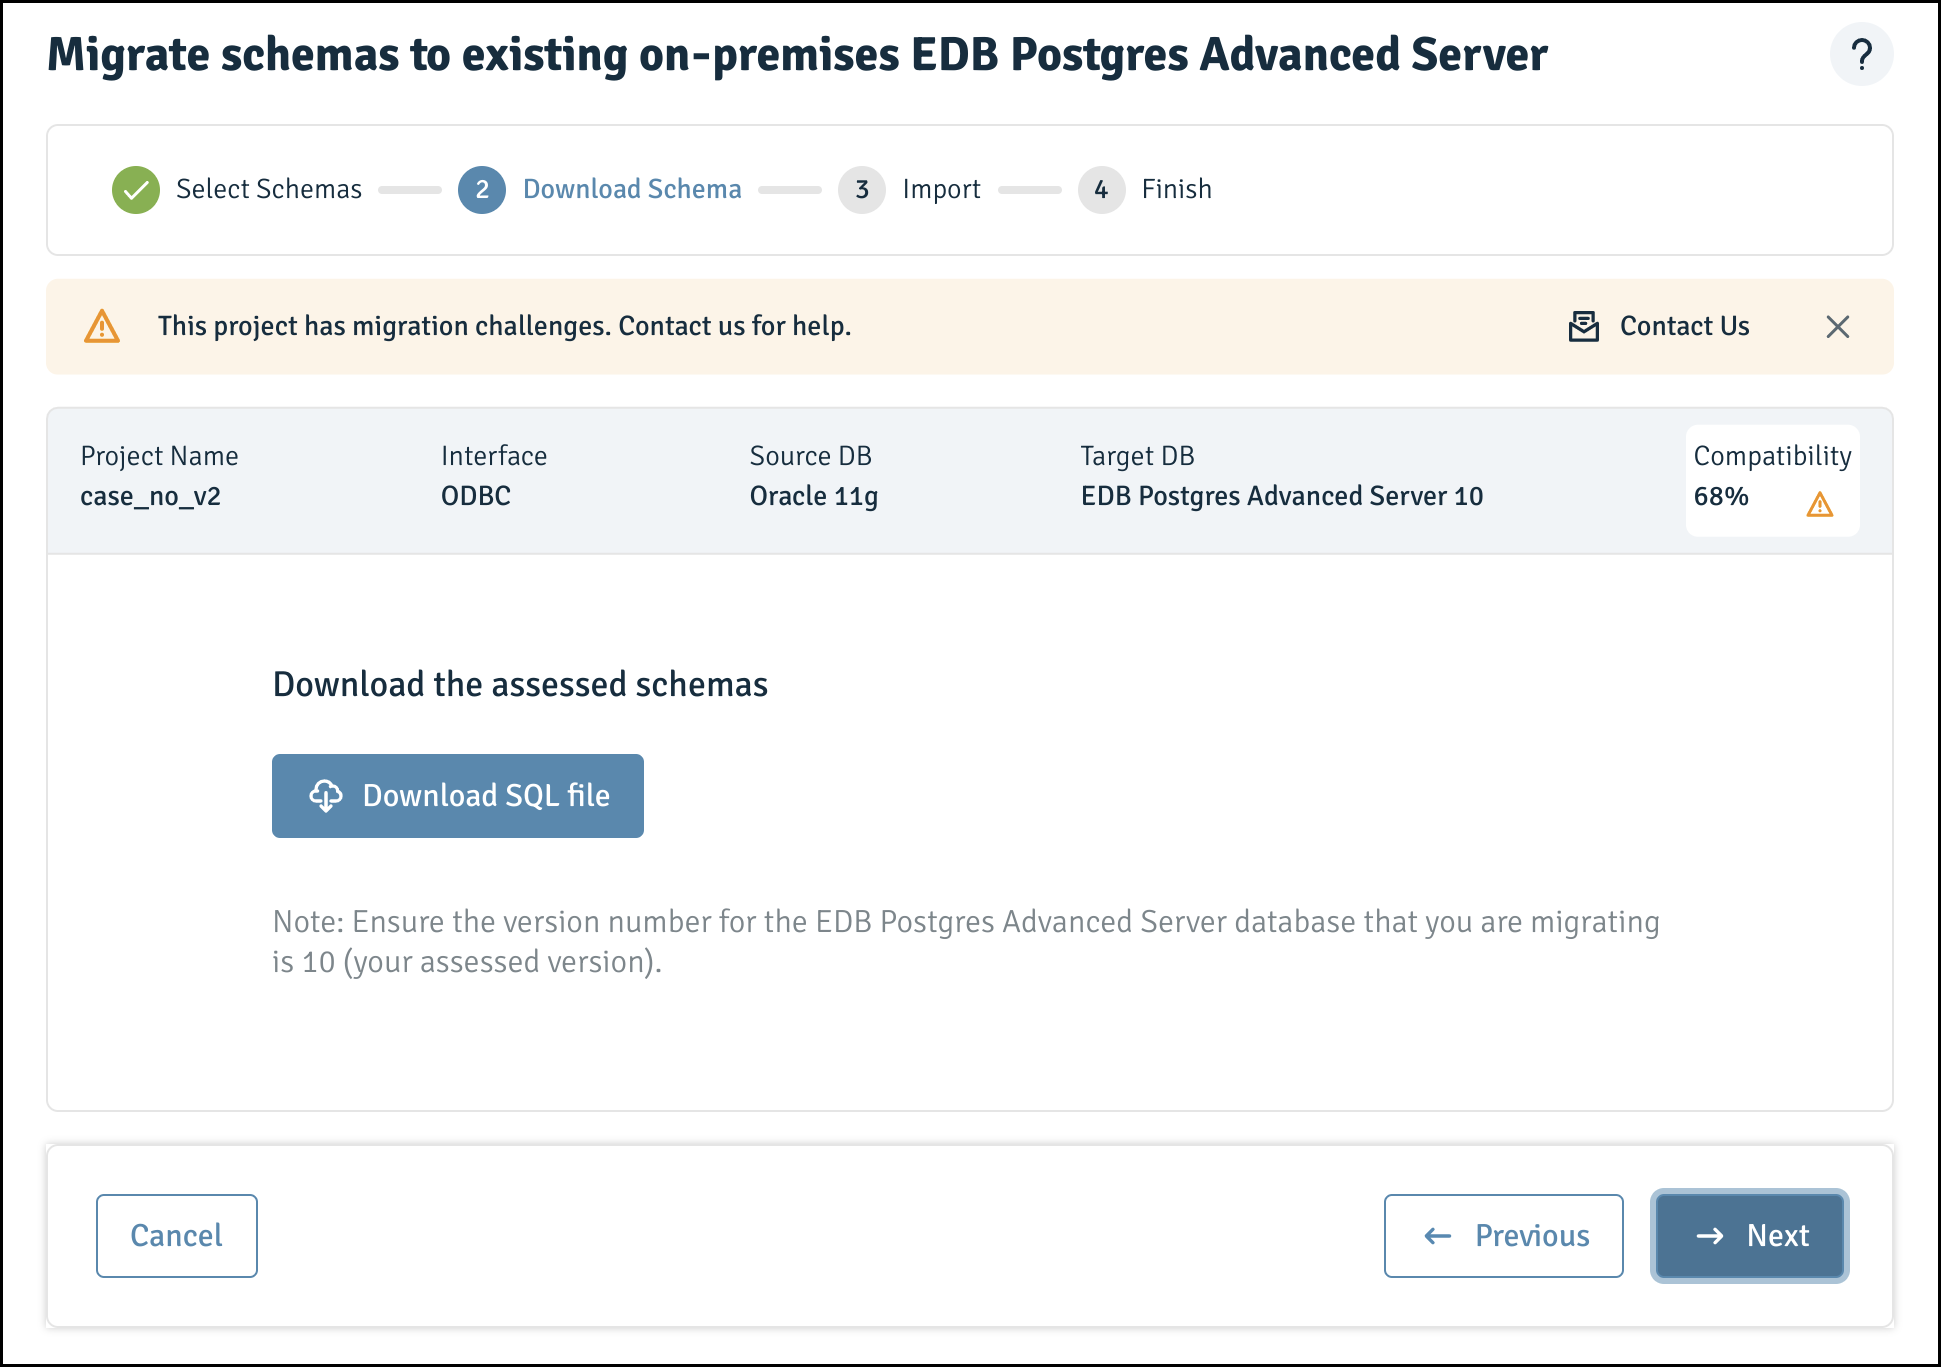
Figure 3-18: Download the assessed schemas
- Click on
Windows:
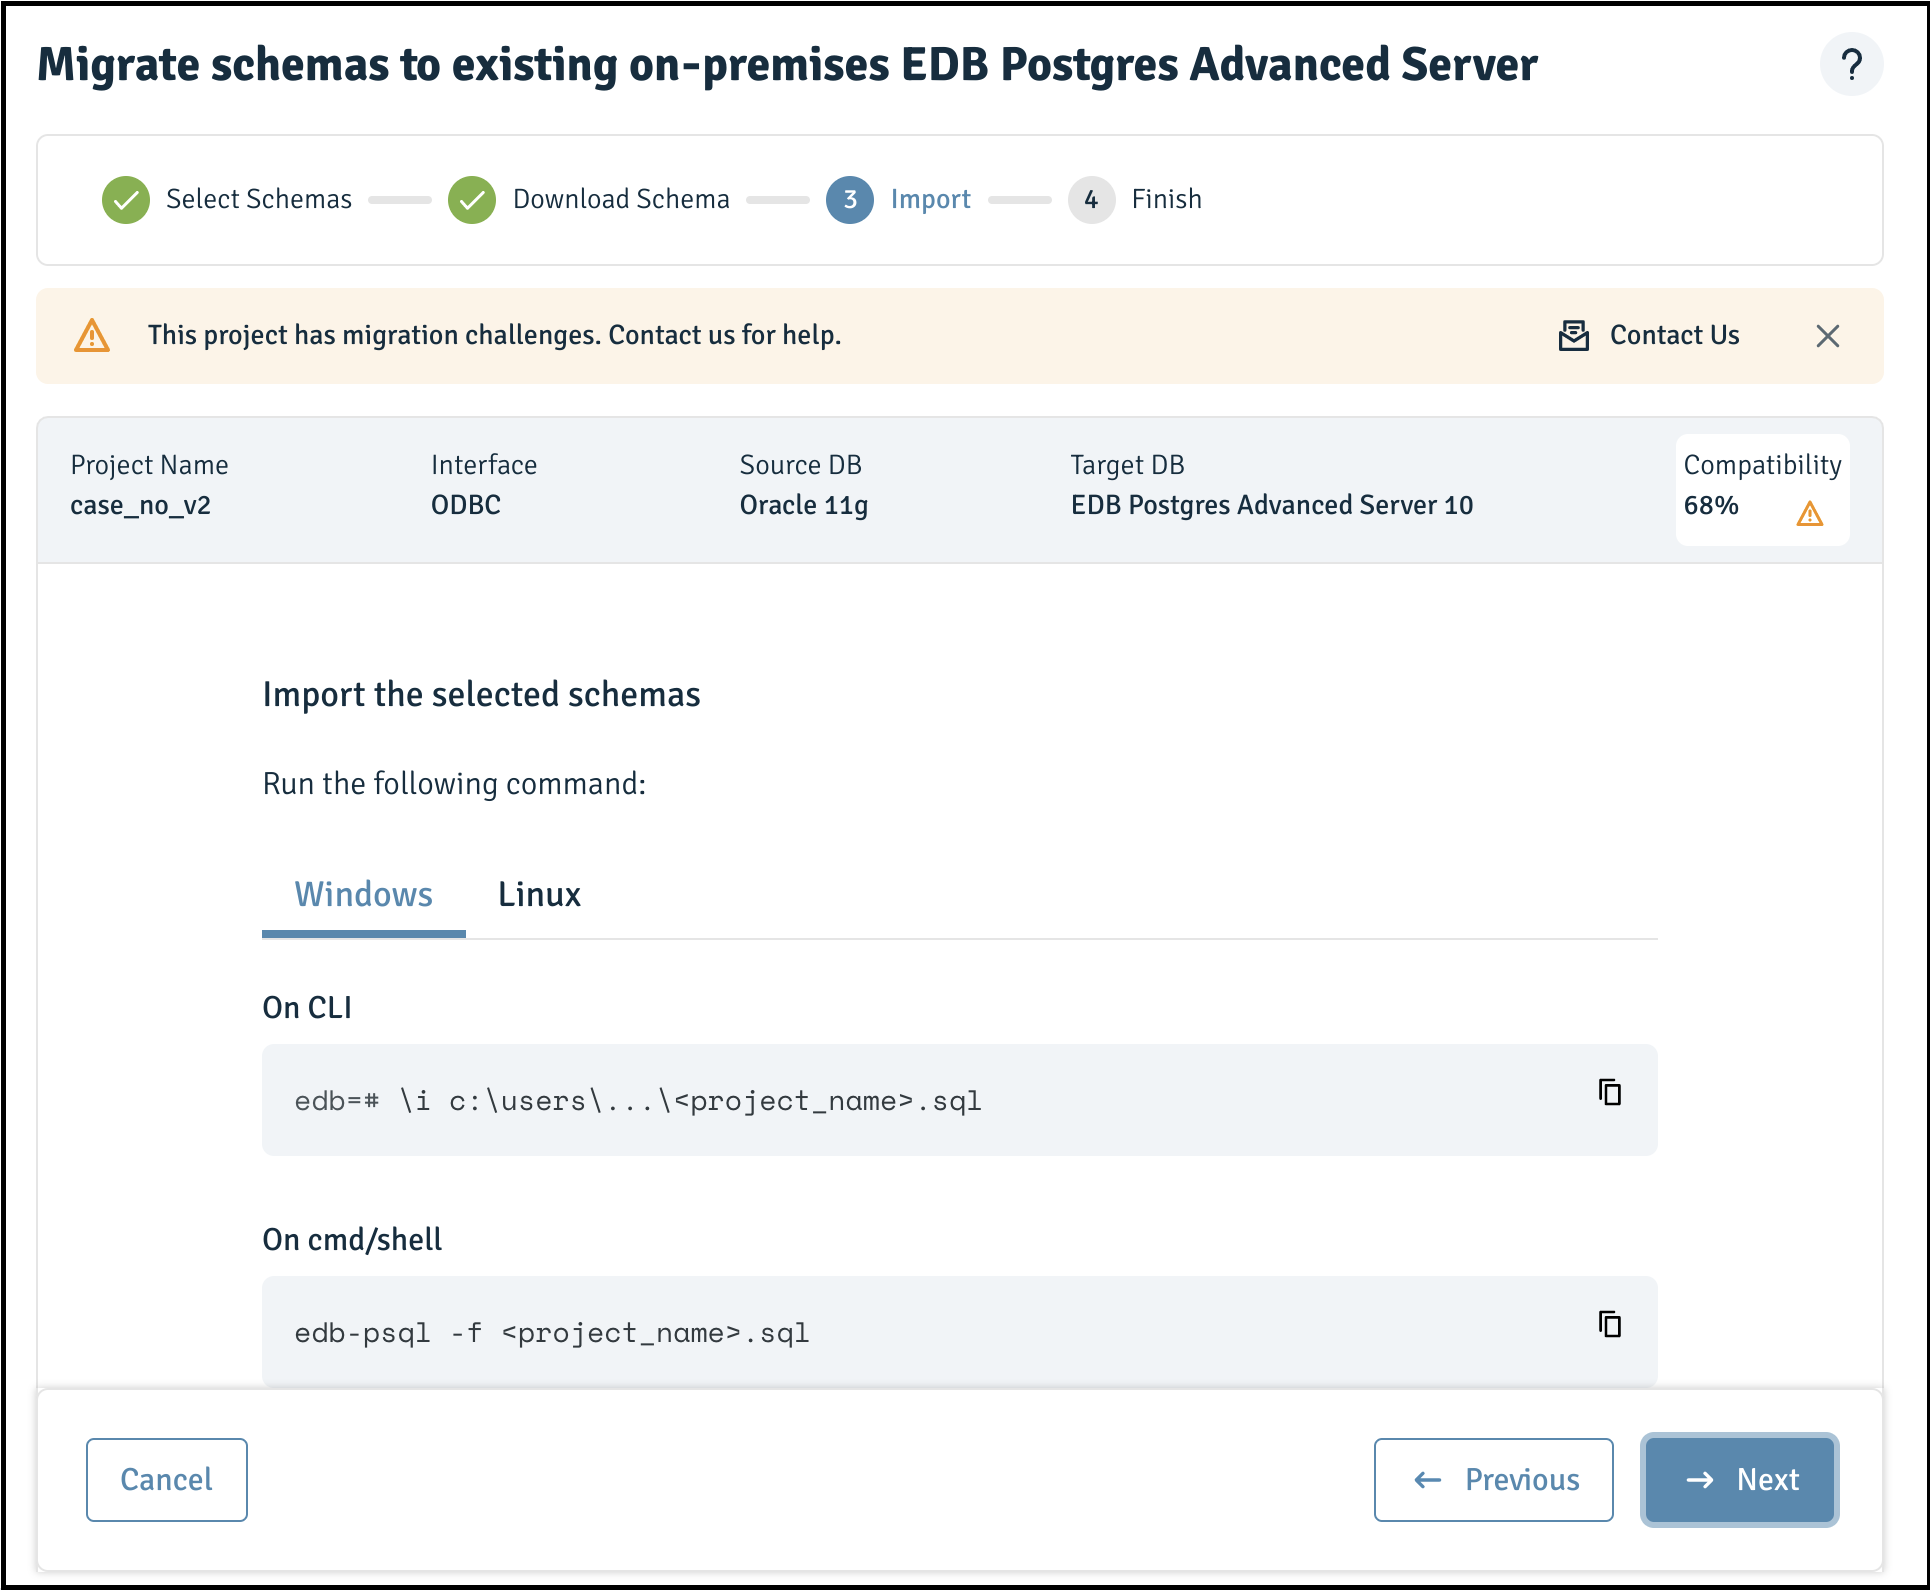
Figure 3-19: Selecting Windows operating system
- To import the schemas, run the following command:
- On CLI
\i c:\users\...\<project_name>.sql- On cmd/shell
edb-psql -f <project_name>.sqlNote You can also use
pgAdmininstead.
The converted schemas are migrated to the target server.
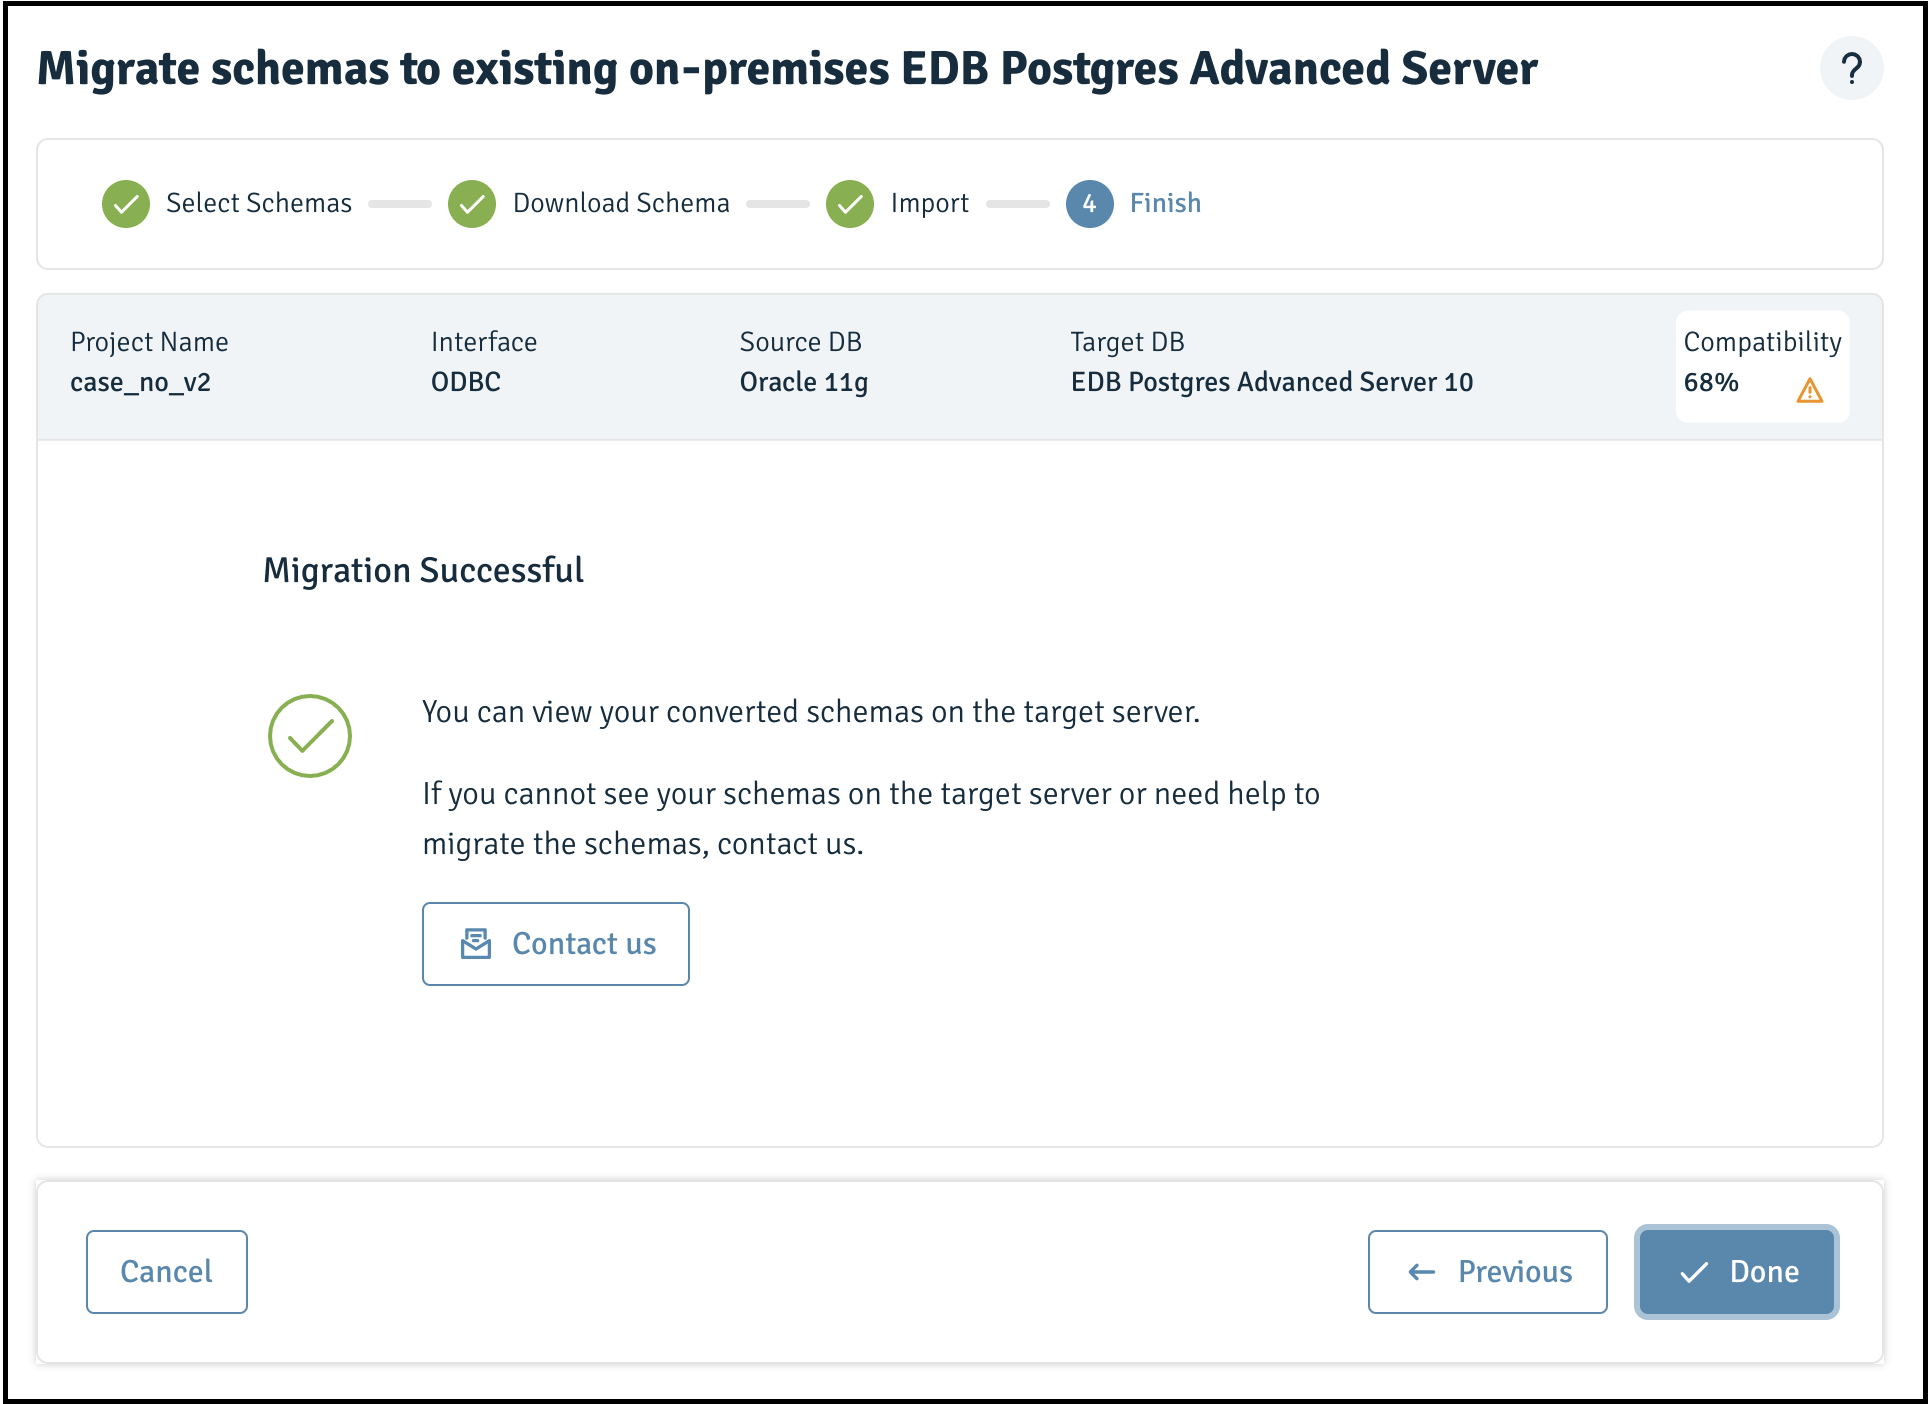
Figure 3-20: A successful migration
Migrating Schemas on Linux
To migrate schemas to an existing on-premises EDB Postgres Advanced Server on Linux, complete the following steps:
- Click the
Existing on-premises EDB Postgres Advanced Serveroption:
Figure 3-21: Existing on-Premises EDB Postgres Advanced Server home page
- Select one or more schemas to migrate to EDB Postgres Advanced Server:

Figure 3-22: Selecting schemas for migration
- Download the assessed schemas:
Figure 3-23: Download the assessed schemas
- Click on
Linux:
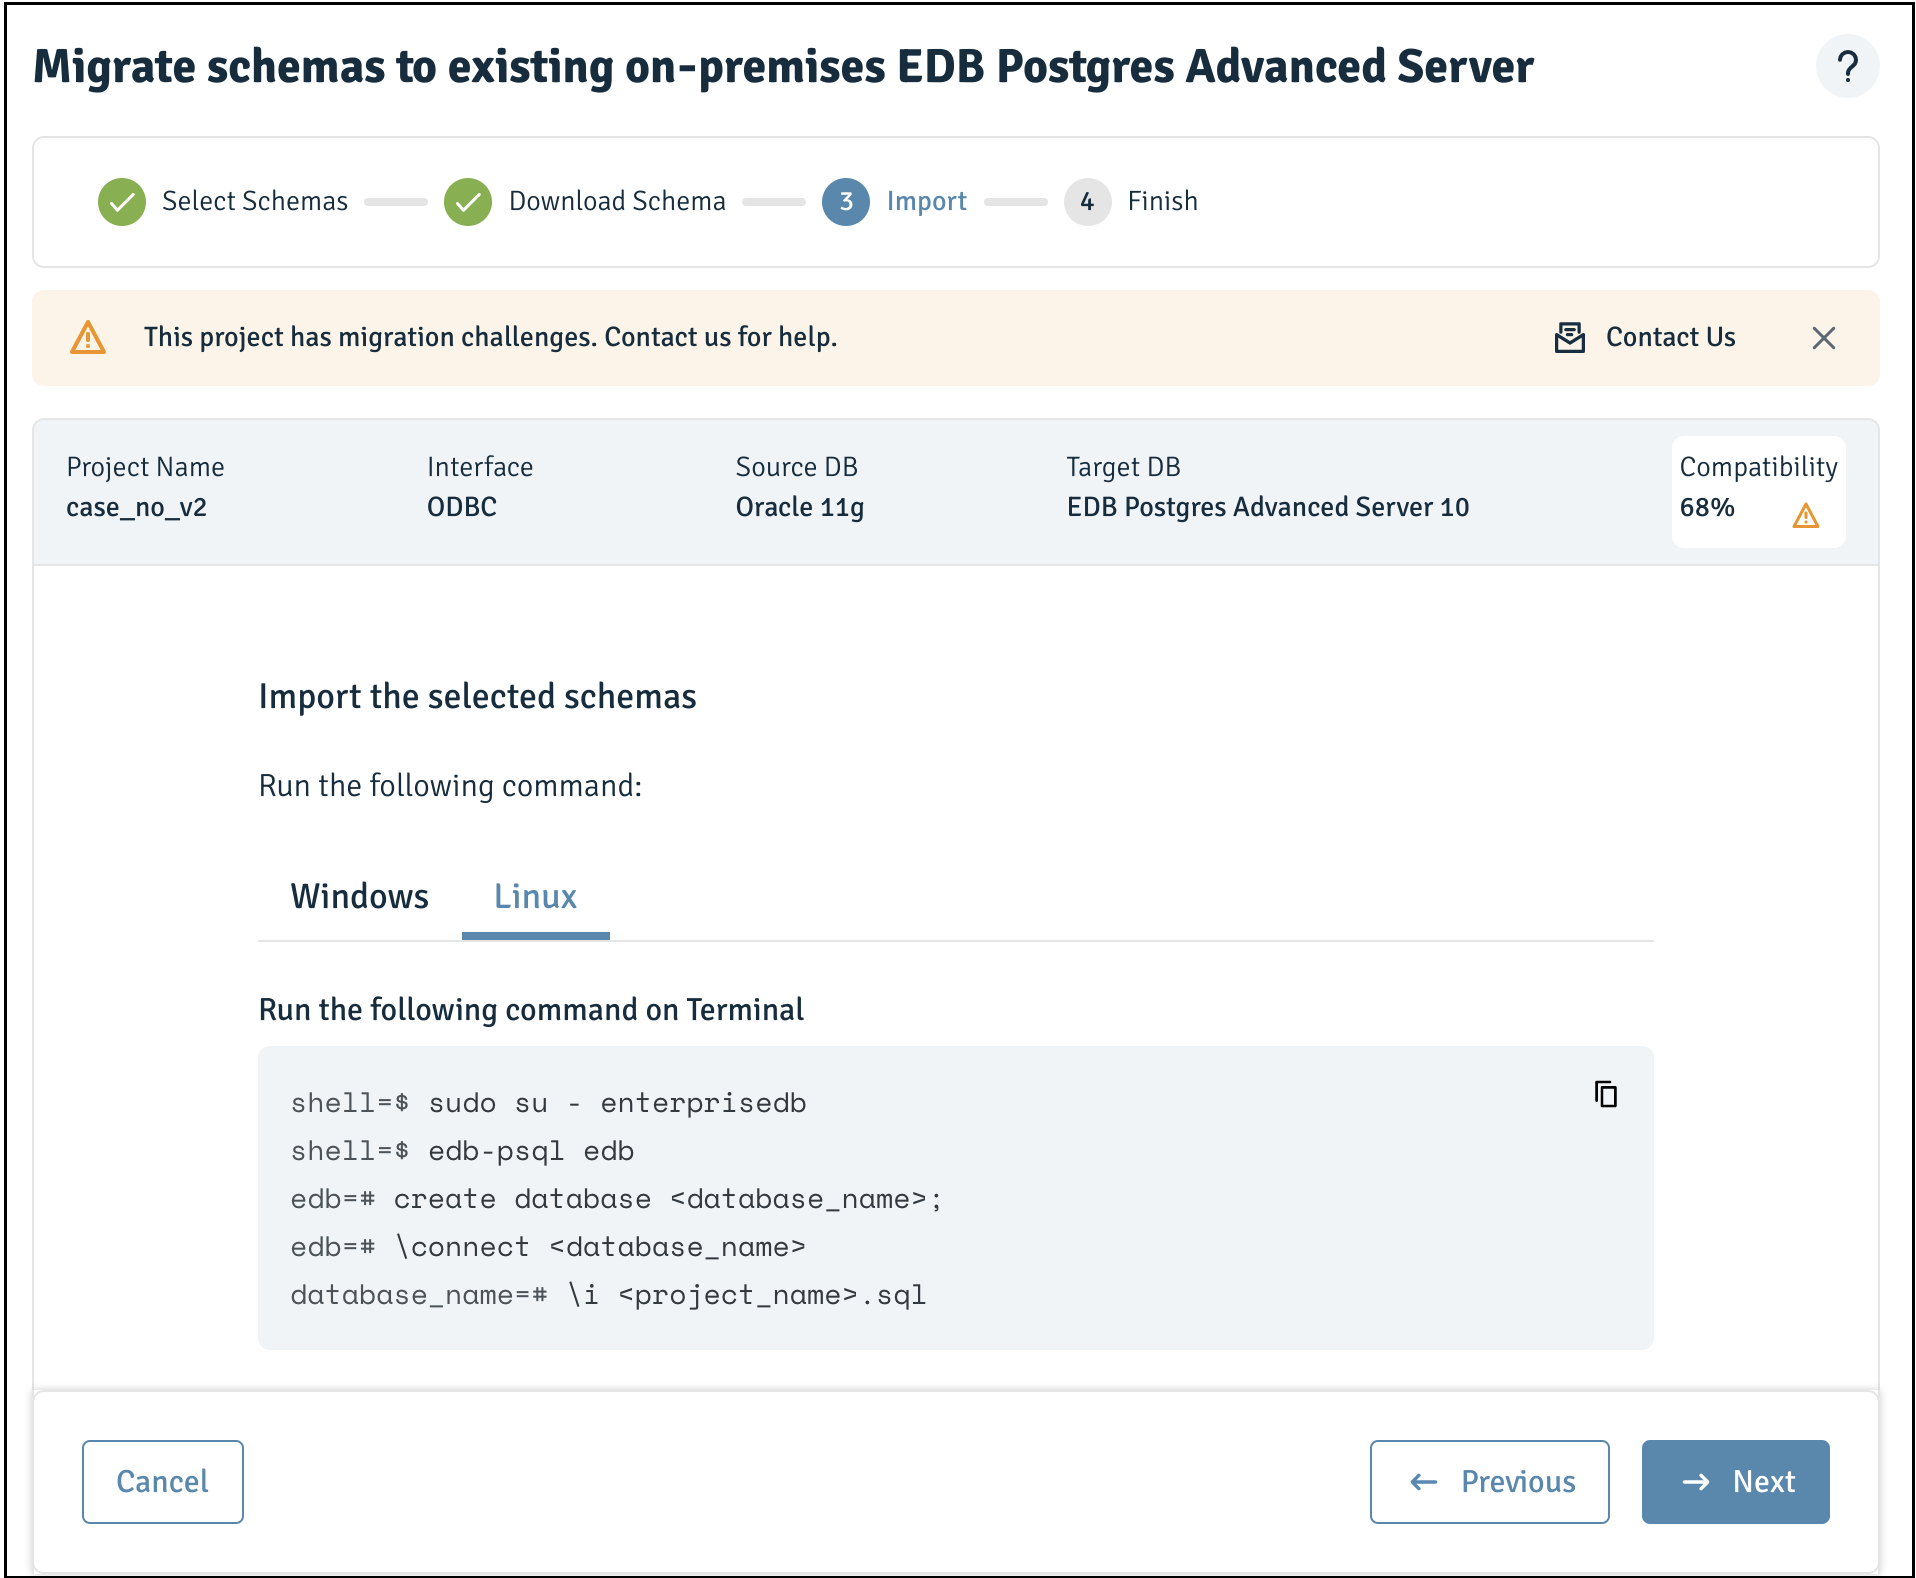
Figure 3-24: Selecting Linux operating system
- To import the schemas, invoke the following
edb-psqlclient commands:
sudo su - enterprisedb
edb-psql edb
create database <database_name>;
\\connect <database_name>
\\i <project_name>.sql
Note You can optionally use the
pgAdminclient for the import.
The converted schemas are migrated to the target server.
Figure 3-25: A successful schema migration
Migrating to a New On-Premises EDB Postgres Advanced Server Installation
You can install new EDB Postgres Advanced Server on-premises on Windows or Linux platforms and migrate the schemas.
Migrating Schemas on Windows
To migrate schemas to a new on-premises EDB Postgres Advanced Server on Windows, complete the following steps:
- Click
New on-premises EDB Postgres Postgres Advanced Serveroption.
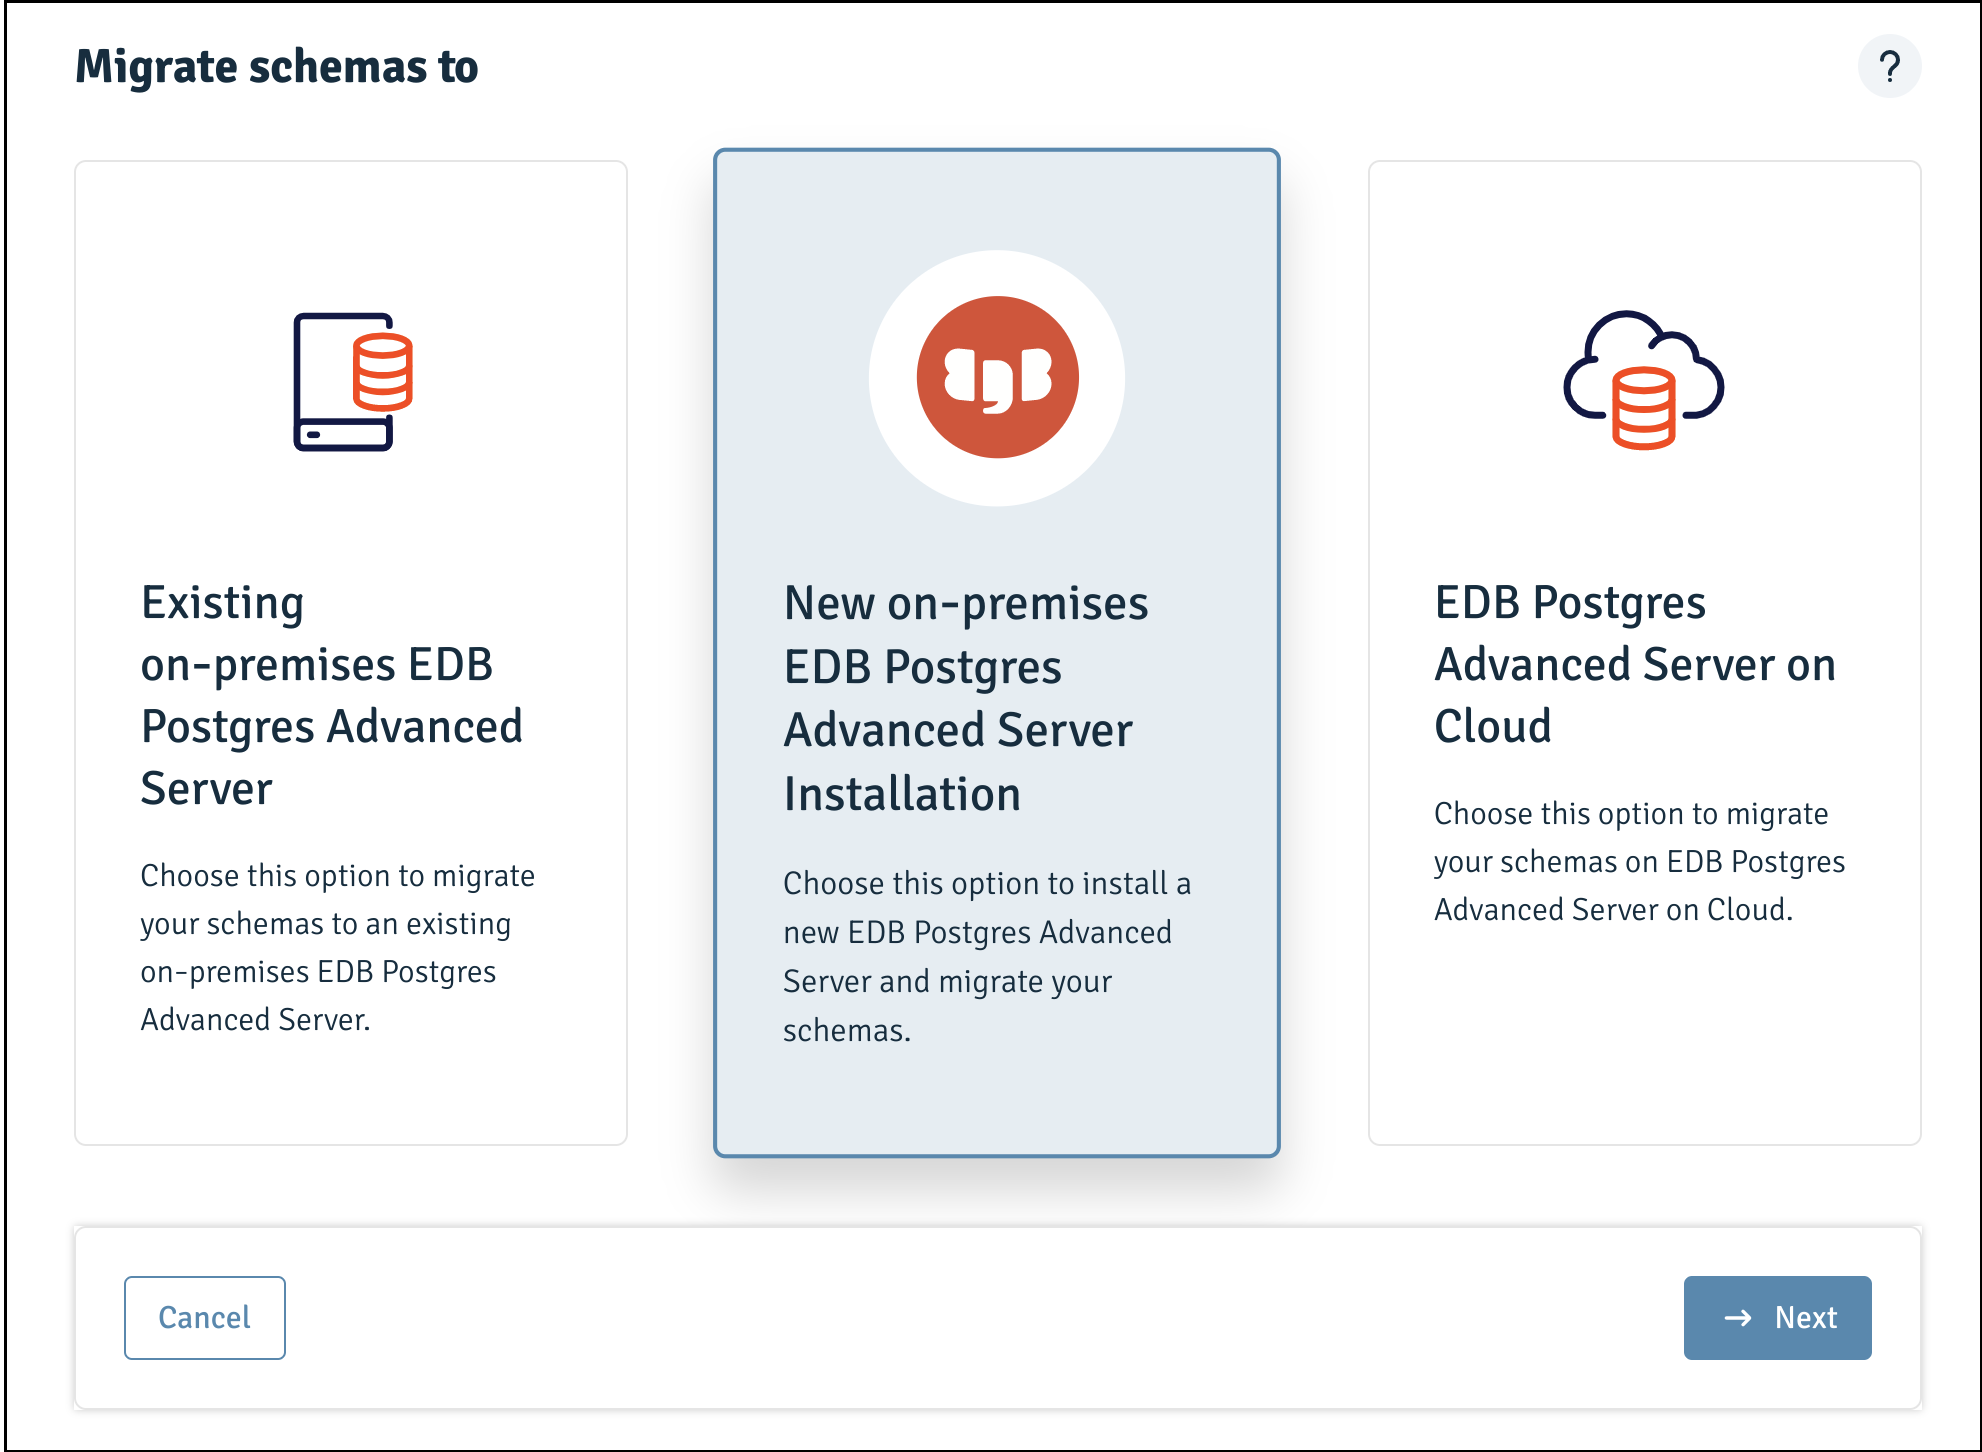
Figure 3-26: New on-premises EDB Postgres Advanced Server home page
- Select one or more schemas to migrate on EDB Postgres Advanced Server.
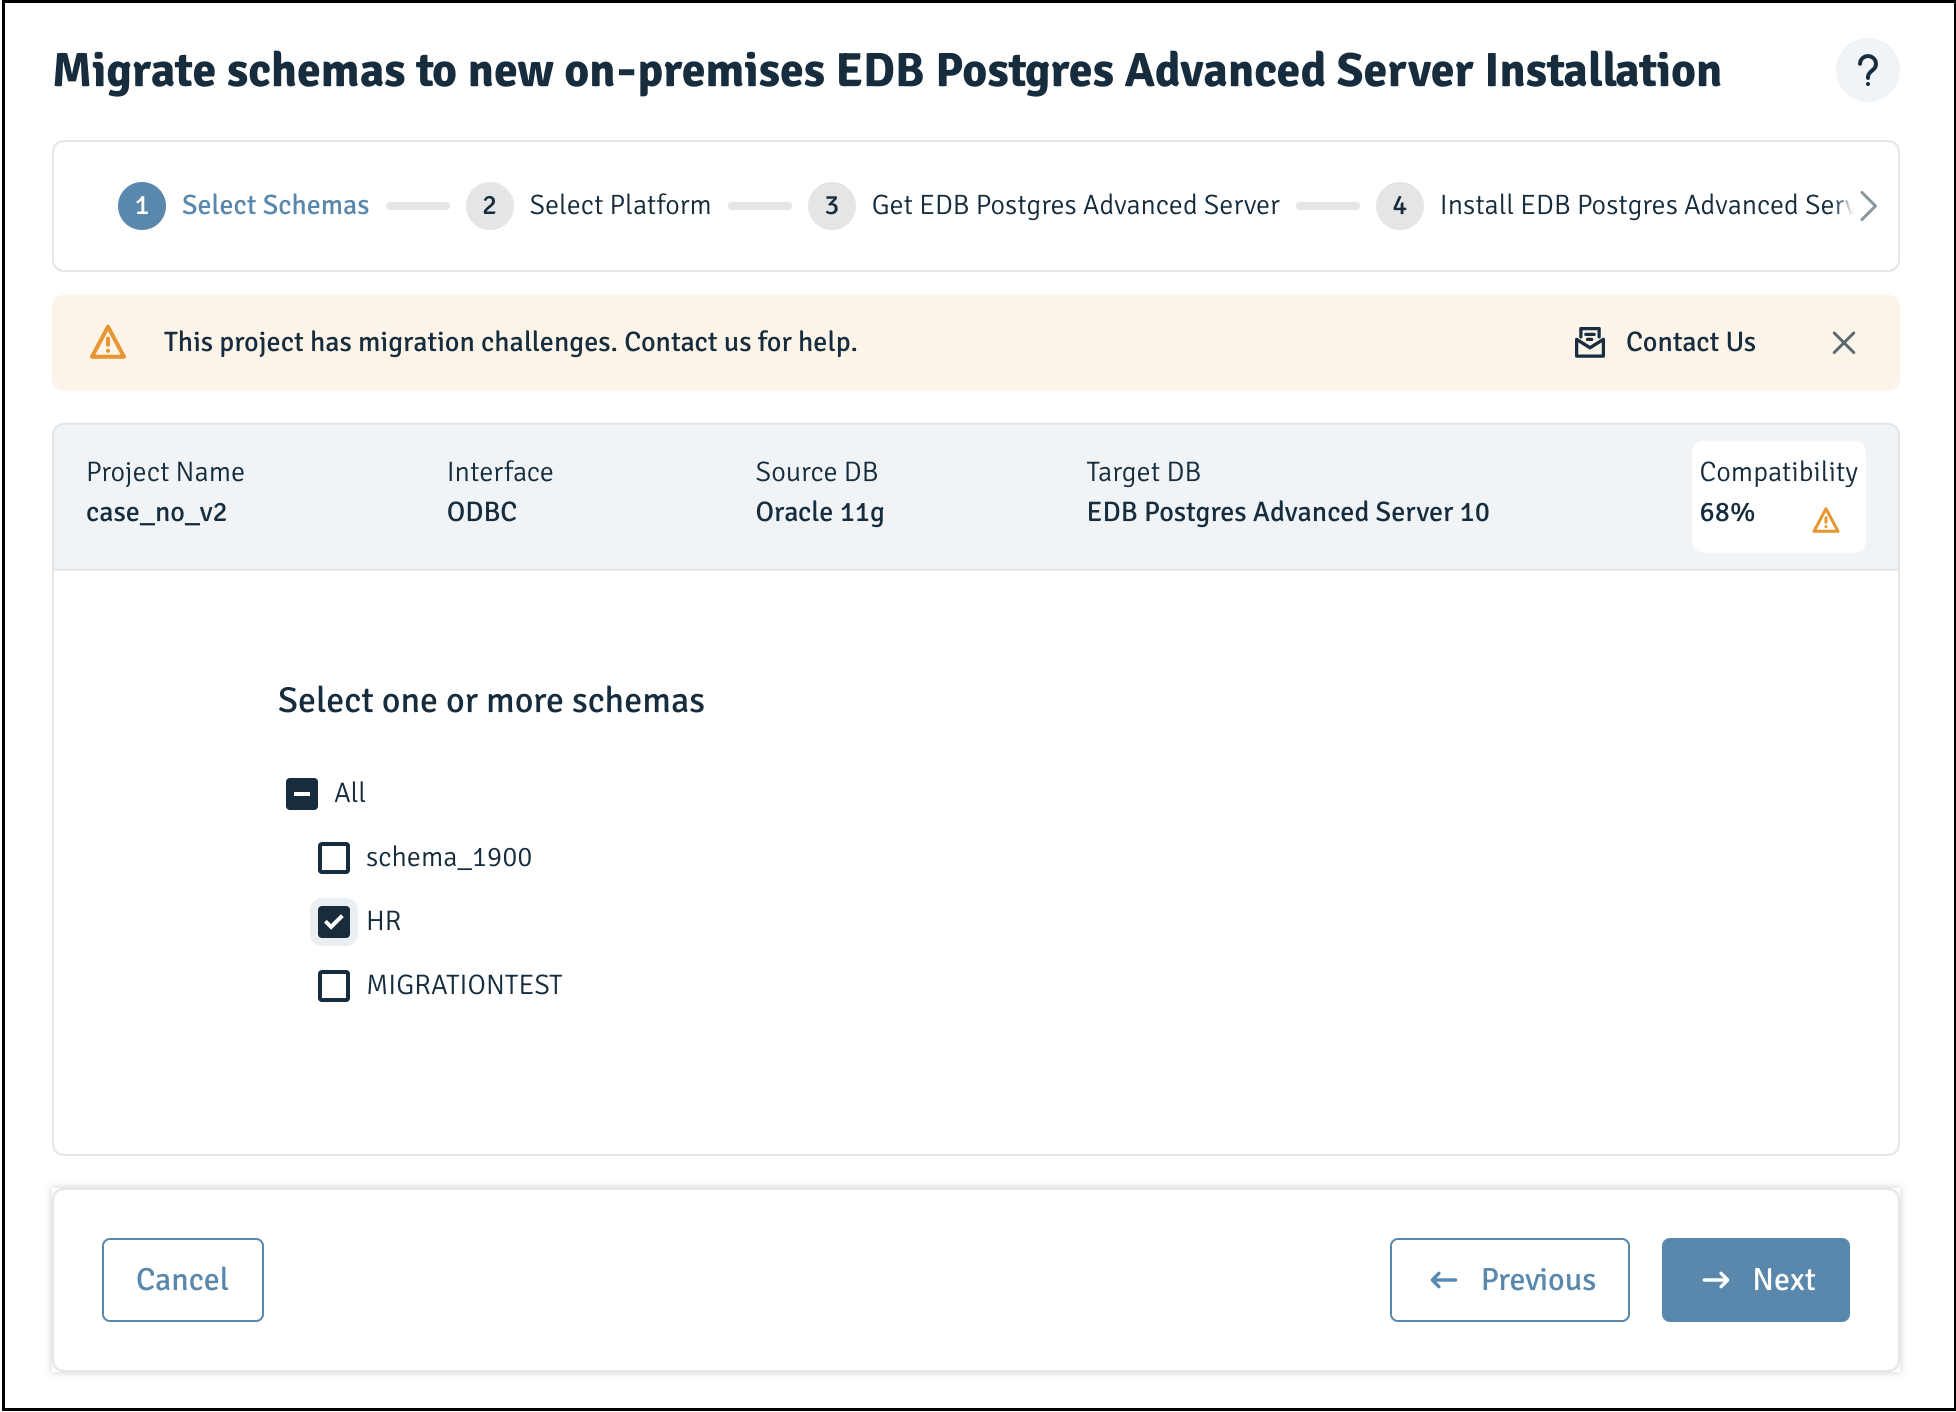
Figure 3-27: Selecting schemas for migration
- Select the
Windowsoperating system.
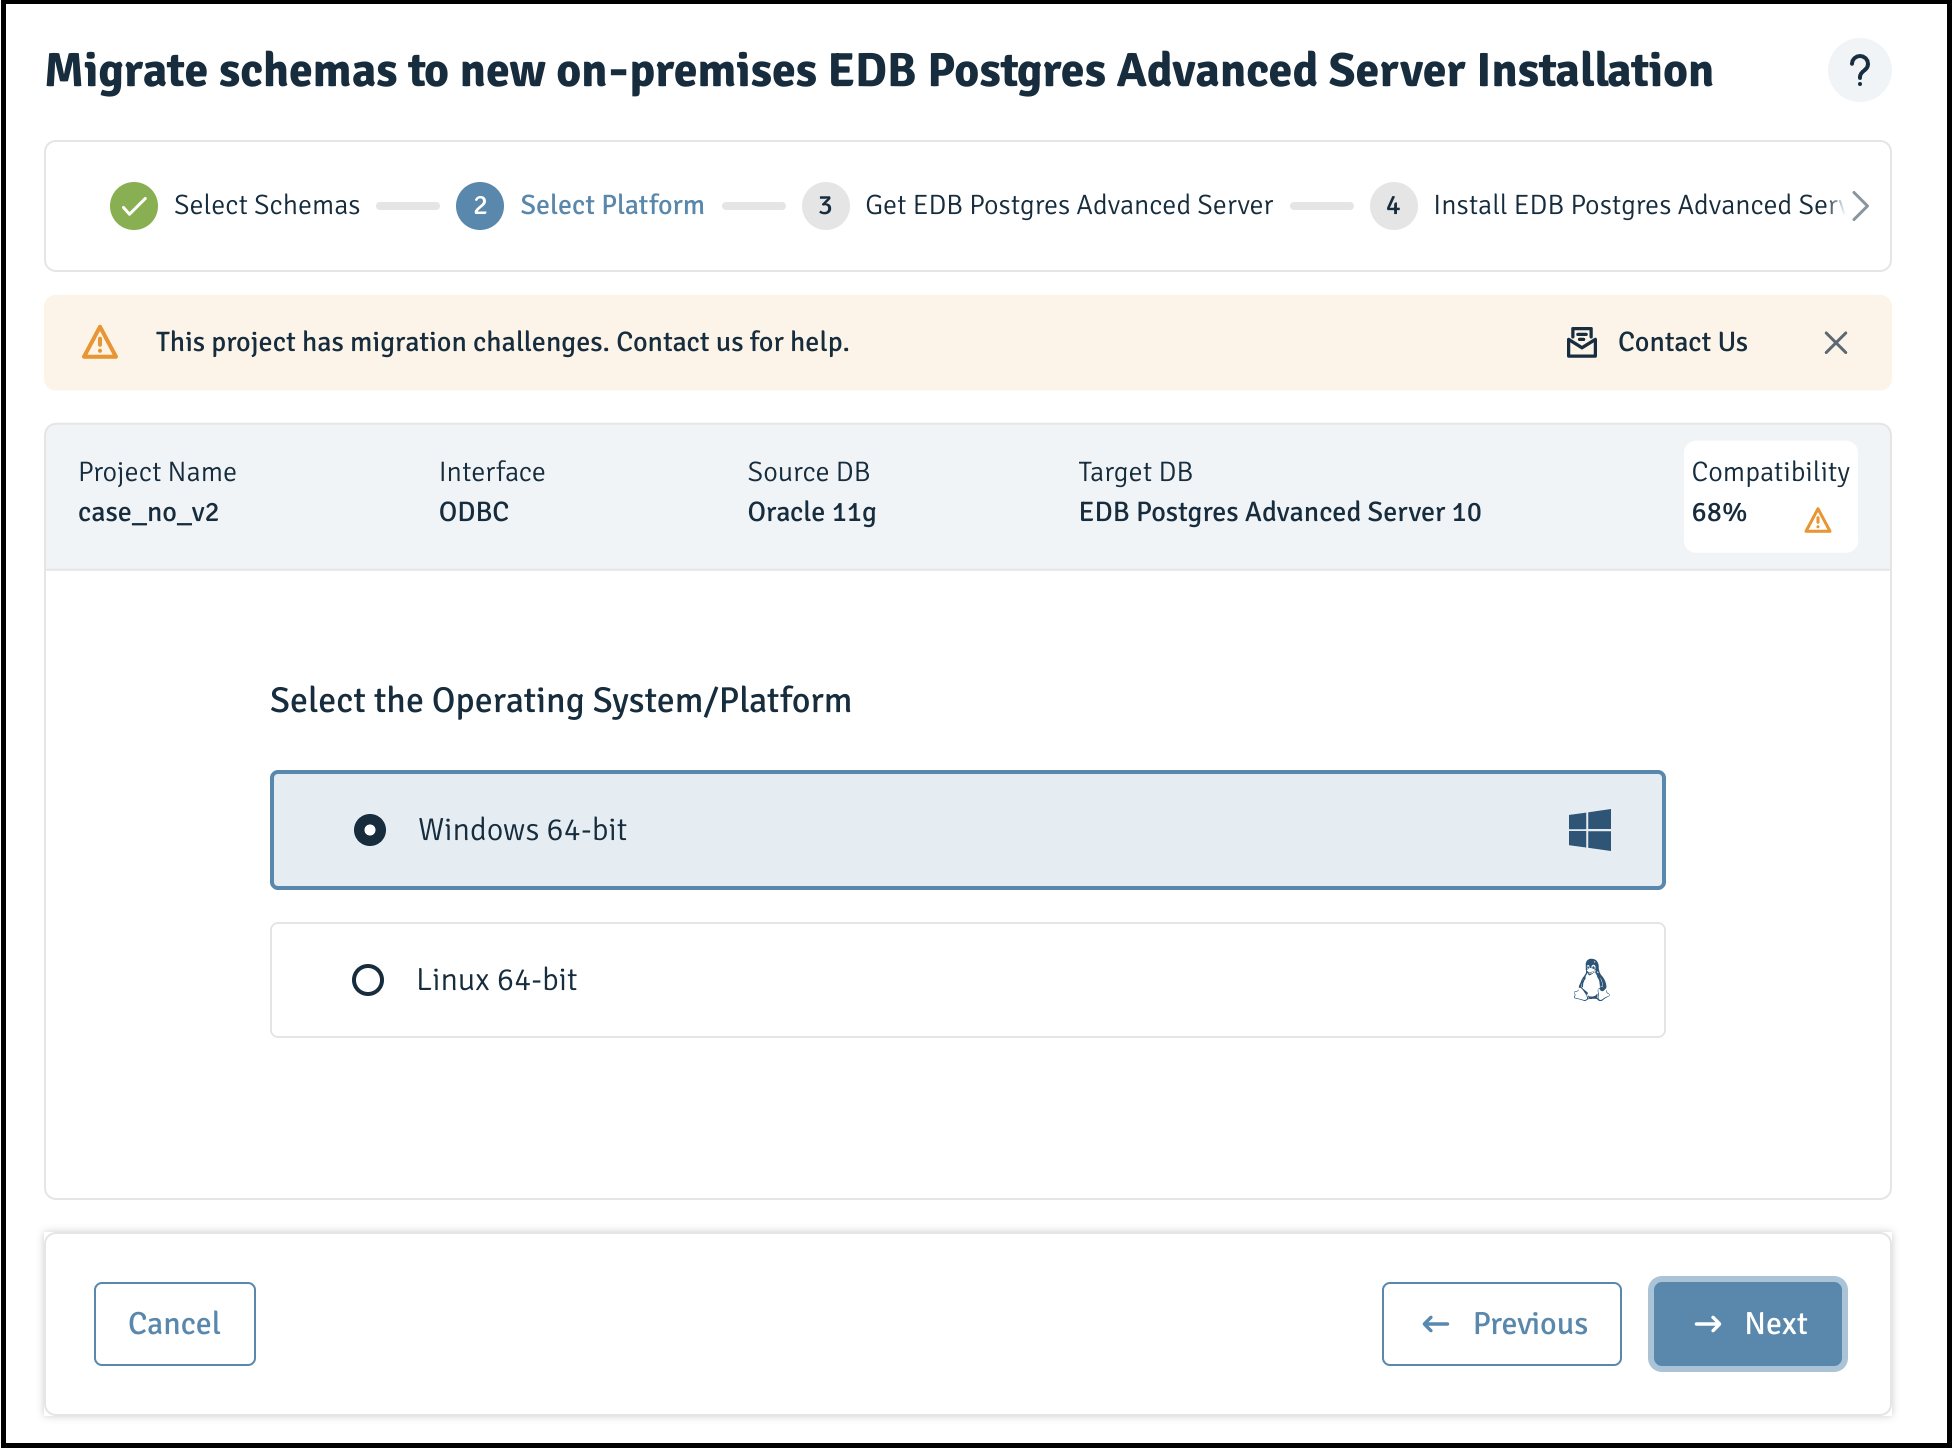
Figure 3-28: Selecting Windows operating system
- Download
Windows Installer.
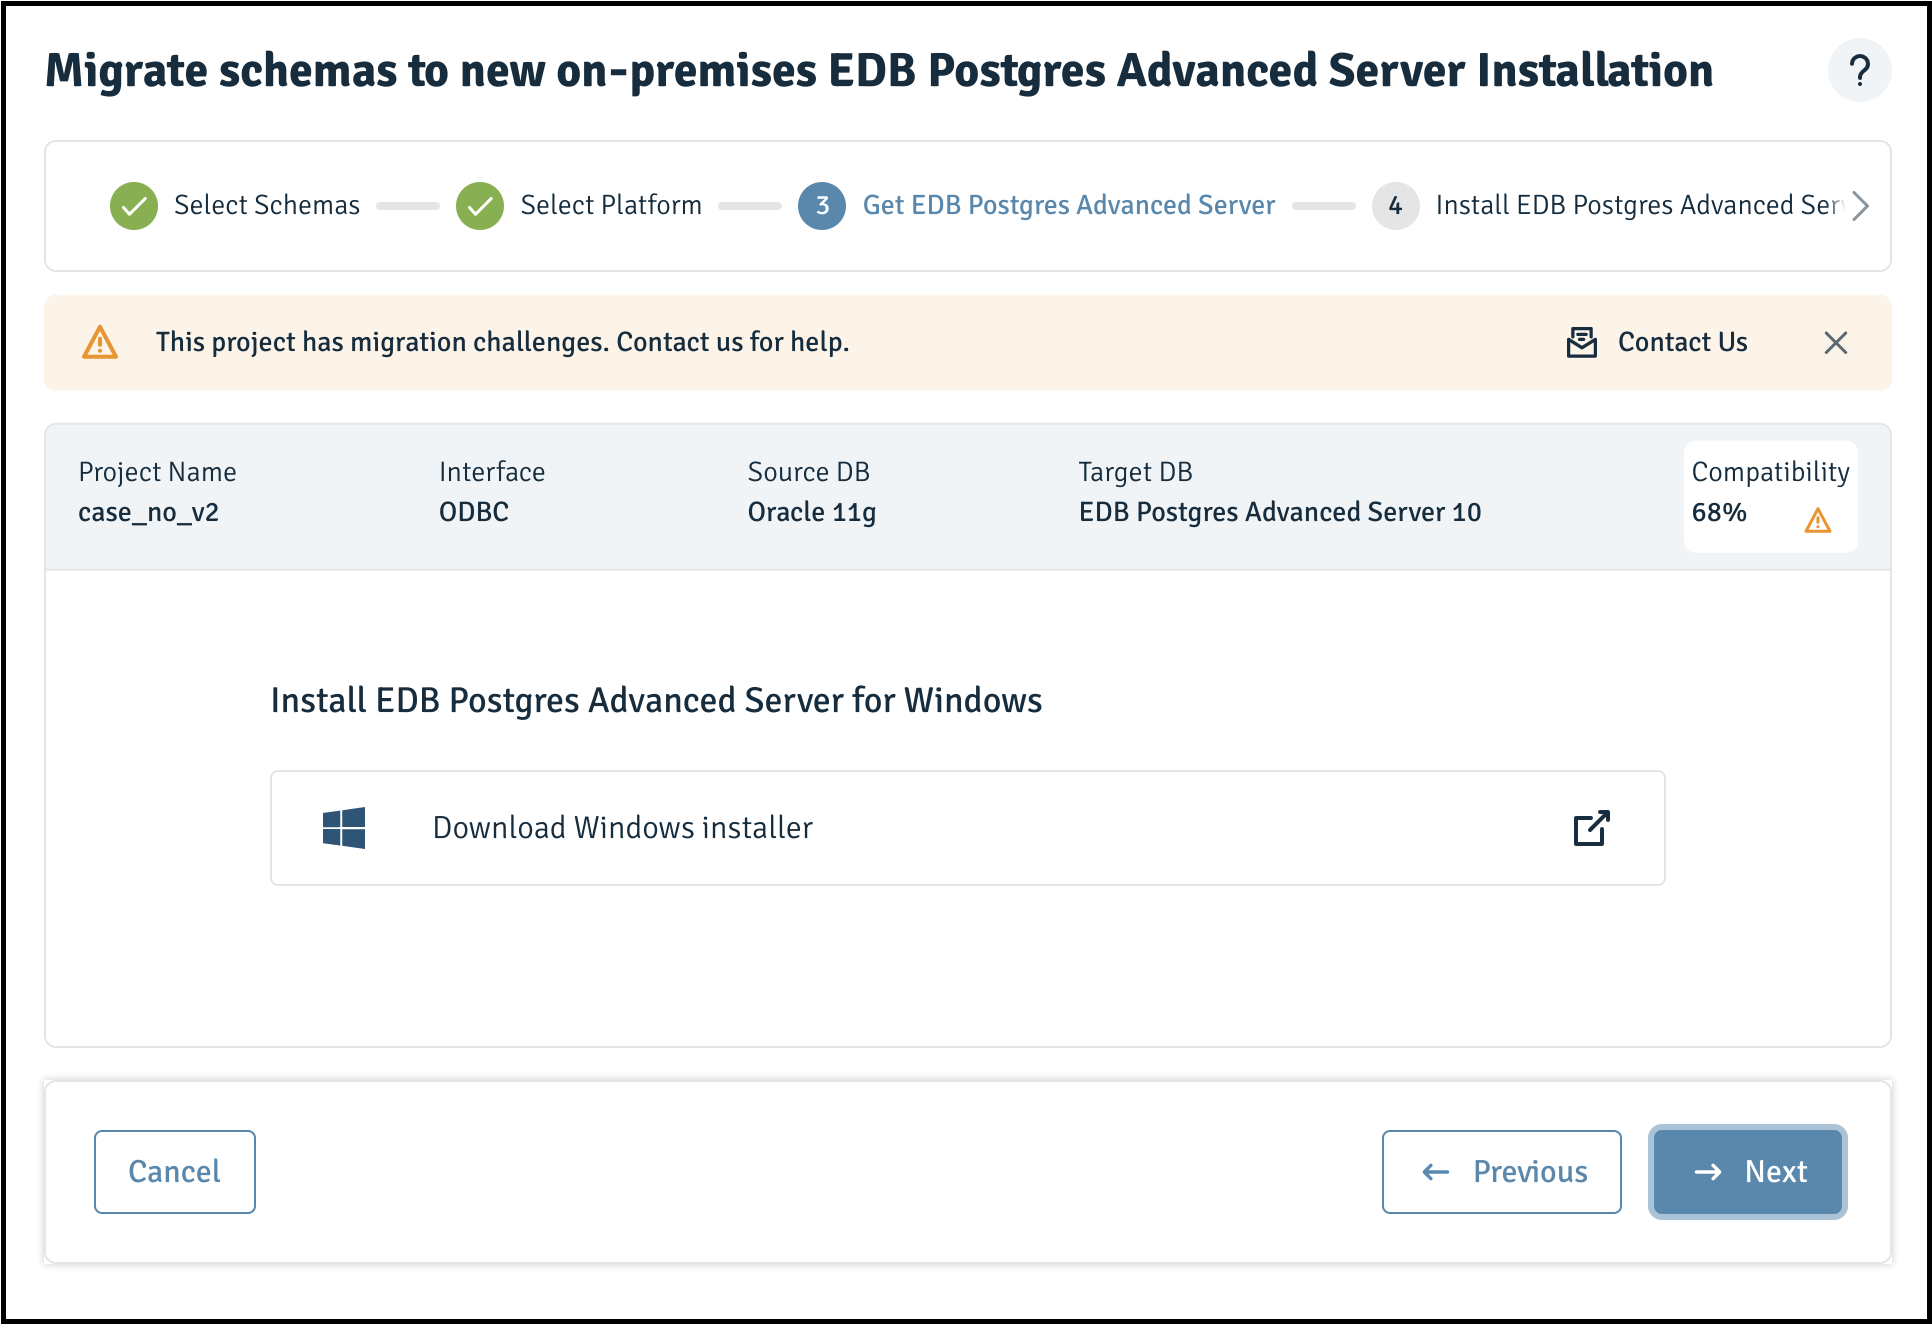
Figure 3-29: Downloading Windows installer
- For installation steps, click
EDB Postgres Advanced Server Installation Guide for Windows.
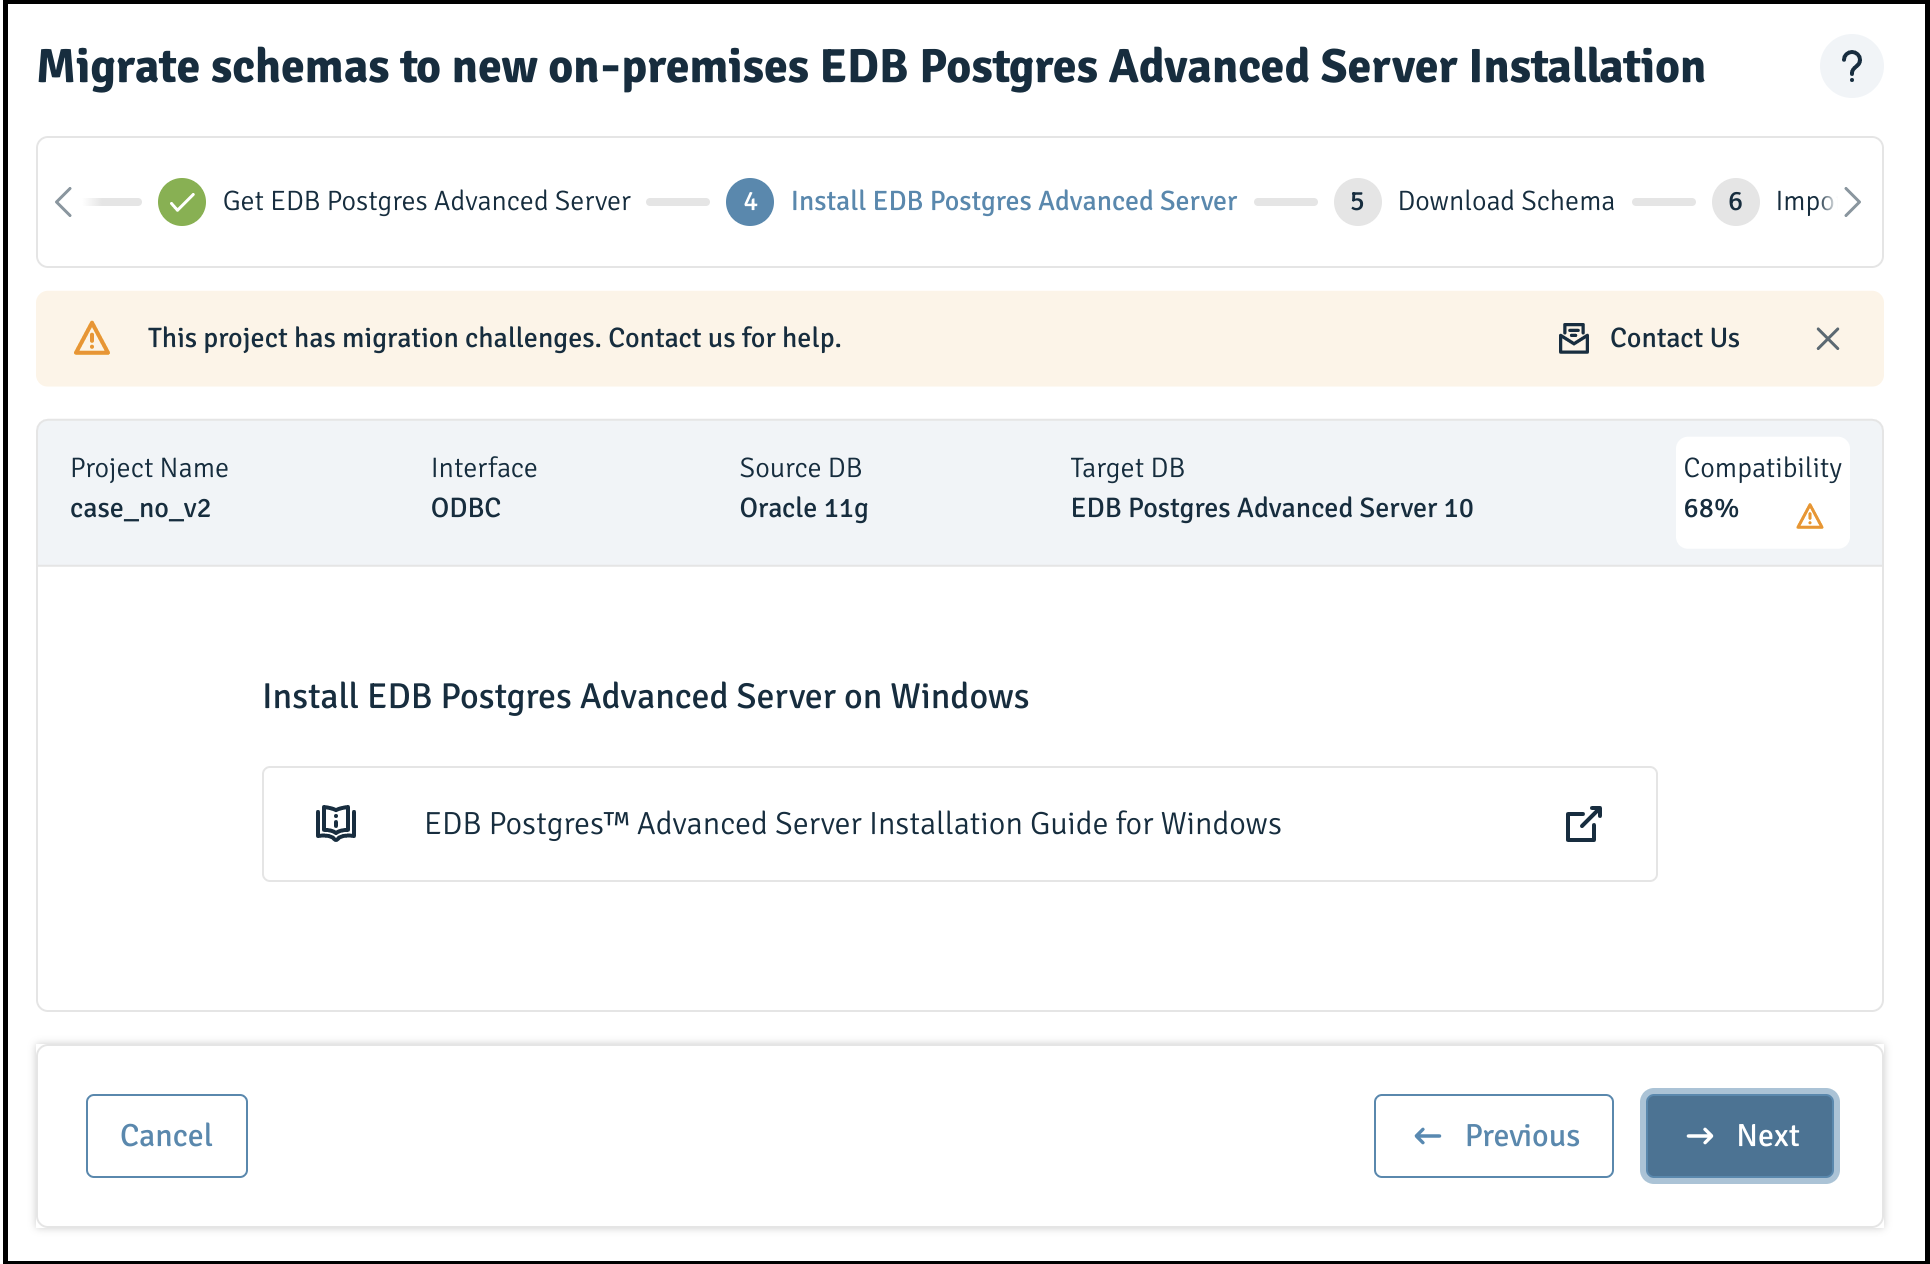
Figure 3-30: A successful schema migration
- Download the assessed schemas.
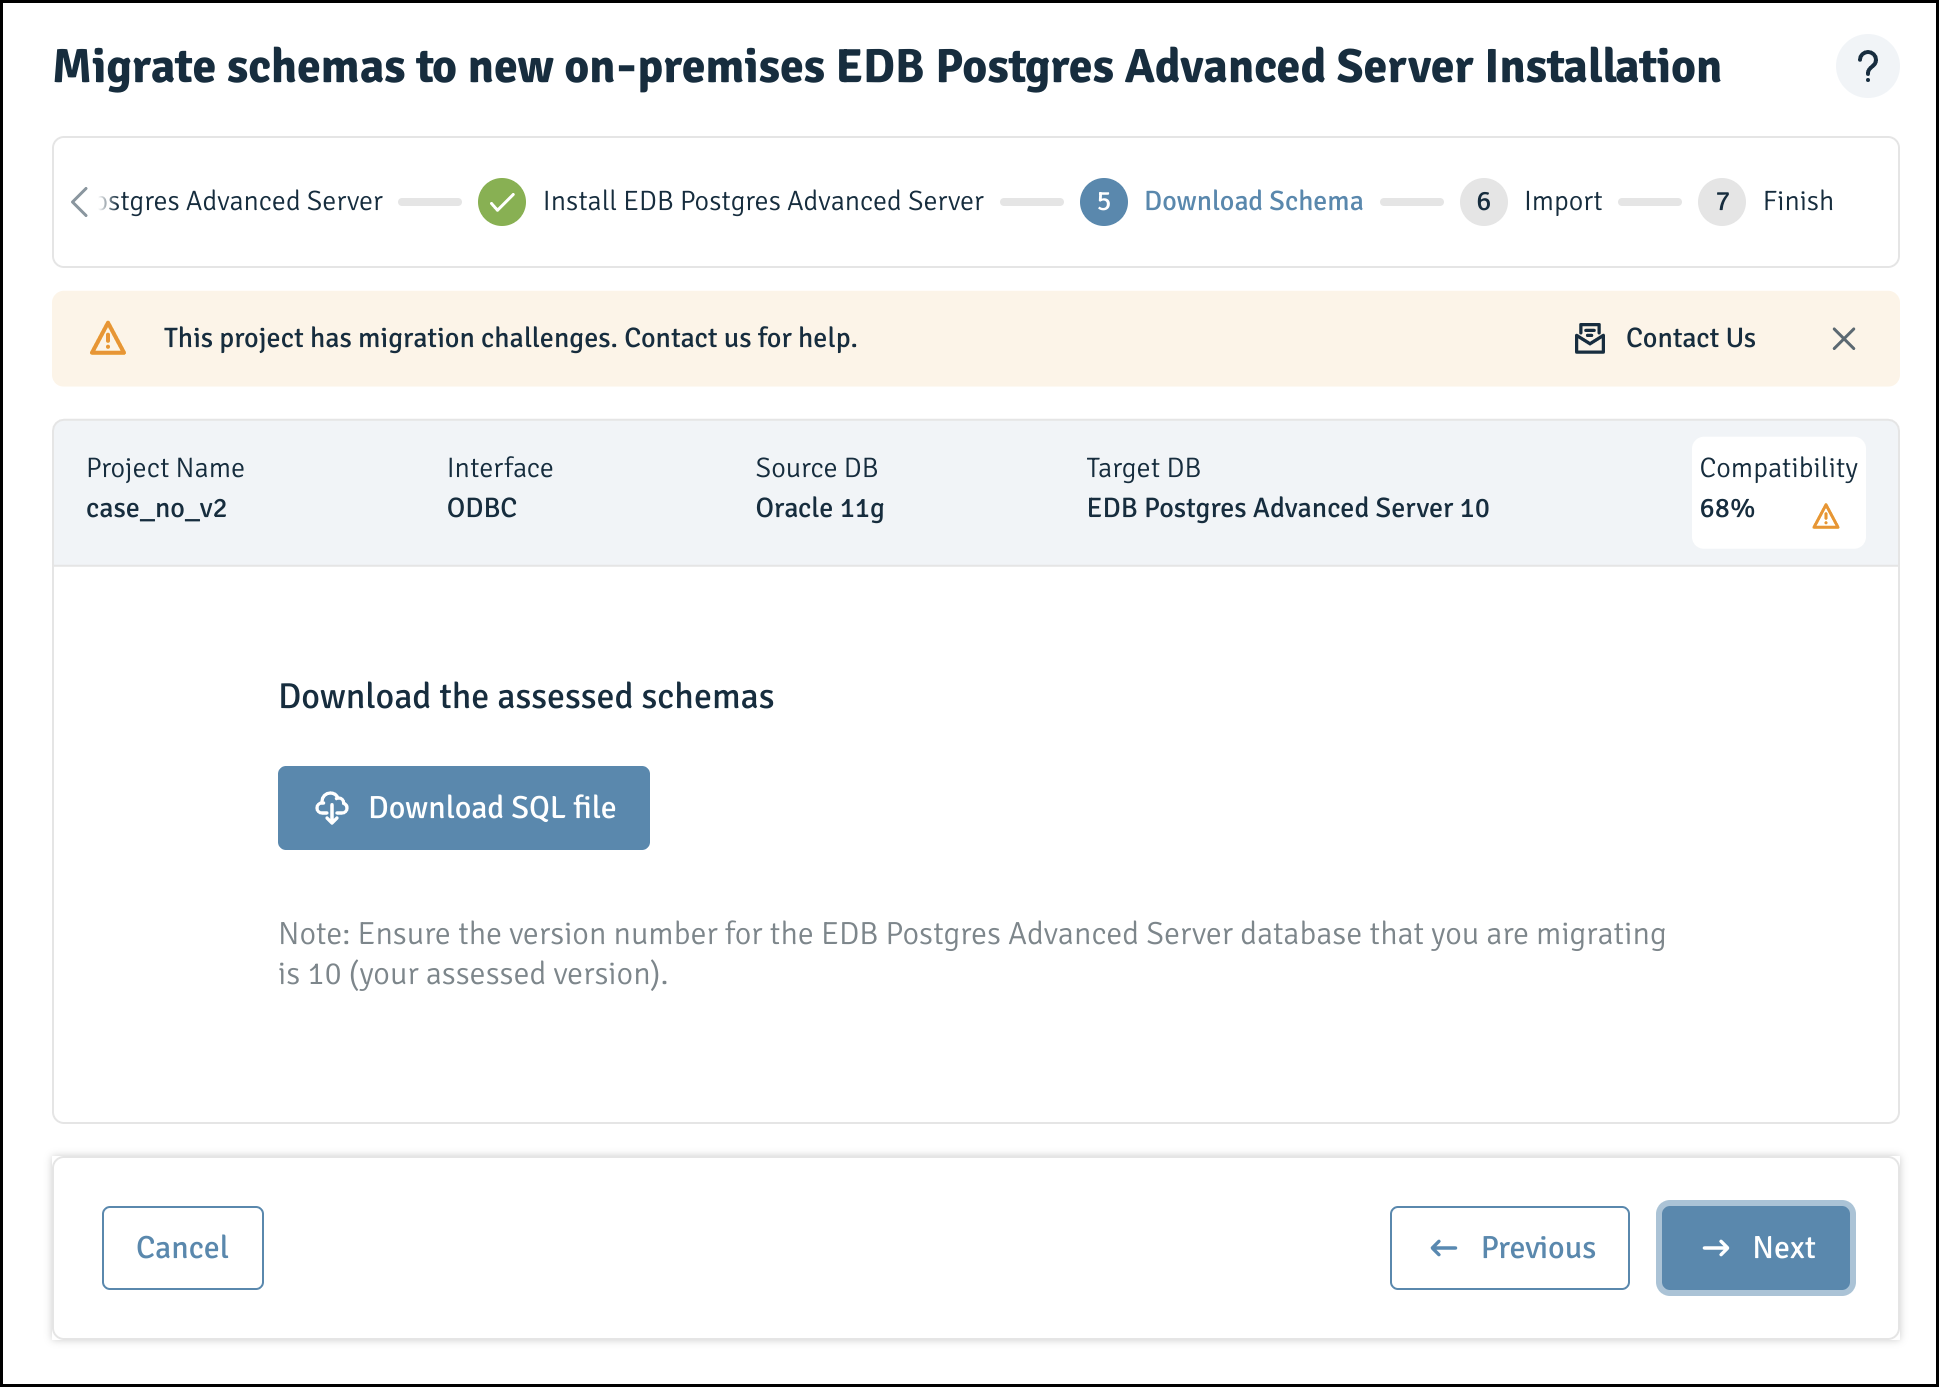
Figure 3-31: Downloading the assessed file
- You can import schemas by running the following command:
- On CLI
\i c:\users\...\<project_name>.sql- On cmd/shell
edb-psql -f <project_name>.sql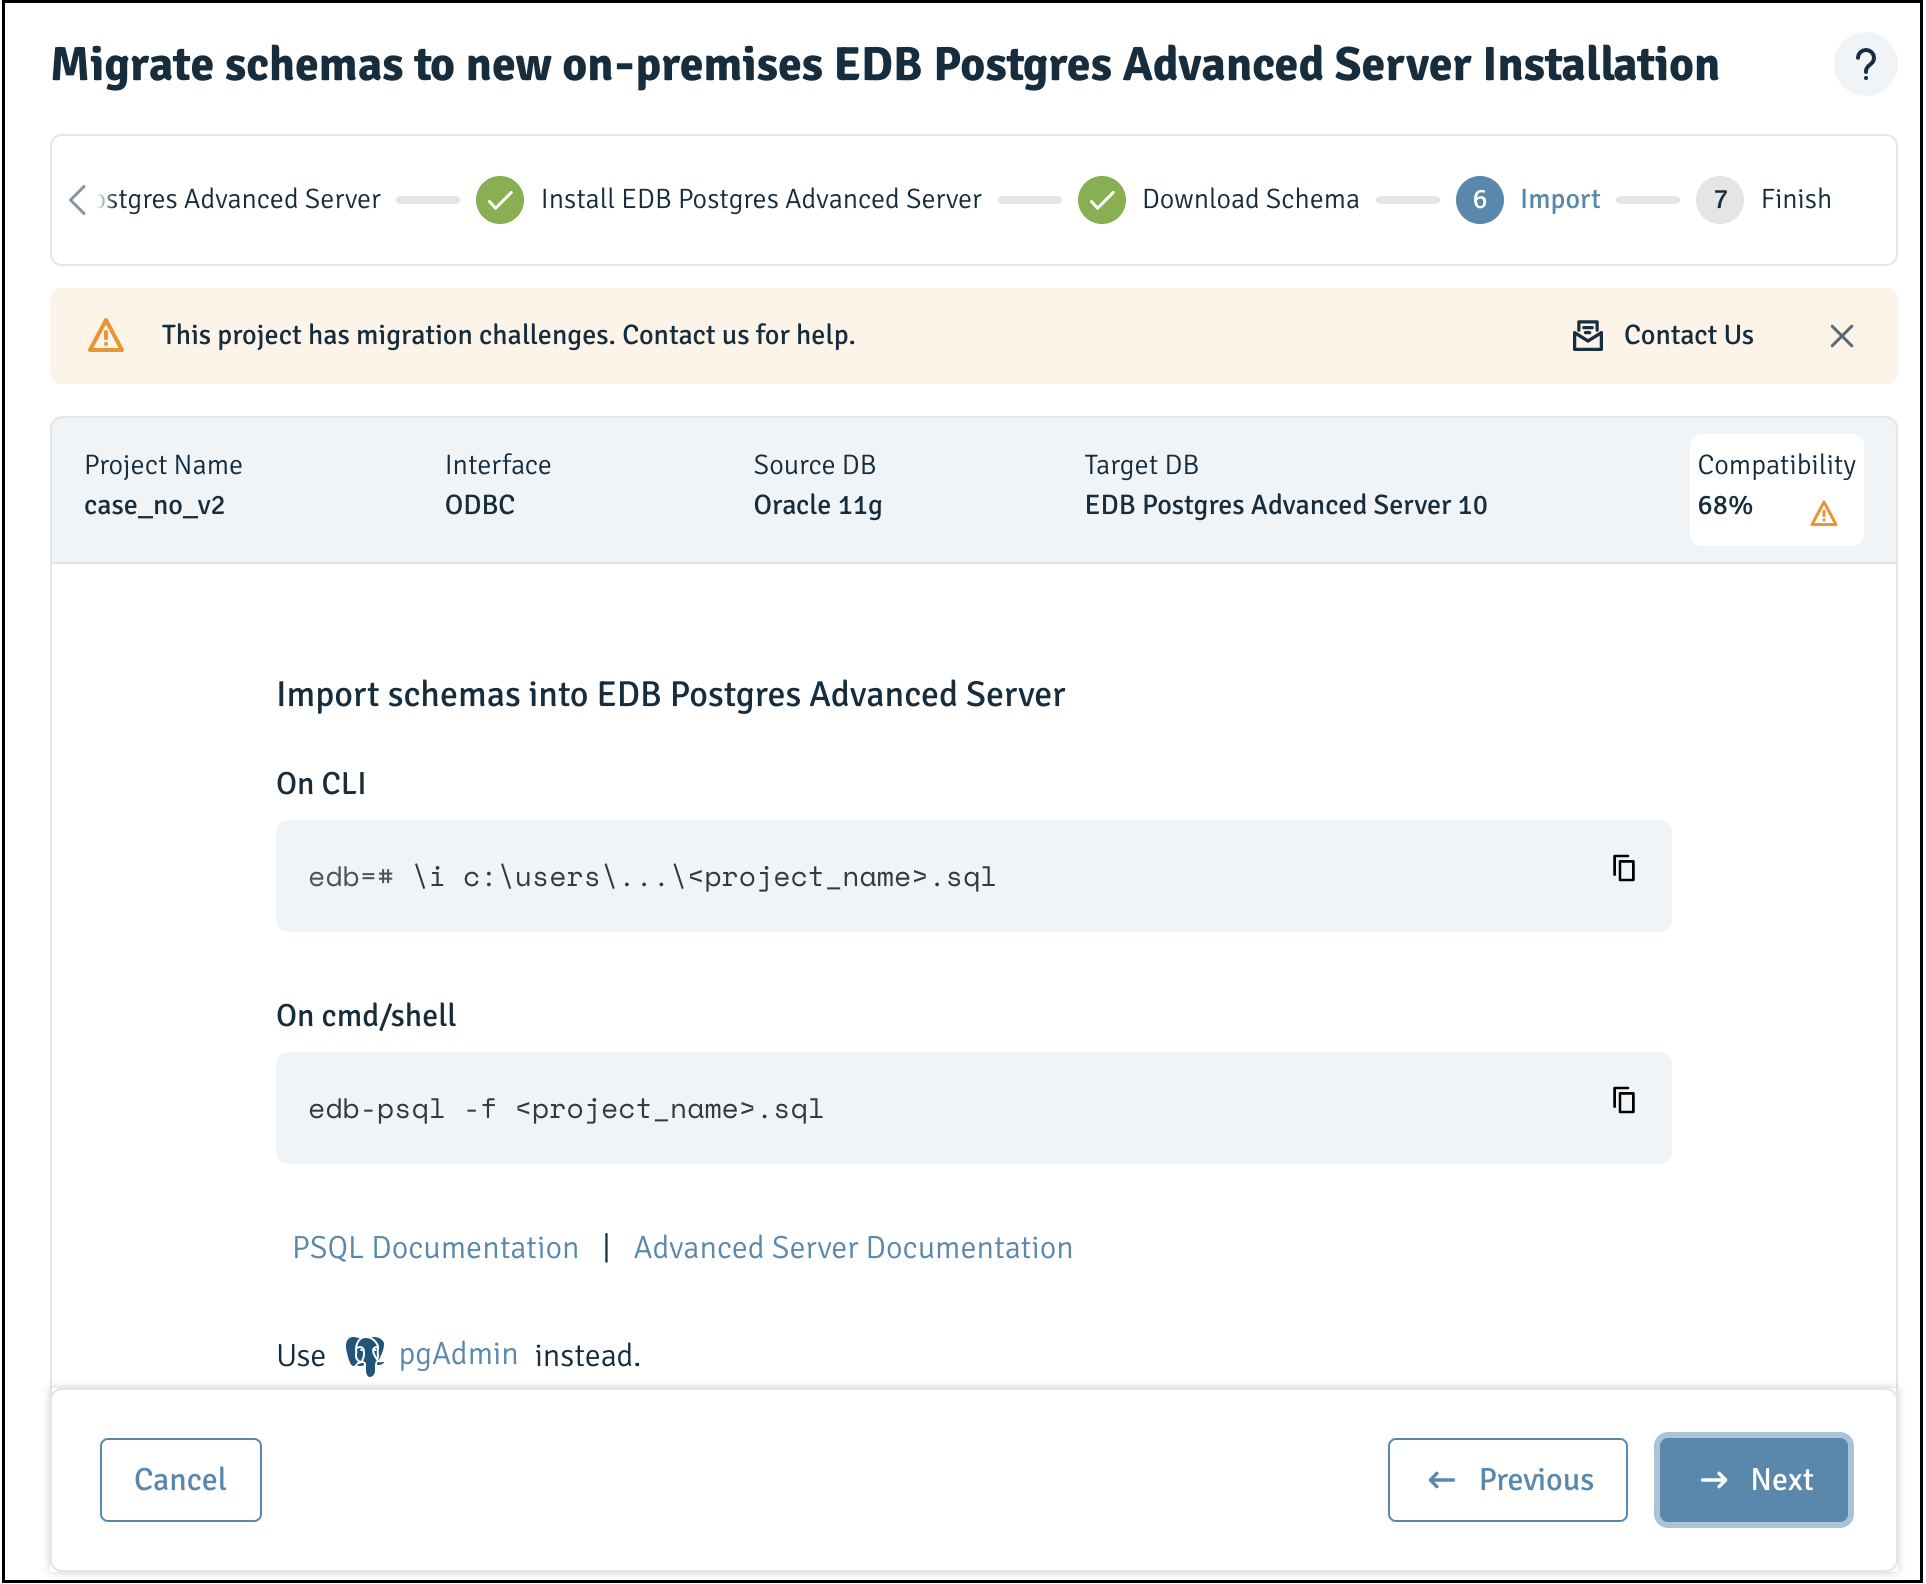
Figure 3-32: Importing schemas into EDB Postgres Advanced Server
Note You can also use
pgAdmininstead.
The schemas are migrated to the target server.
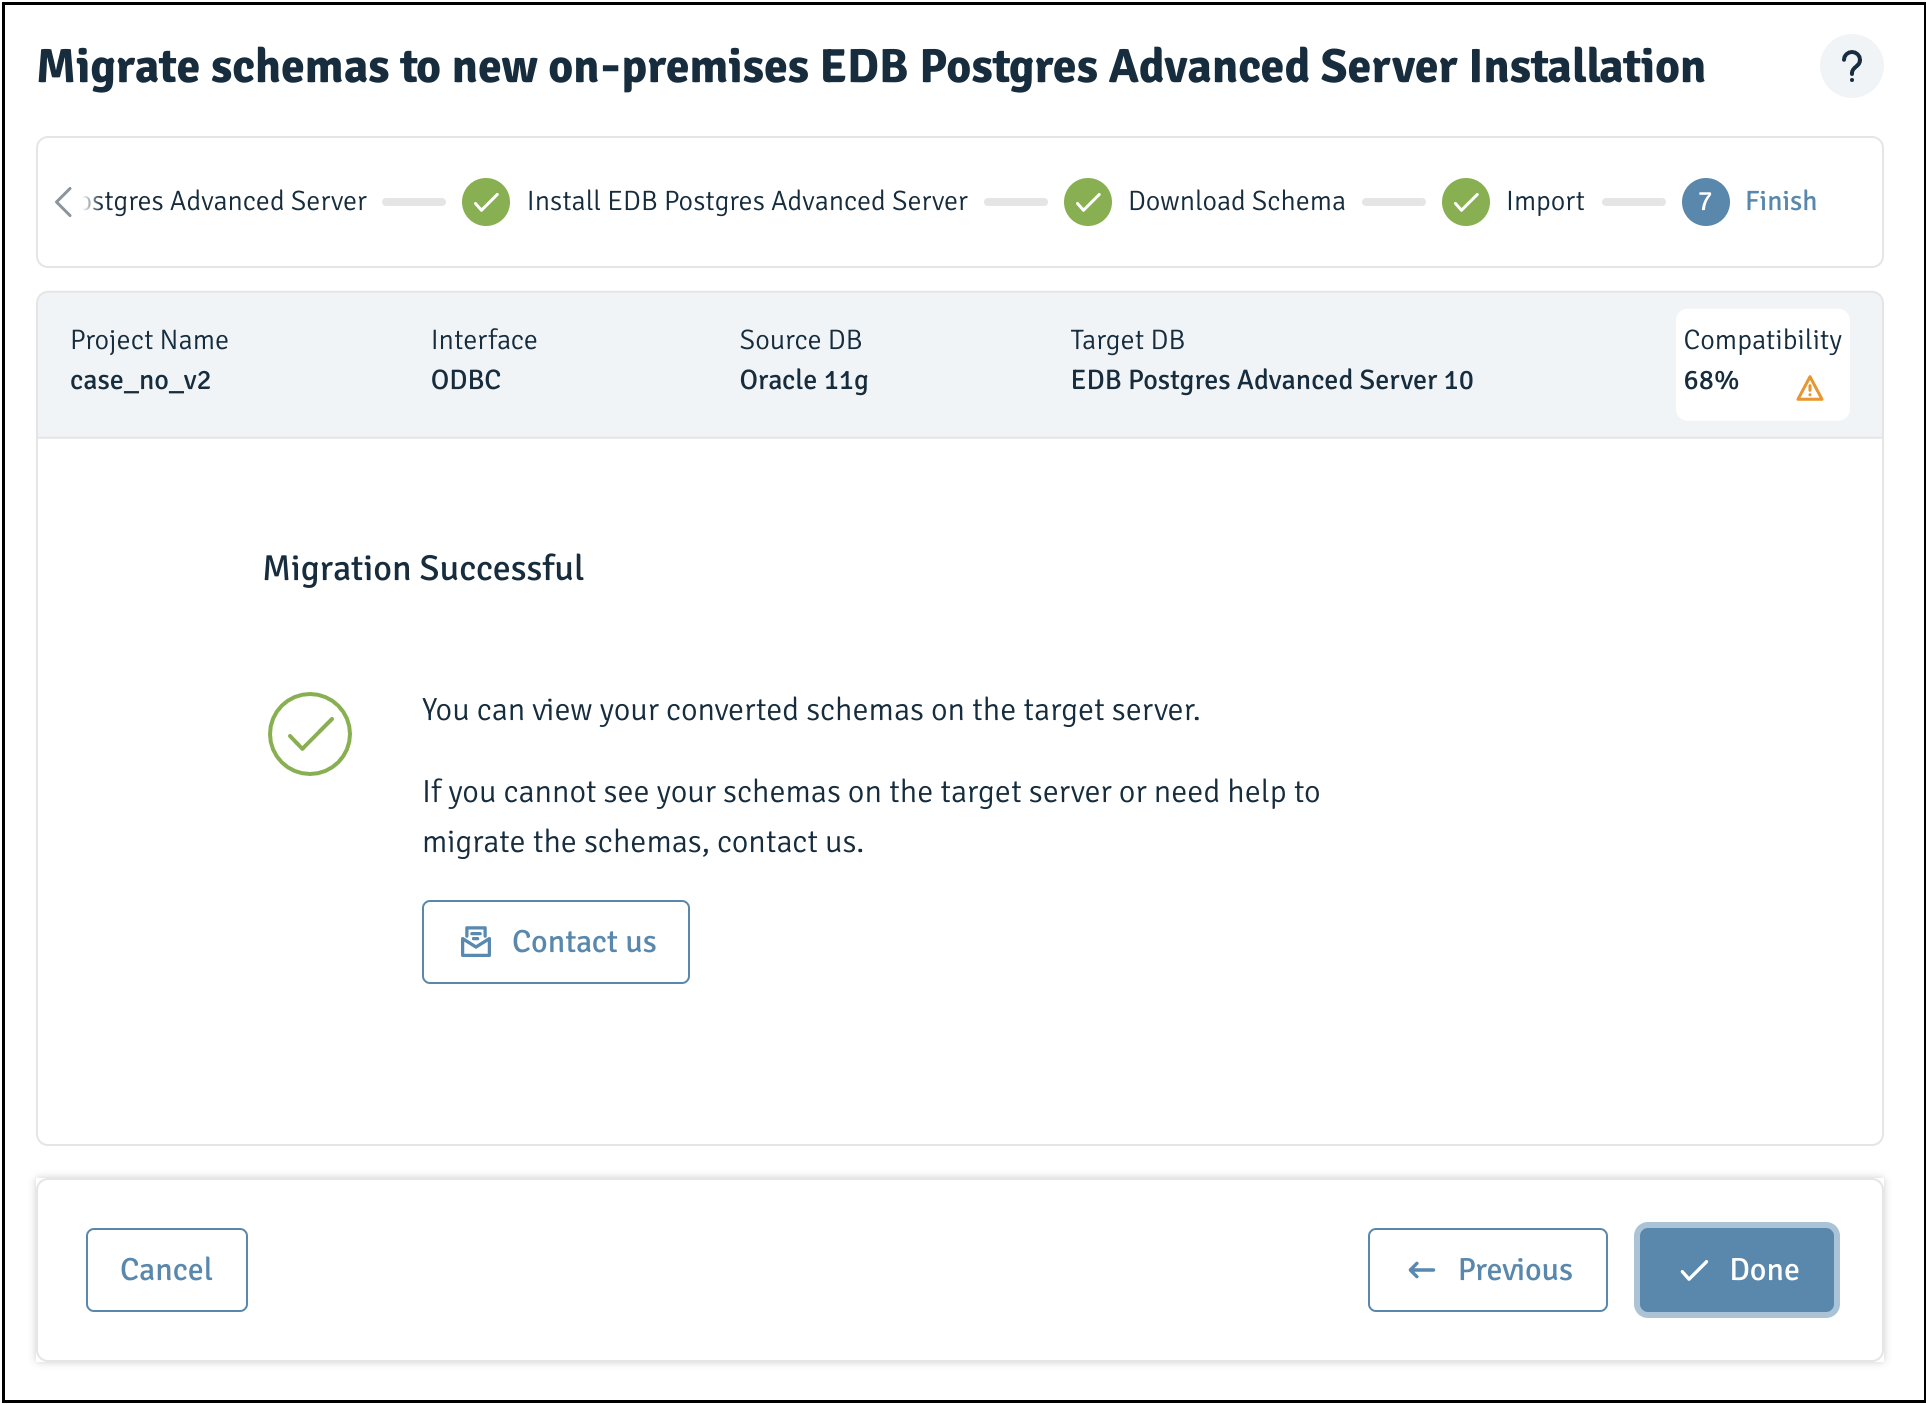
Figure 3-33: Importing schemas into EDB Postgres Advanced Server
Migrating Schemas on Linux
To migrate schemas to an on-premises EDB Postgres Advanced Server on Linux, complete the following steps:
- Click
New On-premises EDB Postgres Advanced Serveroption.
Figure 3-34: Migrating schemas home page
- Select one or more schemas to migrate on EDB Postgres Advanced Server.
Figure 3-35: Selecting schemas for migration
- Select the
Linuxoperating system.
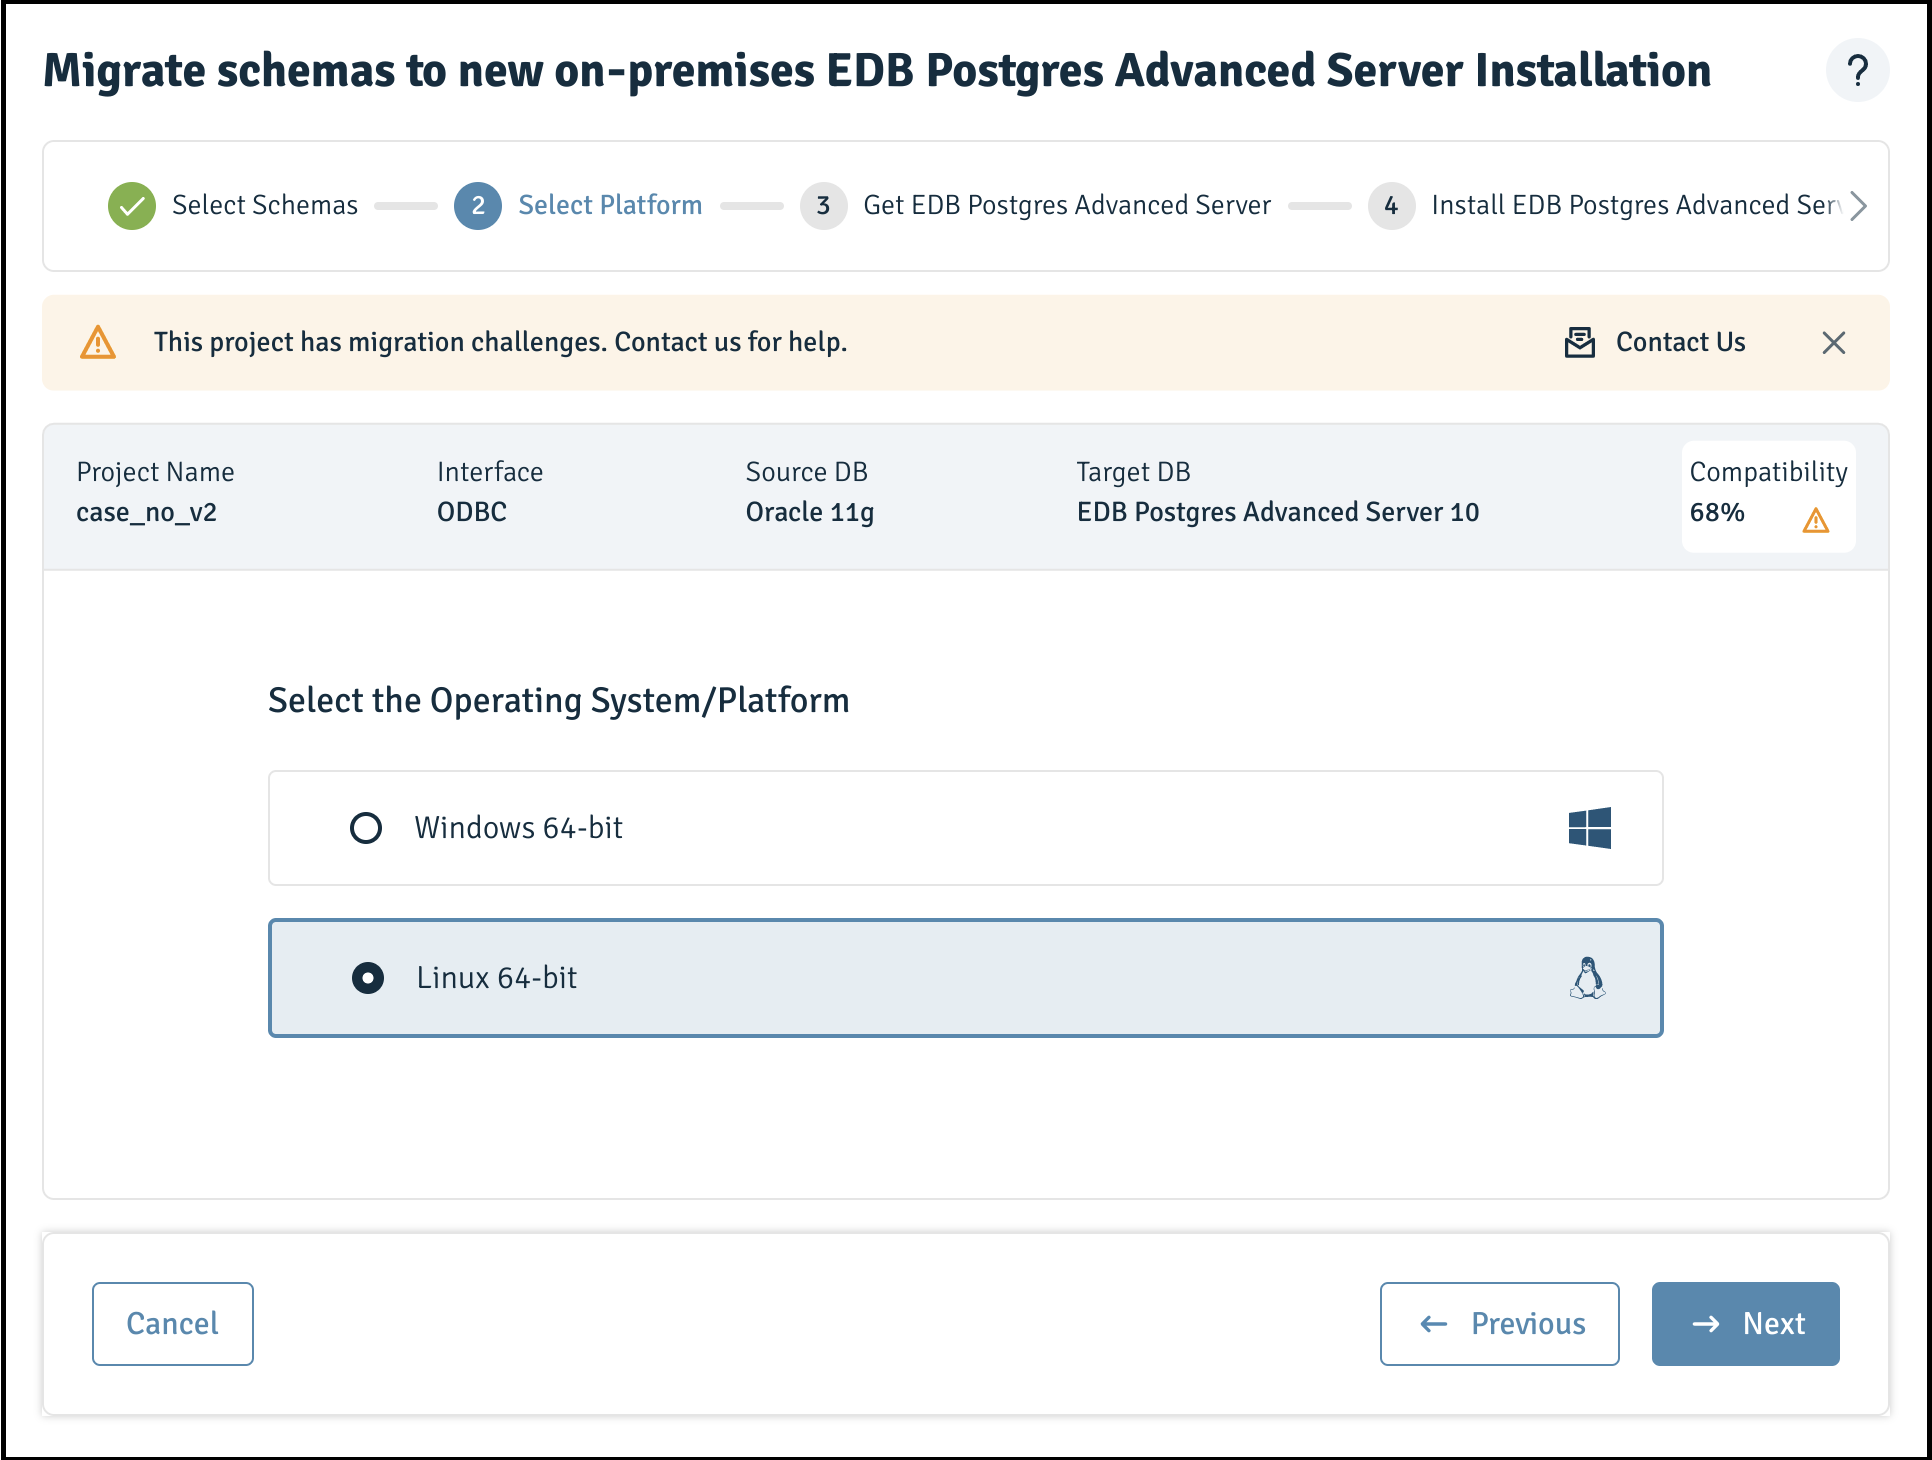
Figure 3-36: Selecting Linux operating system
- You can select one of the following options to install the EDB Postgres Advanced Server:
Repository
More options
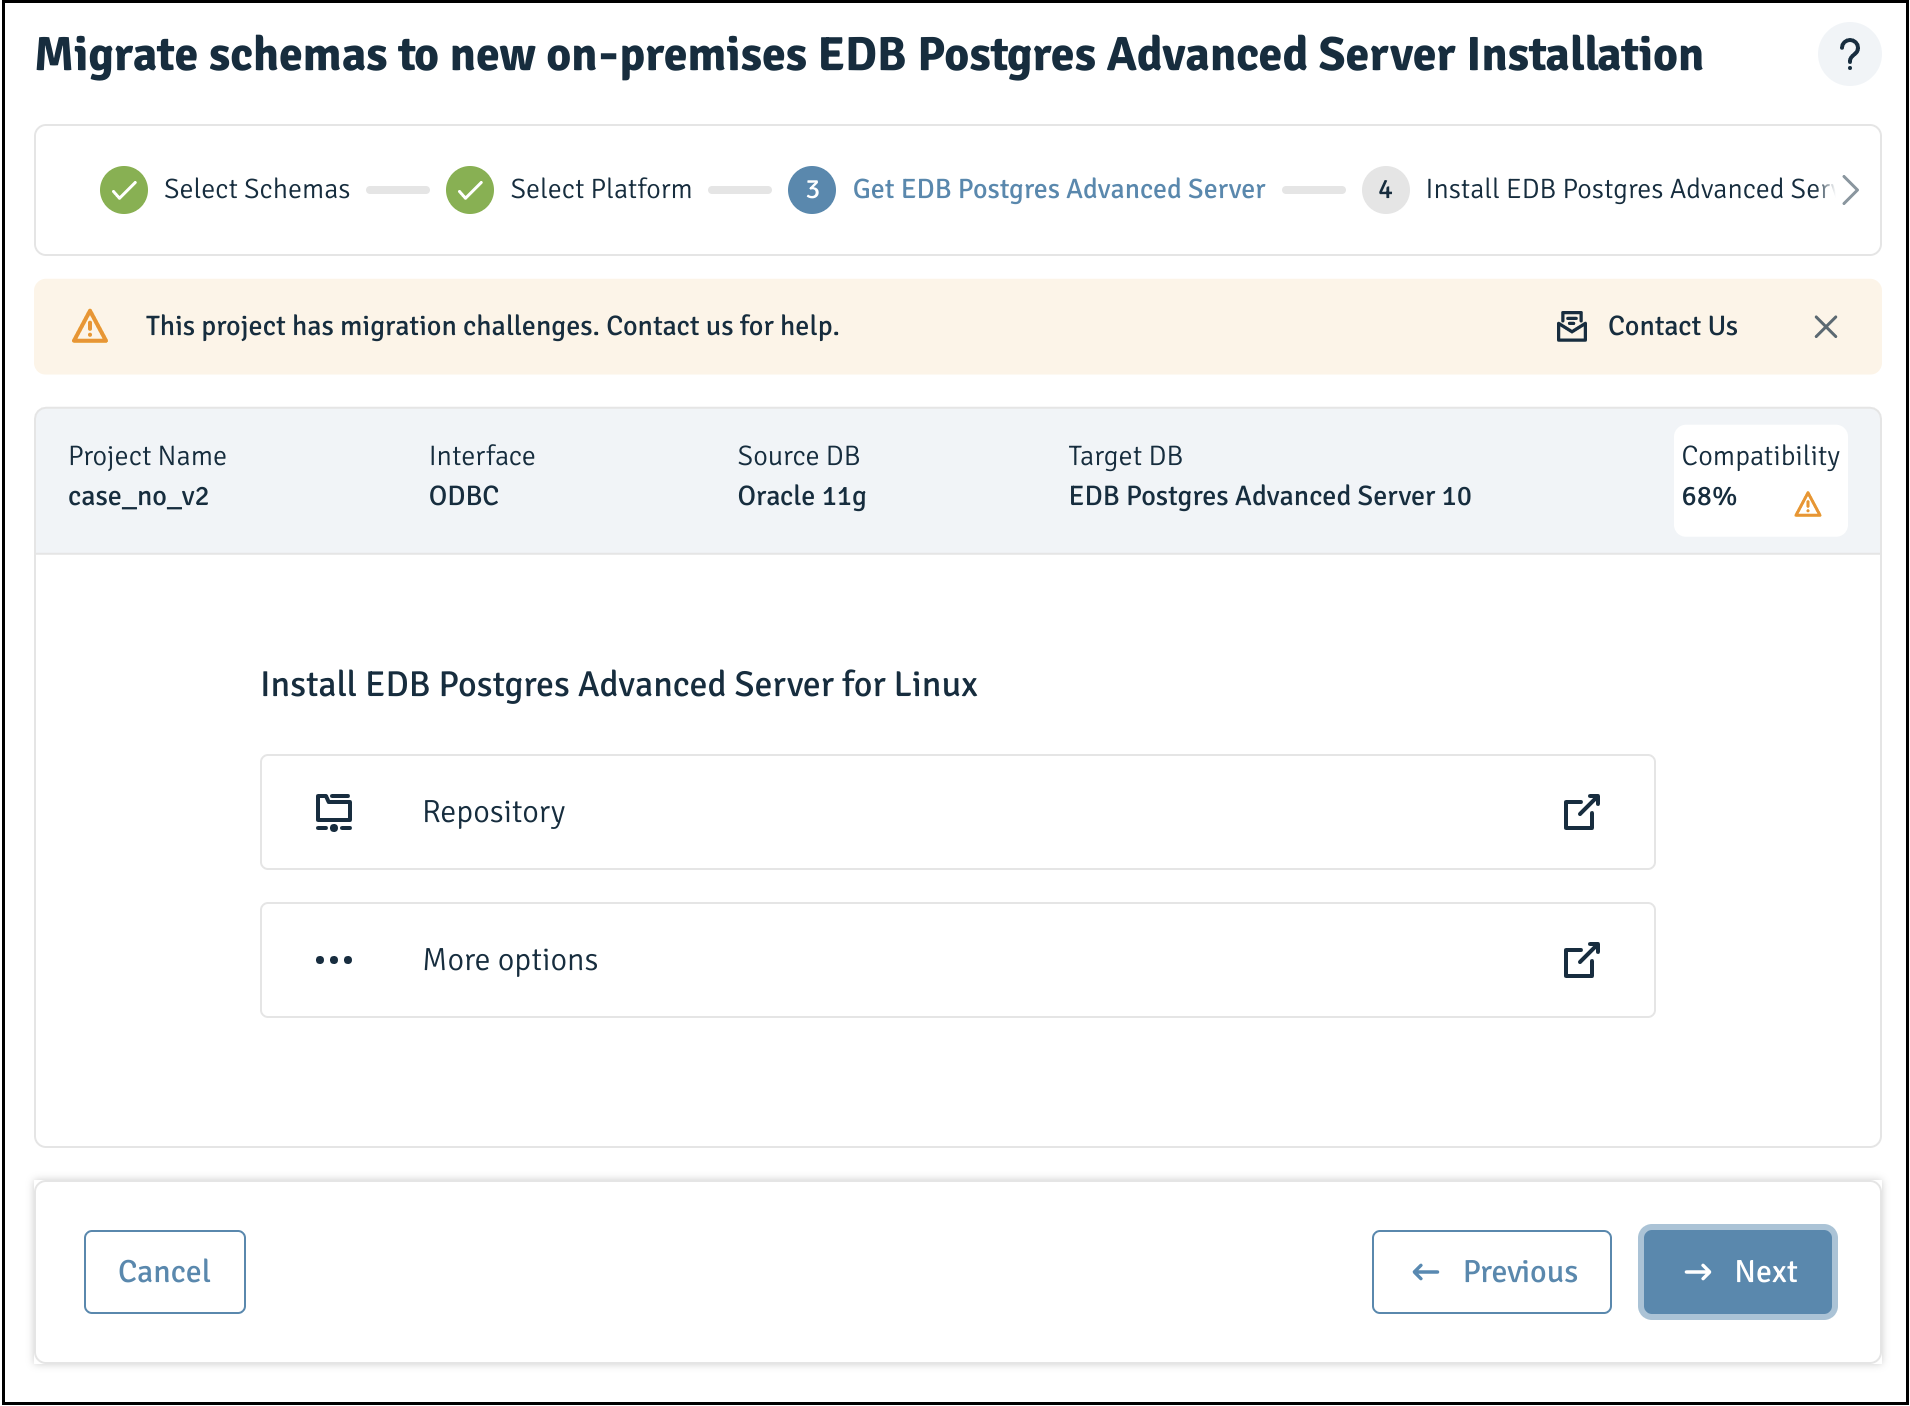
Figure 3-37: Selecting Linux repository
- For information on the installation procedure, click
EDB Postgres Advanced Server Installation Guidefor Linux:
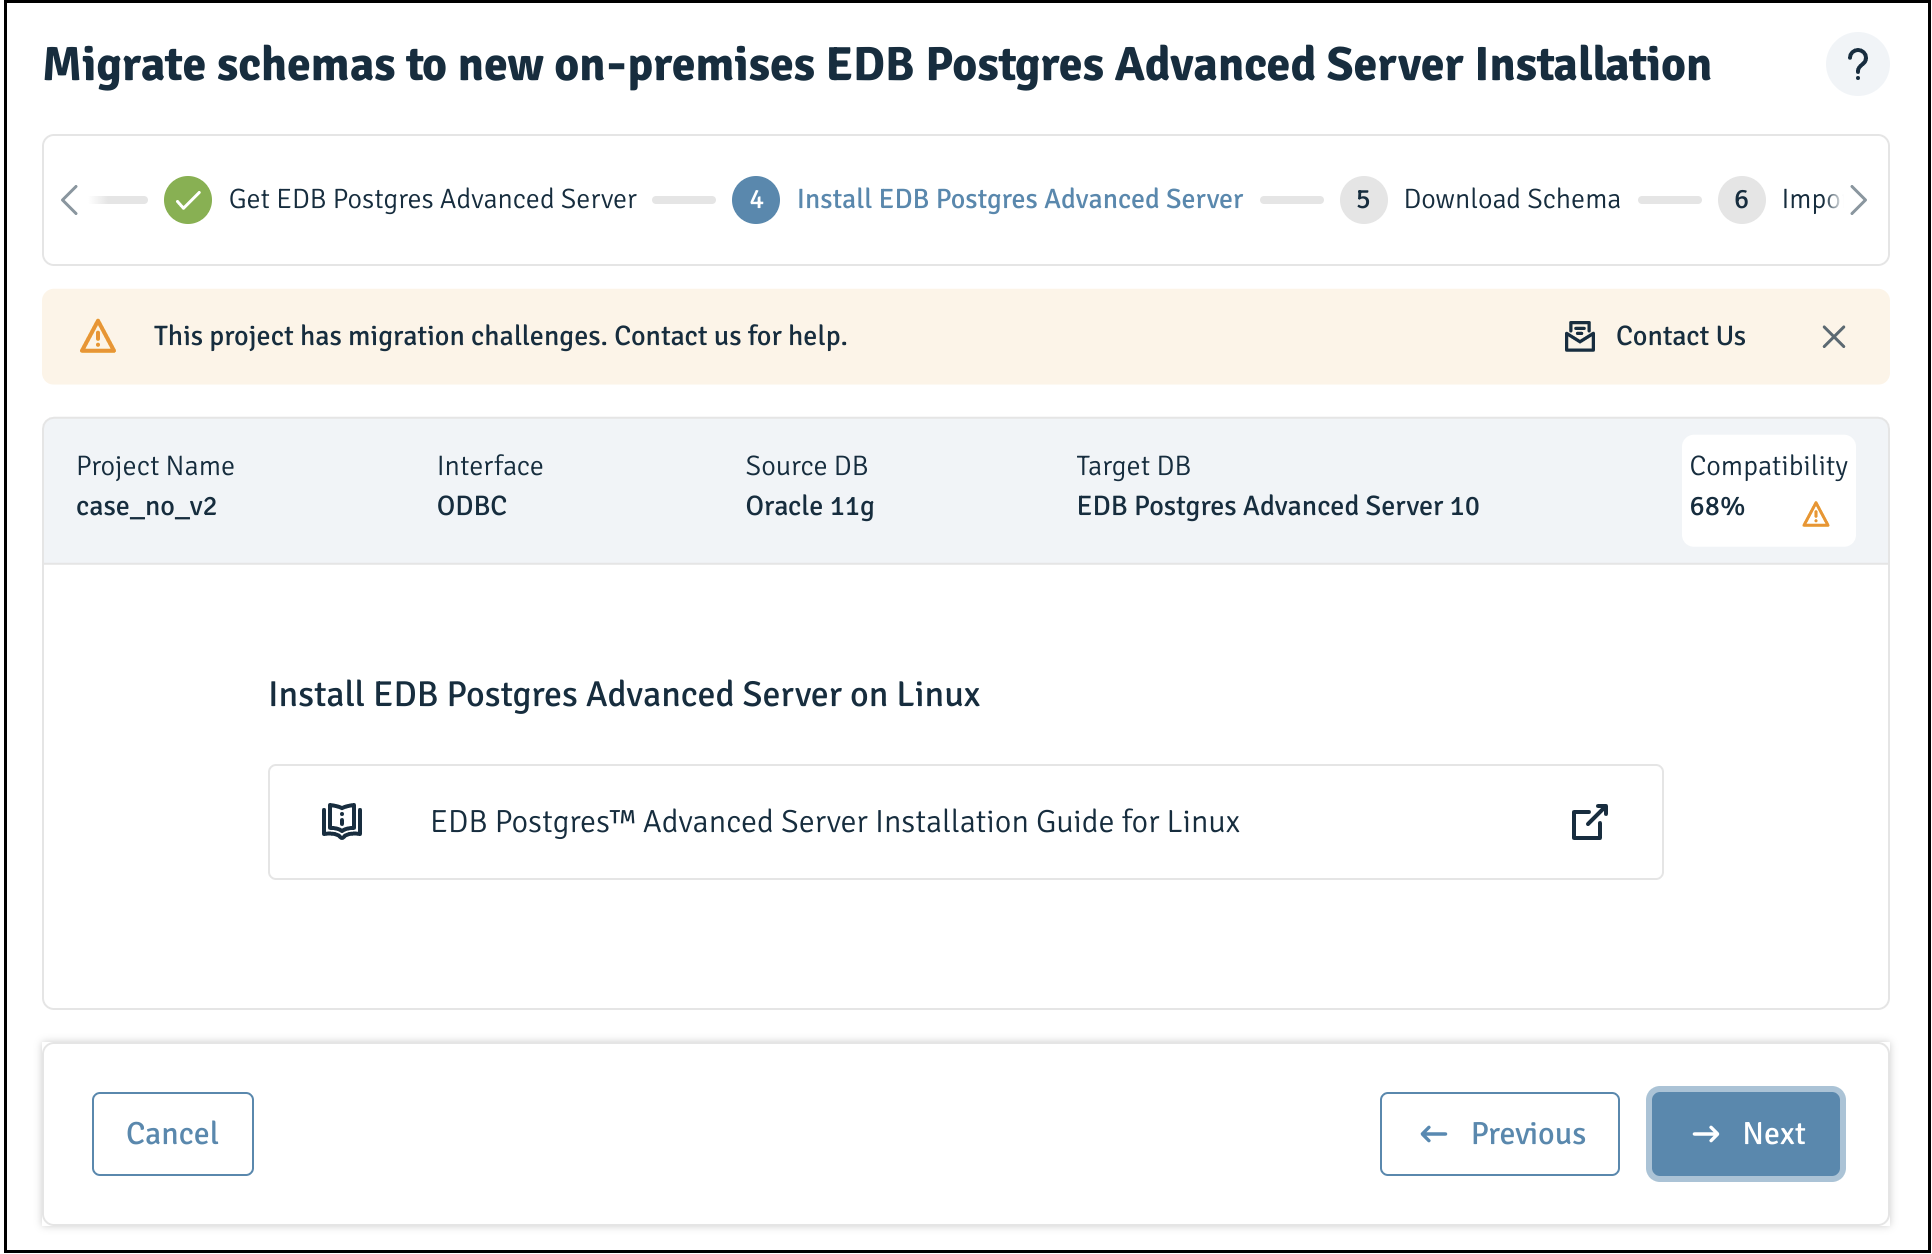
Figure 3-38: Selecting Linux installation guide
- Download the assessed schemas:
Figure 3-39: Downloading the assessed schemas
- To import the schemas, run the following command:
sudo su - enterprisedb
edb-psql edb
create database <database_name>;
\connect <database_name>
\i <project_name>.sql
Figure 3-40: Importing schemas into EDB Postgres Advanced Server
Note You can also use pgAdmin instead.
The converted schemas are migrated to the target server.
Figure 3-41: A successful schema migration
Migrating to the Cloud
To migrate schemas on EDB Postgres Advanced Server to Cloud, complete the following steps:
- Click
EDB Postgres Advanced Server on Cloudoption:

Figure 3-42: EDB Postgres Advanced Server on Cloud
- Select one or more schemas to migrate to EDB Postgres Advanced Server:
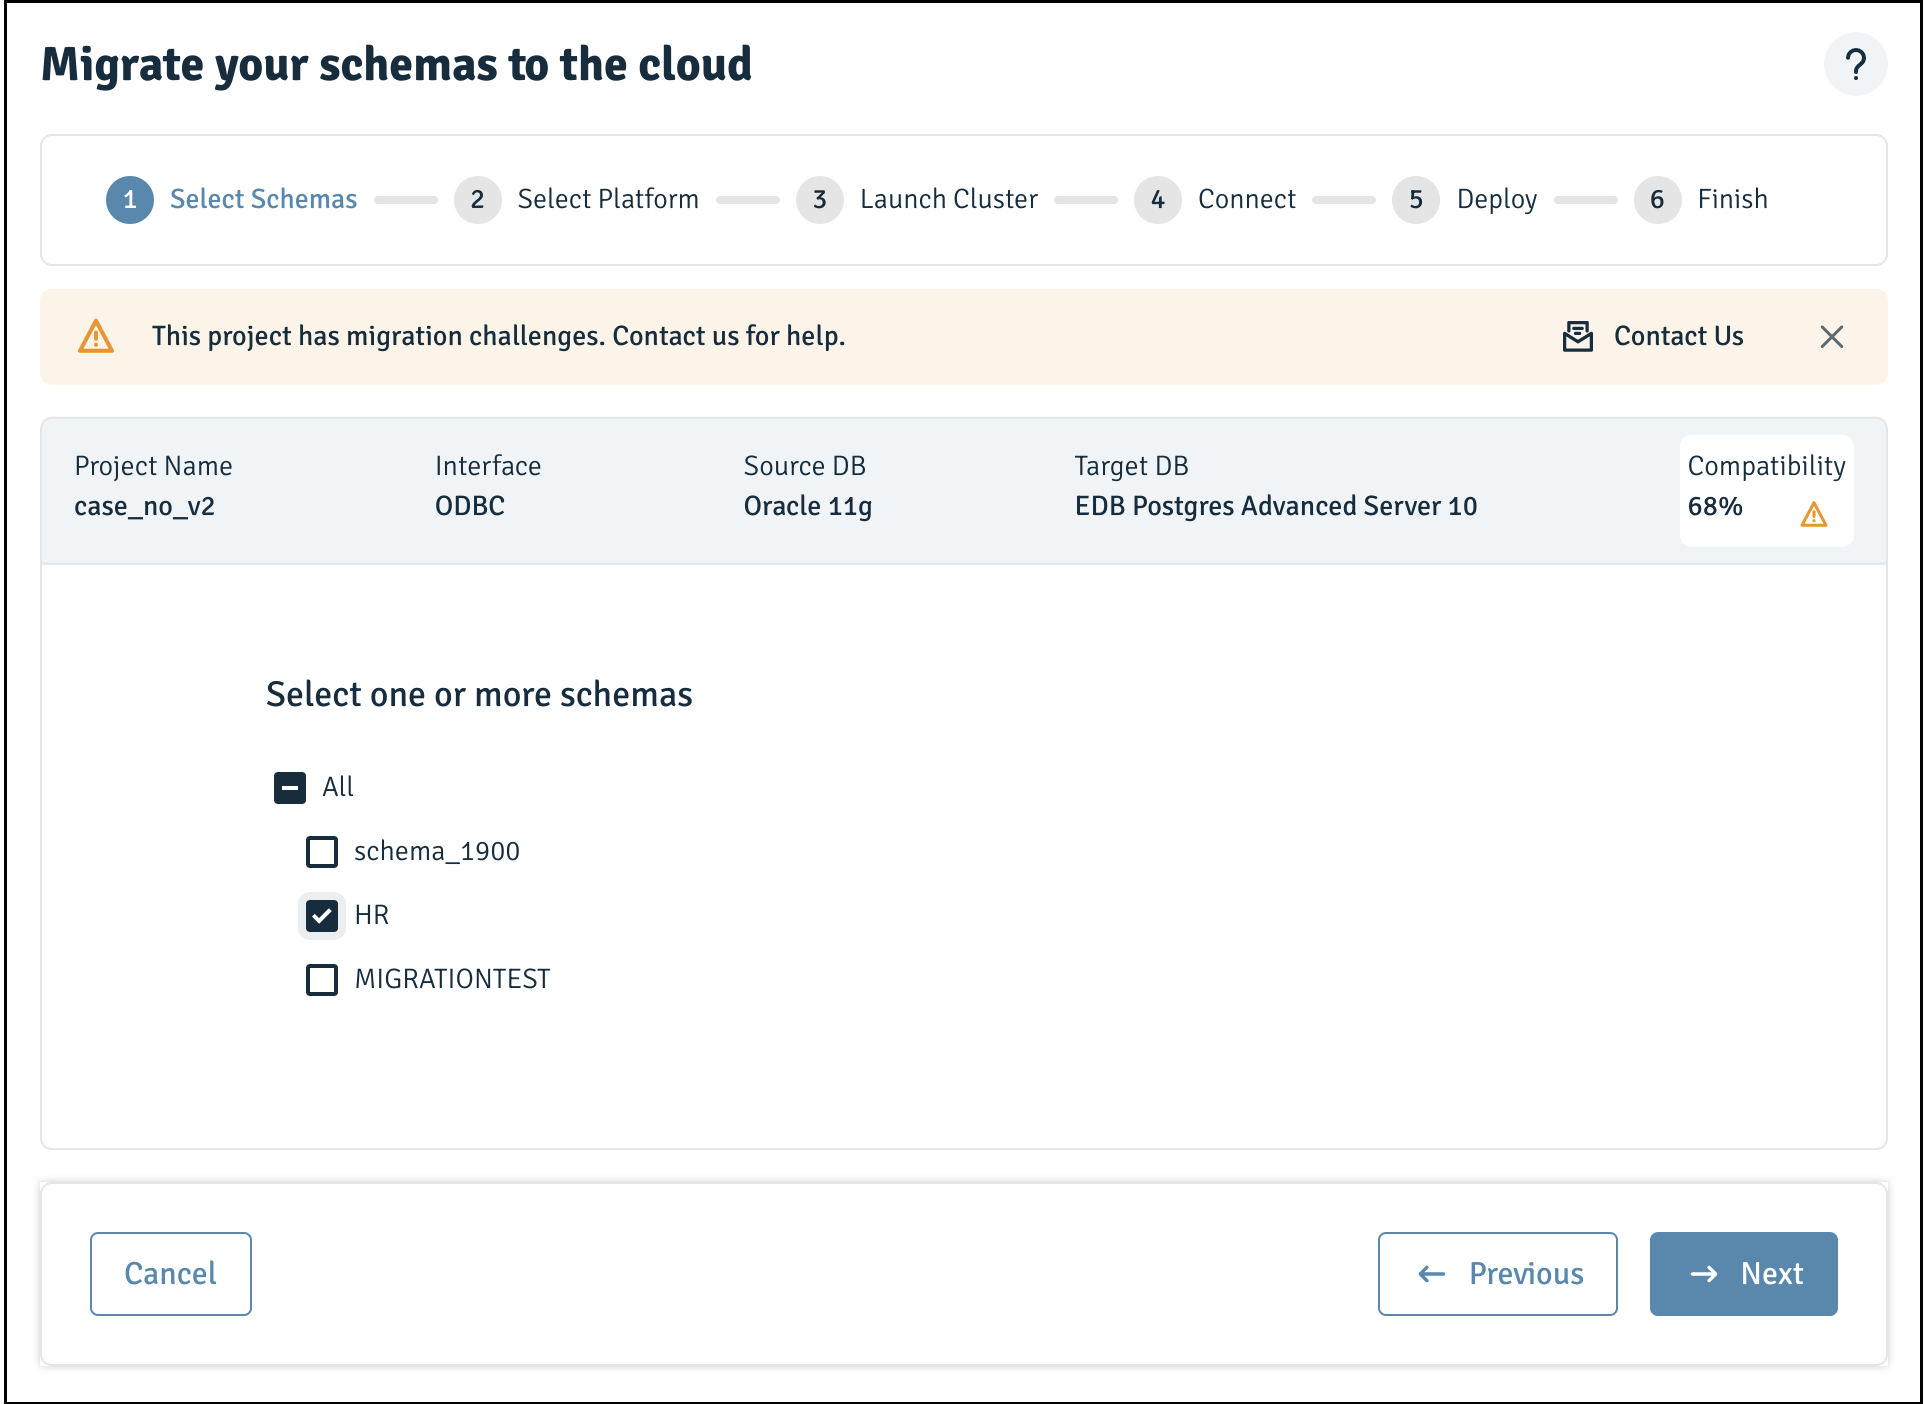
Selecting schemas for migration
- Select the cloud platform. For example,
IBM Cloud:
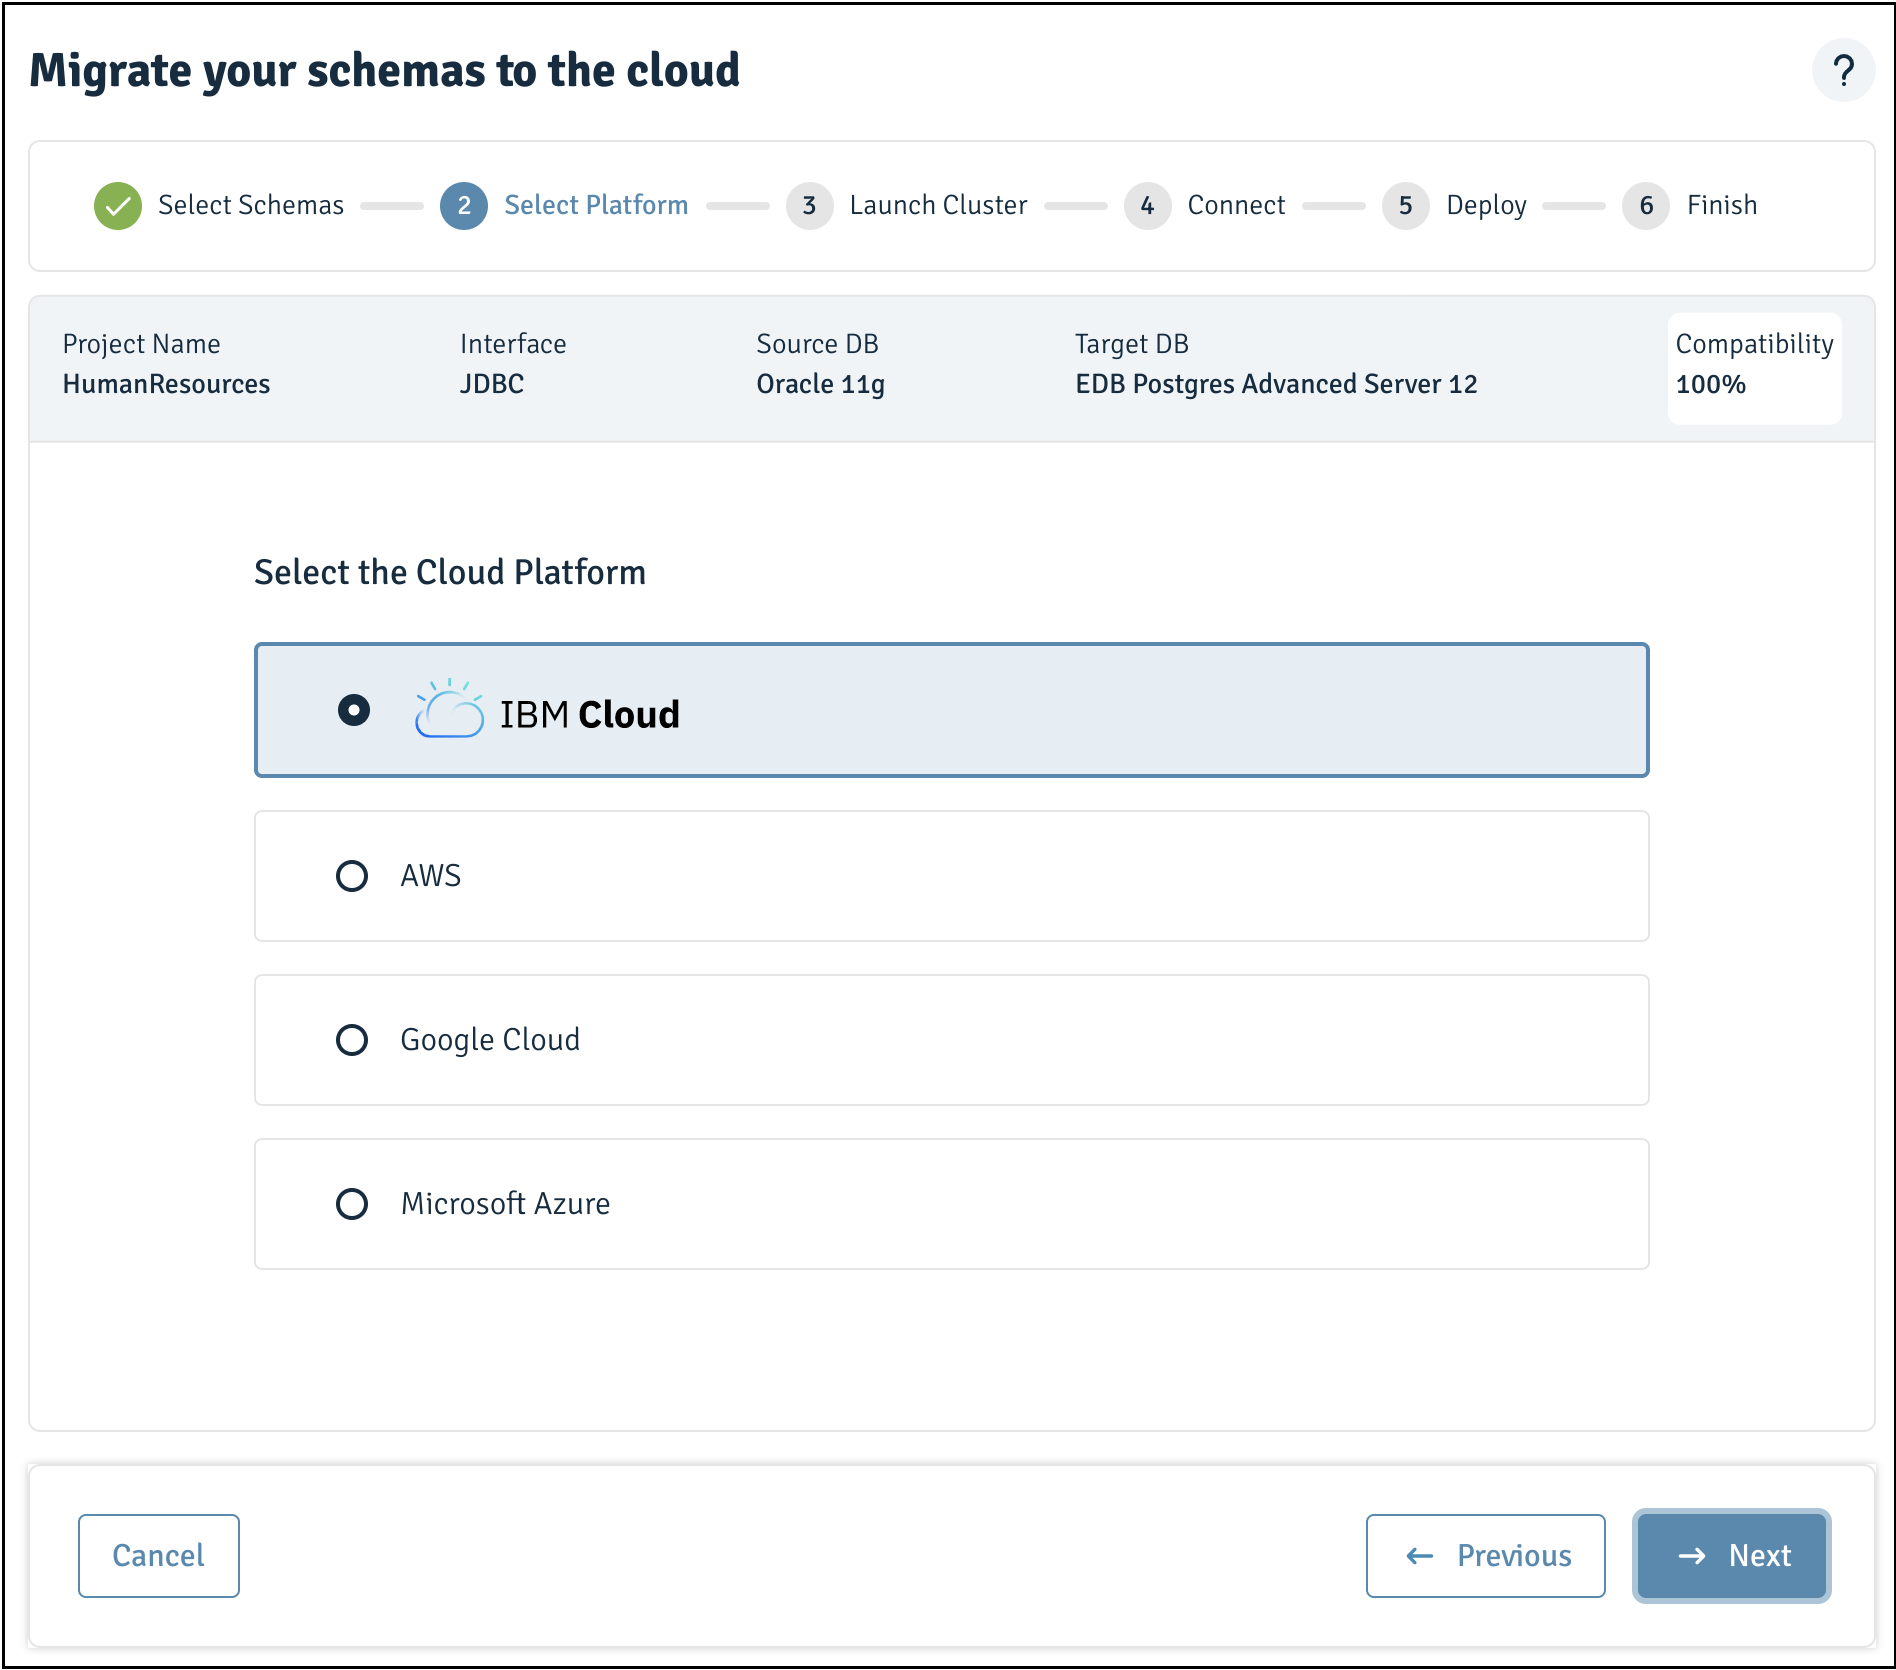
Figure 3-43: Selecting cloud option for migration
- To launch a new cluster, click
Go to Cloud:
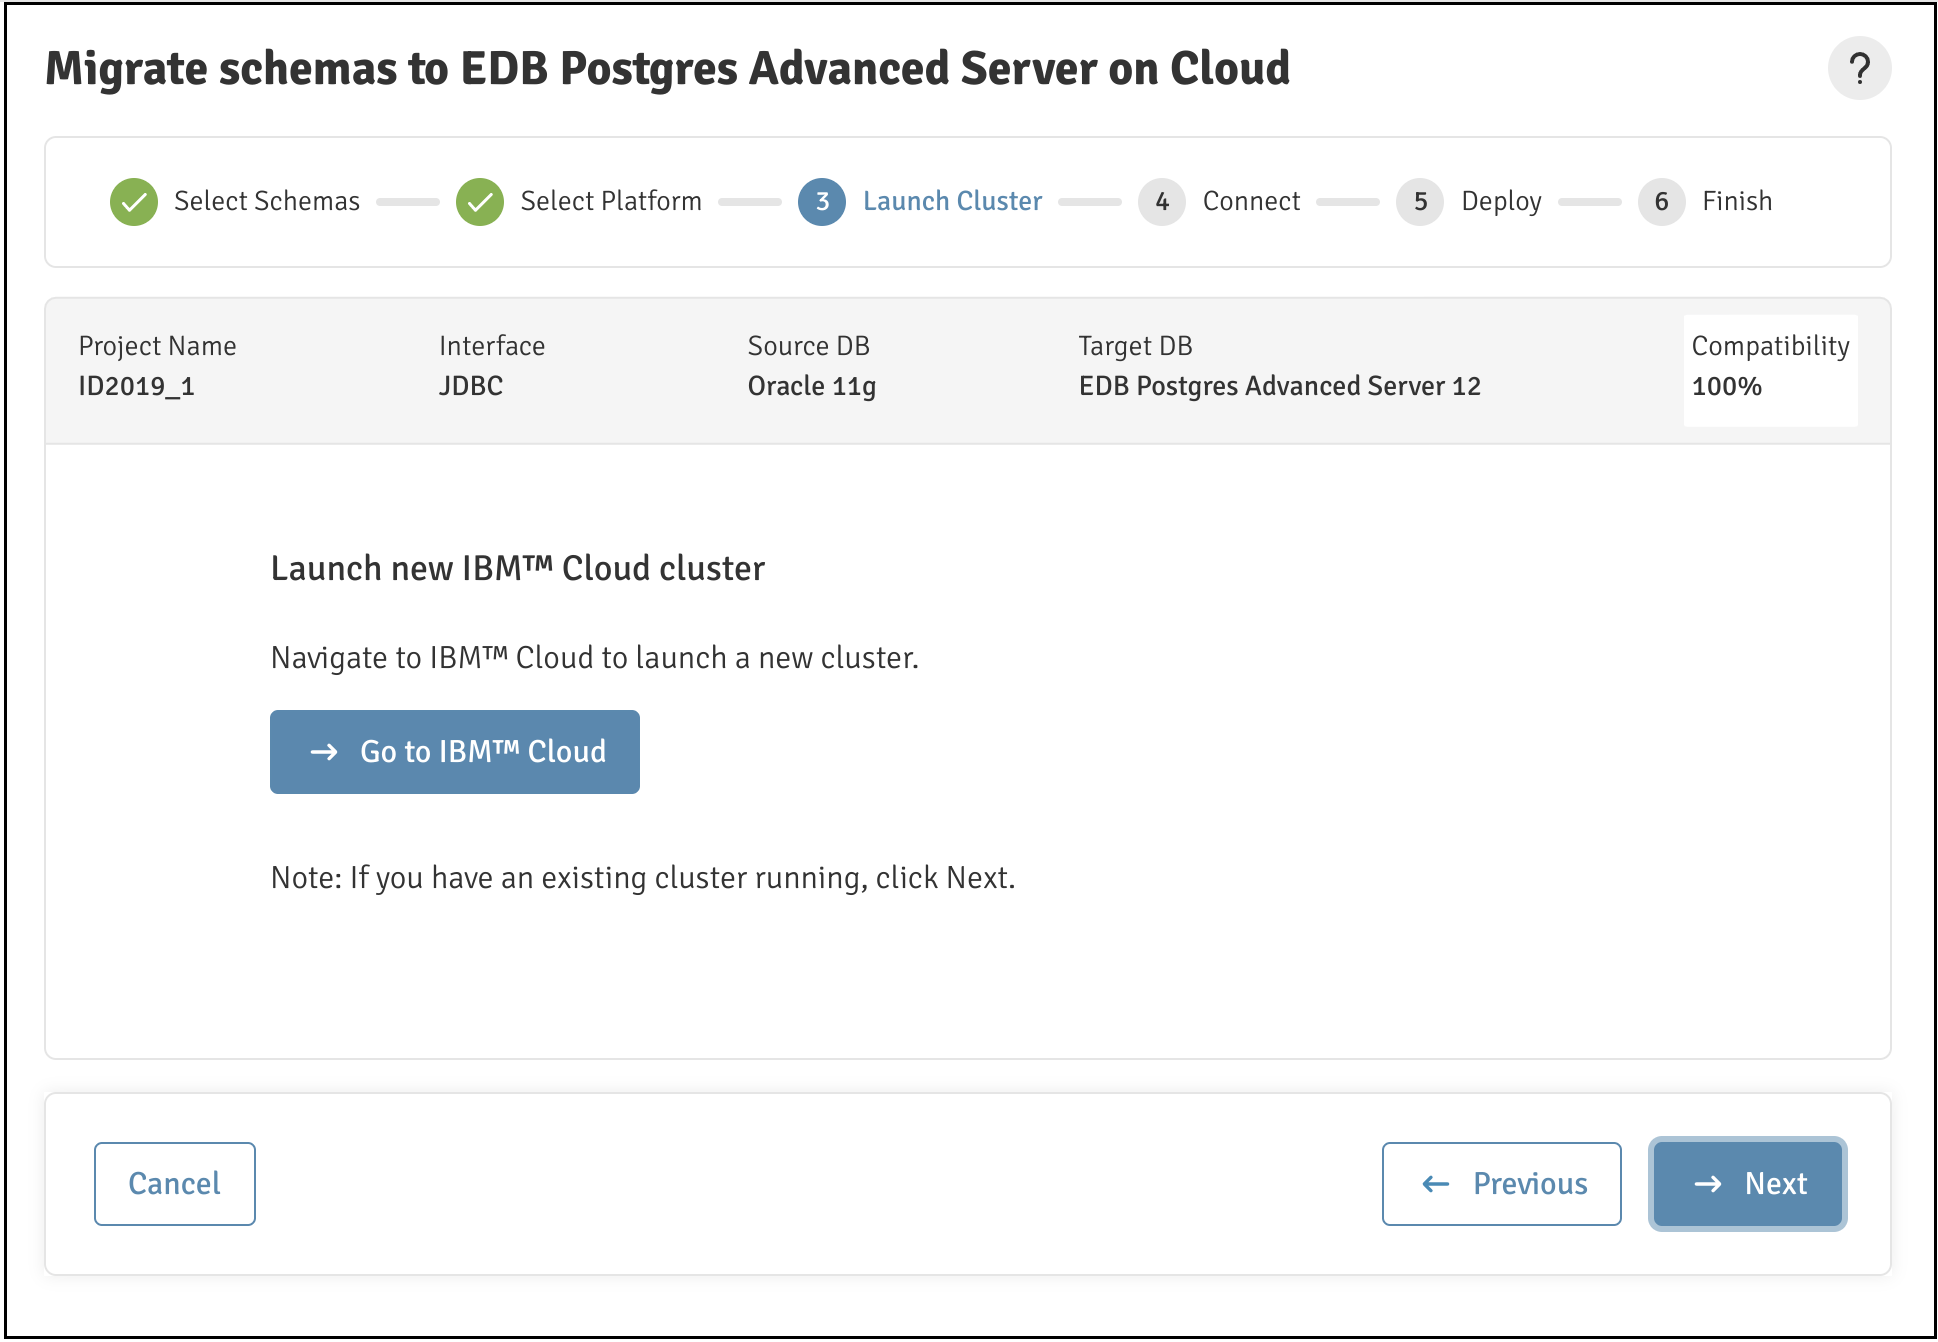
Figure 3-44: Launching a cloud cluster
Or, if you have an existing cluster running, click Next.
- Enter the required connection details on the
Connectpage:
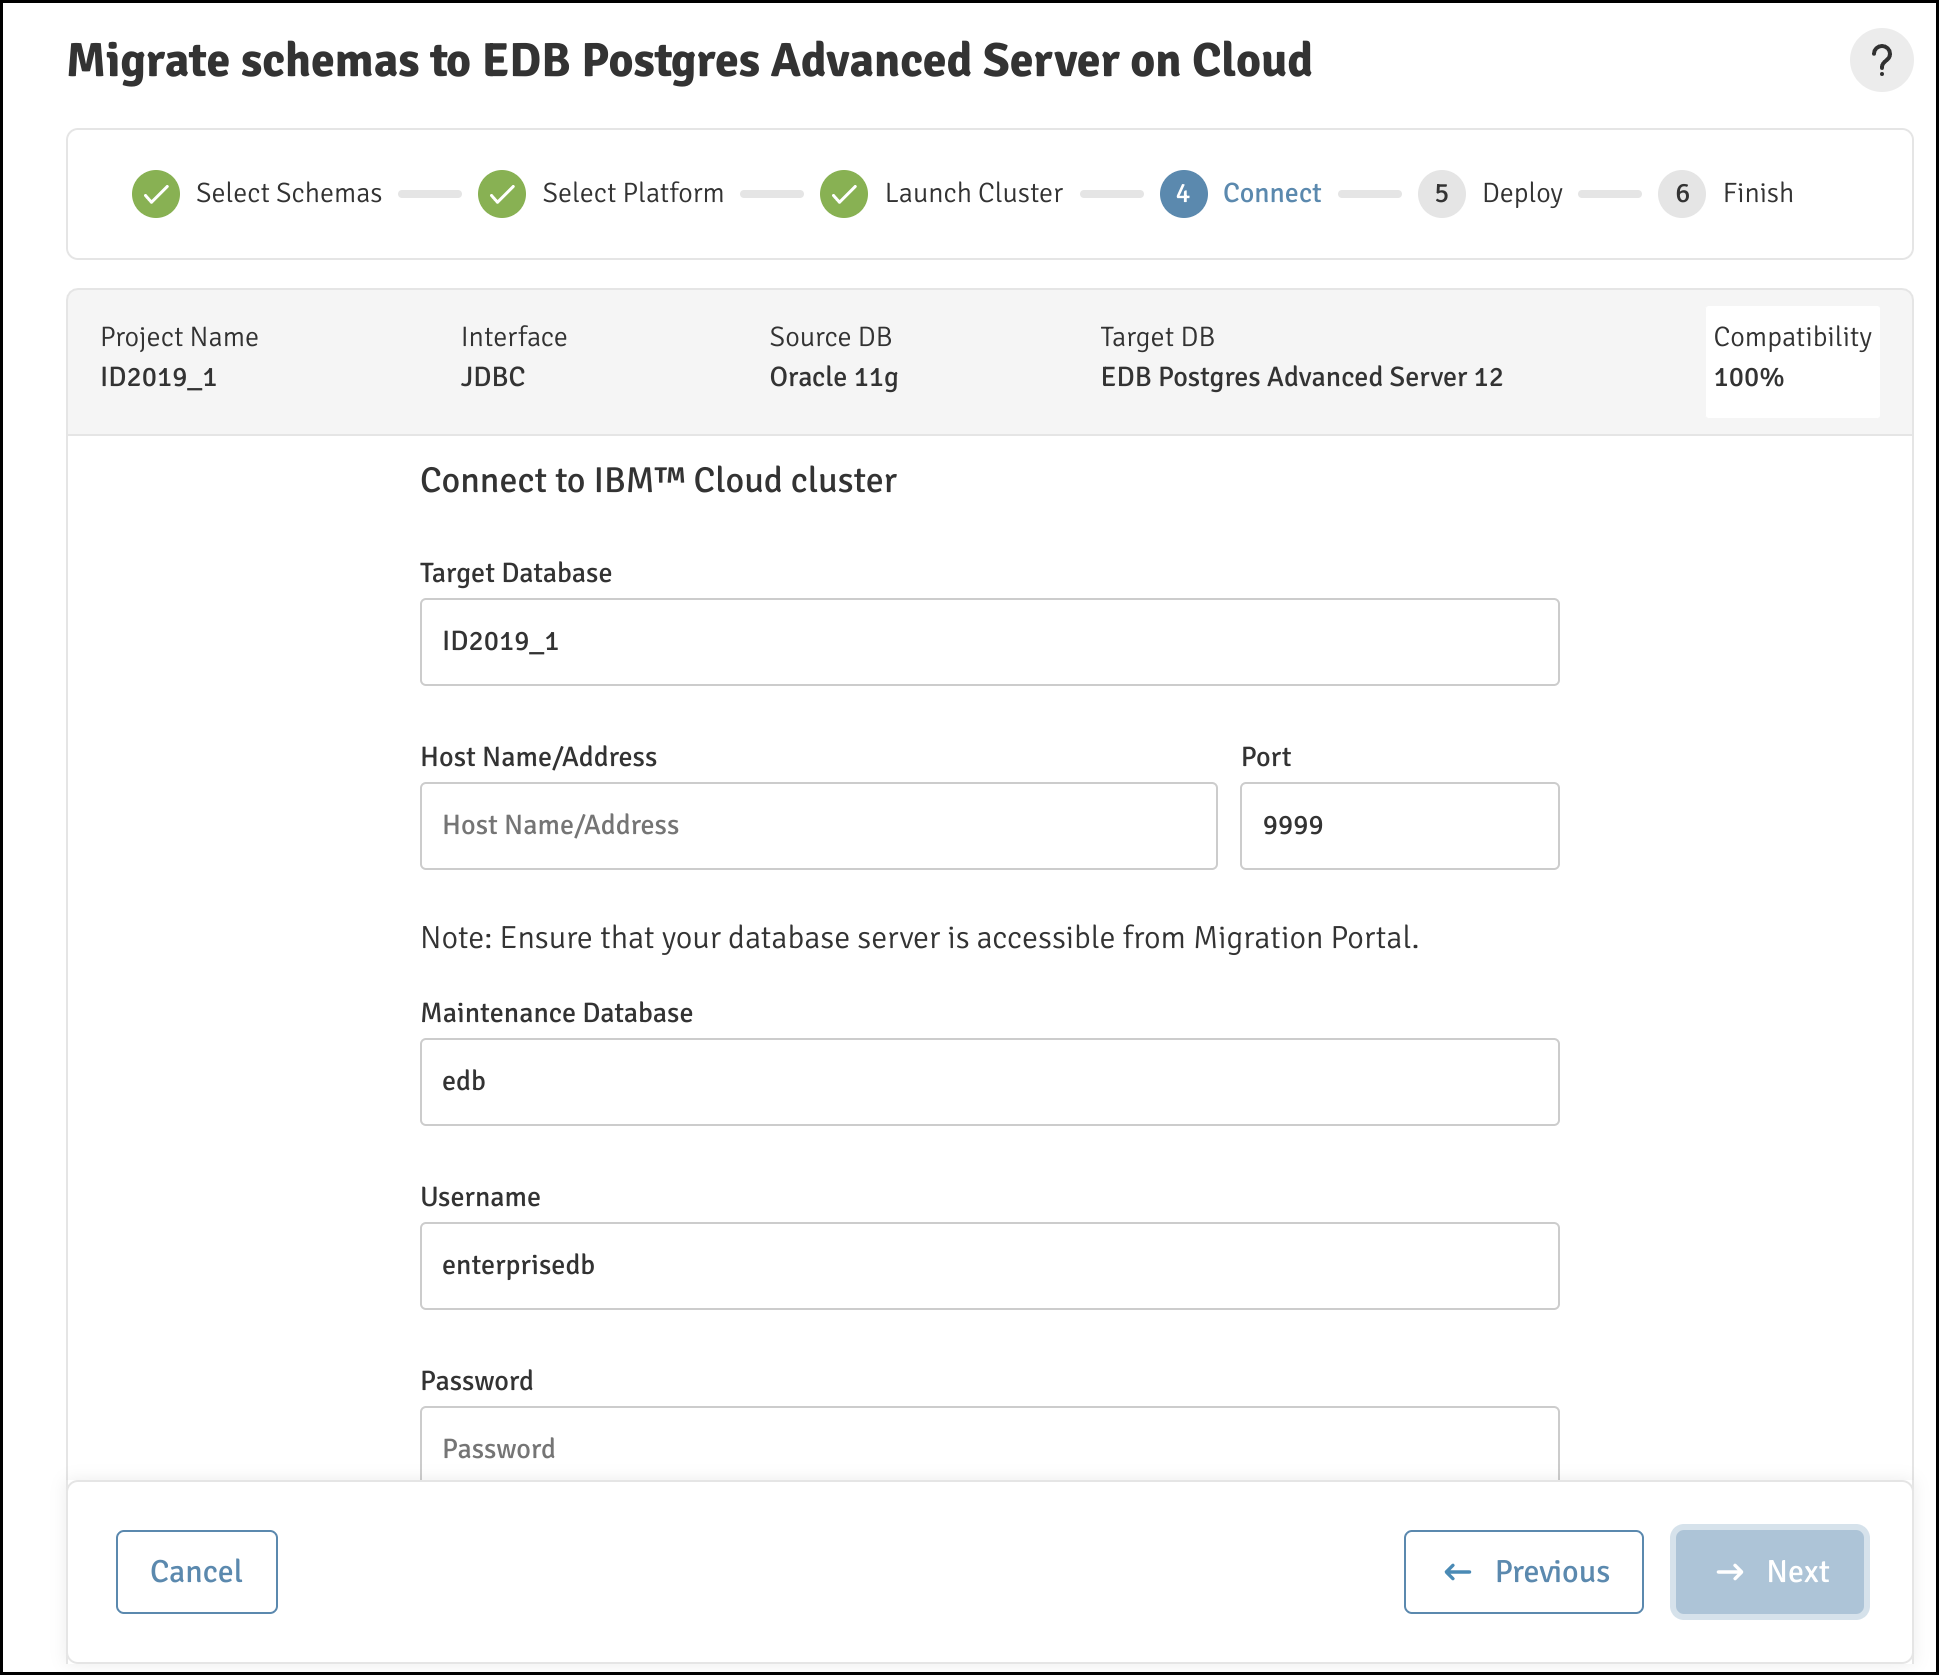
Figure 3-45: Connecting to the cloud cluster
Note You can click
Edit Connectionto make changes to the connection details and retest the connection details.
- Click
Test Connectionto verify the connection details:
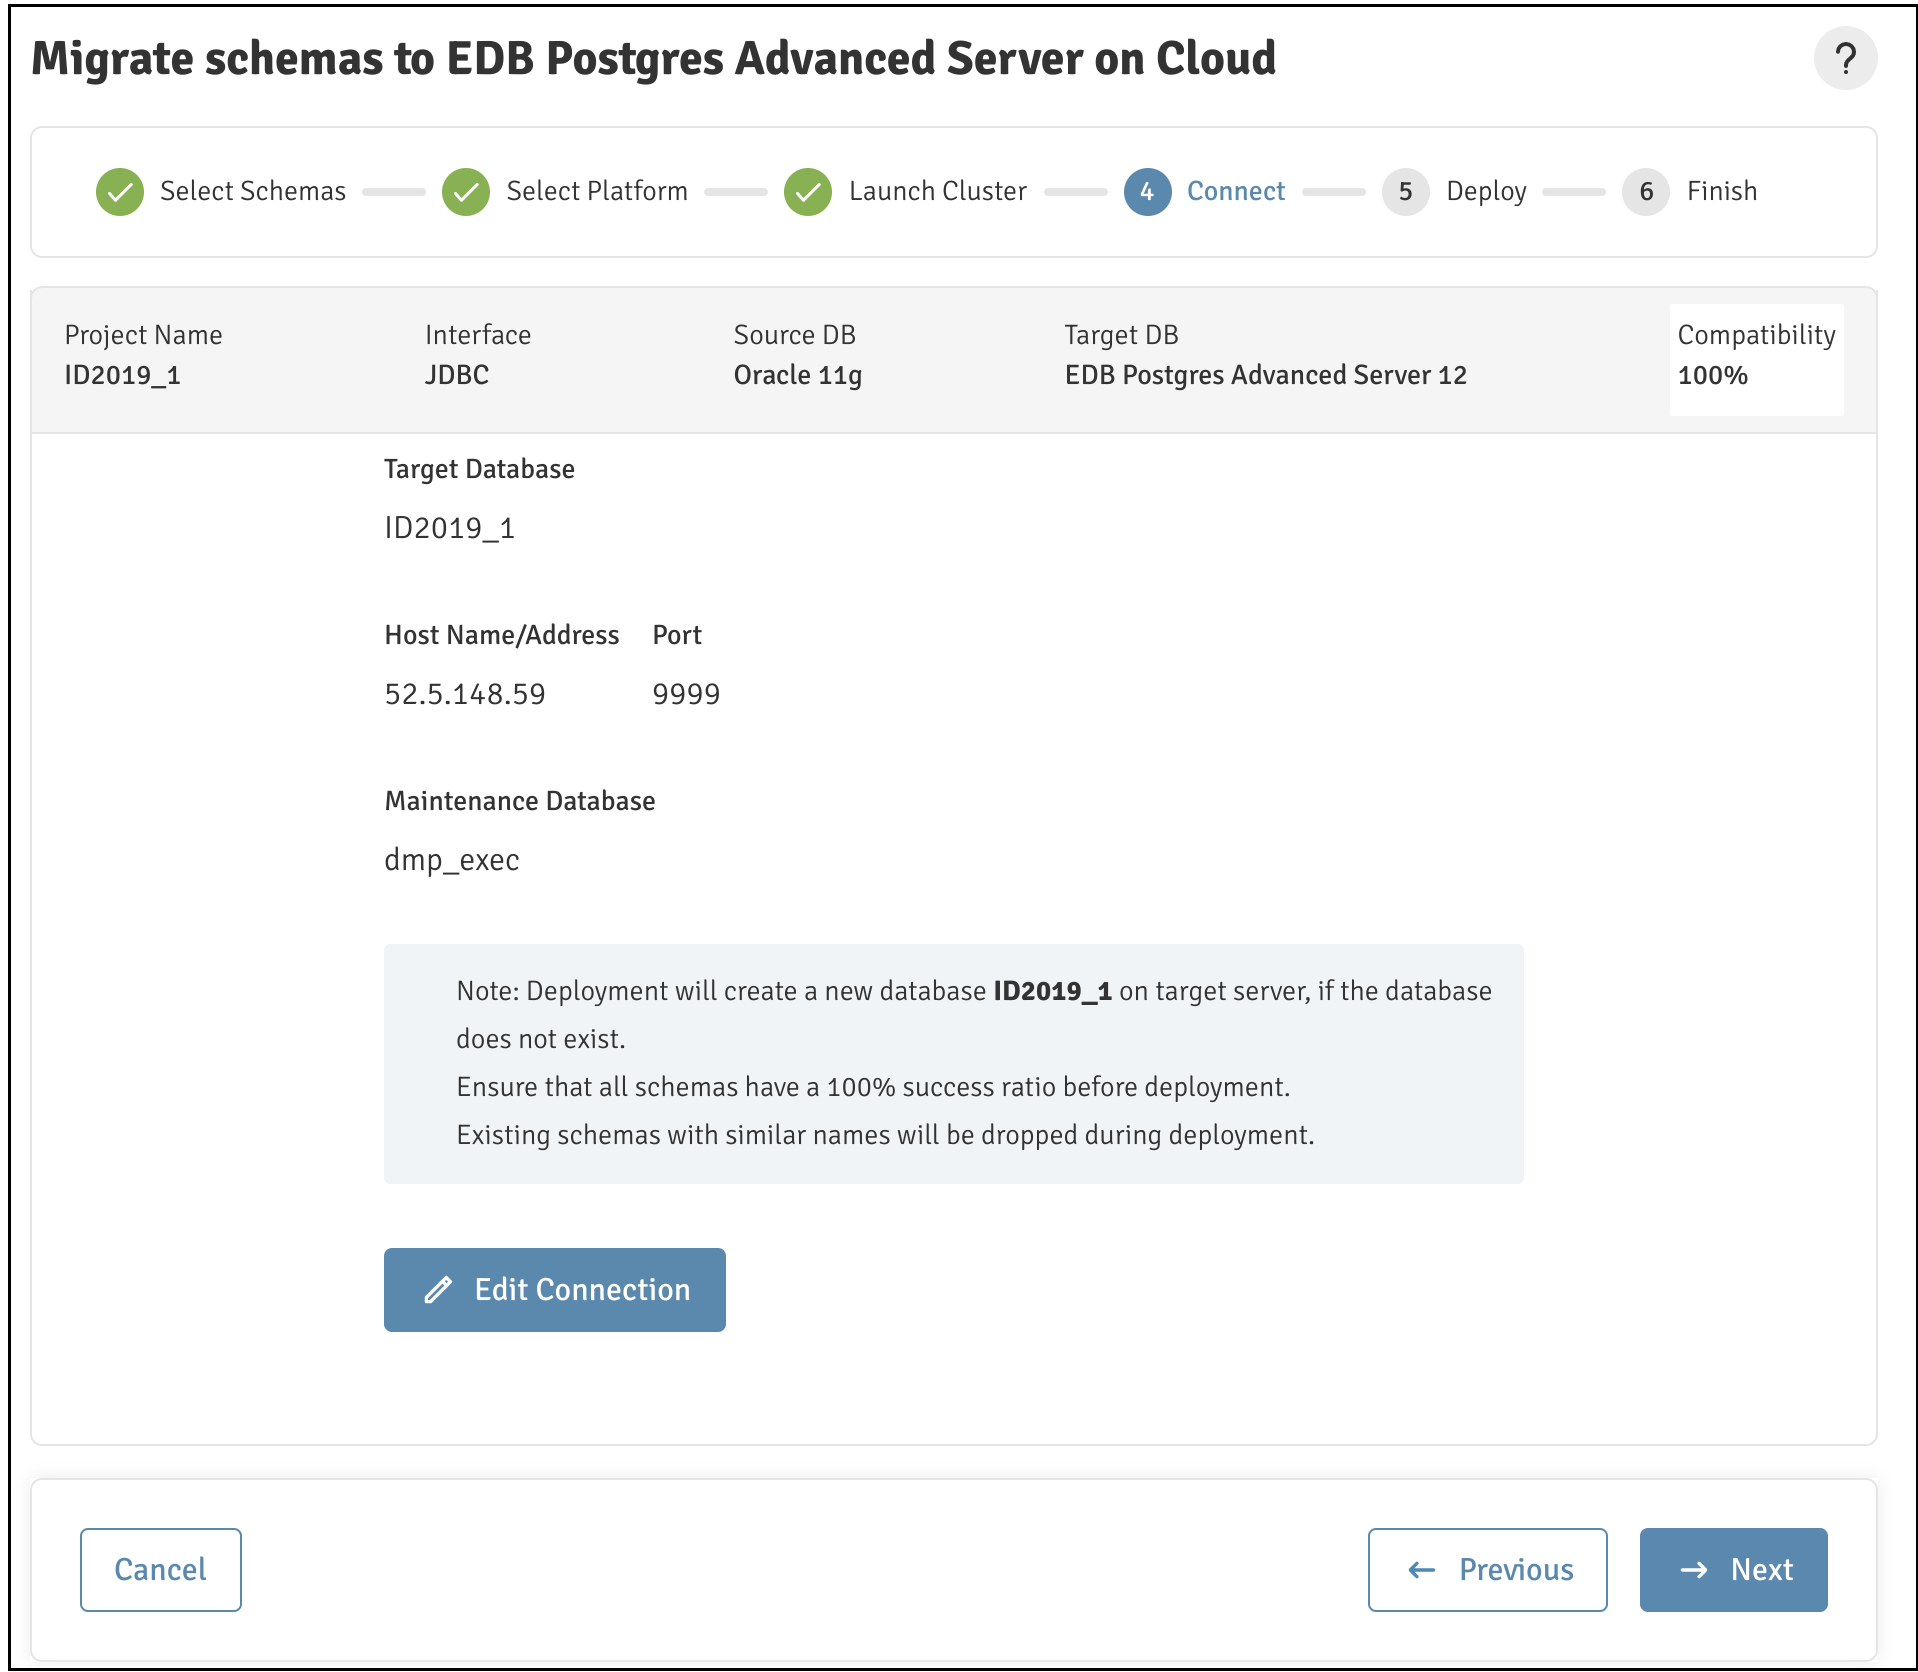
Figure 3-46: Verify the connection details
- Once the connection is successful, click
Next:
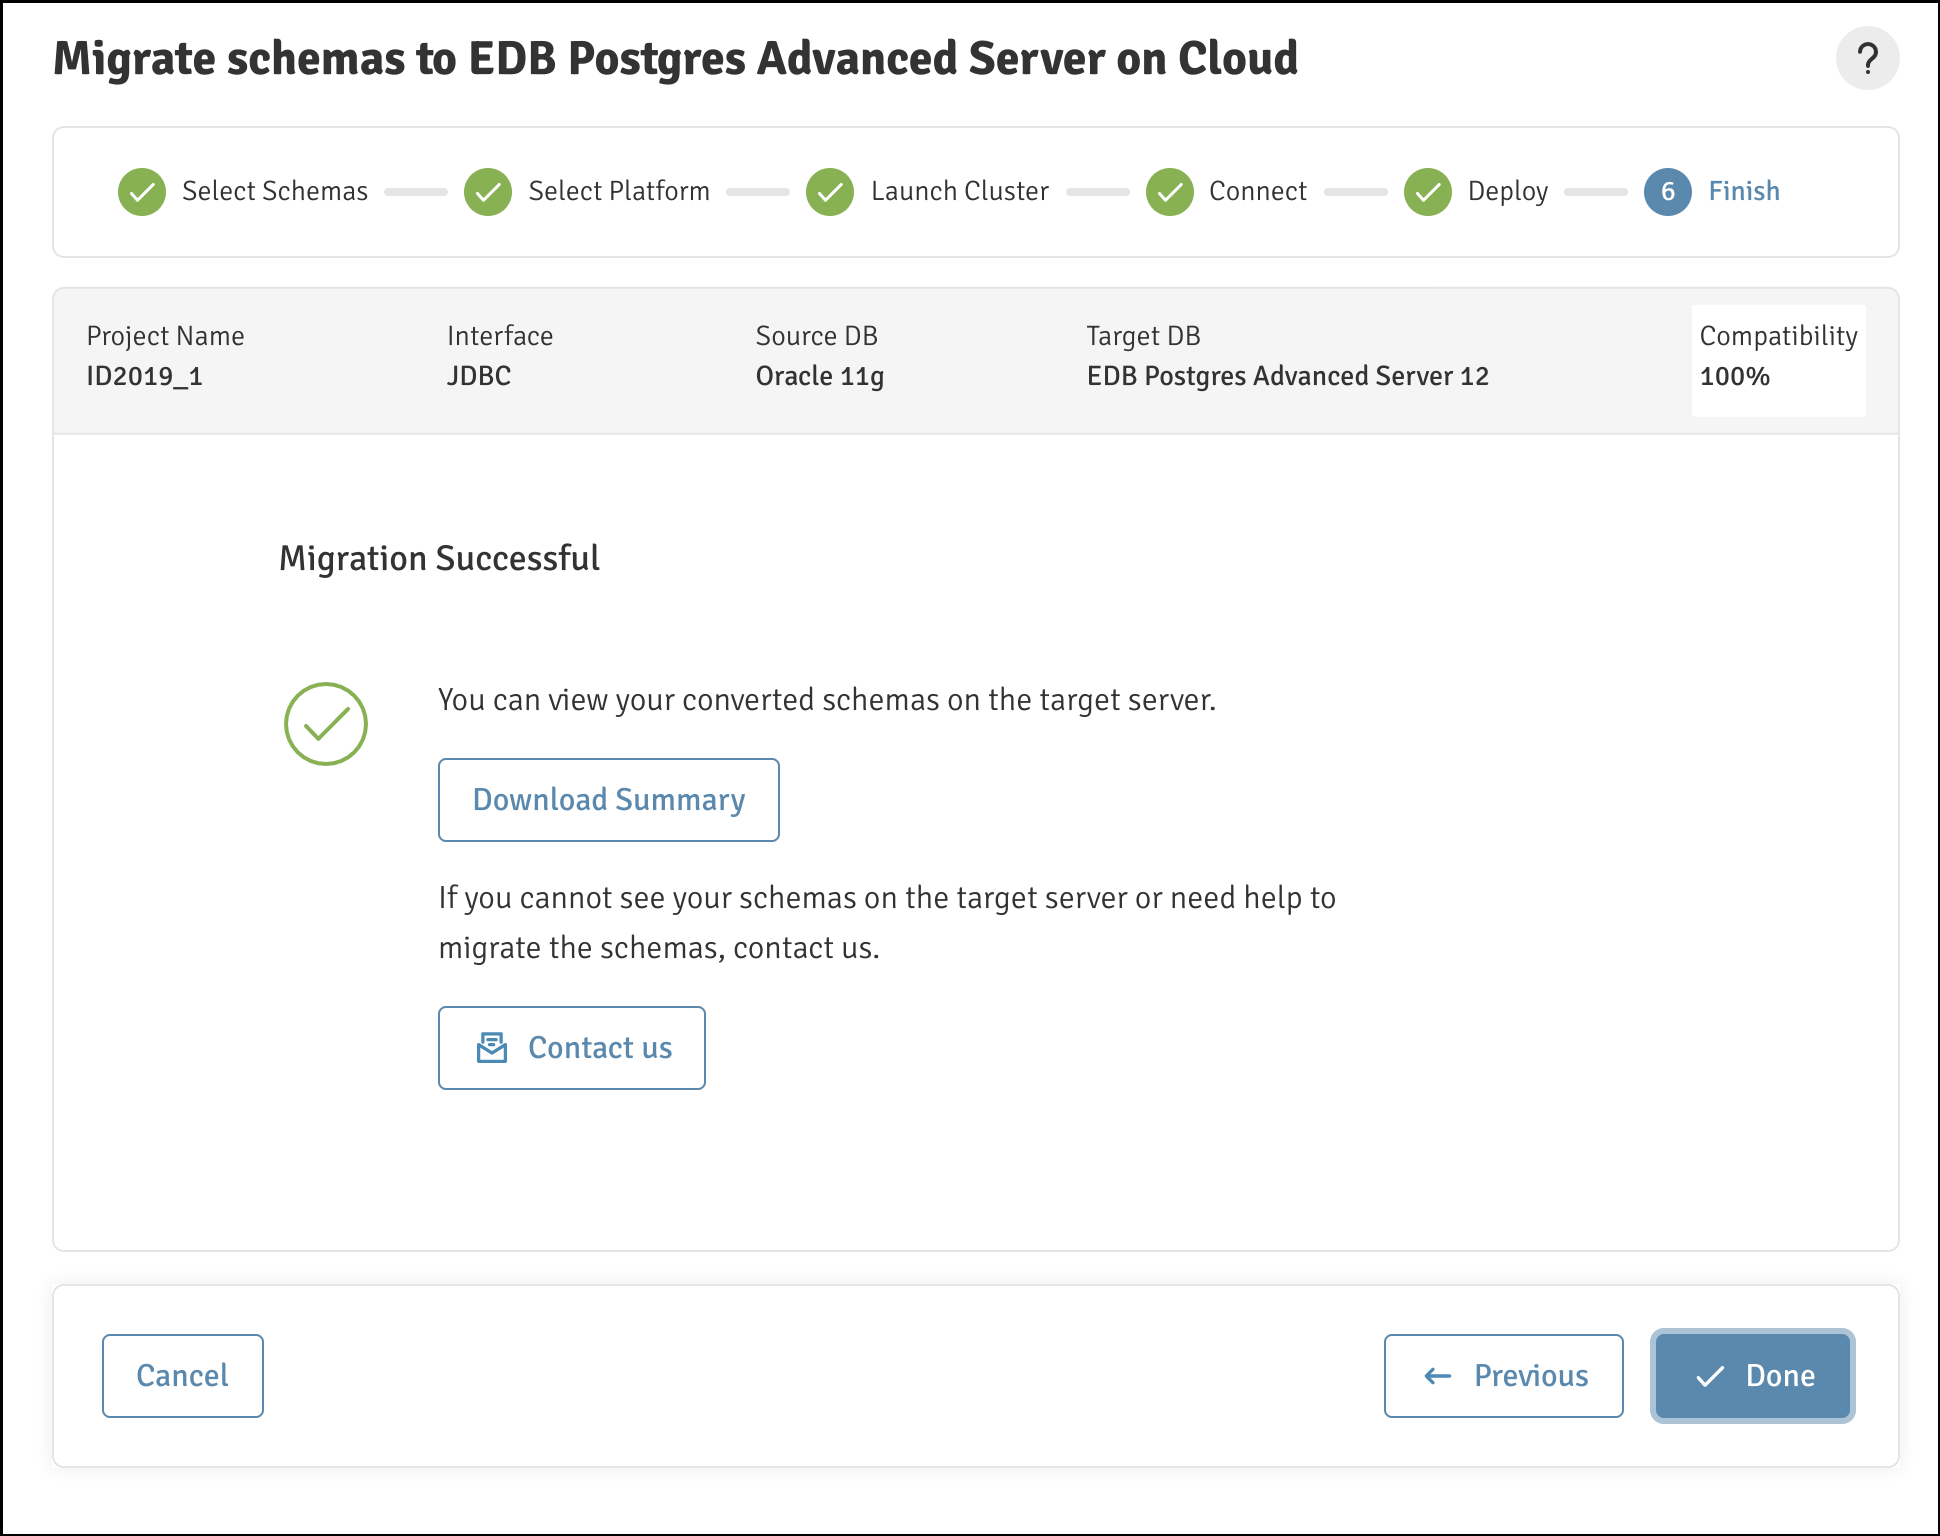
Figure 3-47: A successful migration
The converted schemas are migrated to the target server.
Data Migration
After performing the schema migration, complete the following steps to migrate data:
Use Migration Toolkit to migrate the data. For detailed information about using Migration Toolkit, see the Migration Toolkit Guide.
Configure the Migration Toolkit
toolkit.propertiesfile, ensuring that connection information for the source and target databases is available in the property file:
SRC_DB_URL = jdbc: oracle:thin:@localhost:1521:ORCL
SRC_DB_USER = user_name
SRC_DB_PASSWORD = password
TARGET_DB_URL= jdbc:edb://localhost:5444/migration
TARGET_DB_USER = enterprisedb
TARGET_DB-PASSWORD = password
For more information, see Building the toolkit.properties File.
Invoke Migration Toolkit in
–dataOnlymode. Include the–truncLoadkeyword to resolve foreign key dependencies across tables.For example, the following command migrates data to a schema named
hr:runMTK.sh –dataOnly –targetSchema hr –truncLoad HRThe command migrates the specified
source_schemato thetarget_schema. The data is loaded into the locally installed EDB Postgres instance with a database superuser namedenterprisedband the password ofpassword.
Note The tables are truncated before attempting the data load.
Advanced Data Migration
For larger databases that require a parallel data load, you can use one of the following methods:
Use the EDB Postgres Advanced Server database link feature (for compatibility with Oracle databases).
Or
Use a Dblink or a database link style migration (if your data contains
CLOBdata).
For more information, see the Migration Toolkit Guide.