Upgrading the Backing Postgres Database
If you are updating both PEM components and the PEM backing database,you should perform PEM component updates (the server, agents and client) before updating the backing database. For more information about updating PEM component software, see Upgrading a PEM Installation.
The update process described in this section uses the pg_upgrade utility to migrate from one version of the backing server to a more recent
version. pg_upgrade facilitates migration between any version of Postgres (version 9.3 or later), and any subsequent release of Postgres
that is supported on the same platform.
pg_upgrade supports a transfer of data between servers of the same type. For example, you can use pg_upgrade to move data from a PostgreSQL 9.6
backing database to a PostgreSQL 10 backing database, but not to an Advanced Server 10 backing database. If you wish to migrate to a
different type of backing database (i.e from a PostgreSQL server to Advanced Server), see Moving the Postgres Enterprise Manager™ Server.
You can find more information about using pg_upgrade at:
Step 1 - Download and Invoke the Updated Backing Database Installer
Installers for PostgreSQL and Advanced Server are available through the EnterpriseDB website:
After downloading the installer for the server version to which you will be upgrading, invoke the installer on the host of the PEM server. Follow the onscreen instructions of the installation wizard to configure and install the Postgres server.
You can optionally use a custom-built PostgreSQL server as a host of the PEM backing database. Note that if you are upgrading from a PostgreSQL
backing database listening on port 5432, the new server must be configured to listen on a different port.
Step 2 - Configure the SSL Utilities on the New Server
The new backing database must be running the same version of sslutils that the current backing database is running; you can download the SSL
Utils package that is used in EnterpriseDB installers at:
You are not required to manually add the sslutils extension when using the Advanced Server as the new backing database. The process of
configuring sslutils is platform-specific.
On Linux
If you are using Linux, you can download versions of the archived SSL Utils file from:
When the download completes, extract the sslutils folder, and move it into the Postgres installation directory for the Postgres version to
which you are upgrading.
Open a command line, assume superuser privileges, and set the value of the PATH environment variable to allow make to locate the pg_config program:
export PATH=$PATH:/opt/<Postgres>/<x.x>/bin/
Where:
Postgres specifies either of the folllowing:
PostgreSQLif you are upgrading to a PostgreSQL server.PostgresPlusif you are upgrading to an Advanced Server server.x.xspecifies the version of Postgres to which you are migrating.
Then, use yum to install sslutil dependencies:
yum install openssl-devel
Navigate into the sslutils folder, and build the sslutils package by
entering:
make USE_PGXS=1
make USE_PGXS=1 install
On Windows
sslutils must be compiled on the new backing database with the same compiler that was used to compile sslutils on the original backing
database. If you are moving to a Postgres database that was installed using a PostgreSQL one-click installer (from EnterpriseDB) or an
Advanced Server installer, use Visual Studio to build sslutils. If you are upgrading to PostgreSQL 9.3 or later, use Visual Studio 2010.
For detailed information about building a specific version of Postgres on Windows, please consult the core documentation for that version. Core documentation is available at the PostgreSQL project website at:
or at the EnterpriseDB website at:
While specific details of the process will vary by platform and compiler, the basic steps on each platform are the same. The example that follows demonstrates compiling OpenSSL support for PostgreSQL on a 32-bit Windows system.
Before compiling the OpenSSL extension, you must locate and install OpenSSL for your version of Windows. Before invoking the OpenSSL
installer you may be required to download and install a pre-requisite redistributable (such as vcredist_x86.exe).
After installing OpenSSL, download and unpack the sslutils utility package available at:
Copy the unpacked sslutils folder to the Postgres installation directory (i.e. C:\ProgramFiles\PostgreSQL\9.\<x>)
Open the Visual Studio command line, and navigate into the sslutils directory. Use the following commands to build sslutils:
SET USE_PGXS=1
SET GETTEXTPATH=\ <path_to_gettext>
SET OPENSSLPATH=\ <path_to_openssl>
SET PGPATH=\ <path_to_pg_installation_dir>
SET ARCH=x86
msbuild sslutils.proj /p:Configuration=Release
Where:
path_to_gettextspecifies the location of theGETTEXTlibrary and header files.
path_to_opensslspecifies the location of the openssl library and header files.
path_to_pg_installation_dirspecifies the location of the Postgres installation.
For example, the following set of commands builds OpenSSL support into the PostgreSQL 10 server:
SET USE_PGXS=1
SET OPENSSLPATH=C:\OpenSSL-Win32
SET GETTEXTPATH="C:\Program Files\PostgreSQL\10"
SET PGPATH="C:\Program Files\PostgreSQL\10"
SET ARCH=x86
msbuild sslutils.proj /p:Configuration=Release
When the build completes, the sslutils directory will contain the following files:
sslutils--1.1.sqlsslutils--unpackaged--1.1.sqlsslutils--pemagent.sql.insslutils.dll
Copy the compiled sslutils files to the appropriate directory for your installation; for example:
COPY sslutils*.sql "%PGPATH%\share\extension\"
COPY sslutils.dll "%PGPATH%\lib\"
Step 3 - Stop the Services
Stop the services of both the old backing database and the new backing database.
-On RHEL or CentOS 6.x, open a command line and assume the identity of a superuser. Enter the command:
/etc/init.d/<service_name> stop
-On RHEL or CentOS 7.x, open a command line and assume the identity of a superuser. Enter the command:
systemctl/<service_name> stop
Where service_name specifies the name of the Postgres service.
On Windows, you can use the Services dialog to control the service. To open the Services dialog, navigate through the Control Panel to the
System and Security menu. Select Administrative Tools, and then double-click the Services icon. When the Services dialog opens,
highlight the service name in the list, and use the option provided on the dialog to Stop the service.
Step 4 - Use pg_upgrade to update the Server
You can use the pg_upgrade utility to perform an in-place transfer of existing data between the old backing database and the new backing
database. If your server is configured to enforce md5 authentication, you may need to add an entry to the .pgpass file that specifies the
connection properties (and password) for the database superuser, or modify the pg_hba.conf file to allow trust connections before invoking
pg_upgrade. For more information about creating an entry in the .pgpass file, please see the PostgreSQL core documentation, available at:
During the upgrade process, pg_upgrade will write a series of log files. The cluster owner must invoke pg_upgrade from a directory in which they
have write privileges. If the upgrade completes successfully, pg_upgrade will remove the log files when the upgrade completes. To instruct
pg_upgrade to not delete the upgrade log files, include the --retain keyword when invoking pg_upgrade.
To invoke pg_upgrade, assume the identity of the cluster owner, navigate into a directory in which the cluster owner has write privileges, and
execute the command:
<path_to_pg_upgrade> pg_upgrade
-d <old_data_dir_path>
-D <new_data_dir_path>
-b <old_bin_dir_path> -B <new_bin_dir_path>
-p <old_port> -P <new_port>
-u <user_name>
Where:
path_to_pg_upgrade* specifies the location of the pg_upgrade utility. By default, pg_upgrade is installed in the ``bindirectory under your Postgres directory.
old_data_dir_pathspecifies the complete path to the data directory of the old backing database.
new_data_dir_pathspecifies the complete path to the data directory of the new backing database.
old_bin_dir_pathspecifies the complete path to the bin directory of the old backing database.
new_bin_dir_pathspecifies the complete path to the bin directory of the old backing database.
old_portspecifies the port on which the old server is listening.
new_portspecifies the port on which the new server is listening.
user_namespecifies the name of the cluster owner.
For example, the following command:
C:\>"C:\Program Files\PostgreSQL\10\bin\pg_upgrade.exe"
-d "C:\Program Files\PostgreSQL\9.6\data"
-D "C:\Program Files\PostgreSQL\10\data"
-b "C:\Program Files\PostgreSQL\9.6\bin"
-B "C:\Program Files\PostgreSQL\10\bin"
-p 5432 -P 5433
-u postgres
Instructs pg_upgrade to migrate the PEM database from PostgreSQL 9.6 to
PostgreSQL 10 on a Windows system (if the backing databases are
installed in their default locations).
Once invoked, pg_upgrade will perform consistency checks before moving
the data to the new backing database. When the upgrade is finished,
pg_upgrade will notify you that the upgrade is complete.
For detailed information about using pg_upgrade options, or
troubleshooting the upgrade process, please see:
Step 5 - Copy the Certificate Files from the Old Database to the New Database
Copy the following certificate files from the data directory of the old
backing database to the data directory of the new backing database:
ca_certificate.crtca_key.keyroot.crtroot.crlserver.keyserver.crt
Once in place on the target server, the files should have the (platform-specific) permissions described below:
Permissions and Ownership on Linux
File Name |
Owner |
Permissions |
ca_certificate.crt |
postgres |
-rw——- |
ca_key.key |
postgres |
-rw——- |
root.crt |
postgres |
-rw——- |
root.crl |
postgres |
-rw——- |
server.key |
postgres |
-rw——- |
server.crt |
postgres |
-rw-r–r– |
On Linux, the certificate files must be owned by postgres. You can use
the following command at the command line to modify the ownership of the
files:
chown postgres <file_name>
Where file_name specifies the name of the certificate file.
The server.crt file may only be modified by the owner of the file, but
may be read by any user. You can use the following command to set the
file permissions for the server.crt file:
chmod 644 server.crt
The other certificate files may only be modified or read by the owner of the file. You can use the following command to set the file permissions:
chmod 600 <file_name>
Where file_name specifies the name of the file.
Permissions and Ownership on Windows
On Windows, the certificate files moved from the source host must be
owned by the service account that performed the PEM server and backing
database installation on the target host. If you invoked the PEM server
and Postgres installer using the Run as Administrator option (selected
from the context menu of the installer), the owner of the certificate
files will be Administrators.
To review and modify file permissions on Windows, right-click on the
file name, and select Properties.
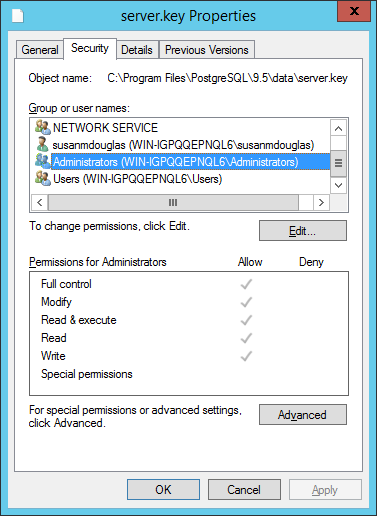
The Security tab.
Navigate to the Security tab and highlight a Group or
user name to view the assigned permissions. Select Edit or Advanced to
access dialogs that allow you to modify the permissions associated with
the selected user.
Step 6 - Update the New Server Configuration File
The postgresql.conf file contains parameter settings that specify server
behavior. You will need to modify the postgresql.conf file on the new
server to match the configuration specified in the postgresql.conf file
of the old server.
By default, the postgresql.conf file is located:
For Postgres version lower than 10 on Linux, in
/opt/PostgreSQL/<version.x>/dataFor Postgres version 10 or higher when installed with graphical installers on Linux, in
/opt/PostgreSQL/<version>/dataFor Postgres version 10 or higher when installed with an RPM on Linux, in
/usr/edb/PostgreSQL/<version>/dataFor any Postgres version on Windows, in
C:\Program Files\PostgreSQL\<version.x>\data
Where, version is the major version of Postgres on your system.
Use your choice of editor to update the postgresql.conf file of the new
server. Modify the following parameters:
The
portparameter to listen on the port monitored by your original backing database (typically,5432).The
sslparameter should be set toon.
You must also ensure that the following parameters are enabled. If the
parameters are commented out, remove the pound sign from in front of
each postgresql.conf file entry:
ssl_cert_file = 'server.crt' # (change requires restart)ssl_key_file = 'server.key' # (change requires restart)ssl_ca_file = 'root.crt' # (change requires restart)ssl_crl_file = 'root.crl'
Your installation may have other parameter settings that require
modification to ensure that the new backing database behaves in a manner
comparable to the old backing database. Review the postgresql.conf files
carefully to ensure that the configuration of the new server matches the
configuration of the old server.
Step 7 - Update the New Server Authentication File
The pg_hba.conf file contains parameter settings that specify how the
server will enforce host-based authentication. When you install the PEM
server, the installer modifies the pg_hba.conf file, adding entries to
the top of the file:
# Adding entries for PEM agents and admins to connect to PEM server
hostssl pem +pem_user 192.168.2.0/24 md5
hostssl pem +pem_agent 192.168.2.0/24 cert
# Adding entries (localhost) for PEM agents and admins to connect to PEM server
hostssl pem +pem_user 127.0.0.1/32 md5
hostssl postgres +pem_user 127.0.0.1/32 md5
hostssl pem +pem_user 127.0.0.1/32 md5
hostssl pem +pem_agent 127.0.0.1/32 cert
By default, the pg_hba.conf file is located at the following location:
For Postgres version lower than 10 on Linux, in
/opt/PostgreSQL/<version>.x/dataFor Postgres version 10 or higher when installed with graphical installers on Linux, in
/Opt/PostgreSQL/<version>/dataFor Postgres version 10 or higher when installed with RPMs on Linux, in
/var/lib/PostgreSQL/<version>/dataFor Advanced Server version 10 or higher when installed with RPMs on Linux, in
/var/lib/edb/AS<version>/dataFor any Postgres version on Windows, in
C:\Program Files\PostgreSQL\version.x\data
Where, version is the major version of Postgres on your system and x is the minor version.
Using your editor of choice, copy the entries from the pg_hba.conf file
of the old server to the pg_hba.conf file for the new server.
Step 8 - Restart the New Postgres Server
Start the service of the new backing database.
-On RHEL or CentOS 6.x, open a command line and assume the identity of a superuser. Enter the command:
/etc/init.d/<service_name> start
-On RHEL or CentOS 7.x, open a command line and assume the identity of a superuser. Enter the command:
systemctl stop <service_name>
Where service_name is the name of the backing database server.
If you are using Windows, you can use the Services dialog to control the
service. To open the Services dialog, navigate through the Control Panel
to the System and Security menu. Select Administrative Tools, and then
double-click the Services icon. When the Services dialog opens,
highlight the service name in the list, and use the option provided on
the dialog to start the service.