PEM 8.1 -Agent User Guide
EnterpriseDB
PEM Agent User Guide
PEM is composed of three primary components: PEM server, PEM agent, and PEM web interface. The PEM agent is responsible for performing tasks on each managed machine and collecting statistics for the database server and operating system.
For information about the platforms and versions supported by PEM, visit the EDB website at:
https://www.enterprisedb.com/services-support/edb-supported-products-and-platforms#pem
For information about the installation, uninstallation, or upgrading of a PEM Agent, visit the EDB website at:
https://www.enterprisedb.com/docs/pem/latest/
This document provides information that is required to work with PEM agents. The guide will acquaint you with the basic registering, configuration, and management of agents. The guide is broken up into the following core sections:
- Postgres Enterprise Manager - Overview - This section provides an overview of PEM architecure.
- Registering a PEM Agent - This section provides information about registration of a PEM agent.
- Managing a PEM agent - This section provides information about configuring and managing a PEM agent.
- Troubleshooting for PEM agent - This section provides information about troubleshooting for PEM agents.
This document uses Postgres to mean either the PostgreSQL or EDB Postgres Advanced Server database or EDB Postgres Extended.
pem_architecture registering_agent managing_pem_agent pem_agent_troubleshooting conclusion
PEM Architecture
Postgres Enterprise Manager (PEM) is a tool designed to monitor and manage multiple Postgres servers through a single GUI interface. PEM is capable of monitoring the following areas of the infrastructure:
Note The term Postgres refers to either PostgreSQL or EDB Postgres Advanced Server or EDB Postgres Extended.
- Hosts - One or more servers (physical or virtual) and their operating systems.
- Servers - One or more instances of PostgreSQL or EDB Postgres Advanced Server or EDB Postgres Extended (formerly known as 2ndQPostgres) running on a host.
- Databases - One or more databases and the schema objects (tables, indexes, etc.) within them.
PEM consists of a number of individual software components; the individual components are described below.
- PEM Server - The PEM Server is used as the data repository for monitoring data and as a server to which both Agents and Clients connect. The PEM server consists of an instance of PostgreSQL and an associated database for storage of monitoring data, and a server that provides web services.
- PEM Agent - The PEM Agent is responsible for executing tasks and reporting statistics from the Agent host and monitored Postgres instances to the PEM server. A single PEM Agent can monitor multiple installed instances of Postgres that reside on one or many hosts.
- PEM Web Client - The PEM web interface allows you to manage and monitor Postgres servers and utilize PEM extended functionality. The web interface software is installed with the PEM server and is accessed via any supported web browser.
- SQL Profiler - SQL Profiler is a Postgres server plugin to record the monitoring data and query plans to be analysed by the SQL Profiler tool in PEM. This is an optional component of PEM, but the plugin must be installed into each instance of Postgres with which you wish to use the SQL Profiler tool. The SQL Profiler may be used with any supported version of an EDB distribution of a PostgreSQL server or Advanced Server (not just those managed through the PEM server). See the PEM SQL Profiler Configuration Guide for details and supported versions.
PEM architecture
The following architectural diagram illustrates the relationships between the PEM server, clients, and managed as well as unmanaged Postgres servers.
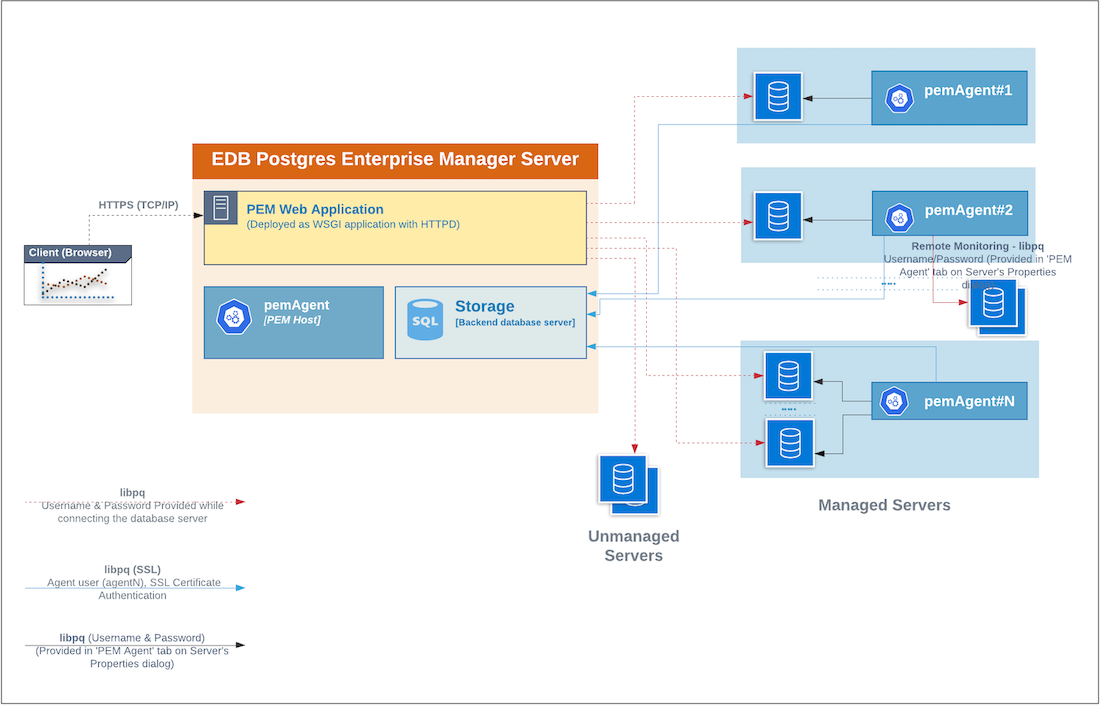
PEM Architecture
The PEM Server
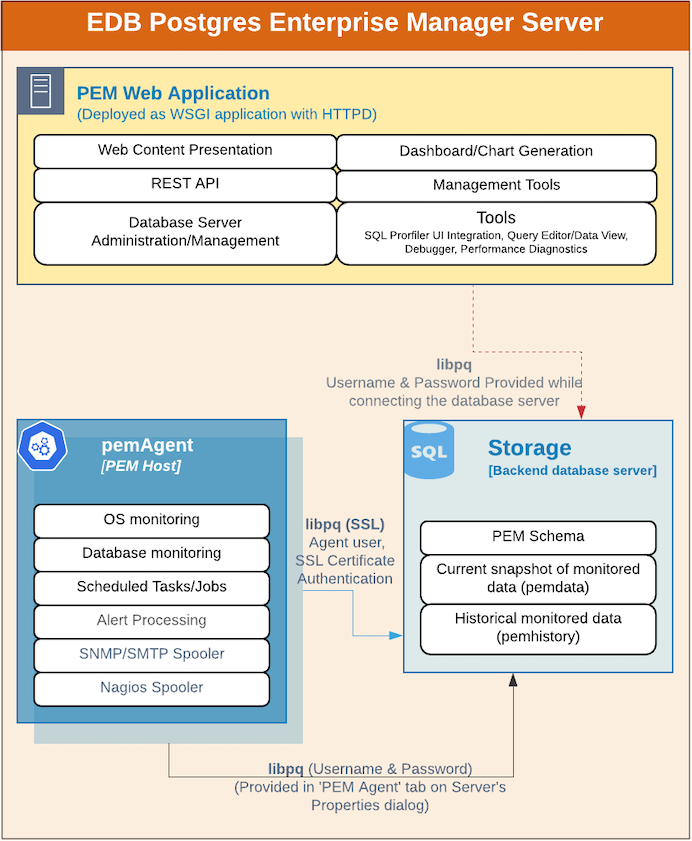
The PEM server consists of an instance of Postgres, an instance of the Apache web-server providing web services to the client, and a PEM Agent. PEM utilizes a server-side cryptographic plugin to generate authentication certificates.
The instance of Postgres (a database server) and an instance of the Apache web-server ( HTTPD) can be on the same host or on separate hosts.
- Postgres Instance (Database server) - This is the backend database server. It hosts a database named pem which acts as the repository for PEM Server. The pem database contains several schemas that store metric data collected from each monitored host, server, and database.
- pem - This schema is the core of the PEM application. It contains the definitions of configuration functions, tables, or views required by the application.
- pemdata - This schema stores the current snapshot of the monitored data.
- pemhistory - This schema stores the historical monitored data.
- Apache Web Server (HTTPD) - The PEM Web Application is deployed as a WSGI application with HTTPD to provide web services to the client. It is comprised of the following:
- Web content presentation - The presentation layer is created by the Web Application (for example Browser, login page,..).
- Rest API - The REST API allows integration with other apps and services.
- Database Server Administration/Management - Database server administration and management activities like CREATE, ALTER, DROP, etc. can be performed for managed as well as unmanaged servers.
- Dashboard/Chart generation - Internally, the web application includes functionality that generates Dashboards and Charts.
- Management Tools - The Audit Manager, Capacity Manager, Log Manager, Postgres Expert, Postgres Log Analysis Expert, and the Tuning Wizard are made available in the Web Application.
- Other tools provide functionality on managed or unmanaged servers:
- SQL Profiler UI Integration - SQL Profiler generates easily analyzed traces of session content.
- Query Editor/Data View - The Query editor allows you to query, edit, and view data.
- Debugger - The Debugger helps you debug queries.
- Performance Diagnostics - Performance Diagnostics help you analyze the performance of Advanced Server.
We recommend that you use a dedicated machine to host production instances of the PEM backend database. The host may be subject to high levels of data throughput, depending on the number of database servers that are being monitored and the workloads the servers are processing.
The PEM Agent
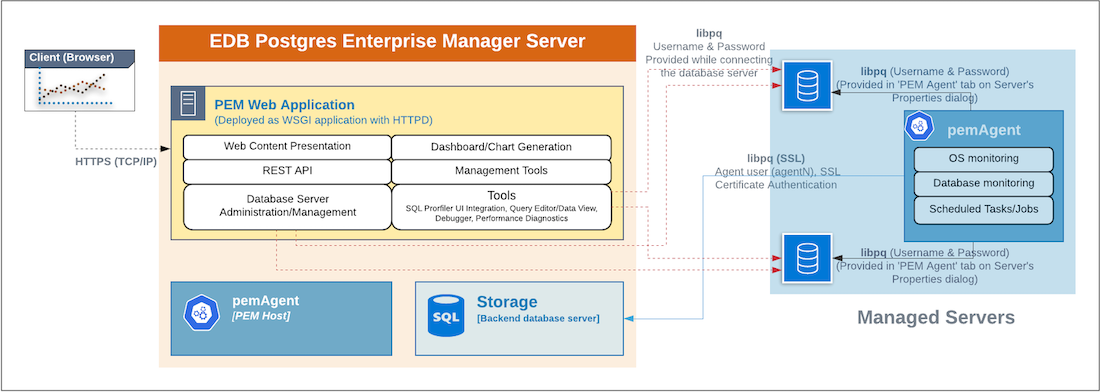
The PEM Agent is responsible for the collection of monitoring data from the machine and operating system, as well as from each of the Postgres instances to which they are bound. Each PEM Agent can monitor one physical or virtual machine and is capable of monitoring multiple database servers locally - installed on the same system, or remotely - installed on other systems. It is also responsible for executing other tasks that may be scheduled by the user (for example, server shutdowns, SQL Profiler traces, user-defined jobs).
A PEM Agent is installed by default on the PEM Server along with the installation of the PEM Server. It is generally referred to as a PEM Agent on the PEM Host. Separately, the PEM Agent can also be installed on the other servers hosting the Postgres instances to be monitored using PEM.
Whether monitoring locally or remotely, the PEM Agent connects to the PEM Server using PostgreSQL’s libpq, using SSL certificate-based authentication. The PEM Agent installer in Windows and pemworker CLI in Linux is responsible for registering each agent with the PEM Server, and generating and installing the required certificates.
Please note that there is only one-way traffic between the PEM Agent and PEM Server; the PEM Agent always connects to the PEM Server.
The PEM Agent must be able to connect to each database server that it monitors. This connection is made over a TCP/IP connection (or optionally a Unix Domain Socket on Unix hosts), and may optionally use SSL. The user must configure the connection and authentication to the monitored server.
Once configured, each agent collects statistics and other information on the host and each database server and database that it monitors. Each piece of information is known as a metric and is collected by a probe. Most probes will collect multiple metrics at once for efficiency. Examples of the metrics collected include:
- Disk I/O statistics
- Network statistics
- Database server version string
- Database server configuration option (GUC) values
- Table access statistics
- Table and index sizes
A list of PEM probes can be found here.
By default, the PEM Agent bound to the database server collects the OS/Database monitoring statistics and also runs any scheduled tasks/jobs for that particular database server, storing data in the pem database on the PEM server.
The Alert processing, SNMP/SMTP spoolers, and Nagios Spooler data is stored in the pem database on the PEM server and is then processed by the PEM Agent on the PEM Host by default. However, processing by other PEM Agents can be enabled by adjusting the SNMP/SMTP and Nagios parameters of the PEM Agents.
To see more information about these parameters see Server Configuration.
The PEM Web Client
The PEM client is a web-based application that runs in supported browsers. The client’s web interface connects to the PEM server and allows direct management of managed or unmanaged servers, and the databases and schemas that reside on them.
The client allows you to use PEM functionality that makes use of the data logged on the server through features such as the dashboards, the Postgres Log Analysis Expert, and Capacity Manager.
The SQL Profiler Plugin
You are not required to install the SQL Profiler plugin on every server, but you must install and configure the plugin on each server on which you wish to use the SQL Profiler. You may also want to install and configure SQL Profiler on un-monitored development servers. For ad-hoc use also, you may temporarily install the SQL Profiler plugin.
The plugin is installed with the EDB Postgres Advanced Server distribution but must be installed separately for use with PostgreSQL. The SQL Profiler installer is available from the EDB website.
SQL Profiler may be used on servers that are not managed through PEM, but to perform scheduled traces, a server must have the plugin installed, and must be managed by an installed and configured PEM agent.
For more information about using SQL Profiler, see the PEM SQL Profiler Guide
Registering an Agent
Each PEM agent must be registered with the PEM server. The registration process provides the PEM server with the information it needs to communicate with the agent. The PEM agent graphical installer for Windows supports self-registration for the agent. You must use the pemworker utility to register the agent if the agent is on a Linux host.
The RPM installer places the PEM agent in the /usr/edb/pem/agent/bin directory. To register an agent, include the --register-agent keywords along with registration details when invoking the pemworker utility:
pemworker --register-agent
Append command line options to the command string when invoking the pemworker utility. Each option should be followed by a corresponding value:
| Option | Description |
|---|---|
--pem-server |
Specifies the IP address of the PEM backend database server. This parameter is required. |
--pem-port |
Specifies the port of the PEM backend database server. The default value is 5432. |
--pem-user |
Specifies the name of the Database user (having superuser privileges) of the PEM backend database server. This parameter is required. |
--pem-agent-user |
Specifies the agent user to connect the PEM server backend database server. |
--cert-path |
Specifies the complete path to the directory in which certificates will be created. If you do not provide a path, certificates will be created in: On Linux, ~/.pem On Windows, %APPDATA%/pem |
--config-dir |
Specifies the directory path where configuration file can be found. The default is the <pemworker path>/../etc. |
--display-name |
Specifies a user-friendly name for the agent that will be displayed in the PEM Browser tree control. The default is the system hostname. |
--force-registration |
Include the force_registration clause to instruct the PEM server to register the agent with the arguments provided; this clause is useful if you are overriding an existing agent configuration. The default value is Yes. |
--group |
The name of the group in which the agent will be displayed. |
--team |
The name of the database role, on the PEM backend database server, that should have access to the monitored database server. |
--owner |
The name of the database user, on the PEM backend database server, who will own the agent. |
--allow_server_restart |
Enable the allow-server_restart parameter to allow PEM to restart the monitored server. The default value is True. |
--allow-batch-probes |
Enable the allow-batch-probes parameter to allow PEM to run batch probes on this agent. The default value is False. |
--batch-script-user |
Specifies the operating system user that should be used for executing the batch/shell scripts. The default value is none; the scripts will not be executed if you leave this parameter blank or the specified user does not exist. |
--enable-heartbeat-connection |
Enable the enable-heartbeat-connection parameter to create a dedicated heartbeat connection between PEM Agent and server to update the active status. The default value is False. |
--enable-smtp |
Enable the enable-smtp parameter to allow the PEM agent to send the email on behalf of the PEM server.The default value is False. |
--enable-snmp |
Enable the enable-snmp parameter to allow the PEM agent to send the SNMP traps on behalf of the PEM server.The default value is False. |
-o |
Specify if you want to override the configuration file options. |
Before using any PEM feature for which a database server restart is required by the pemagent (such as Audit Manager, Log Manager, or Tuning Wizard), you must first set the value for allow_server_restart to true in the agent.cfg file.
Note When configuring a shell/batch script run by a PEM agent that has PEM 7.11 or later version installed, the user for the
batch_script_userparameter must be specified. It is strongly recommended that a non-root user is used to run the scripts. Using the root user may result in compromising the data security and operating system security. However, if you want to restore the pemagent to its original settings using root user to run the scripts, then thebatch_script_userparameter value must be set toroot.
You can use the PEM_SERVER_PASSWORD environment variable to set the password of the PEM Admin User. If the PEM_SERVER_PASSWORD is not set, the server will use the PGPASSWORD or .pgpass file when connecting to the PEM Database Server.
Failure to provide the password will result in a password authentication error; you will be prompted for any other required but omitted information. When the registration is complete, the server will confirm that the agent has been successfully registered.
Setting PEM Agent Configuration Parameters
The PEM agent RPM installer creates a sample configuration file named agent.cfg.sample in the /usr/edb/pem/agent/etc directory. When you register the PEM agent, the pemworker program creates the actual agent configuration file (named agent.cfg). You must modify the agent.cfg file, adding the following configuration parameter:
heartbeat_connection = true
You must also add the location of the ca-bundle.crt file (the certificate authority). By default, the installer creates a ca-bundle.crt file in the location specified in your agent.cfg.sample file. You can copy the default parameter value from the sample file, or, if you use a ca-bundle.crt file that is stored in a different location, specify that value in the ca_file parameter:
ca_file=/usr/libexec/libcurl-pem7/share/certs/ca-bundle.crt
Then, use a platform-specific command to start the PEM agent service; the service is named pemagent.
On a RHEL or CentOS 7.x or 8.x host, use systemctl to start the service:
systemctl start pemagent
The service will confirm that it is starting the agent; when the agent is registered and started, it will be displayed on the Global Overview dashboard and in the Object browser tree control of the PEM web interface.
For information about using the pemworker utility to register a server, please see the PEM Administrator’s Guide
Using a non-root User Account to Register a PEM Agent
To use a non-root user account to register a PEM agent, you must first install the PEM agent as a root user. After installation, assume the identity of a non-root user (for example, edb) and perform the following steps:
- Create the
.pemdirectory andlogsdirectory and assign read, write, and execute permissions to the file:
mkdir /home/<edb>/.pem
mkdir /home/<edb>/.pem/logs
chmod 700 /home/<edb>/.pem
chmod 700 /home/<edb>/.pem/logs- Register the agent with PEM server:
./pemworker --register-agent --pem-server <172.19.11.230> --pem-user <postgres> --pem-port <5432> --display-name <non_root> --cert-path /home/<edb> --config-dir /home/<edb>

The above command creates agent certificates and an agent configuration file (``agent.cfg``) in the ``/home/edb/.pem`` directory. Use the following command to assign read and write permissions to these files:

``chmod -R 600 /home/edb/.pem/agent*``- Change the parameters of the
agent.cfgfile:
agent_ssl_key=/home/edb/.pem/agent<id>.key
agent_ssl_crt=/home/edb/.pem/agent<id>.crt
log_location=/home/edb/.pem/worker.log
agent_log_location=/home/edb/.pem/agent.log- Update the values for the configuration file path and the user in the
pemagentservice file:
User=edb
ExecStart=/usr/edb/pem/agent/bin/pemagent -c /home/edb/.pem/agent.cfg- Stop the agent process, and then restart the agent service using the non-root user:
sudo systemctl start/stop/restart pemagent- Check the agent status on PEM dashboard.
Managing a PEM Agent
The sections that follow provide information about the behavior and management of a PEM agent.
Agent Privileges
By default, the PEM agent is installed with root privileges for the operating system host and superuser privileges for the database server. These privileges allow the PEM agent to invoke unrestricted probes on the monitored host and database server about system usage, retrieving and returning the information to the PEM server.
Please note that PEM functionality diminishes as the privileges of the PEM agent decrease. For complete functionality, the PEM agent should run as root. If the PEM agent is run under the database server’s service account, PEM probes will not have complete access to the statistical information used to generate reports, and functionality will be limited to the capabilities of that account. If the PEM agent is run under another lesser-privileged account, functionality will be limited even further.
If you limit the operating system privileges of the PEM agent, some of the PEM probes will not return information, and the following functionality may be affected:
| Probe or Action | Operating System | PEM Functionality Affected |
|---|---|---|
| Data And Logfile Analysis | Linux/ Windows | The Postgres Expert will be unable to access complete information. |
| Session Information | Linux | The per-process statistics will be incomplete. |
| PG HBA | Linux/ Windows | The Postgres Expert will be unable to access complete information. |
| Service restart functionality | Linux/ Windows | The Audit Log Manager, Server Log Manager Log Analysis Expert and PEM may be unable to apply requested modifications. |
| Package Deployment | Linux/ Windows | PEM will be unable to run downloaded installation modules. |
| Batch Task | Windows | PEM will be unable to run scheduled batch jobs in Windows. |
| Collect data from server (root access required) | Linux/ Windows | Columns such as swap usage, CPU usage, IO read, IO write will be displayed as 0 in the session activity dashboard. |
Note The above-mentioned list is not comprehensive, but should provide an overview of the type of functionality that will be limited.
If you restrict the database privileges of the PEM agent, the following PEM functionality may be affected:
| Probe | Operating System | PEM Functionality Affected |
|---|---|---|
| Audit Log Collection | Linux/Windows | PEM will receive empty data from the PEM database. |
| Server Log Collection | Linux/Windows | PEM will be unable to collect server log information. |
| Database Statistics | Linux/Windows | The Database/Server Analysis dashboards will contain incomplete information. |
| Session Waits/System Waits | Linux/Windows | The Session/System Waits dashboards will contain incomplete information. |
| Locks Information | Linux/Windows | The Database/Server Analysis dashboards will contain incomplete information. |
| Streaming Replication | Linux/Windows | The Streaming Replication dashboard will not display information. |
| Slony Replication | Linux/Windows | Slony-related charts on the Database Analysis dashboard will not display information. |
| Tablespace Size | Linux/Windows | The Server Analysis dashboard will not display complete information. |
| xDB Replication | Linux/Windows | PEM will be unable to send xDB alerts and traps. |
If the probe is querying the operating system with insufficient privileges, the probe may return a permission denied error.
If the probe is querying the database with insufficient privileges, the probe may return a permission denied error or display the returned data in a PEM chart or graph as an empty value.
When a probe fails, an entry will be written to the log file that contains the name of the probe, the reason the probe failed, and a hint that will help you resolve the problem.
You can view probe-related errors that occurred on the server in the Probe Log dashboard, or review error messages in the PEM worker log files. On Linux, the default location of the log file is:
/var/log/pem/worker.log
On Windows, log information is available on the Event Viewer.
Agent Configuration
A number of user-configurable parameters and registry entries control the behavior of the PEM agent. You may be required to modify the PEM agent’s parameter settings to enable some PEM functionality. After modifying values in the PEM agent configuration file, you must restart the PEM agent to apply any changes.
With the exception of the PEM_MAXCONN parameter, we strongly recommend against modifying any of the configuration parameters or registry entries listed below without first consulting EDB support experts unless the modifications are required to enable PEM functionality.
On Linux systems, PEM configuration options are stored in the agent.cfg file, located in /usr/edb/pem/agent/etc. The agent.cfg file contains the following entries:
| Parameter Name | Description | Default Value |
|---|---|---|
| pem_host | The IP address or hostname of the PEM server. | 127.0.0.1. |
| pem_port | The database server port to which the agent connects to communicate with the PEM server. | Port 5432. |
| pem_agent | A unique identifier assigned to the PEM agent. | The first agent is ‘1’, the second agent is ‘2’, and so on. |
| agent_ssl_key | The complete path to the PEM agent’s key file. | /root/.pem/agent.key |
| agent_ssl_crt | The complete path to the PEM agent’s certificate file. | /root/.pem/agent.crt |
| agent_flag_dir | Used for HA support. Specifies the directory path checked for requests to take over monitoring another server. Requests are made in the form of a file in the specified flag directory. | Not set by default. |
| log_level | Log level specifies the type of event that will be written to the PEM log files. | warning |
| log_location | Specifies the location of the PEM worker log file. | 127.0.0.1. |
| agent_log_location | Specifies the location of the PEM agent log file. | /var/log/pem/agent.log |
| long_wait | The maximum length of time (in seconds) that the PEM agent will wait before attempting to connect to the PEM server if an initial connection attempt fails. | 30 seconds |
| short_wait | The minimum length of time (in seconds) that the PEM agent will wait before checking which probes are next in the queue (waiting to run). | 10 seconds |
| alert_threads | The number of alert threads to be spawned by the agent. | Set to 1 for the agent that resides on the host of the PEM server; 0 for all other agents. |
| enable_smtp | When set to true for multiple PEM Agents (7.13 or lesser) it may send more duplicate emails. Whereas for PEM Agents (7.14 or higher) it may send lesser duplicate emails. | true for PEM server host; false for all others. |
| enable_snmp | When set to true for multiple PEM Agents (7.13 or lesser) it may send more duplicate traps. Whereas for PEM Agents (7.14 or higher) it may send lesser duplicate traps. | true for PEM server host; false for all others. |
| enable_nagios | When set to true, Nagios alerting is enabled. | true for PEM server host; false for all others. |
| enable_webhook | When set to true, Webhook alerting is enabled. | true for PEM server host; false for all others. |
| max_webhook_retries | Set maximum number of times pemAgent should retry to call webhooks on failure. | Default 3. |
| connect_timeout | The max time in seconds (a decimal integer string) that the agent will wait for a connection. | Not set by default; set to 0 to indicate the agent should wait indefinitely. |
| allow_server_restart | If set to TRUE, the agent can restart the database server that it monitors. Some PEM features may be enabled/disabled, depending on the value of this parameter. | False |
| max_connections | The maximum number of probe connections used by the connection throttler. | 0 (an unlimited number) |
| connection_lifetime | Use ConnectionLifetime (or connection_lifetime) to specify the minimum number of seconds an open but idle connection is retained. This parameter is ignored if the value specified in MaxConnections is reached and a new connection (to a different database) is required to satisfy a waiting request. | By default, set to 0 (a connection is dropped when the connection is idle after the agent’s processing loop). |
| allow_batch_probes | If set to TRUE, the user will be able to create batch probes using the custom probes feature. | false |
| heartbeat_connection | When set to TRUE, a dedicated connection is used for sending the heartbeats. | false |
| batch_script_dir | Provide the path where script file (for alerting) will be stored. | /tmp |
| connection_custom_setup | Use to provide SQL code that will be invoked when a new connection with a monitored server is made. | Not set by default. |
| ca_file | Provide the path where the CA certificate resides. | Not set by default. |
| batch_script_user | Provide the name of the user that should be used for executing the batch/shell scripts. | None |
| webhook_ssl_key | The complete path to the webhook’s SSL client key file. | |
| webhook_ssl_crt | The complete path to the webhook’s SSL client certificate file. | |
| webhook_ssl_crl | The complete path of the CRL file to validate webhook server certificate. | |
| webhook_ssl_ca_crt | The complete path to the webhook’s SSL ca certificate file. | |
| allow_insecure_webhooks | When set to true, allow webhooks to call with insecure flag. | false |
On 64 bit Windows systems, PEM registry entries are located in:
HKEY_LOCAL_MACHINE\Software\Wow6432Node\EnterpriseDB\PEM\agent
The registry contains the following entries:
| Parameter Name | Description | Default Value |
|---|---|---|
| PEM_HOST | The IP address or hostname of the PEM server. | 127.0.0.1. |
| PEM_PORT | The database server port to which the agent connects to communicate with the PEM server. | Port 5432. |
| AgentID | A unique identifier assigned to the PEM agent. | The first agent is ‘1’, the second agent is ‘2’, and so on. |
| AgentKeyPath | The complete path to the PEM agent’s key file. | %APPDATA%\Roaming\pem\ agent.key. |
| AgentCrtPath | The complete path to the PEM agent’s certificate file. | %APPDATA%\Roaming\pem\ agent.crt |
| AgentFlagDir | Used for HA support. Specifies the directory path checked for requests to take over monitoring another server. Requests are made in the form of a file in the specified flag directory. | Not set by default. |
| LogLevel | Log level specifies the type of event that will be written to the PEM log files. | warning |
| LongWait | The maximum length of time (in seconds) that the PEM agent will wait before attempting to connect to the PEM server if an initial connection attempt fails. | 30 seconds |
| shortWait | The minimum length of time (in seconds) that the PEM agent will wait before checking which probes are next in the queue (waiting to run). | 10 seconds |
| AlertThreads | The number of alert threads to be spawned by the agent. | Set to 1 for the agent that resides on the host of the PEM server; 0 for all other agents. |
| EnableSMTP | When set to true, the SMTP email feature is enabled. | true for PEM server host; false for all others. |
| EnableSNMP | When set to true, the SNMP trap feature is enabled. | true for PEM server host; false for all others. |
| EnableWebhook | When set to true, Webhook alerting is enabled. | true for PEM server host; false for all others. |
| MaxWebhookRetries | Set maximum number of times pemAgent should retry to call webhooks on failure. | Default 3. |
| ConnectTimeout | The max time in seconds (a decimal integer string) that the agent will wait for a connection. | Not set by default; if set to 0, the agent will wait indefinitely. |
| AllowServerRestart | If set to TRUE, the agent can restart the database server that it monitors. Some PEM features may be enabled/disabled, depending on the value of this parameter. | true |
| MaxConnections | The maximum number of probe connections used by the connection throttler. | 0 (an unlimited number) |
| ConnectionLifetime | Use ConnectionLifetime (or connection_lifetime) to specify the minimum number of seconds an open but idle connection is retained. This parameter is ignored if the value specified in MaxConnections is reached and a new connection (to a different database) is required to satisfy a waiting request. | By default, set to 0 (a connection is dropped when the connection is idle after the agent’s processing loop). |
| AllowBatchProbes | If set to TRUE, the user will be able to create batch probes using the custom probes feature. | false |
| HeartbeatConnection | When set to TRUE, a dedicated connection is used for sending the heartbeats. | false |
| BatchScriptDir | Provide the path where script file (for alerting) will be stored. | /tmp |
| ConnectionCustomSetup | Use to provide SQL code that will be invoked when a new connection with a monitored server is made. | Not set by default. |
| ca_file | Provide the path where the CA certificate resides. | Not set by default. |
| AllowBatchJobSteps | If set to true,the batch/shell scripts will be executed using Administrator user account. | None |
| WebhookSSLKey | The complete path to the webhook’s SSL client key file. | |
| WebhookSSLCrt | The complete path to the webhook’s SSL client certificate file. | |
| WebhookSSLCrl | The complete path of the CRL file to validate webhook server certificate. | |
| WebhookSSLCaCrt | The complete path to the webhook’s SSL ca certificate file. | |
| AllowInsecureWebhooks | When set to true, allow webhooks to call with insecure flag. | false |
Agent Properties
The PEM Agent Properties dialog provides information about the PEM agent from which the dialog was opened; to open the dialog, right-click on an agent name in the PEM client tree control, and select Properties from the context menu.
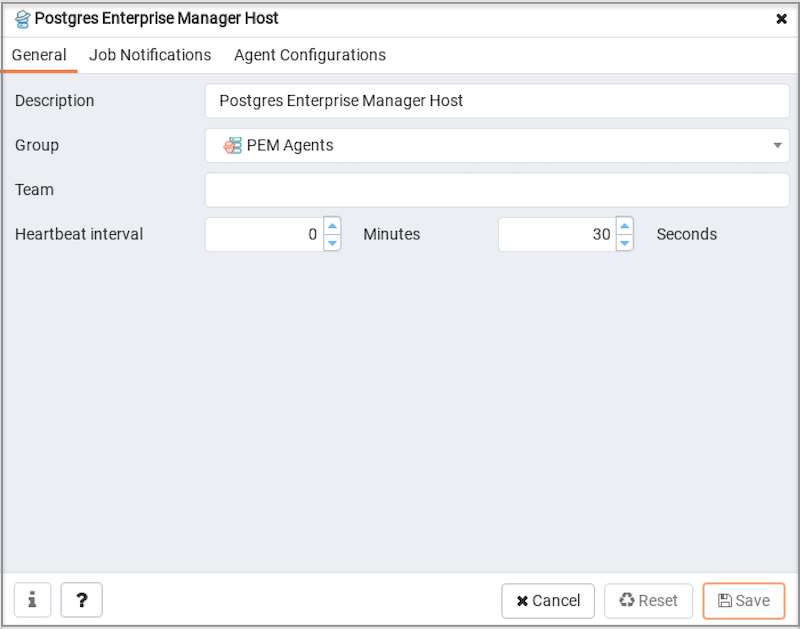
PEM Agent Properties dialog - General tab
Use fields on the PEM Agent Properties dialog to review or modify information about the PEM agent:
The
Descriptionfield displays a modifiable description of the PEM agent. This description is displayed in the tree control of the PEM client.You can use groups to organize your servers and agents in the PEM client tree control. Use the
Groupdrop-down listbox to select the group in which the agent will be displayed.Use the
Teamfield to specify the name of the group role that should be able to access servers monitored by the agent; the servers monitored by this agent will be displayed in the PEM client tree control to connected team members. Please note that this is a convenience feature. The Team field does not provide true isolation, and should not be used for security purposes.The
Heartbeat intervalfields display the length of time that will elapse between reports from the PEM agent to the PEM server. Use the selectors next to theMinutesorSecondsfields to modify the interval.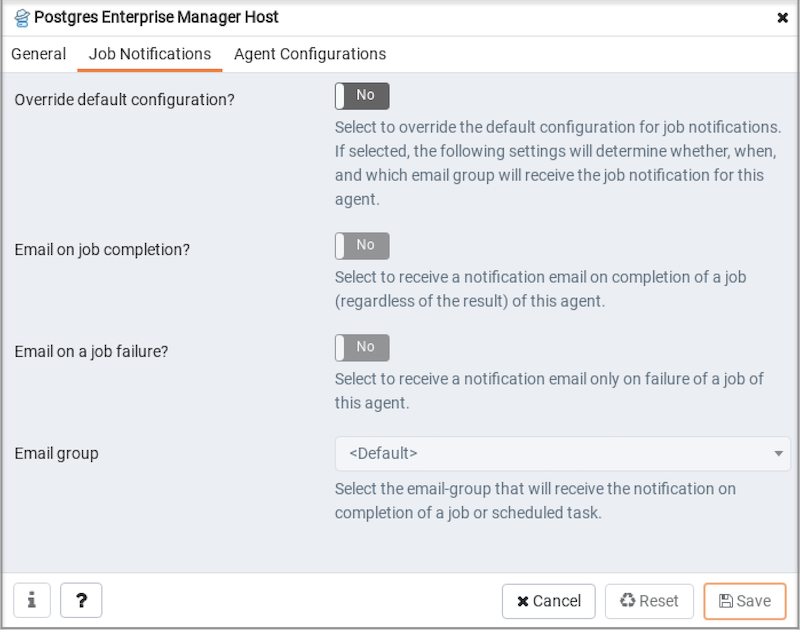
PEM Agent Properties dialog - Job Notifications tab
Use the fields on the
Job Notificationstab to configure the email notification settings on agent level:- Use the
Override default configuration?switch to specify if you want the agent level job notification settings to override the default job notification settings. If you selectYesfor this switch, you can use the rest of the settings on this dialog to define when and to whom the job notifications should be sent. Please note that the rest of the settings on this dialog work only if you enable theOverride default configuration?switch. - Use the
Email on job completion?switch to specify if the job notification should be sent on the successful job completion. - Use the
Email on a job failure?switch to specify if the job notification should be sent on the failure of a job. - Use the
Email groupfield to specify the email group to whom the job notification should be sent.
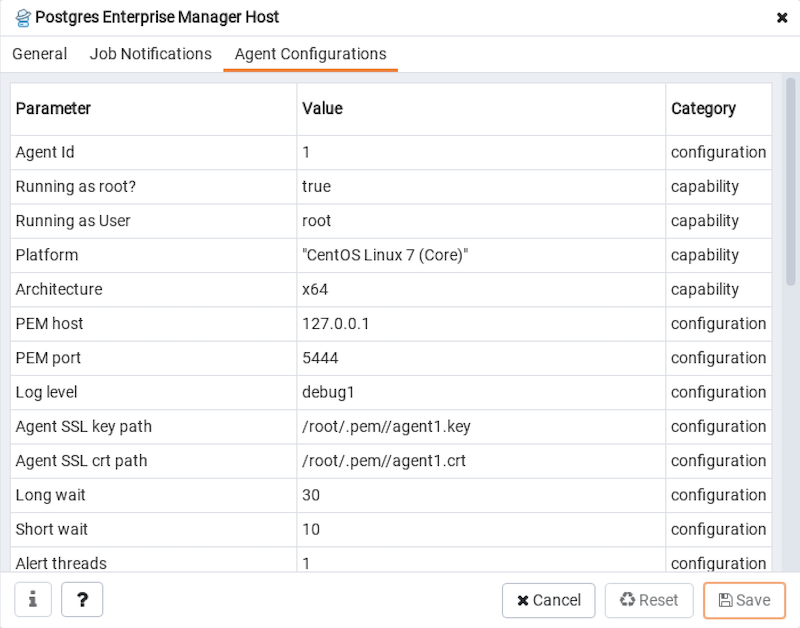
PEM Agent Properties dialog - Agent Configurations tab
The
Agent Configurationstab displays all the current configurations and capabilities of a agent.- The
Parametercolumn displays a list of parameters. - The
Valuecolumn displays the current value of the corresponding parameter. - The
Categorycolumn displays the category of the corresponding parameter; it can be eitherconfigurationorcapability.
- Use the
PEM Agent Troubleshooting
Restoring a Deleted PEM Agent
If an agent has been deleted from the pem.agent table then you cannot restore it. You will need to use the pemworker utility to re-register the agent.
If an agent has been deleted from PEM Web client but still has an entry in the pem.agent table with value of active = f, then you can use the following steps to restore the agent:
Use the following command to check the values of the
idandactivefields:pem=# SELECT * FROM pem.agent;Update the status for the agent to
truein thepem.agenttable:pem=# UPDATE pem.agent SET active=true WHERE id=<x>;Where
xis the identifier that was displayed in the output of the query used in step 1.Refresh the PEM web client.
The deleted agent will be restored again. However, the servers that were bound to that particular agent might appear to be down. To resolve this issue, you need to modify the PEM agent properties of the server to add the bound agent again; after the successful modification, the servers will be displayed as running properly.
Using the Command Line to Delete a PEM Agent with Down or Unknown Status
Using the PEM web interface to delete PEM agents with Down or Unknown status may be difficult if the number of such agents is large. In such a situation, you might want to use the command line interface to delete Down or Unknown agents.
- Use the following query to delete the agents that are
Downfor more than N number of hours:
UPDATE pem.agent SET active=false WHERE id IN
(SELECT a.id FROM pem.agent
a JOIN pem.agent_heartbeat b ON (b.agent_id=a.id)
WHERE a.id IN
(SELECT agent_id FROM pem.agent_heartbeat WHERE (EXTRACT (HOUR FROM now())-
EXTRACT (HOUR FROM last_heartbeat)) > <N> ));- Use the following query to delete the agents with an
Unknownstatus:
UPDATE pem.agent SET active=false WHERE id IN
(SELECT id FROM pem.agent WHERE id NOT IN
(SELECT agent_id FROM pem.agent_heartbeat));