PEM 8.1 -PEM pgbouncer Guide
EnterpriseDB
EDB Postgres Enterprise Manager Configuring pgBouncer for Use with PEM Agents
This document provides detailed information about using pgBouncer as a connection pooler for limiting the number of connections from the PEM Agent towards the Postgres Enterprise Manager (PEM) server on non-Windows machine:
- Preparing the PEM Database Server – provides information about preparing the PEM database server to be used with pgBouncer.
- Configuring pgBouncer – provides detailed information about configuring pgBouncer to make it work with the PEM database server.
- Configuring the PEM Agent – provides detailed information about configuring a PEM Agent to connect to pgBouncer.
For detailed information about using the PEM web interface, please see the PEM Administrator’s Guide.
This document uses the term Postgres to mean either the PostgreSQL or the Advanced Server database.
the_pem_server_pem_agent_connection_management_mechanism preparing_the_pem_database_server configuring_pgBouncer configuring_the_pem_agent conclusion
The PEM Server - PEM Agent Connection Management Mechanism
Each PEM Agent connects to the PEM database server using the SSL certificates for each individual user. For example, an Agent with ID#1 connects to the PEM database server using the agent1 user.
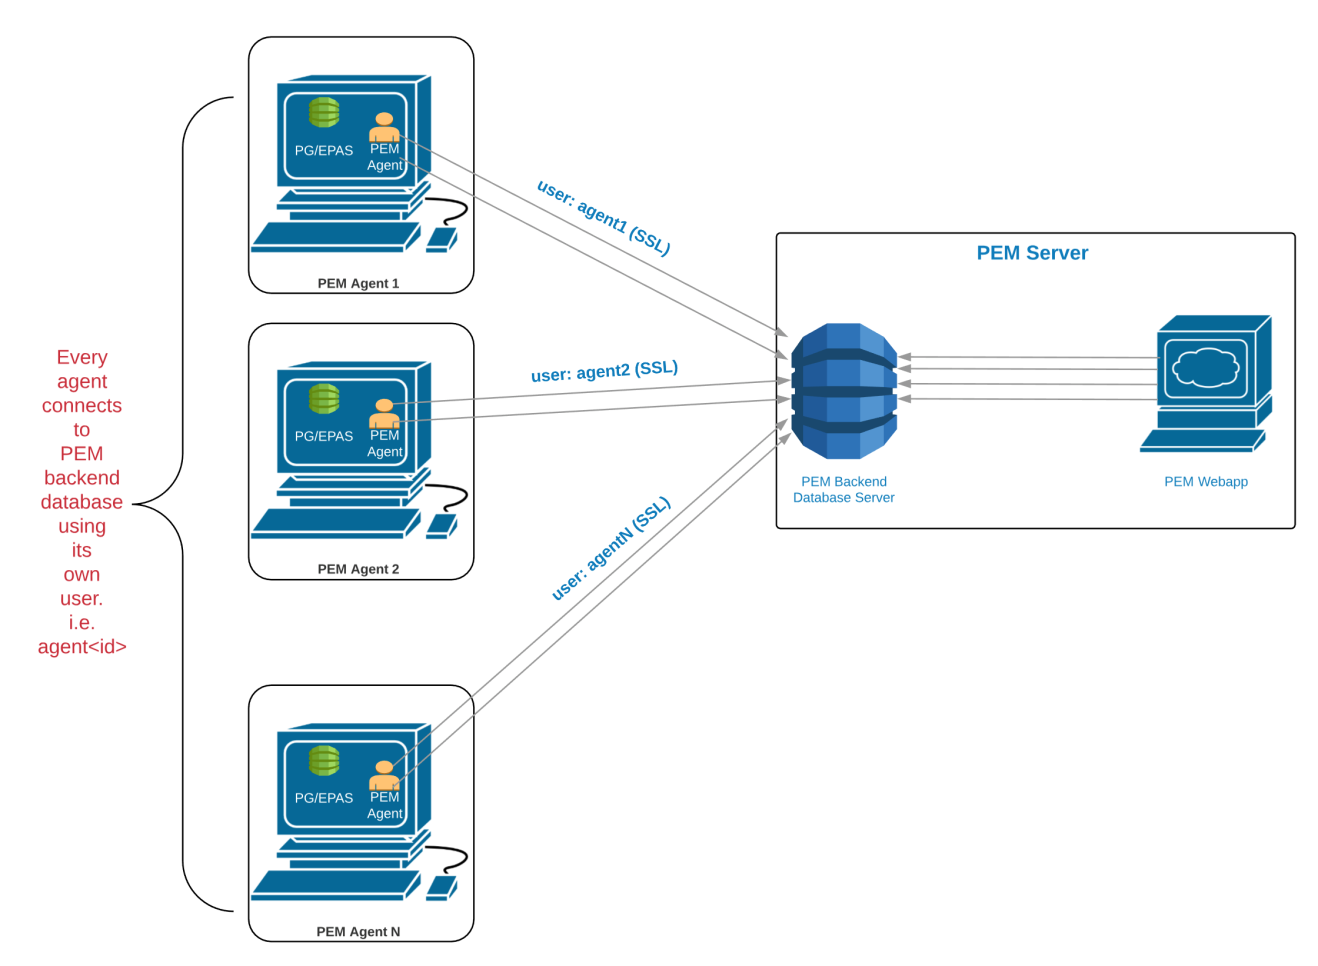
Prior to PEM version 7.5, the following limitations disallowed the use of the connection pooler between the PEM Server and PEM Agent:
- The PEM Agent uses an SSL Certificate to connect the PEM database server.
- It uses an individual user identifier when connecting to the PEM database server.
EDB has modified the PEM Agent to allow the agent to use a common database user (instead of the dedicated agent users) to connect the PEM database server.
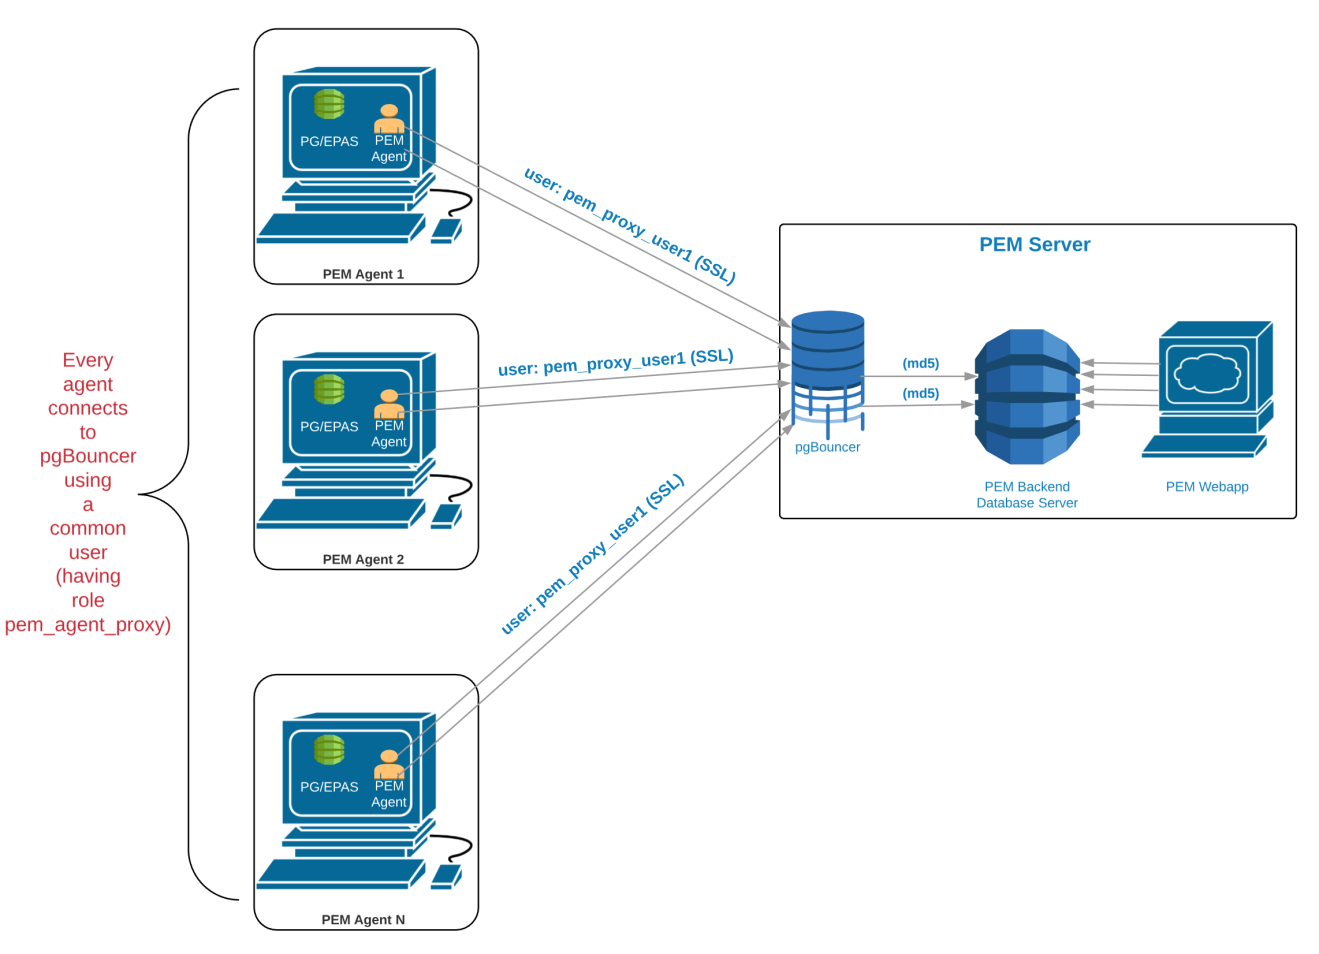
We recommend using PgBouncer versions equal to or later than version 1.9.0 as the connection pooler. Versions 1.9.0 or later support cert authentication; PEM Agents can connect to pgBouncer using SSL certificates.
Preparing the PEM Database Server
You must configure the PEM database server to work with PgBouncer; the following example demonstrates the steps required to configure the PEM database server.
- Create a dedicated user named
pgbounceron the PEM database server. For example:
pem=# CREATE USER pgbouncer PASSWORD 'ANY_PASSWORD' LOGIN;
CREATE ROLE- Create a user named
pem_admin1(a non-super user) withpem_adminandpem_agent_pool rolemembership on the PEM database server. For example:
pem=# CREATE USER pem_admin1 PASSWORD 'ANY_PASSWORD' LOGIN
CREATEROLE;
CREATE ROLE
pem=# GRANT pem_admin, pem_agent_pool TO pem_admin1;
GRANT ROLE- Grant
CONNECTprivileges to thepgbounceruser on thepemdatabase. For example:
pem=# GRANT CONNECT ON DATABASE pem TO pgbouncer ;GRANT USAGE ON
SCHEMA pem TO pgbouncer;
GRANT- Grant
USAGEprivileges to thepgbounceruser for thepemschema on the pem database. For example:
pem=# GRANT USAGE ON SCHEMA pem TO pgbouncer;
GRANT- Grant
EXECUTEprivileges to thepgbounceruser on thepem.get_agent_pool_auth(text)function in thepemdatabase. For example:
pem=# GRANT EXECUTE ON FUNCTION pem.get_agent_pool_auth(text) TO
pgbouncer;
GRANT- Use the
pem.create_proxy_agent_user(varchar)function to create a user namedpem_agent_user1on the PEM database server. For example:
pem=# SELECT pem.create_proxy_agent_user('pem_agent_user1');
create_proxy_agent_user
-------------------------
(1 row)
The function will create a user with the same name with a random password, and grant pem_agent and pem_agent_pool roles to the user. This allows pgBouncer to use a proxy user on behalf of the agent.
- Add the following entries to the start of the
pg_hba.conffile of the PEM database server; this will allow pgBouncer user to connect to the pem database using the md5 authentication method. For example:
# Allow the PEM agent proxy user (used by
# pgbouncer) to connect the to PEM server using
# md5

local pem pgbouncer,pem_admin1 md5
Configuring PgBouncer
You must configure PgBouncer to work with the PEM database server. In our example, we will run PgBouncer as the enterprisedb system user. The following steps outline the process of configuring pgBouncer (version >= 1.9).
Open a terminal window and navigate into the pgBouncer directory.
Change the owner of the
etcdirectory for pgBouncer (wherepgbouncer.iniresides) toenterprisedb, and change the directory permissions to0700. For example:
$ chown enterprisedb:enterprisedb /etc/edb/pgbouncer1.9
$ chmod 0700 /etc/edb/pgbouncer1.9- Change the contents of the
pgbouncer.inioredb-pgbouncer.inifile as follows:
[databases]
;; Change the pool_size according to maximum connections allowed
;; to the PEM database server as required.
;; 'auth_user' will be used for authenticate the db user (proxy
;; agent user in our case)

pem = port=5444 host=/tmp dbname=pem auth_user=pgbouncer
pool_size=80 pool_mode=transaction
* = port=5444 host=/tmp dbname=pem auth_user=pgbouncer
pool_size=10

[pgbouncer]
logfile = /var/log/edb/pgbouncer1.9/edb-pgbouncer-1.9.log
pidfile = /var/run/edb/pgbouncer1.9/edb-pgbouncer-1.9.pid
listen_addr = *
;; Agent needs to use this port to connect the pem database now
listen_port = 6432
;; Require to support for the SSL Certificate authentications
;; for PEM Agents
client_tls_sslmode = require
;; These are the root.crt, server.key, server.crt files present
;; in the present under the data directory of the PEM database
;; server, used by the PEM Agents for connections.
client_tls_ca_file = /var/lib/edb/as11/data/root.crt
client_tls_key_file = /var/lib/edb/as11/data/server.key
client_tls_cert_file = /var/lib/edb/as11/data/server.crt
;; Use hba file for client connections
auth_type = hba
;; Authentication file, Reference:
;; https://pgbouncer.github.io/config.html#auth_file
auth_file = /etc/edb/pgbouncer1.9/userlist.txt
;; HBA file
auth_hba_file = /etc/edb/pgbouncer1.9/hba_file
;; Use pem.get_agent_pool_auth(TEXT) function to authenticate
;; the db user (used as a proxy agent user).
auth_query = SELECT * FROM pem.get_agent_pool_auth($1)
;; DB User for administration of the pgbouncer
admin_users = pem_admin1
;; DB User for collecting the statistics of pgbouncer
stats_users = pem_admin1
server_reset_query = DISCARD ALL
;; Change based on the number of agents installed/required
max_client_conn = 500
;; Close server connection if its not been used in this time.
;; Allows to clean unnecessary connections from pool after peak.
server_idle_timeout = 60- Use the following command to create and update the
/etc/edb/pgbouncer1.9/userlist.txtauthentication file for PgBouncer.
pem=# COPY (
SELECT 'pgbouncer'::TEXT, 'pgbouncer_password'
UNION ALL
SELECT 'pem_admin1'::TEXT, 'pem_admin1_password'
TO '/etc/edb/pgbouncer1.9/userlist.txt'
WITH (FORMAT CSV, DELIMITER ' ', FORCE_QUOTE *);

COPY 2
!!! Note A super user cannot invoke the PEM authentication query function pem.get_proxy_auth(text). If the pem_admin user is a super user, you must add the password to the authentication file (enterprisedb in the above example).
- Create an HBA file
(/etc/edb/pgbouncer1.9/hba_file)for PgBouncer that contains the following content:
# Use authentication method md5 for the local connections to
# connect pem database & pgbouncer (virtual) database.
local pgbouncer all md5
# Use authentication method md5 for the remote connections to
# connect to pgbouncer (virtual database) using enterprisedb
# user.

host pgbouncer,pem pem_admin1 0.0.0.0/0 md5
# Use authentication method cert for the TCP/IP connections to
# connect the pem database using pem_agent_user1
hostssl pem pem_agent_user1 0.0.0.0/0 cert- Change the owner of the HBA file
(/etc/edb/pgbouncer1.9/hba_file)toenterprisedb, and change the directory permissions to0600. For example:
$ chown enterprisedb:enterprisedb /etc/edb/pgbouncer1.9/hba_file
$ chmod 0600 /etc/edb/pgbouncer1.9/hba_file- Enable the PgBouncer service, and start the service. For example:
$ systemctl enable edb-pgbouncer-1.9

Created symlink from
/etc/systemd/system/multi-user.target.wants/edb-pgbouncer-1.9.service
to /usr/lib/systemd/system/edb-pgbouncer-1.9.service.

$ systemctl start edb-pgbouncer-1.9
Configuring the PEM Agent
You can use an RPM package to install a PEM Agent; for detailed installation information, please see the PEM Linux Installation Guide.
Please note that PEM Agent which is responsible for sending SNMP notifications should not be configured with pgBouncer. For example, if the default PEM Agent installed along with PEM Server is used for SNMP notifications, then it should not be configured with pgBouncer.
Configuring a New PEM Agent (Installed via RPM)
After using an RPM package to install the PEM agent, you will need to configure it to work it against a particular PEM database server. Use the following command:
$ PGSSLMODE=require PEM_SERVER_PASSWORD=pem_admin1_password
/usr/edb/pem/agent/bin/pemworker --register-agent --pem-server
pem_agent_user1 --display-name "Agent Name"

Postgres Enterprise Manager Agent registered successfully!
In above command, the --pem-agent-user argument instructs the agent to create an SSL certificate and key pair for the pem_agent_user1 database user in /root/.pem directory.
For example:
/root/.pem/pem_agent_user1.crt

/root/.pem/pem_agent_user1.key
The keys will be used by the PEM agent to connect to the PEM database server as pem_agent_user1. It will also create an agent configuration file named /usr/edb/pem/agent/etc/agent.cfg.
You will find a line mentioning the agent-user to be used in the agent.cfg configuration file.
For example:
$ cat /usr/edb/pem/agent/etc/agent.cfg
[PEM/agent]
pem_host=172.16.254.22
pem_port=6432
agent_id=12
agent_user=pem_agent_user1
agent_ssl_key=/root/.pem/pem_agent_user1.key
agent_ssl_crt=/root/.pem/pem_agent_user1.crt
log_level=warning
log_location=/var/log/pem/worker.log
agent_log_location=/var/log/pem/agent.log
long_wait=30
short_wait=10
alert_threads=0
enable_smtp=false
enable_snmp=false
enable_webhook=false
max_webhook_retries=3
allow_server_restart=true
allow_package_management=false
allow_streaming_replication=false
max_connections=0
connect_timeout=-1
connection_lifetime=0
allow_batch_probes=false
heartbeat_connection=false
Configuring an Existing PEM Agent (Installed via RPM)
If you are using an existing PEM agent, you can copy the SSL certificate and key files to the target machine, and reuse the files. You will need to modify the files, adding a new parameter and replacing some parameters in the existing agent.cfg file:
Add a line for agent_user to be used for the agent. For example:
agent_user=pem_agent_user1Update the port to specify the pgBouncer port. For example:
pem_port=6432Update the certificate and key path locations. For example:
agent_ssl_key=/root/.pem/pem_agent_user1.key
agent_ssl_crt=/root/.pem/pem_agent_user1.crt
Please note: as an alternative, you can run the agent self registration script, but that will create a new agent id. If you do run the agent self-registration script, you must replace the new agent id with existing id, and disable the entry for the new agent id in the pem.agent table. For example:
pem=# UPDATE pem.agent SET active = false WHERE id = <new_agent_id>;

UPDATE 1
Note Keep a backup of the existing SSL certificate, key file, and agent configuration file.