PEM 8.1 -PEM pgbouncer Guide
EnterpriseDB
EDB Postgres Enterprise Manager Configuring pgBouncer for Use with PEM Agents
このドキュメントは、Windows以外のマシン上のPEMエージェントからPostgres Enterprise Manager(PEM)サーバーへの接続数を制限するためのコネクションプーラとしてのpgBouncerの使用に関する詳細情報を提供します。
- PEMデータベースサーバーの準備-pgBouncerで使用するPEMデータベースサーバの準備に関する情報を提供します。
- pgBouncerの設定-PEMデータベースサーバと連携するmakeのpgBouncerの設定に関する詳細情報を提供します。
- PEMエージェントの設定-pgBouncerに接続するためのPEMエージェントの設定に関する詳細情報を提供します。
PEM Webインタフェースの使用に関する詳細については、PEM Administrator’s Guideを参照してください。
このドキュメントでは、Postgresという用語を使用して、 PostgreSQLまたはAdvanced Serverデータベースを意味します。
the_pem_server_pem_agent_connection_management_mechanism
</ div>
The PEM Server - PEM Agent Connection Management Mechanism
各PEMエージェントは、個々のユーザのSSL証明書を使用してPEMデータベースサーバに接続します。例、agent1ユーザを使用してPEMデータベースサーバへID#1コネクトを有する薬剤。
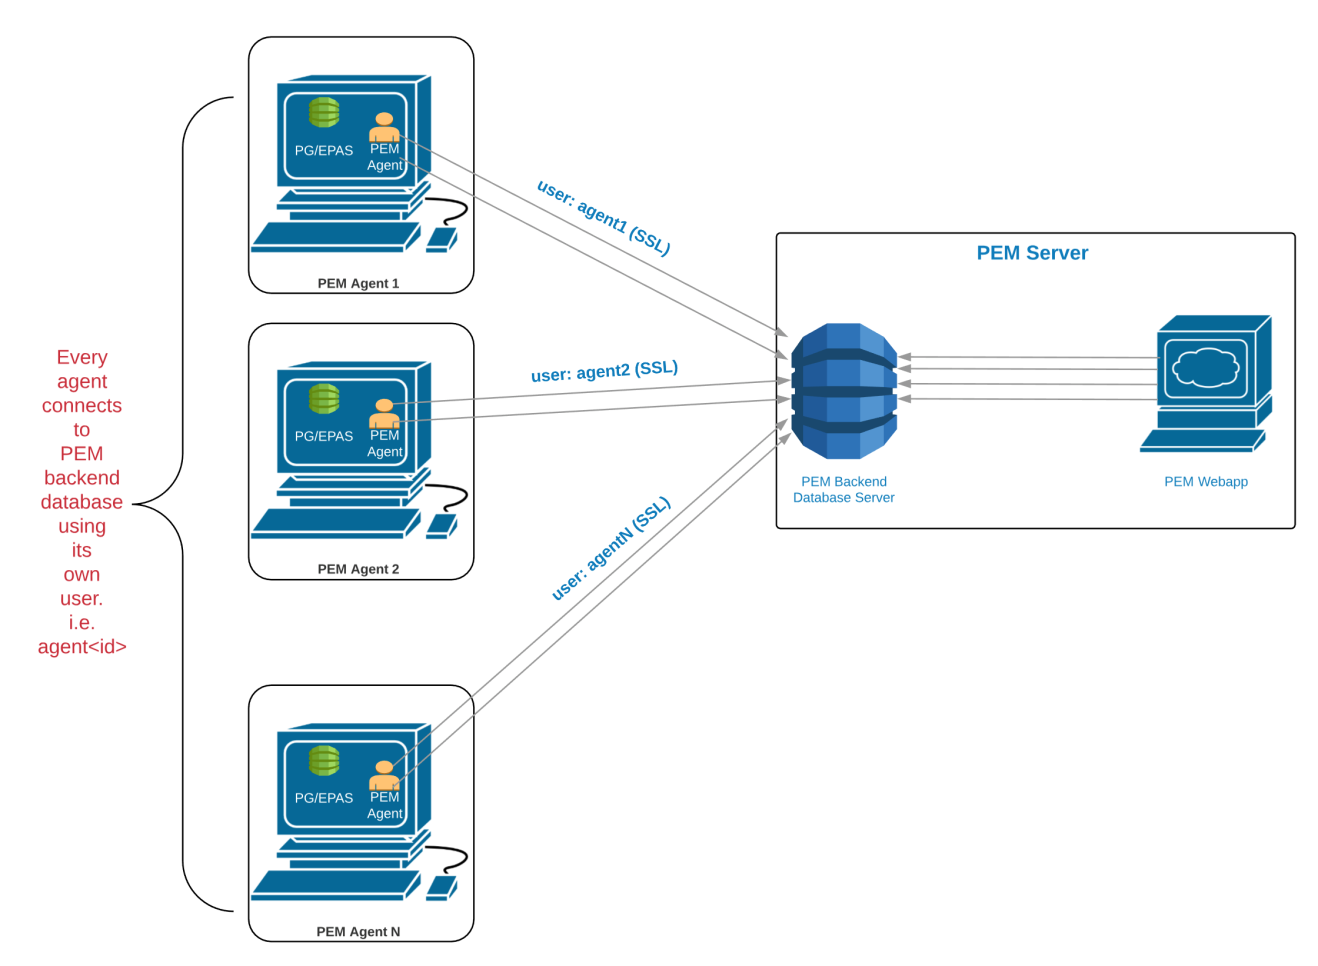
PEMバージョン7.5より前のバージョンでは、次の制限により、PEMサーバーとPEMエージェント間のコネクションプーラの使用が許可されていませんでした。
- PEMエージェントはSSL証明書を使用してPEMデータベースサーバに接続します。
- PEMデータベースサーバに接続するときに、個々のユーザ識別子を使用します。
EDBはPEMエージェントを変更して、エージェントが(専用のエージェントユーザーではなく)共通のデータベースユーザを使用してPEMデータベースサーバに接続できるようにしました。
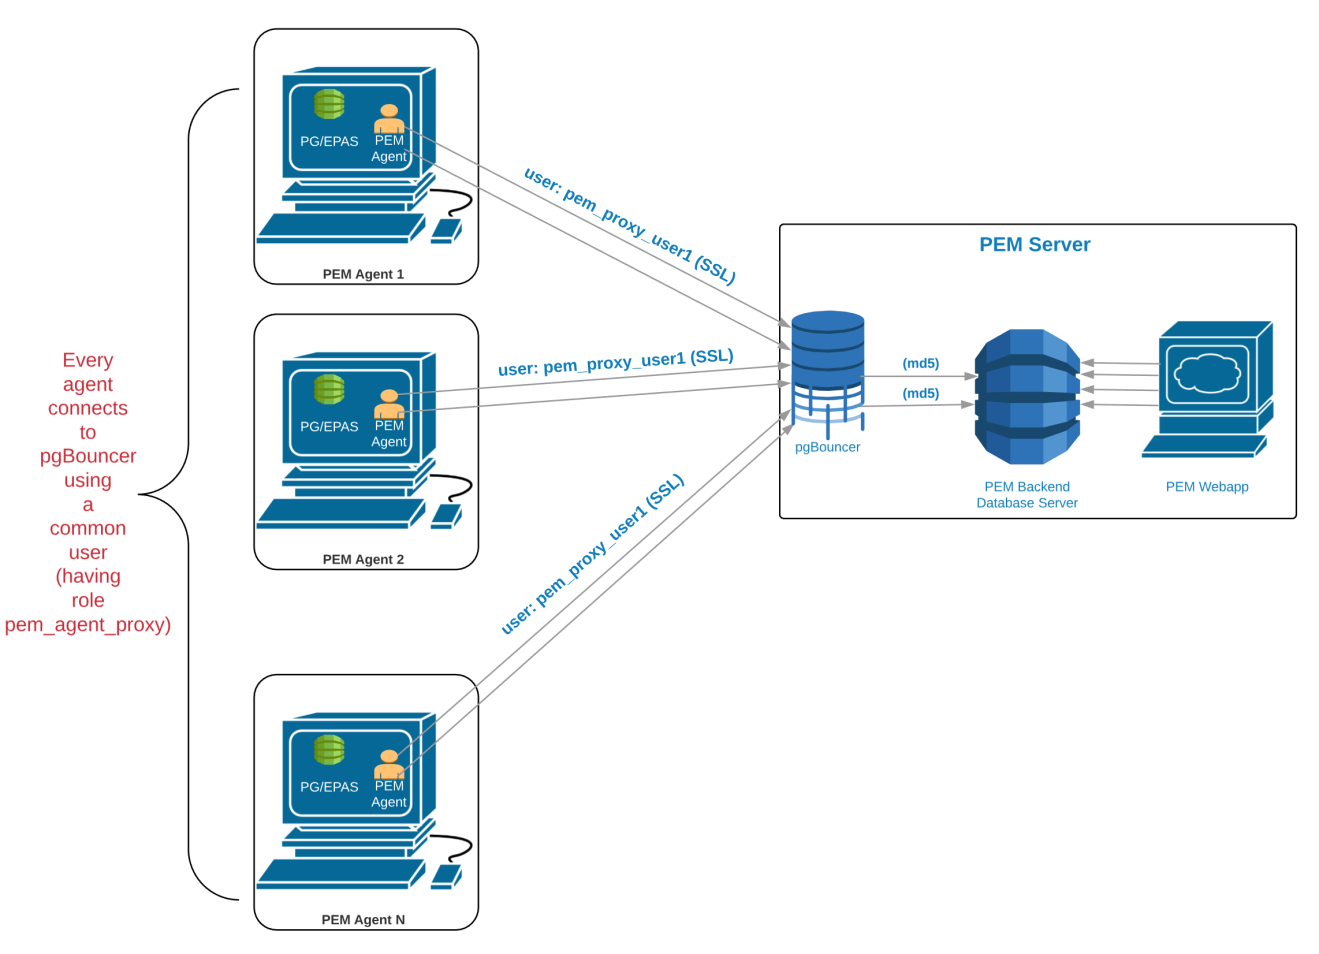
私たちは、PgBouncerのバージョンを使用することをお勧めコネクションプーラとして以降のバージョン1.9.0と同じか。バージョン1.9.0以降はcert認証をサポートしています。 PEMエージェントは、SSL証明書を使用してpgBouncerに接続できます。
Preparing the PEM Database Server
PgBouncerと連携するようにPEMデータベースサーバを構成する必要があります。次の例は、PEMデータベースサーバの構成に必要な手順を示しています。
- PEMデータベースサーバに
pgbouncer名前付けの専用ユーザを作成します。例:
pem=# CREATE USER pgbouncer PASSWORD 'ANY_PASSWORD' LOGIN;
CREATE ROLE- PEMデータベースサーバで、
pem_adminおよびpem_agent_pool roleメンバーシップを持つpem_admin1名前付けのユーザ(非スーパーユーザ)を作成します。例:
pem=# CREATE USER pem_admin1 PASSWORD 'ANY_PASSWORD' LOGIN
CREATEROLE;
CREATE ROLE
pem=# GRANT pem_admin, pem_agent_pool TO pem_admin1;
GRANT ROLEpemデータベースのpgbouncerユーザにCONNECT特権を付与します。例:
pem=# GRANT CONNECT ON DATABASE pem TO pgbouncer ;GRANT USAGE ON
SCHEMA pem TO pgbouncer;
GRANT- pemデータベースの
pemスキーマのpgbouncerユーザにUSAGE特権を付与します。例:
pem=# GRANT USAGE ON SCHEMA pem TO pgbouncer;
GRANTpemデータベースのpem.get_agent_pool_auth(text)ファンクションのpgbouncerユーザにEXECUTE特権を付与します。例:
pem=# GRANT EXECUTE ON FUNCTION pem.get_agent_pool_auth(text) TO
pgbouncer;
GRANTpem.create_proxy_agent_user(varchar)ファンクションを使用して、PEMデータベースサーバにpem_agent_user1名前付けのユーザを作成します。例:
pem=# SELECT pem.create_proxy_agent_user('pem_agent_user1');
create_proxy_agent_user
-------------------------
(1 row)- このファンクションは、ランダムパスワードで同じ名前のユーザーを作成し、そのユーザに
pem_agentおよびpem_agent_poolロールを付与しユーザ。これにより、pgBouncerはエージェントに代わってプロキシユーザを使用できます。
- PEMデータベースサーバの
pg_hba.confファイルのスタートに次のエントリを追加します。これにより、pgBouncerユーザはmd5認証メソッドを使用してpemデータベースに接続できます。例:
#  Allow the PEM agent proxy user (used by
#  pgbouncer) to connect the to PEM server using
#  md5

local pem pgbouncer,pem_admin1 md5
Configuring PgBouncer
PEMデータベースサーバと連携するようにPgBouncerを構成する必要があります。この例では、PgBouncerをenterprisedbシステムユーザとして実行します。次の手順は、pgBouncer(バージョン> = 1.9)を構成するプロセスの概要を示しています。
1.ターミナルウィンドウを開き、pgBouncerディレクトリに移動します。
- pgBouncer(
pgbouncer.iniが存在する)のetcディレクトリの所有者をenterprisedbに変更し、ディレクトリ権限を0700に変更します。例:
$ chown enterprisedb:enterprisedb /etc/edb/pgbouncer1.9
$ chmod 0700 /etc/edb/pgbouncer1.9pgbouncer.iniまたはedb-pgbouncer.iniファイルの内容を次のように変更します。
[databases]
;; Change the pool_size according to maximum connections allowed
;; to the PEM database server as required.
;; 'auth_user' will be used for authenticate the db user (proxy
;; agent user in our case)

pem = port=5444 host=/tmp dbname=pem auth_user=pgbouncer
pool_size=80 pool_mode=transaction
*  = port=5444 host=/tmp dbname=pem auth_user=pgbouncer
pool_size=10

[pgbouncer]
logfile = /var/log/edb/pgbouncer1.9/edb-pgbouncer-1.9.log
pidfile = /var/run/edb/pgbouncer1.9/edb-pgbouncer-1.9.pid
listen_addr = *
;; Agent needs to use this port to connect the pem database now
listen_port = 6432
;; Require to support for the SSL Certificate authentications
;; for PEM Agents
client_tls_sslmode = require
;; These are the root.crt, server.key, server.crt files present
;; in the present under the data directory of the PEM database
;; server, used by the PEM Agents for connections.
client_tls_ca_file = /var/lib/edb/as11/data/root.crt
client_tls_key_file = /var/lib/edb/as11/data/server.key
client_tls_cert_file = /var/lib/edb/as11/data/server.crt
;; Use hba file for client connections
auth_type = hba
;; Authentication file, Reference:
;; https://pgbouncer.github.io/config.html#auth_file
auth_file = /etc/edb/pgbouncer1.9/userlist.txt
;; HBA file
auth_hba_file = /etc/edb/pgbouncer1.9/hba_file
;; Use pem.get_agent_pool_auth(TEXT) function to authenticate
;; the db user (used as a proxy agent user).
auth_query = SELECT * FROM pem.get_agent_pool_auth($1)
;; DB User for administration of the pgbouncer
admin_users = pem_admin1
;; DB User for collecting the statistics of pgbouncer
stats_users = pem_admin1
server_reset_query = DISCARD ALL
;; Change based on the number of agents installed/required
max_client_conn = 500
;; Close server connection if its not been used in this time.
;; Allows to clean unnecessary connections from pool after peak.
server_idle_timeout = 604.次のコマンドを使用して、PgBouncerの/etc/edb/pgbouncer1.9/userlist.txt認証ファイルを作成および更新します。
pem=# COPY (
SELECT 'pgbouncer'::TEXT, 'pgbouncer_password'
UNION ALL
SELECT 'pem_admin1'::TEXT, 'pem_admin1_password'
TO '/etc/edb/pgbouncer1.9/userlist.txt'
WITH (FORMAT CSV, DELIMITER ' ', FORCE_QUOTE *);

COPY 2- !!! Note
- スーパーユーザは、PEM認証クエリーファンクション
pem.get_proxy_auth(text)を呼び出すことができません。pem_adminユーザがスーパーユーザである場合、パスワードを認証ファイル(enterprisedb in the above example)に追加する必要があります。
5.次のコンテンツを含むPgBouncerのHBAファイル(/etc/edb/pgbouncer1.9/hba_file)を作成します。
#  Use authentication method md5 for the local connections to
#  connect pem database & pgbouncer (virtual) database.
local pgbouncer all md5
#  Use authentication method md5 for the remote connections to
#  connect to pgbouncer (virtual database) using enterprisedb
#  user.

host pgbouncer,pem pem_admin1 0.0.0.0/0 md5
# Use authentication method cert for the TCP/IP connections to
# connect the pem database using pem_agent_user1
hostssl pem pem_agent_user1 0.0.0.0/0 cert- HBAファイル
(/etc/edb/pgbouncer1.9/hba_file)の所有者をenterprisedbに変更し、ディレクトリ権限を0600に変更します。例:
$ chown enterprisedb:enterprisedb /etc/edb/pgbouncer1.9/hba_file
$ chmod 0600 /etc/edb/pgbouncer1.9/hba_file- PgBouncerサービスを有効にして、サービスをスタートしサービス。例:
$ systemctl enable edb-pgbouncer-1.9

Created symlink from
/etc/systemd/system/multi-user.target.wants/edb-pgbouncer-1.9.service
to /usr/lib/systemd/system/edb-pgbouncer-1.9.service.

$ systemctl start edb-pgbouncer-1.9
Configuring the PEM Agent
RPMパッケージを使用してPEMエージェントをインストールできます。詳細なインストール情報については、PEM Linux Installation Guideを参照してください。
SNMP通知を送信するための責任があるPEMエージェントがpgBouncerで構成すべきではないことにノートしてください。 PEMエージェントがPEMサーバーと一緒にインストールされるデフォルトのSNMP通知のために使用されている場合例、それはpgBouncerで構成すべきではありません。
新しいPEMエージェントの設定(RPM経由でインストール)
RPMパッケージを使用してPEMエージェントをインストールした後、特定のPEMデータベースサーバに対して動作するように構成する必要があります。次のコマンドを使用します。
$ PGSSLMODE=require PEM_SERVER_PASSWORD=pem_admin1_password
/usr/edb/pem/agent/bin/pemworker --register-agent --pem-server
pem_agent_user1 --display-name "Agent Name"

Postgres Enterprise Manager Agent registered successfully!上記のコマンドでは、--pem-agent-user引数は/root/.pemディレクトリにpem_agent_user1のデータベースユーザのSSL証明書とキーペアを作成するために、エージェントに指示します。
例:
/root/.pem/pem_agent_user1.crt

/root/.pem/pem_agent_user1.keyキーは、PEMエージェントがpem_agent_user1としてPEMデータベースサーバに接続するために使用されます。また、/usr/edb/pem/agent/etc/agent.cfg.名前付けのエージェント構成ファイルを作成します
agent.cfg構成ファイルで使用されるagent-userに言及する行があります。
例:
$ cat /usr/edb/pem/agent/etc/agent.cfg
[PEM/agent]
pem_host=172.16.254.22
pem_port=6432
agent_id=12
agent_user=pem_agent_user1
agent_ssl_key=/root/.pem/pem_agent_user1.key
agent_ssl_crt=/root/.pem/pem_agent_user1.crt
log_level=warning
log_location=/var/log/pem/worker.log
agent_log_location=/var/log/pem/agent.log
long_wait=30
short_wait=10
alert_threads=0
enable_smtp=false
enable_snmp=false
enable_webhook=false
max_webhook_retries=3
allow_server_restart=true
allow_package_management=false
allow_streaming_replication=false
max_connections=0
connect_timeout=-1
connection_lifetime=0
allow_batch_probes=false
heartbeat_connection=false
既存のPEMエージェントの設定(RPM経由でインストール)
既存のPEMエージェントを使用している場合は、SSL証明書とキーファイルをターゲットマシンにコピーして、ファイルを再利用できます。ファイルを変更し、新しいパラメータを追加して、既存のagent.cfgファイルのいくつかのパラメーターを置き換える必要があります。
エージェントに使用するagent_userの行を追加します。例:
agent_user=pem_agent_user1ポートを更新してpgBouncerポートを指定します。例:
pem_port=6432証明書とキーのパスの場所を更新します。例:
agent_ssl_key=/root/.pem/pem_agent_user1.key
agent_ssl_crt=/root/.pem/pem_agent_user1.crtノート:別の方法として、エージェントの自己登録スクリプトを実行できますが、新しいエージェントIDが作成されます。エージェント自己登録スクリプトを実行する場合は、新しいエージェントIDを既存のIDに置き換え、pem.agentテーブルの新しいエージェントIDのエントリーを無効にする必要があります。例:
pem=# UPDATE pem.agent SET active = false WHERE id = <new_agent_id>;

UPDATE 1
Note * 既存のSSL証明書、キーファイル、およびエージェント構成ファイルのバックアップを保持します。