Moving the Postgres Enterprise Manager Server
The steps in this section describe how to move a PEM server from one host machine to a new host machine. The PEM server on the new host (the target) must be installed with the same version of the PEM server installer as the original host (the source). Please note that if you do not use the same installer version, you may encounter a schema-mismatch error.
The backend database of the target server (either PostgreSQL or Advanced Server) may be of the same type and version, or a different type and version than the backend database of the source PEM server. A PEM server that resides on a PostgreSQL host can be migrated to an Advanced Server host, or vice versa.
Before starting the server migration, you should ensure that the firewalls between the source host, the target host, and the host of any PEM Agent will allow connections between the services.
Prepare the Target Host
Invoke the installer for the PEM server on the target host. Please note that you must use the same version of the PEM server installer that you used when installing the source PEM server.
The backend database of the target server may be a different version or type than the backend database of the source. If the new PEM server does not reside on the same type of backend database as the original server, you must ensure that the same version of the
sslutilsextension is installed on the new server host. The version ofsslutilsthat is distributed with the PEM installers is freely available for download from the EDB website at:For information about installing the PEM server or the
sslutilsextension, please refer to thePEM Installation Guides, available at:Drop Existing Schemas from the New PEM Server
The migration process re-creates the
pem,pemdata, andpemhistoryschemas from the source PEM server on the target PEM server. In preparation for the move, use thepsqlclient to delete these schemas from thepemdatabase on the target host. You can open thepsqlclient at the command line, or by selectingSQL Shell (psql)from thePostgres Enterprise Managermenu.When the
psqlclient opens, connect to thepembackend database as the database superuser. After connecting to thepemdatabase on the target host, use the following commands to drop the schemas:DROP SCHEMA pem CASCADE; DROP SCHEMA pemdata CASCADE; DROP SCHEMA pemhistory CASCADE;
When dropping the schemas, you must include the
CASCADEkeyword, instructing the server to delete all dependent objects. When executing the command, thepsqlclient displays a list of the dependent objects; the client confirms each the schema is removed by displayingDROP SCHEMA.Prepare the PEM Agents on the New PEM Server
Before moving the PEM server, you must identify the number of Agents that are monitored by the source PEM server, and create identities for that number of Agents (less one) on the target server. To discover the total number of
PEMAgents monitored by the PEM server, connect to the pem database on the source host with thepsqlclient, and query thepem.agenttable.SELECT id FROM pem.agent WHERE active = true;
You must manually create the number of Agents that reside on the original PEM server, less one; the PEM server installer has already created one Agent on the target host. For example, if the source server contains three Agents, you must manually create two additional Agents. Open a
psqlsession with thepemdatabase on the target server, and create the required Agents. Use the command:CREATE USER agent<X>;
Where
<X>specifies an Agent number. Remember,agent1is created on the target host by the PEM Server installer.Then, use the
GRANTcommand to assign each Agent that resides on the target PEM Serverpem_agentpermissions:GRANT pem_agent TO agent<X>;
Where
<X>specifies an agent number.
Generate a Backup Script of the Source PEM Server
You can use the
pg_dumputility to generate a script that contains the commands required to recreate thepemdatabase on the target host. By default,pg_dumpis installed in thebindirectory under your Postgres installation. To invokepg_dump, open a command line, navigate to thebindirectory, and enter:pg_dump -U <user_name> <db_name> > <file_name>
Where:
<user_name>specifies the name of the database superuser for the PEM backend database.<db_name>specifies the name of the PEM backend database.<file_name>specifies the name of the script generated by pg_dump.
When prompted, provide the password associated with the user specified.
The command shown instructs
pg_dumpto generate a script that (when executed) will re-create thepemdatabase. The script will be namedbackup.sql, and will be created in thetmpdirectory.pg_dumpis connecting to the server using the credentials of the user,postgres.Note that invoking the
pg_dumputility will not interrupt current database users.Move the Backup to the Target Host
Move the script generated by the
pg_dumputility to the target host of the PEM server.Restore the Backup on the Target Host
Open a command line on the target host and navigate into the
bindirectory (under the Postgres backend database installation directory). Startpsql, executing the script generated by thepg_dumputility:psql -U <user_name> -d pem -f <file_name>
Where:
<user_name>specifies the name of the database superuser. The user specified must have connection privileges for the backend database.<file_name>specifies the complete path to the backup script generated by pg_dump.
When prompted, provide the password associated with the database superuser.
The example shown uses the
psqlclient to invoke a script namedbackup.sqlto recreate thepemdatabase. The script is invoked using the privileges associated with the database superuser,postgres.Stop the Database Server on the Target Host
To stop the PEM Server on CentOS or RHEL 7.x or 8.x, use the command:
systemctl stop <service_name>
Where,
<service_name>specifies the name of the backend database server. For a PostgreSQL backend database, the service name ispostgresql-<x>, and for an Advanced Server backend database, the service name isedb-as-<X>, where<X>specifies the version number.If you are using Windows, you can use the
Servicesdialog to control the service. To open theServicesdialog, navigate through theControl Panelto theSystem and Securitymenu. SelectAdministrative Tools, and then double-click theServicesicon. When theServicesdialog opens, highlight the service name in the list, and use the option provided on the dialog to Stop the service.Copy the Certificate Files to the Target Host
You must replace the certificate files that are created when the target host is installed with the certificate files of the source host. Copy the following files from the source PEM server to the target PEM server:
ca_certificate.crtca_key.keyroot.crtroot.crlserver.keyserver.crt
Copy the files to the
datadirectory under the Postgres installation that provides the backend database for the target cluster.On Linux, the files reside in:
/var/lib/pgsql/<X>/data/
On Windows, the files reside in:
C:\Program Files\PostgreSQL\<X>\data
Where:
<X>specifies the version of PostgresSQL on your system.The files will already exist on the target cluster; delete the existing files before performing the copy, or overwrite the existing files with the files from the source server. Once in place on the target server, the files should have the (platform-specific) permissions described in the sections that follow.
Permissions and Ownership on Linux
File Name
Owner
Permissions
ca_certificate.crt
postgres
-rw——-
ca_key.key
postgres
-rw——-
root.crt
postgres
-rw——-
root.crl
postgres
-rw——-
server.key
postgres
-rw——-
server.crt
postgres
-rw-r–r–
On Linux, the certificate files must be owned by postgres. You can use the following command at the command line to modify the ownership of the files:
chown postgres <file_name>
Where
file_namespecifies the name of the certificate file.The server.crt file may only be modified by the owner of the file, but may be read by any user. You can use the following command to set the file permissions for the server.crt file:
chmod 644 server.crt
The other certificate files may only be modified or read by the owner of the file. You can use the following command to set the file permissions:
chmod 600 <file_name>
Where
file_namespecifies the name of the file.Permissions and Ownership on Windows
On Windows, the certificate files moved from the source host must be owned by the service account that performed the PEM server and backend database installation on the target host. If you invoked the PEM server and Postgres installer using the
Run as Administratoroption (selected from the context menu of the installer), the owner of the certificate files will beAdministrators.To review and modify file permissions on Windows, right-click on the file name, and select
Properties.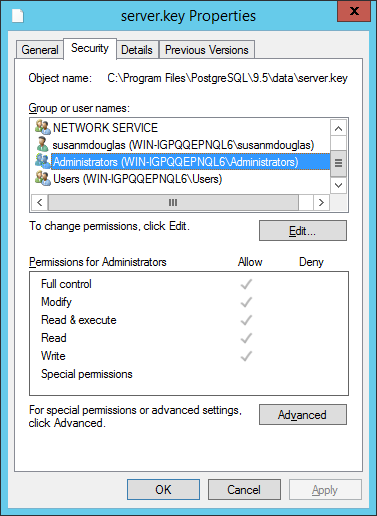
The Permissions tab
Navigate to the
Securitytab and highlight aGroup or user nameto view the assigned permissions. SelectEditorAdvancedto access dialogs that allow you to modify the permissions associated with the selected user.Move the PEM Agent Certificate Files to the PEM Server Host
You must move the certificate files used by the PEM Agent of the source PEM server to the target host. This step is platform-specific.
On Linux
Copy the
agent1.keyandagent1.crtfiles from the source host to the target host. By default, on Linux, the files are installed in/root/.pem; copy the files to the same directory on the target host.File ownership and permissions of the files must be set to:
File Name
Owner
Permissions
agent1.key
root
-rw——-
agent1.crt
root
-rw-r–r–
If necessary, navigate to
/root/.pem, and use the following commands to modify the permissions and ownership of theagent1.keyfile:chmod 600 agent1.key chown root agent1.key
Use the following commands to modify the permissions and ownership of the
agent1.crtfile:chmod 644 agent1.crt chown root agent1.crt
On Windows
Copy the
agent1.keyandagent1.crtfiles from the source host to the target host. On Windows, the files are located in:C:\Users\<user_name>\AppData\Roaming\pem
Where
user_nameis the name of the user that invoked the PEM installer.The ownership and permissions associated with the certificate files on the target machine should match the ownership and permissions of the certificate files on the source machine. If you invoked the PEM server and Postgres installer using the
Run as Administratoroption (selected from the context menu of the installer), the owner of the Agent certificate files will beAdministrators.To review and modify file permissions on Windows, right-click on the file name, and select
Properties. Navigate to theSecuritytab and highlight aGroup or user nameto view the assigned permissions. SelectEditorAdvancedto access dialogs that allow you to modify the permissions associated with the selected user.
Update the
pg_hba.confFiles on the Target Host
Modify the
pg_hba.conffile on the target host to allow connections from each PEM Agent. By default, thepg_hba.conffile is located in the data directory under your Postgres installation.
Start the Server on the Target Host
After modifying the
pg_hba.conffile, you must restart the server for the changes to take effect.To restart the database server on Linux, use the command:
/etc/init.d/<service_name> startWhere
service_nameis the name of the backend database server.If you are using Windows, you can use the
Servicesdialog to control the service. To open theServicesdialog, navigate through theControl Panelto theSystem and Securitymenu. SelectAdministrative Tools, and then double-click theServicesicon. When theServicesdialog opens, highlight the service name in the list, and use the option provided on the dialog to Start the service.
Connecting Monitored Agents to the New PEM Server Host
To instruct existing PEM Agents to connect to the new PEM server host, you must:
Ensure that the PEM Agent host can connect to the new PEM server host.
Modify the registry (on each Windows host with a PEM Agent) or the Agent configuration files (on each Linux host with a PEM Agent), specifying the IP address and port of the new PEM server.
Restart the PEM Agent’s service. These steps are platform-specific:
If the PEM Agent Resides on Linux
Use your choice of editor to modify the agent.cfg file, specifying the new IP address and port number of the PEM server in the pem_host and pem_port parameters.
By default, the agent.cfg file is located in:
/usr/edb/pem/agent/etc/agent.cfg
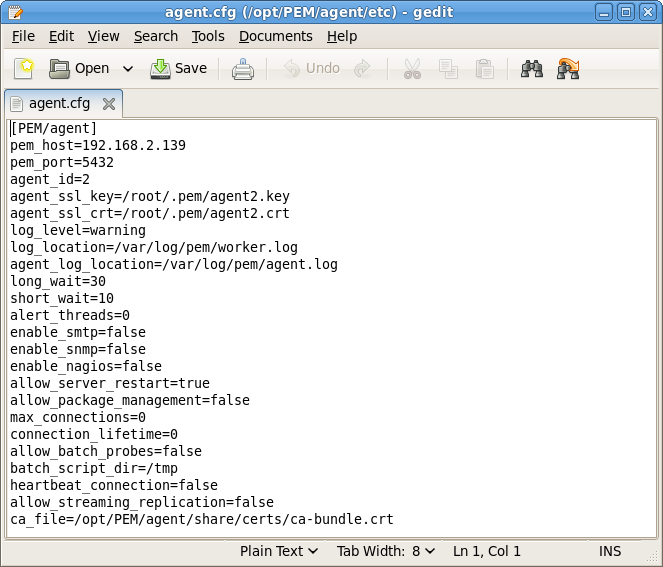
The agent.cfg file
After modifying the agent.cfg file, you must restart the PEM Agent service; you can use the pemagent service script on the Linux command line to restart the service:
/etc/init.d/pemagent restart
If the PEM Agent Resides on Windows
Before modifying the Windows registry on the monitored node, confirm that the firewall on the host of the PEM Agent will allow connections to the PEM server. After confirming that the PEM Agent host can connect to the PEM server host, you can use the Windows Registry Editor to review and edit the PEM_HOST and PEM_PORT entries to ensure that they correctly identify the host and port used by the PEM server. To open the Registry Editor, enter regedit in the Windows Run dialog or in the Windows start menu search box. Navigate through the registry tree control to view or modify registry entries.
On 64-bit Windows, the PEM Agent registry entries are located:
HKEY_LOCAL_MACHINE SOFTWARE wow6432Mode EnterpriseDB PEM Agent
On 32-bit Windows, the PEM Agent registry entries are located:
HKEY_LOCAL_MACHINE SOFTWARE EnterpriseDB PEM Agent
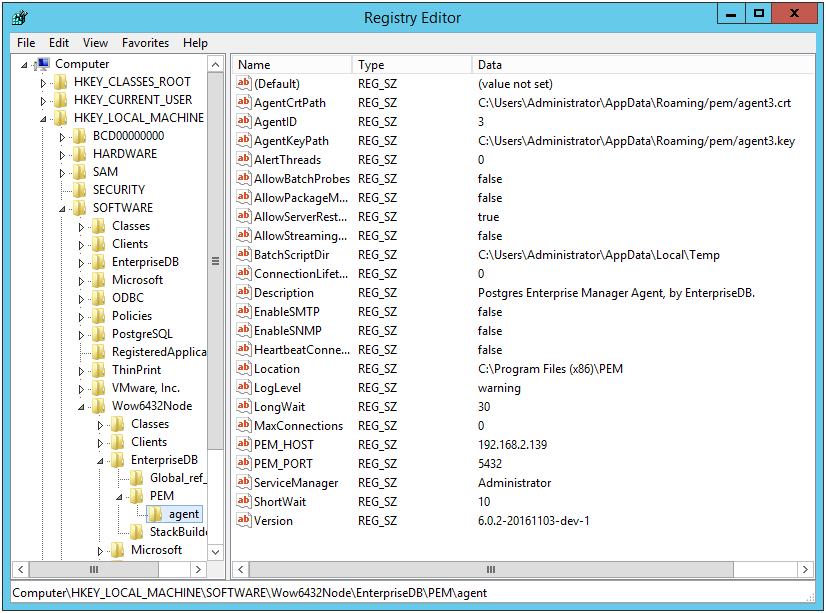
The Windows Registry Editor
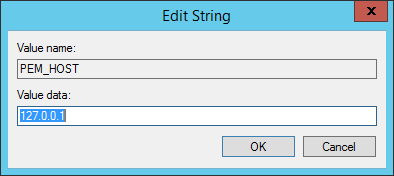
The PEM_HOST and PEM_PORT entries must specify the address and port number of the new PEM server on the target host. To modify a registry entry, right click on the entry Name, and select Modify from the context menu to open the Edit String dialog.
The Windows Registry Editor
Use the Edit String dialog to make any changes to the value of the entry. When you’re finished, click OK to save your changes, or Cancel to exit without saving.
After modifying the registry, you must restart the PEM Agent’s service; you can use the Services dialog (accessed through the Windows Control Panel) to restart the Postgres Enterprise Manager - pemagent service .
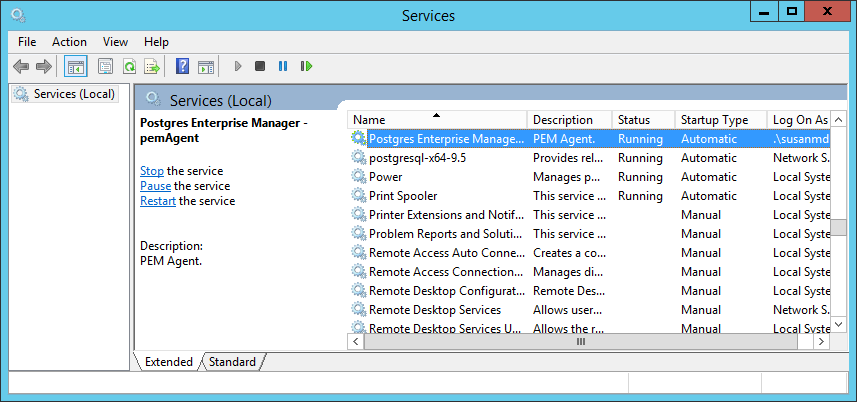
Restarting the PEM Agent’s service
After moving the server, change the connection properties in any installed PEM clients to connect to the new host of the PEM server, Agents, and monitored servers.
