In the following descriptions, a term refers to any word or group of words that are language keywords, user-supplied values, literals, etc. A term’s exact meaning depends upon the context in which it is used.
You can use yum to install the epel-release package:Please note that you may need to enable the [extras] repository definition in the CentOS-Base.repo file (located in /etc/yum.repos.d).If you receive this error, you can download the EPEL rpm package, and install it manually. To manually install EPEL, download the rpm package, assume superuser privileges, navigate into the directory that contains the package, and install EPEL with the command:You must install xterm, konsole, or gnome-terminal before executing any console-based program installed by EnterpriseDB installers.
For a list of the RPM installers and Debian packages available from EnterpriseDB for Advanced Server and supporting components, see Section 4.1.1.Installing the server package creates a database superuser named enterprisedb. The user is assigned a user ID (UID) and a group ID (GID) of 26. The user has no default password; use the passwd command to assign a password for the user. The default shell for the user is bash, and the user's home directory is /var/lib/edb/as11.By default, Advanced Server logging is configured to write files to the log subdirectory of the data directory, rotating the files each day and retaining one week of log entries. You can customize the logging behavior of the server by modifying the postgresql.conf file; for more information about modifying the postgresql.conf file, please see Section 6.2.
After creating the edb.repo file, use your choice of editor to ensure that the value of the enabled parameter is 1, and replace the username and password placeholders in the baseurl specification with the name and password of a registered EnterpriseDB user.After saving your changes to the configuration file, you can use yum install command to install Advanced Server. For example, to install the server and its core components, use the command:When you install an RPM package that is signed by a source that is not recognized by your system, yum may ask for your permission to import the key to your local server. If prompted, and you are satisfied that the packages come from a trustworthy source, enter a y, and press Return to continue.After installing Advanced Server, you must configure the installation; see Section 4.4 , Configuring a Package Installation, for details.You can also use the yum search command to access a list of the packages that are currently available from your configured repository. Open a command line, assume superuser privileges, and enter:yum search packageWhere package is the search term that specifies the name (or partial name) of a package. The repository search will return a list of available packages that include the specified search term.
Documentation: /usr/edb/as11/share/doc
Loadable modules: /usr/edb/as11/lib
Binaries: /usr/edb/as11/bin
If you have an existing Advanced Server RPM installation, you can use yum to upgrade your repository configuration file and update to a more recent product version. To update the edb.repo file, assume superuser privileges and enter:yum will update the edb.repo file to enable access to the current EDB repository, configured to connect with the credentials specified in your edb.repo file. Then, you can use yum to upgrade all packages whose names include the expression edb:yum upgrade edb*Please note that the yum upgrade command will only perform an update between minor releases; to update between major releases, you must use pg_upgrade.For more information about using yum commands and options, enter yum --help on your command line, or visit:
Each command creates a repository configuration file in the /etc/zypp/repos.d directory. The files are named:After creating the repository configuration files, use the zypper refresh command to refresh the metadata on your SLES host to include the EnterpriseDB repositories.When prompted for a User Name and Password, provide your connection credentials for the EnterpriseDB repository. If you need credentials, contact EnterpriseDB at:The following sections provide information about the specific repositories that are not hosted by EnterpriseDB, but that provide software that satisfies dependencies for each listed component. Please note that after adding repository access, you should use the zypper refresh command to process the repository content:The PEM server installer includes a script (configure-pem-server.sh) to help automate the configuration process for RPM installations. The script is installed in the /usr/edb/pem/bin directory. To invoke the script, use the command:To update components installed with zypper, use the zypper update command.
The following steps will walk you through using the EnterpriseDB apt repository to install a debian package. When using the commands, replace the username and password with the credentials provided by EnterpriseDB.sh -c 'echo "deb https://username:password@apt.enterprisedb.com/$(lsb_release -cs)-edb/ $(lsb_release -cs) main" > /etc/apt/sources.list.d/edb-$(lsb_release -cs).list'You can also use the apt list command to access a list of the packages that are currently available from your configured repository. Open a command line, assume superuser privileges, and enter:
The PostgreSQL initdb command creates a database cluster. After installing Advanced Server, you must manually configure the service and invoke initdb to create your cluster. When invoking initdb, you can:
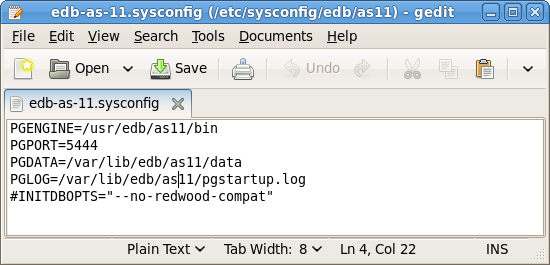
On a CentOS or RedHat version 6.x host, the RPM installer creates a service configuration file named edb-as-11.sysconfig in /etc/sysconfig/edb/as11 (see Figure 4.1). Please note that options specified in the service configuration file are only enforced if initdb is invoked via the service command; if you manually invoke initdb (at the command line), you must specify the other options (such as the location of the data directory and installation mode) on the command line.
On a CentOS or RedHat version 7.x host, the unit file is named edb-as-11.service and resides in /usr/lib/systemd/system. The unit file contains references to the location of the Advanced Server data directory. You should avoid making any modifications directly to the unit file because it may be overwritten during package upgrades.By default, data files reside under /var/lib/edb/as11/data directory. To use a data directory that resides in a non-default location, create a copy of the unit file under the /etc directory:After copying the unit file to the new location, modify the service file (/etc/systemd/system/edb-as-11.service) with your editor of choice, correcting any required paths.Then, use the following command to reload systemd, updating the modified service scripts:
The edb-as11-server-core RPM contains a script that starts the Advanced Server instance. The script can be copied, allowing you to run multiple services, with unique data directories and that monitor different ports. You must have root access to invoke or modify the script.
name=EnterpriseDB Advanced Server 11
baseurl=https://yum.your_domain.com/edbas11
enabled=1
gpgcheck=0
If you encounter difficulty displaying Java-based server features (controls or text not being displayed correctly, or blank windows), upgrading to the latest libxcb-xlib libraries should correct the problem on most distributions. Please visit the following link for other possible work-arounds:If you encounter a similar message, you should confirm that the data directory is empty; the presence of files (including the system-generated lost+found folder) will prevent the installation from completing. Either remove the files from the data directory, or specify a different location for the data directory before re-invoking the installer to complete the installation.
If your installation of Advanced Server resides on version 7.x of RHEL and CentOS, you must use the systemctl command to control the Advanced Server service and supporting components.The systemctl command must be in your search path and must be invoked with superuser privileges. To use the command, open a command line, and enter:systemctl action service_nameaction specifies the action taken by the service command. Specify:
On version 6.x of RHEL or CentOS Linux, you can control a service at the command line with the service command. The service command can be used to manage an Advanced Server cluster, as well as the services of component software installed with Advanced Server.Using the service command to change the status of a service allows the Linux service controller to keep track of the server status (the pg_ctl command does not alert the service controller to changes in the status of a server). The command must be in your search path and must be invoked with superuser privileges. Open a command line, and issue the command:The Linux service command invokes a script (with the same name as the service) that resides in /etc/init.d. If your Linux distribution does not support the service command, you can call the script directly by entering:service_name specifies the name of the service.action specifies the action taken by the service command. Specify:
By default, a server is running with the peer or md5 permission on a Debian or Ubuntu host. You can change the auth_type from pg_hba.conf file available under:Please note, all the server configuration files are available under /etc/edb-as/11/main.
You can use the pg_ctl utility to control an Advanced Server service from the command line on any platform. pg_ctl allows you to start, stop, or restart the Advanced Server database server, reload the configuration parameters, or display the status of a running server. To invoke the utility, assume the identity of the cluster owner, navigate into the home directory of Advanced Server, and issue the command:./bin/pg_ctl -D data_directory actiondata_directory is the location of the data controlled by the Advanced Server cluster.action specifies the action taken by the pg_ctl utility. Specify:
/sbin/chkconfig service_name on
Configuration parameters in the postgresql.conf file specify server behavior with regards to auditing, authentication, encryption, and other behaviors. The postgresql.conf file resides in the data directory under your Advanced Server installation.Parameters that are preceded by a pound sign (#) are set to their default value (as shown in the parameter setting). To change a parameter value, remove the pound sign and enter a new value. After setting or changing a parameter, you must either reload or restart the server for the new parameter value to take effect.Within the postgresql.conf file, some parameters contain comments that indicate change requires restart (see Figure 6.1). To view a list of the parameters that require a server restart, execute the following query at the psql command line:
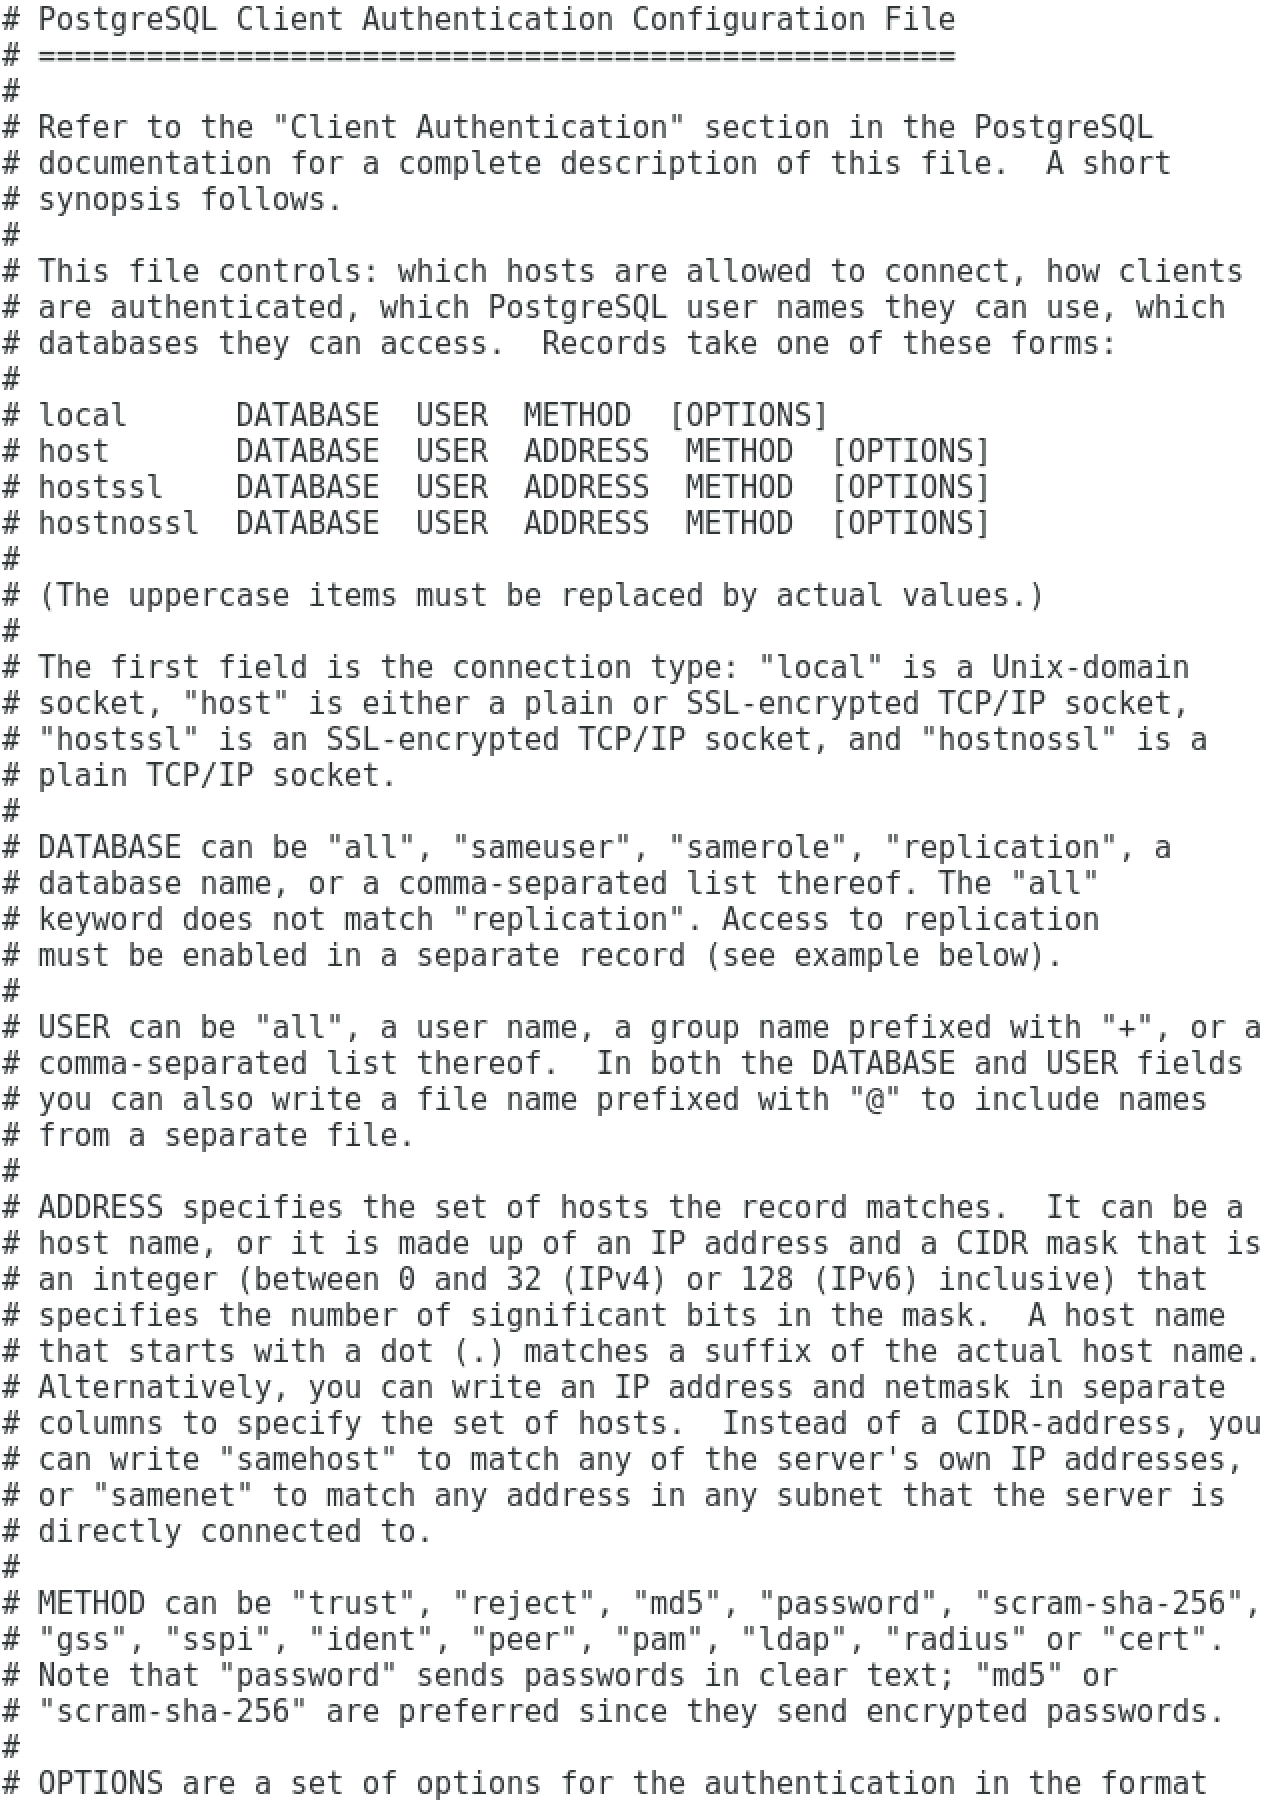
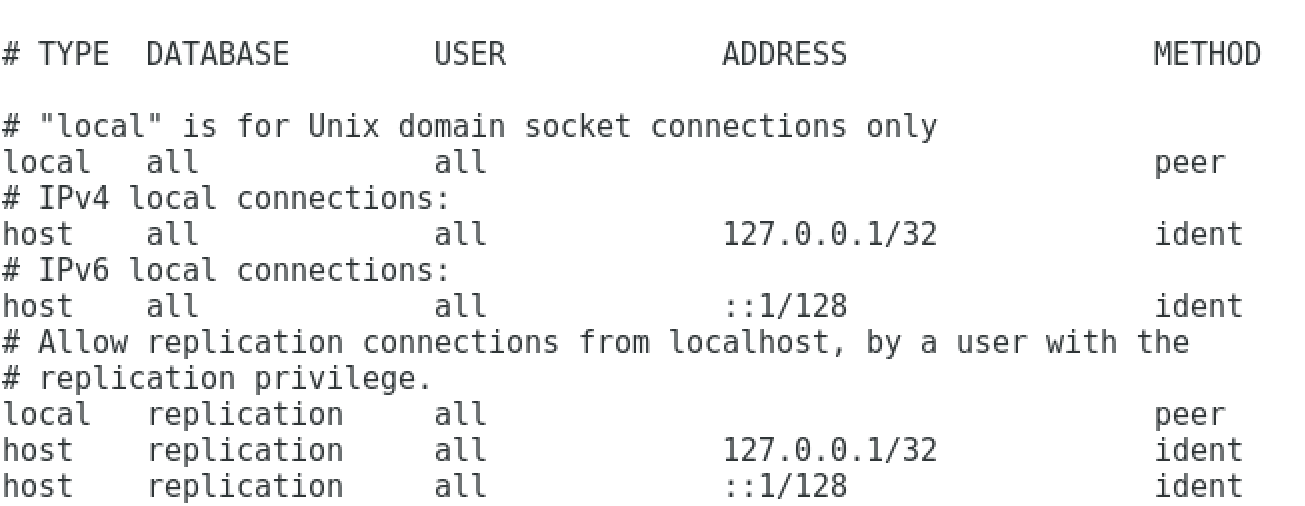
Appropriate authentication methods provide protection and security. Entries in the pg_hba.conf file specify the authentication method or methods that the server will use when authenticating connecting clients. Before connecting to the server, you may be required to modify the authentication properties specified in the pg_hba.conf file.When you invoke the initdb utility to create a cluster, initdb creates a pg_hba.conf file for that cluster that specifies the type of authentication required from connecting clients.The default authentication configuration specified in the pg_hba.conf file is:To modify the pg_hba.conf file, open the file with your choice of editor. After modifying the authentication settings in the pg_hba.conf file, use the Linux command line to restart the server and apply the changes.For more information about authentication, and modifying the pg_hba.conf file, see the PostgreSQL Core Documentation at:
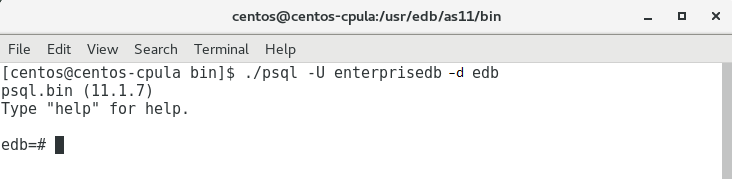
psql is a command line client application that allows you to execute SQL commands and view the results. To open the psql client, the client must be in your search path. The executable resides in the bin directory, under your Advanced Server installation.-d specifies the database to which psql will connect;-U specifies the identity of the database user that will be used for the session.
You can use variations of the rpm or yum command to remove installed packages. Note that removing a package does not damage the Advanced Server data directory.Include the -e option when invoking the rpm command to remove an installed package; the command syntax is:Where package_name is the name of the package that you would like to remove.You can use the yum remove command to remove a package installed by yum. To remove a package, open a terminal window, assume superuser privileges, and enter the command:Note: yum and RPM will not remove a package that is required by another package. If you attempt to remove a package that satisfies a package dependency, yum or RPM will provide a warning.
Please note: the configuration files and data directory remains intact.