バッキングPostgresデータベースのアップグレード
PEMコンポーネントとPEMバッキングデータベースの両方を更新する場合、バッキングデータベースを更新する前にPEMコンポーネントの更新(サーバー、エージェント、およびクライアント)を実行する必要があります。PEMコンポーネントソフトウェアの更新の詳細については、 :ref:`PEMインストールのアップグレード<upgrading_pem_installation>`を参照してください。
The update process described in this section uses the pg_upgrade utility to migrate from one version of the backing server to a more recent
version. pg_upgrade facilitates migration between any version of Postgres (version 9.3 or later), and any subsequent release of Postgres
that is supported on the same platform.
pg_upgrade supports a transfer of data between servers of the same type. For example, you can use pg_upgrade to move data from a PostgreSQL 9.6
backing database to a PostgreSQL 10 backing database, but not to an Advanced Server 10 backing database. If you wish to migrate to a
different type of backing database (i.e from a PostgreSQL server to Advanced Server), see Moving the Postgres Enterprise Manager™ Server.
pg_upgradeの使用に関する詳細については、次を参照してください。
ステップ1-更新されたバッキングデータベースインストーラーのダウンロードと呼び出し
PostgreSQLおよびAdvancedServerのインストーラーは、EnterpriseDBWebサイトから入手できます。
アップグレードするサーバーバージョンのインストーラーをダウンロードした後、PEMサーバーのホストでインストーラーを起動します。インストールウィザードの画面上の指示に従って、Postgresサーバーを構成およびインストールします。
オプションで、カスタム構築されたPostgreSQLサーバーをPEMバッキングデータベースのホストとして使用できます。ポート 5432 をリッスンするPostgreSQLバッキングデータベースからアップグレードする場合、新しいサーバーは別のポートでリッスンするように設定する必要があることに注意してください。
ステップ2-新しいサーバーでSSLユーティリティを構成する
新しいバッキングデータベースは、現在のバッキングデータベースが実行されているのと同じバージョンの sslutils を実行している必要があります。EnterpriseDBインストーラーで使用されるSSLUtilsパッケージは、次の場所からダウンロードできます。
You are not required to manually add the sslutils extension when using the Advanced Server as the new backing database. The process of
configuring sslutils is platform-specific.
Linuxで
Linuxを使用している場合、アーカイブされたSSLUtilsファイルのバージョンを次からダウンロードできます。
ダウンロードが完了したら、 sslutils フォルダーを抽出し、アップグレード先のPostgresバージョンのPostgresインストールディレクトリに移動します。
コマンドラインを開き、スーパーユーザー権限を引き受けて、PATH環境変数の値を設定して、makeがpg_configプログラムを見つけられるようにします。
export PATH=$PATH:/opt/<Postgres>/<x.x>/bin/
どこで:
*Postgres*は、次のいずれかを指定します。
PostgreSQLサーバーにアップグレードする場合は
PostgreSQL。AdvancedServerサーバーにアップグレードする場合は
PostgresPlus。x.xは、移行先のPostgresのバージョンを指定します。
次に、 yum を使用して sslutil の依存関係をインストールします。
yum install openssl-devel
Navigate into the sslutils folder, and build the sslutils package by
entering:
make USE_PGXS=1
make USE_PGXS=1 install
Windowsで
sslutils must be compiled on the new backing database with the same compiler that was used to compile sslutils on the original backing
database. If you are moving to a Postgres database that was installed using a PostgreSQL one-click installer (from EnterpriseDB) or an
Advanced Server installer, use Visual Studio to build sslutils. If you are upgrading to PostgreSQL 9.3 or later, use Visual Studio 2010.
Windowsで特定のバージョンのPostgresをビルドする方法の詳細については、そのバージョンのコアドキュメントを参照してください。コアドキュメントは、PostgreSQLプロジェクトのWebサイトで入手できます。
または、EnterpriseDBWebサイト:
プロセスの具体的な詳細はプラットフォームとコンパイラーによって異なりますが、各プラットフォームの基本的な手順は同じです。次の例は、32ビットWindowsシステムでのPostgreSQLのOpenSSLサポートのコンパイルを示しています。
OpenSSL拡張機能をコンパイルする前に、ご使用のWindowsバージョンのOpenSSLを見つけてインストールする必要があります。OpenSSLインストーラーを起動する前に、必要な再配布可能ファイル( vcredist_x86.exe など)をダウンロードしてインストールする必要がある場合があります。
OpenSSLをインストールした後、次から入手できる sslutils ユーティリティパッケージをダウンロードして解凍します。
解凍した sslutils フォルダーをPostgresインストールディレクトリ(つまり C:/ProgramFiles/PostgreSQL/9./<x> )にコピーします
Open the Visual Studio command line, and navigate into the sslutils directory. Use the following commands to build sslutils:
SET USE_PGXS=1
SET GETTEXTPATH=/ <path_to_gettext>
SET OPENSSLPATH=/ <path_to_openssl>
SET PGPATH=/ <path_to_pg_installation_dir>
SET ARCH=x86
msbuild sslutils.proj /p:Configuration=Release
どこで:
path_to_gettextはGETTEXTライブラリとヘッダーファイルの場所を指定します。
path_to_opensslはopensslライブラリとヘッダーファイルの場所を指定します。
path_to_pg_installation_dirはPostgresインストールの場所を指定します。
たとえば、次のコマンドセットは、OpenSSLサポートをPostgreSQL10サーバーに組み込みます。
SET USE_PGXS=1
SET OPENSSLPATH=C:/OpenSSL-Win32
SET GETTEXTPATH=/"C:/Program Files/PostgreSQL/10/"
SET PGPATH=/"C:/Program Files/PostgreSQL/10/"
SET ARCH=x86
msbuild sslutils.proj /p:Configuration=Release
ビルドが完了すると、 sslutils ディレクトリに次のファイルが含まれます。
sslutils--1.1.sqlsslutils--unpackaged--1.1.sqlsslutils--pemagent.sql.insslutils.dll
コンパイル済みのsslutilsファイルをインストールに適したディレクトリにコピーします。例えば:
COPY sslutils*.sql /"%PGPATH%/share/extension/"
COPY sslutils.dll /"%PGPATH%/lib/"
ステップ3-サービスの停止
古いバッキングデータベースと新しいバッキングデータベースの両方のサービスを停止します。
-RHELまたはCentOS6.xで、コマンドラインを開き、スーパーユーザーのIDを引き継ぎます。次のコマンドを入力します。
/etc/init.d/<service_name> stop
-RHELまたはCentOS7.xまたは8.xで、コマンドラインを開き、スーパーユーザーのIDを引き継ぎます。次のコマンドを入力します。
systemctl/<service_name> stop
ここで、 service_name はPostgresサービスの名前を指定します。
On Windows, you can use the Services dialog to control the service. To open the Services dialog, navigate through the Control Panel to the
System and Security menu. Select Administrative Tools, and then double-click the Services icon. When the Services dialog opens,
highlight the service name in the list, and use the option provided on the dialog to Stop the service.
ステップ4-pg_upgradeを使用してサーバーを更新
You can use the pg_upgrade utility to perform an in-place transfer of existing data between the old backing database and the new backing
database. If your server is configured to enforce md5 authentication, you may need to add an entry to the .pgpass file that specifies the
connection properties (and password) for the database superuser, or modify the pg_hba.conf file to allow trust connections before invoking
pg_upgrade. For more information about creating an entry in the .pgpass file, please see the PostgreSQL core documentation, available at:
During the upgrade process, pg_upgrade will write a series of log files. The cluster owner must invoke pg_upgrade from a directory in which they
have write privileges. If the upgrade completes successfully, pg_upgrade will remove the log files when the upgrade completes. To instruct
pg_upgrade to not delete the upgrade log files, include the --retain keyword when invoking pg_upgrade.
pg_upgrade を呼び出すには、クラスター所有者のIDを想定し、クラスター所有者が書き込み権限を持つディレクトリに移動して、コマンドを実行します。
<path_to_pg_upgrade> pg_upgrade
-d <old_data_dir_path>
-D <new_data_dir_path>
-b <old_bin_dir_path> -B <new_bin_dir_path>
-p <old_port> -P <new_port>
-u <user_name>
どこで:
path_to_pg_upgradeはpg_upgradeユーティリティの場所を指定します。デフォルトでは、pg_upgradeはPostgresディレクトリの下のbinディレクトリにインストールされます。
old_data_dir_pathは、古いバッキングデータベースのデータディレクトリへの完全なパスを指定します。
new_data_dir_pathは、新しいバッキングデータベースのデータディレクトリへの完全なパスを指定します。
old_bin_dir_pathは、古いバッキングデータベースのbinディレクトリへの完全なパスを指定します。
new_bin_dir_pathは、古いバッキングデータベースのbinディレクトリへの完全なパスを指定します。
old_portは古いサーバーがリッスンしているポートを指定します。
new_portは、新しいサーバーがリッスンするポートを指定します。
user_nameはクラスター所有者の名前を指定します。
たとえば、次のコマンド:
C:/>/"C:/Program Files/PostgreSQL/10/bin/pg_upgrade.exe/"
-d /"C:/Program Files/PostgreSQL/9.6/data/"
-D /"C:/Program Files/PostgreSQL/10/data/"
-b /"C:/Program Files/PostgreSQL/9.6/bin/"
-B /"C:/Program Files/PostgreSQL/10/bin/"
-p 5432 -P 5433
-u postgres
WindowsシステムでPEMデータベースをPostgreSQL9.6からPostgreSQL10に移行するように pg_upgrade に指示します(バッキングデータベースがデフォルトの場所にインストールされている場合)。
Once invoked, pg_upgrade will perform consistency checks before moving
the data to the new backing database. When the upgrade is finished,
pg_upgrade will notify you that the upgrade is complete.
pg_upgrade オプションの使用またはアップグレードプロセスのトラブルシューティングの詳細については、以下を参照してください。
ステップ5-古いデータベースから新しいデータベースに証明書ファイルをコピーします
Copy the following certificate files from the data directory of the old
backing database to the data directory of the new backing database:
ca_certificate.crtca_key.keyroot.crtroot.crlserver.keyserver.crt
ターゲットサーバーに配置したら、ファイルには以下で説明する(プラットフォーム固有の)権限が必要です。
Linuxでの許可と所有権
ファイル名 |
所有者 |
許可 |
ca_certificate.crt |
ポストグレス |
-rw------- |
ca_key.key |
ポストグレス |
-rw------- |
root.crt |
ポストグレス |
-rw------- |
root.crl |
ポストグレス |
-rw------- |
server.key |
ポストグレス |
-rw------- |
server.crt |
ポストグレス |
-rw-r--r-- |
Linuxでは、証明書ファイルは postgres によって所有されている必要があります。コマンドラインで次のコマンドを使用して、ファイルの所有権を変更できます。
chown postgres <file_name>
ここで、 file_name は証明書ファイルの名前を指定します。
The server.crt file may only be modified by the owner of the file, but
may be read by any user. You can use the following command to set the
file permissions for the server.crt file:
chmod 644 server.crt
他の証明書ファイルは、ファイルの所有者のみが変更または読み取ることができます。次のコマンドを使用して、ファイルのアクセス許可を設定できます。
chmod 600 <file_name>
ここで、 file_name はファイルの名前を指定します。
Windowsでの権限と所有権
Windowsでは、ソースホストから移動した証明書ファイルは、ターゲットホストでPEMサーバーとバッキングデータベースのインストールを実行したサービスアカウントが所有している必要があります。 Run as Administrator オプション(インストーラーのコンテキストメニューから選択)を使用してPEMサーバーとPostgresインストーラーを呼び出した場合、証明書ファイルの所有者は Administrators になります。
Windowsでファイルのアクセス許可を確認および変更するには、ファイル名を右クリックし、 Properties を選択します。
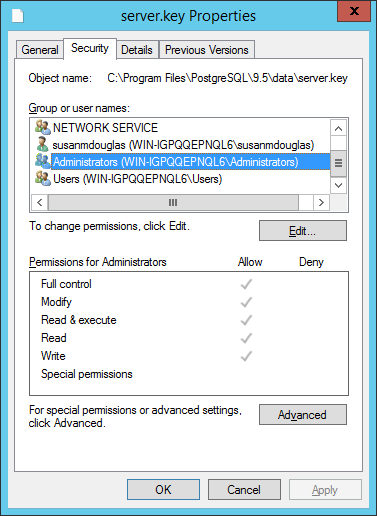
[セキュリティ]タブ。
Security タブに移動し、 Group or user name を強調表示して、割り当てられた権限を表示します。 Edit または Advanced を選択して、選択したユーザーに関連付けられた権限を変更できるダイアログにアクセスします。
ステップ6-新しいサーバー構成ファイルの更新
The postgresql.conf file contains parameter settings that specify server
behavior. You will need to modify the postgresql.conf file on the new
server to match the configuration specified in the postgresql.conf file
of the old server.
デフォルトでは、 postgresql.conf ファイルがあります:
LinuxのPostgresバージョンが10未満の場合、
/opt/PostgreSQL/<version.x>/dataLinuxのグラフィカルインストーラーでインストールされたPostgresバージョン10以降の場合、
/opt/PostgreSQL/<version>/dataLinuxにRPMをインストールしたPostgresバージョン10以降の場合、
/usr/edb/PostgreSQL/<version>/dataWindowsのPostgresバージョンの場合、
C:/Program Files/PostgreSQL/<version.x>/data
ここで、 version はシステム上のPostgresのメジャーバージョンです。
選択したエディターを使用して、新しいサーバーの postgresql.conf ファイルを更新します。以下のパラメーターを変更します。
元のバッキングデータベースで監視されているポートでリッスンする
portパラメーター(通常は5432)。sslパラメーターはonに設定する必要があります。
また、次のパラメーターが有効になっていることを確認する必要があります。パラメータがコメントアウトされている場合、各 postgresql.conf ファイルエントリの前からポンド記号を削除します:
ssl_cert_file = 'server.crt' # (change requires restart)ssl_key_file = 'server.key' # (change requires restart)ssl_ca_file = 'root.crt' # (change requires restart)ssl_crl_file = 'root.crl'
インストールには、新しいバッキングデータベースが古いバッキングデータベースと同等の方法で動作することを保証するために変更が必要な他のパラメータ設定がある場合があります。 postgresql.conf ファイルを注意深く確認して、新しいサーバーの構成が古いサーバーの構成と一致することを確認します。
ステップ7-新しいサーバー認証ファイルの更新
The pg_hba.conf file contains parameter settings that specify how the
server will enforce host-based authentication. When you install the PEM
server, the installer modifies the pg_hba.conf file, adding entries to
the top of the file:
# Adding entries for PEM agents and admins to connect to PEM server
hostssl pem +pem_user 192.168.2.0/24 md5
hostssl pem +pem_agent 192.168.2.0/24 cert
# Adding entries (localhost) for PEM agents and admins to connect to PEM server
hostssl pem +pem_user 127.0.0.1/32 md5
hostssl postgres +pem_user 127.0.0.1/32 md5
hostssl pem +pem_user 127.0.0.1/32 md5
hostssl pem +pem_agent 127.0.0.1/32 cert
デフォルトでは、 pg_hba.conf ファイルは次の場所にあります。
LinuxのPostgresバージョンが10未満の場合、
/opt/PostgreSQL/<version>.x/dataLinuxのグラフィカルインストーラーでインストールされたPostgresバージョン10以降の場合、
/Opt/PostgreSQL/<version>/dataLinuxにRPMをインストールしたPostgresバージョン10以降の場合、
/var/lib/PostgreSQL/<version>/dataLinuxにRPMをインストールしたAdvancedServerバージョン10以降の場合、
/var/lib/edb/AS<version>/dataWindowsのPostgresバージョンの場合、
C:/Program Files/PostgreSQL/version.x/data
ここで、 version はシステム上のPostgresのメジャーバージョンであり、*x*はマイナーバージョンです。
Using your editor of choice, copy the entries from the pg_hba.conf file
of the old server to the pg_hba.conf file for the new server.
ステップ8-新しいPostgresサーバーの再起動
新しいバッキングデータベースのサービスを開始します。
-RHELまたはCentOS6.xで、コマンドラインを開き、スーパーユーザーのIDを引き継ぎます。次のコマンドを入力します。
/etc/init.d/<service_name> start
-RHELまたはCentOS7.xまたは8.xで、コマンドラインを開き、スーパーユーザーのIDを引き継ぎます。次のコマンドを入力します。
systemctl stop <service_name>
ここで、 service_name はバッキングデータベースサーバーの名前です。
If you are using Windows, you can use the Services dialog to control the
service. To open the Services dialog, navigate through the Control Panel
to the System and Security menu. Select Administrative Tools, and then
double-click the Services icon. When the Services dialog opens,
highlight the service name in the list, and use the option provided on
the dialog to start the service.