
Using the ERD tool#
The Entity-Relationship Diagram (ERD) tool is a database design tool that provides a graphical representation of database tables, columns, and inter-relationships. ERD can give sufficient information for the database administrator to follow when developing and maintaining the database. To access the ERD tool, select Tools > ERD Tool. The ERD tool allows you to:
Design and visualize the database tables and their relationships.
Add notes to the diagram.
Align the tables and links for a cleaner look.
Save the diagram and open it later to continue working on it.
Generate ready-to-run SQL from the database design.
Generate the database diagram for an existing database.
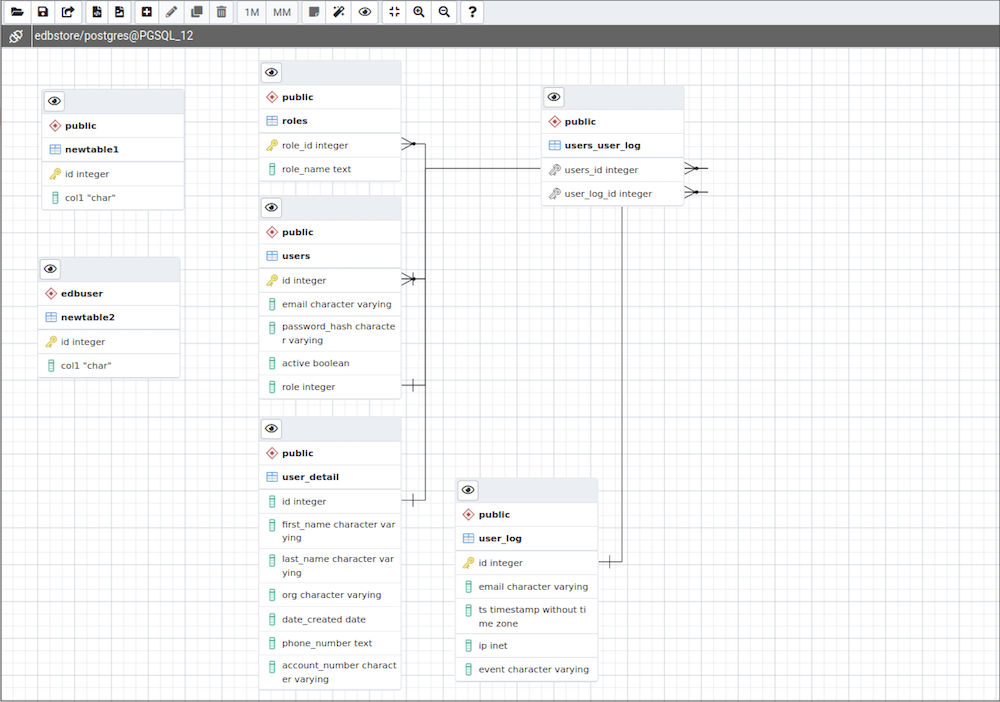
ERD Tool#
You can open multiple copies of the ERD tool in individual tabs simultaneously. To close a copy of the ERD tool, select the X in the upper-right corner of the tab bar.
Toolbar#
The ERD Tool toolbar uses context-sensitive icons that provide shortcuts to frequently performed tasks.
File options#
Icon |
Behavior |
Shortcut |
|---|---|---|
Open File |
Load a saved diagram. |
Ctrl + O |
Save |
Save changes to a saved diagram or save the diagram to a file. |
Ctrl + S |
Save as |
Open a new dialog box and specify a new location to save the diagram. |
Ctrl + Shift + S |
Export options#
Icon |
Behavior |
Shortcut |
|---|---|---|
Generate SQL |
Generate the DDL SQL for the diagram and open a Query tool with the generated SQL ready for execution. |
Option + Ctrl + S |
Download image |
Save the ERD diagram in an image format. |
Option + Ctrl + I |
Editing options#
Icon |
Behavior |
Shortcut |
|---|---|---|
Add table |
Add a new table to the diagram. In the table dialog box, enter the table details. |
Option/Alt + Ctrl + A |
Edit table |
Edit a selected table on the diagram. In the table dialog box, enter the table details. |
Option/Alt + Ctrl + E |
Clone table |
Clone the complete table structure, name it with a auto-generated name, and put it in the diagram. |
Option/Alt + Ctrl + C |
Drop table/link |
Drop a selected table or link. |
Option/Alt + Ctrl + D |
Table relationship options#
Icon |
Behavior |
Shortcut |
|---|---|---|
1M |
Open a one-to-many relationship dialog box to add a relationship between two tables. The selected table is the referencing table and has the many endpoint of the link. |
Option/Alt + Ctrl + O |
MM |
Open a many-to-many relationship dialog box to add a relationship between two tables. This option creates a linked table from the selected columns of the two relating tables. |
Option/Alt + Ctrl + M |
Utility Options#
Icon |
Behavior |
Shortcut |
|---|---|---|
Add/Edit note |
Make notes on table nodes while designing the database. |
Option/Alt + Ctrl + N |
Auto align |
Align all tables and links for a cleaner look. |
Option/Alt + Ctrl + L |
Show details |
Toggle the column details. You can also choose to show few or more column details. |
Option/Alt + Shift + D |
Zoom options#
Icon |
Behavior |
Shortcut |
|---|---|---|
Zoom to fit |
Zoom in/out automatically and fit all the tables to the view. |
Option/Alt + Shift + F |
Zoom in |
Zoom in on the diagram. |
Option/Alt + Shift + "+" |
Zoom out |
Zoom out on the diagram. |
Option/Alt + Shift + "-" |
Table dialog#
The table dialog box allows you to:
Change the table structure details.
Edit an existing table or add a new one.
Table node#
The table node shows table details in a graphical representation:
On the top bar:
To show column details, select Details toggle.
When you add a note, Note becomes enabled. Select Note to changes notes.
The first row displays the table’s schema name, like
publicin the example.The second row displays the table’s name, like
usersin the example.The remaining rows dispalys the table’s column names and their data types.
A column that is a primary key displays as a lock key, like
id integerin the example.Other columns diplay as a green column, like
email character varyingin the example.Select the node to drag it on the canvas.
To open the table dialog box and change the table details, either double-click the table node or select Edit on the toolbar.
One-to-many link dialog box#
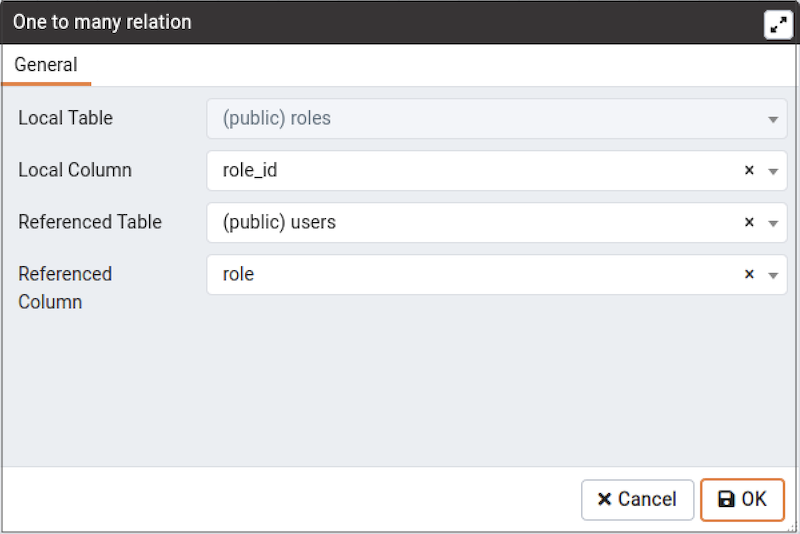
ERD Tool - One-to-Many Dialog Box#
The one-to-many link dialog box allows you to:
Add a foregin key relationship between two tables.
Select a Local Table that references another table. The Local Table has the
manyend point.Select a Local Column that references another column.
Select the Referenced Table. The Referenced Table has the
oneend point.Select the Referenced Column.
Many-to-many link dialog box#
The many-to-many link dialog box allows you to:
Add a many-to-many relationship between two tables.
Create a relation table with linked columns that are derived from the two tables.
Select the Left Table, which is the first table that is linked. The Left Table has the
oneendpoint of the link with the new relation table.Select the Left table Column, which is the first table’s column. The Left table Column is a primary key.
Select the Right Table, which is the second table that is linked. The Right Table has the
oneendpoint of the link with the new relation table.Select the Right table Column, which is the second table’s column. The Right table Column is a primary key.
Table link#
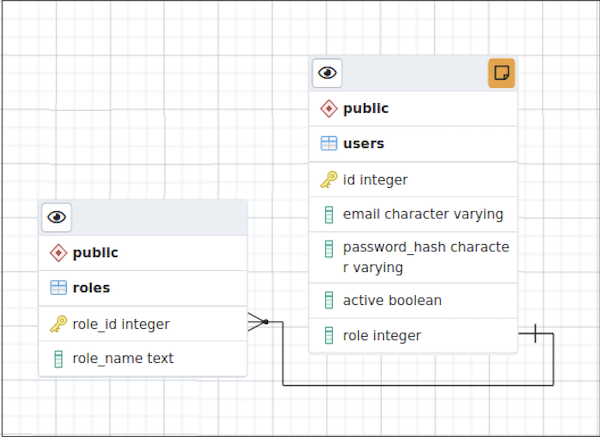
ERD Tool - Table Link#
The table link shows the relationship between tables:
The single-line endpoint of the link shows the column that is the reference.
The three-line endpoint of the link shows the column that references.
If one of the columns that is a reference or that references is removed from the table, then the link drops.
Select the link to drag it on the canvas.
Table notes#
To add a note to a table:
On the toolbar, select Add/Edit note.
In the window, enter your note.
When a note is added to a table, Note becomes enabled on the Table node. To check or update notes, select Note.